Contents
|
|
Contents
Overview: Best Tools for Smart Contract Development (Web3 and Private ethereum Blockchain)
This is a guest post by KC TAM on Using Various Tools for Smart Contract Development: Remix, Web3 on TestRPC.
This setup is very close to the previous one. The difference is to deploy the contract on a private Ethereum blockchain running on localhost instead of using TestRPC.
The node console portion is almost identical, but we need some tasks on private blockchain before things are running as we wish. They are the blockchain initialization and running the blockchain, account creation and mining. All these tasks are done by TestRPC in the previous session.
Part 1: The Best Tools for Smart Contract Development
Smart Contract Development (Part 2)
Preparation: Ethereuem Client (geth)
There are several implementations of Ethereum client. The most popular one is Go client (called geth). Installation of geth can be found here. Pick one to match your operating system.
Genesis.json file
This is the file used to initialize the private ethereum blockchain. I just show the one I am using.
{
  "coinbase"   : "0x0000000000000000000000000000000000000001",
  "difficulty" : "0x20000",
  "extraData"  : "",
  "gasLimit"   : "0x4c4b40",
  "nonce"      : "0x0000000000000042",
  "mixhash"    : "0x0000000000000000000000000000000000000000000000000000000000000000",
  "parentHash" : "0x0000000000000000000000000000000000000000000000000000000000000000",
  "timestamp"  : "0x00",
  "alloc": {},
  "config": {
        "chainId": 15,
        "homesteadBlock": 0,
        "eip155Block": 0,
        "eip158Block": 0
    }
}
You should have this already. Please refer to the Preparation session in the previous setup. Node and Web3 Module
Setup a Private Ethereum Blockchain
1. Initialize the Blockchain
Here I just list the steps good enough for this demo, with some brief explanation. For more detail, you can find on this wiki.
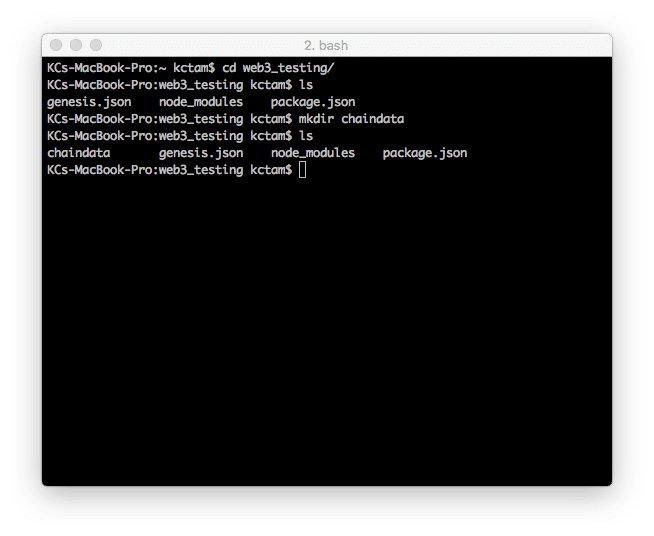
Open up the working directory. For sake of simplicity, we use the directory in the previous session, in which the node modules have already been installed. Make sure the genesis.json file is kept here. Create a directory here called “chaindata”. This directory will keep all the blockchain information and user accounts.
From now on we will split our screen into three, for different purposes.

Now initial the blockchain with geth init. Note we need to specify the datadir for the directory we are storing the blockchain.
blockchain
$ geth --datadir=~/<working directory>/chaindata/ init genesis.json
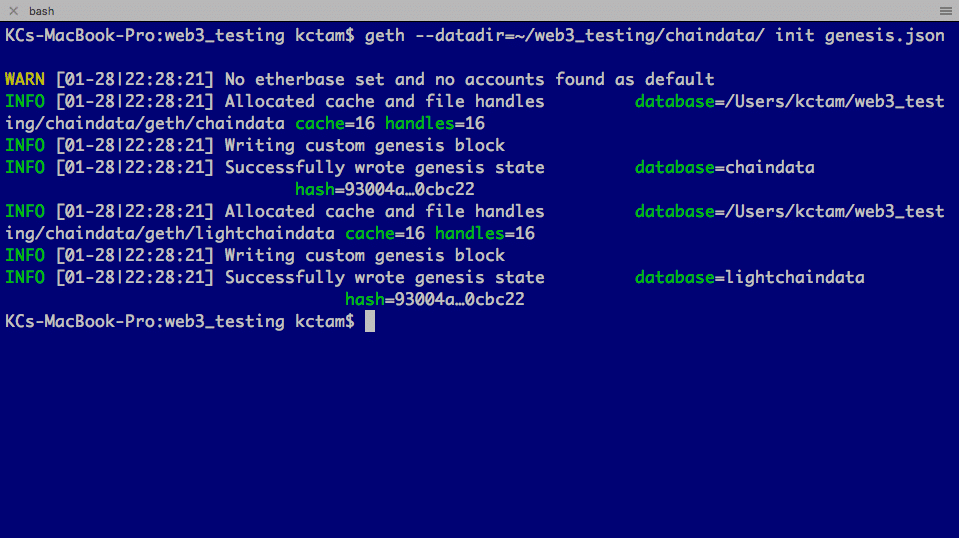
After initialization, in the chaindata directory two directories are created:
- geth holds all blockchain related data
- keystore holds the user account information (empty at this moment).
2. Start the Blockchain
We can start the blockchain now.
blockchain
$ geth --datadir=~/<working directory>/chaindata/ s.json
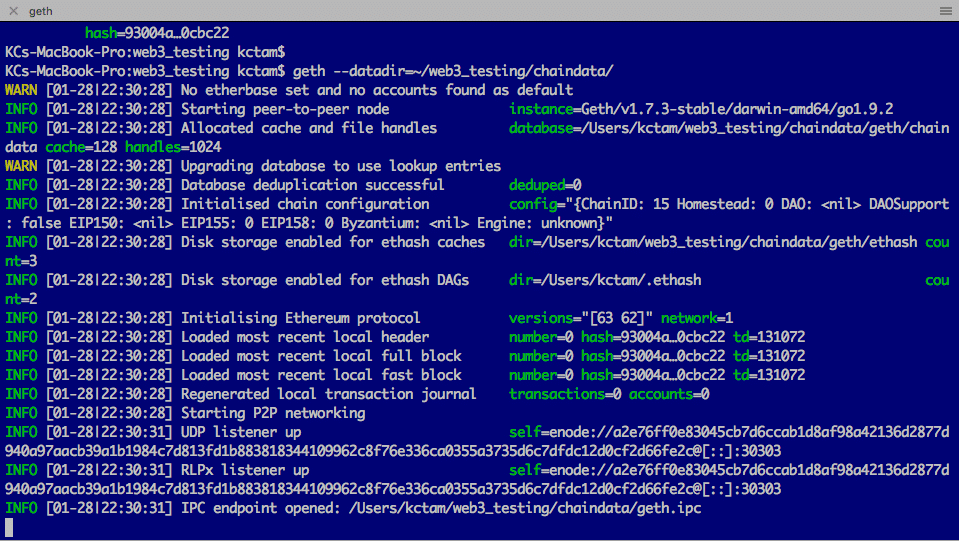
The blockchain is up and running. We do not interact the blockchain in this terminal. During our setup, we will see some useful information keeps appearing in this terminal.
3. Access Blockchain with Geth Console
We can access the blockchain we started through geth console. Note the last line in the blockchain terminal: there is the IPC endpoint opened (the path for the file geth.ipc). We use thie IPC endpoint to access the console.
The geth console is on the bottom right terminal.
geth console
$ geth attach ipc:<working_directory_in_full>/chaindata/geth.ipc
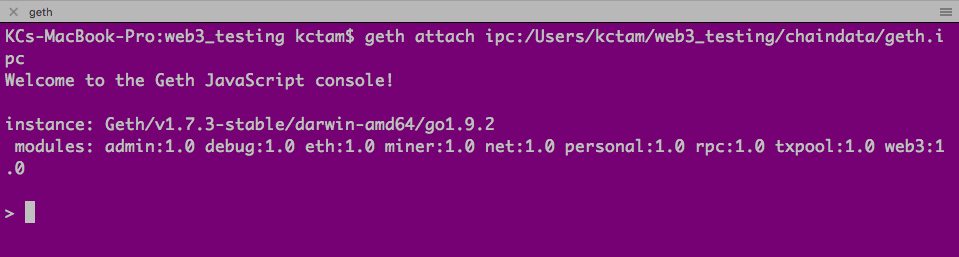
Here is the geth console, and we can issue the geth commands here.
4. Add Some Accounts for Demo
When this private Ethereum blockchain is initialized, there are no accounts. For this demo, we are going to create four.
The first one is our base one, responsible for contract deployment and function execution. In addition, this account is responsible for mining, as, in private ethereum blockchain, we need someone to mine the block.
Three more accounts are created just for demonstrating the revenue sharing.
Note that each account requires paraphrase protection.
geth console
$ eth.accounts
$ personal.newAccount() // repeat four times
$ eth.accounts
And if you check the directory in chaindata/keystore, you will see all these four accounts.
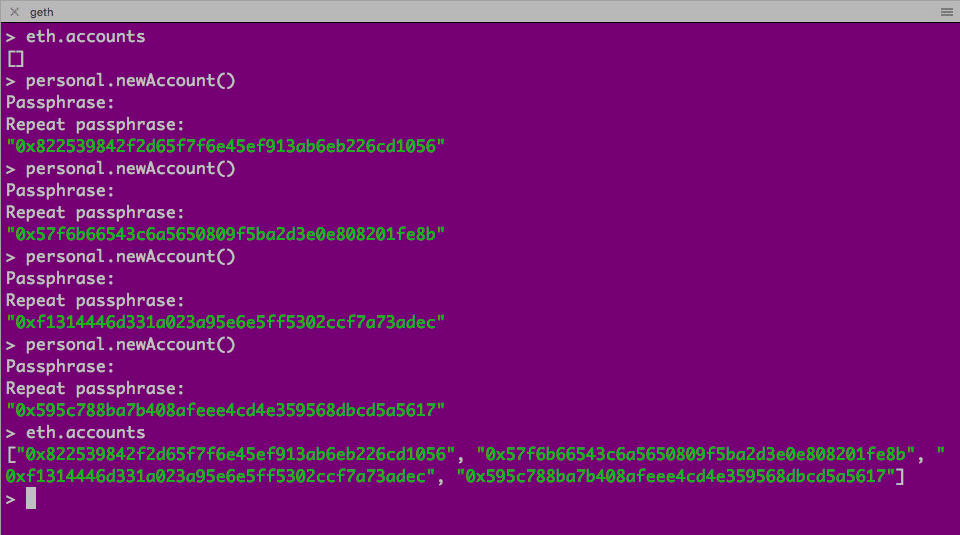
Here are the accounts. We will refer them later.
"0x822539842f2d65f7f6e45ef913ab6eb226cd1056"
"0x57f6b66543c6a5650809f5ba2d3e0e808201fe8b"
"0xf1314446d331a023a95e6e5ff5302ccf7a73adec"
"0x595c788ba7b408afeee4cd4e359568dbcd5a5617"
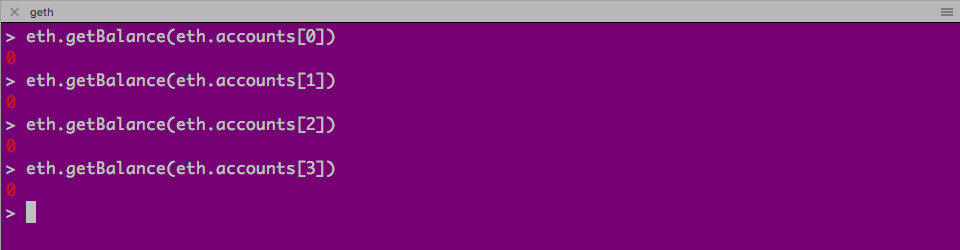
5. Check Account Balance
We can now check the account balance of these four addresses. Not a surprise, no ethers are in these accounts as they are newly created.
geth console
$ eth.getBalance(eth.accounts[0]) // repeat with 1, 2 and 3
6. Mining
We are ready to see how mining is done. Private ethereum blockchain requires mining to build the block. As we have set a very low difficulty in genesis.json, it does not take too much time for a block being mined. After a block is added to the blockchain, 5 ethers are rewarded to accounts[0] (which is also called etherbase or coinbase account).
The first block may take a while. By examining the balance of accounts[0] and what appears on the blockchain window (top right terminal), you will know the mining is working well.
geth console
$ miner.start()
$ eth.getBalance(eth.accounts[0])
$ web3.fromWei(eth.getBalance(eth.accounts[0])) // convert weis to ethers
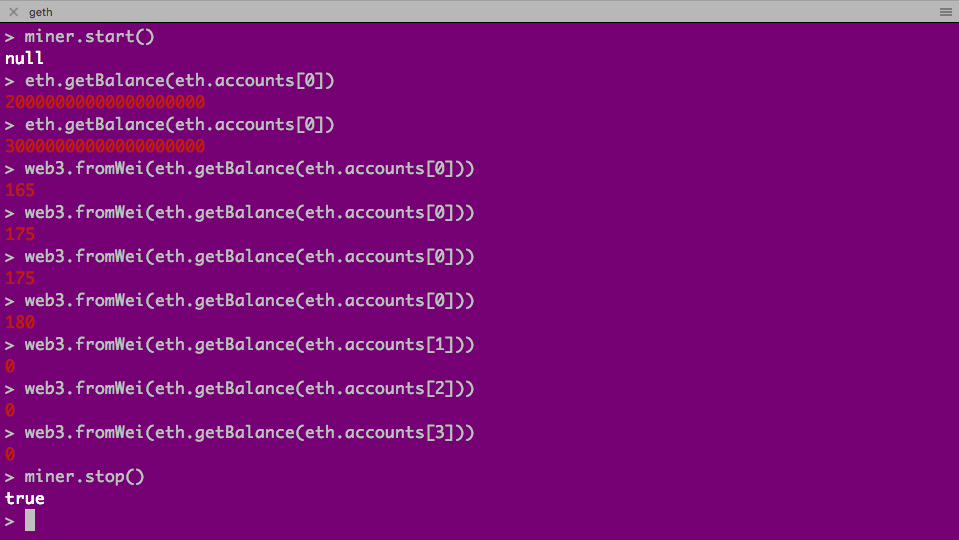
Notice all ethers go to eth.accounts[0], and we can use web3.fromWei to convert the balance from wei to ethers. And we can stop and start mining at any time. We stop it first and can start it later when we deploy contract and execute function. (In real life, some miners will do the job, and you don’t need mining by yourself unless you wish to earn some ethers through mining.)
We have some ethers for eth.accounts[0], and it can be used for contract deployment and executing the function. And my private blockchain is ready for use. Now we shift to the contract deployment.
Deploy the Contract
The procedure is almost identical to what we did in the previous session. However, there is some additional work on the geth console, and we will highlight this.
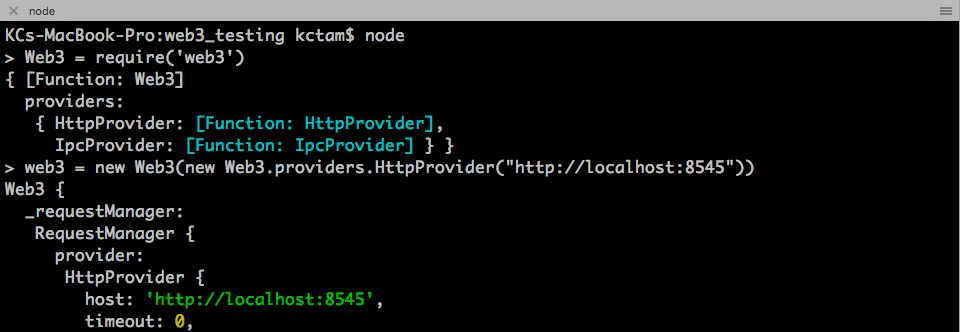
1. Get Node Console Ready
On the node console, the terminal on the left-hand side, we first access node console and define the web3 object for accessing the private chain.
node console
$ node
> Web3 = require('web3')
> web3 = new Web3(new Web3.providers.HttpProvider("http://localhost:8545"))
2. Turn on RPC on Geth Console
When we start the private blockchain, by default the RPC (accessing through http://localhost:8545) is off. We need to turn it on from the geth console.
geth console
$ admin.startRPC()

And we can see on the blockchain terminal this message:

That means web3 from node can access the blockchain through RPC. This is not required for TestRPC as it is opened already. We can also turn RPC on when we start the blockchain (with option –rpc).
3. Test Blockchain Access on Node Console
Verify the addresses that we have created before.
node console
> web3.eth.accounts

We see the exact addresses we have created on geth console.
4. Check Balance Handy Function
We re-use the same checkAllBalances(), which is taken from here.
function checkAllBalances() {
var i =0;
web3.eth.accounts.forEach( function(e){
     console.log("  web3.eth.accounts["+i+"]: " +  e + " tbalance: " + web3.fromWei(web3.eth.getBalance(e), "ether") + " ether");
i++;
})
};
Simply copy-n-paste this function into node console. Now we can call the function checkAllBalances() at any time, and it will show up the balance of all accounts in ether.
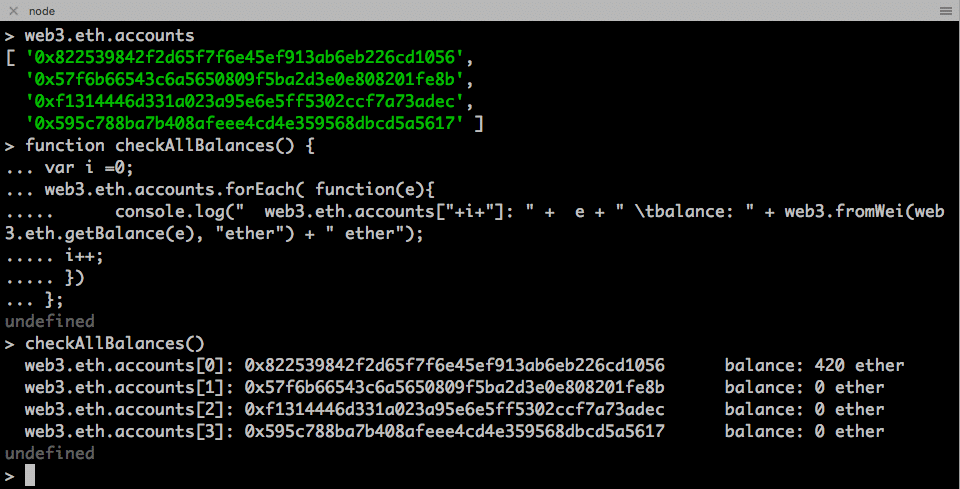
The balance is correct. The ethers in accounts[0] is due to mining. We will not refer to this, as during mining, this amount keeps increasing. We will check the balance of the other three accounts, which currently is zero.
5. Deploy the Contract
Again, we are following what we have done before. And I just copy the information from the previous session. Refer to the previous session how I obtain them.
Create a variable address, which holds the three target sharing accounts.
node console
> var addresses = [web3.eth.accounts[1], web3.eth.accounts[2], web3.eth.accounts[3]];
> addresses
Create a class for revenuesharingContract based on the ABI.
node console
> var revenuesharingContract = web3.eth.contract([{"constant":true,"inputs":[],"name":"creator","outputs":[{"name":"","type":"address"}],"payable":false,"stateMutability":"view","type":"function"},{"constant":false,"inputs":[],"name":"kill","outputs":[],"payable":false,"stateMutability":"nonpayable","type":"function"},{"constant":true,"inputs":[],"name":"numShareholders","outputs":[{"name":"","type":"uint256"}],"payable":false,"stateMutability":"view","type":"function"},{"constant":true,"inputs":[{"name":"","type":"uint256"}],"name":"shareholders","outputs":[{"name":"","type":"address"}],"payable":false,"stateMutability":"view","type":"function"},{"constant":false,"inputs":[],"name":"shareRevenue","outputs":[{"name":"success","type":"bool"}],"payable":true,"stateMutability":"payable","type":"function"},{"inputs":[{"name":"addresses","type":"address[]"}],"payable":false,"stateMutability":"nonpayable","type":"constructor"},{"anonymous":false,"inputs":[{"indexed":false,"name":"_amount","type":"uint256"},{"indexed":false,"name":"_numShareholders","type":"uint256"}],"name":"Disburse","type":"event"}]);
Up to this moment, we have not deployed anything on the private blockchain yet. Therefore no mining is needed. Gas is required for contract deployment, and therefore we need to unlock the eth.accounts[0] as we use accounts[0] to deploy this contract. It is done on geth console.
geth console
$ personal.unlockAccount(eth.accounts[0])

In case you are prompted to unlock the account due to timeout, you need to do this again.
Now we can deploy the contract with bytecode and necessary information.
node console
> var revenuesharing = revenuesharingContract.new(
   addresses,
   {
     from: web3.eth.accounts[0],
     data: '0x6060604052341561000f57600080fd5b60405161049d38038061049d833981016040528080518201919050506000336000806101000a81548173ffffffffffffffffffffffffffffffffffffffff021916908373ffffffffffffffffffffffffffffffffffffffff1602179055508151600281905550600090505b81518110156100f957818181518110151561009157fe5b906020019060200201516001600083815260200190815260200160002060006101000a81548173ffffffffffffffffffffffffffffffffffffffff021916908373ffffffffffffffffffffffffffffffffffffffff160217905550808060010191505061007a565b50506103938061010a6000396000f30060606040526004361061006d576000357c0100000000000000000000000000000000000000000000000000000000900463ffffffff16806302d05d3f1461007257806341c0e1b5146100c757806368eca613146100dc578063ab377daa14610105578063e579a0bd14610168575b600080fd5b341561007d57600080fd5b61008561018a565b604051808273ffffffffffffffffffffffffffffffffffffffff1673ffffffffffffffffffffffffffffffffffffffff16815260200191505060405180910390f35b34156100d257600080fd5b6100da6101af565b005b34156100e757600080fd5b6100ef610240565b6040518082815260200191505060405180910390f35b341561011057600080fd5b6101266004808035906020019091905050610246565b604051808273ffffffffffffffffffffffffffffffffffffffff1673ffffffffffffffffffffffffffffffffffffffff16815260200191505060405180910390f35b610170610279565b604051808215151515815260200191505060405180910390f35b6000809054906101000a900473ffffffffffffffffffffffffffffffffffffffff1681565b6000809054906101000a900473ffffffffffffffffffffffffffffffffffffffff1673ffffffffffffffffffffffffffffffffffffffff163373ffffffffffffffffffffffffffffffffffffffff16141561023e576000809054906101000a900473ffffffffffffffffffffffffffffffffffffffff1673ffffffffffffffffffffffffffffffffffffffff16ff5b565b60025481565b60016020528060005260406000206000915054906101000a900473ffffffffffffffffffffffffffffffffffffffff1681565b60008060006002543481151561028b57fe5b049150600090505b60025481101561031d576001600082815260200190815260200160002060009054906101000a900473ffffffffffffffffffffffffffffffffffffffff1673ffffffffffffffffffffffffffffffffffffffff166108fc839081150290604051600060405180830381858888f19350505050151561031057600080fd5b8080600101915050610293565b7f9c26340b8d01b4e039192edfd25f4a56ed070d45afe866b8685658b1ed3cd74d34600254604051808381526020018281526020019250505060405180910390a1600192505050905600a165627a7a72305820f0e717ba935e00c43896cc9266a85af91a519061c044503be0a52b93f721d1610029',
     gas: '4700000'
   }, function (e, contract){
    console.log(e, contract);
    if (typeof contract.address !== 'undefined') {
         console.log('Contract mined! address: ' + contract.address + ' transactionHash: ' + contract.transactionHash);
    }
 })
0])
Different from the previous session, we see the transaction is already shown in the blockchain terminal but not mined yet. No message from node console is observed yet.

Now we need to turn on mining on geth console.
As we turn on mining, we very soon see some blocks are mined, and on the node console, the message also comes out, showing that the contract is successfully deployed.
![]()
Interacting with Deployed Contract
Similar to the previous session, the deployed contract is accessed through the object revenuesharing.
1. Examine the public variables
Examining public variables does not require gas, and therefore we do not need to unlock accounts and mining to perform this.

2. Execute shareRevenue() function
As executing function requires transaction cost and mining, we can start both from the geth console first.
The command we execute the function is the same. As in the previous session, we check the balance before and after the command.
node console
> checkAllBalance()
> revenuesharing.shareRevenue({from: web3.eth.accounts[0], value: web3.toWei(30), gas: 4700000});
> checkAllBalance()
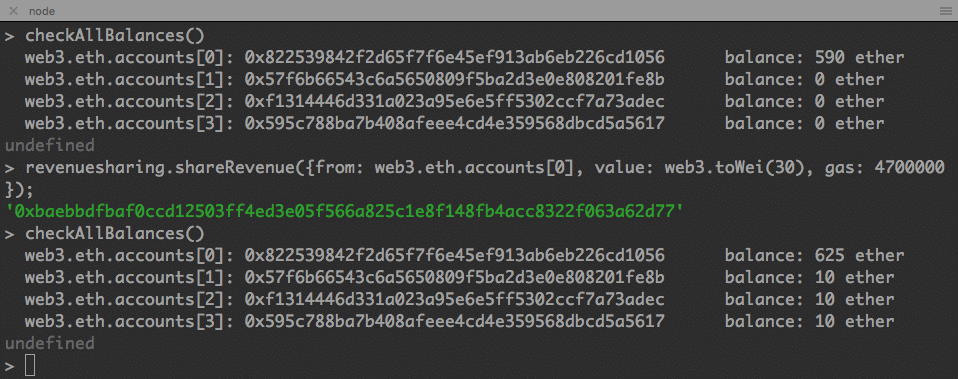
We have got our desired result. The 30 ethers from accounts[0] is now distributed to accounts[1] to accounts[3]. We cannot verify the accounts[0] as new ethers are coming in due to mining.
Summary
We have again used web3 through node console to deploy and interact with the contract. This time we do it on a private Ethernet blockchain. The overall process is almost the same on node console side, but we have to take care of account creations, unlocking account, mining, etc in order to complete the whole process. This is not required in TestRPC as TestRPC performs all of these tasks.
Next time we will work on MIST, a user interface and again interacting on a private ethereum blockchain.