Introduction
- In the previous blog, we saw Widget Testing. Widget testing is a technique that allows us to ensure that various portions of the user interface work as intended without the need for a physical device or simulator.
- They can be a great way to isolate small parts of your app and find out whether your code is behaving as expected.
- In this blog, we are going to see another testing technique in Flutter which is Integration Test.
Integration Test
- Integration tests are recommended when you want to exercise the complete application and its dependencies.
- Integration tests are the highest-level testing technique available in the Flutter SDK, and they provide the highest level of confidence to your application.
- They spin up your application in a real device or a simulator, and from there they isolate the application from the scripted test driver so you can ensure that your results are accurate.
- To run integration tests, you'll need to be using profile or release mode instead of debugging mode: that way, you can measure accurately the performance of the app.
- To run Integration Test in the flutter application you will use two dependencies :
- flutter_driver: Provides the necessary APIs to instrument your application
- test: Contains the necessary tools to create test methods.
- Add these two dependencies inside pubspec file under the
dev_dependencies.
dev_dependencies:
    flutter_driver:
        sdk: flutter
    flutter_test:
        sdk: flutter
- Integration tests do not run the same as applications. As a result, we will not be adding these tests to the lib folder or the current test folder, which contains unit and widget tests.
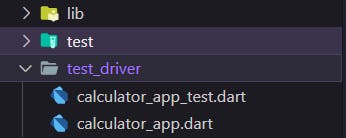
- Instead, it is standard practice to create a new folder called
test driver.
- Inside the test driver folder, we'll make two new files. The first file, which we'll call
calculator app.dart, will contain an instrumented version of our application.
- In this file, there will be a
main method that will start the instrumented version of our app.
- We'll need to import the driver extension from the
flutter driver package, as well as the file containing our application's main function. So the instrumentation tool knows what is the starting point of our application.
import 'package:flutter_driver/driver_extension.dart';
import 'package:learning_testing/main.dart' as calculator_app;
- To distinguish it from the main method that we already have in this file, we will alias the import of the calculator's main file with the keyword
as.
- Then, within the main section of this file, we will call the function
enableFlutterDriverExtension() to notify Flutter that we are running an instrumented app. Finally, we'll invoke the main method of our flutter application.
void main() {
  enableFlutterDriverExtension();
  calculator_app.main();
}
- The second file inside our test driver folder will be named
calculator_app_test.dart and it will contain the actual code that will drive and test our application as we do with any other testing file.
- We are going to add a
main method that will contain our tests we will also import the flutter_driver package and the test package.
import 'package:flutter_driver/flutter_driver.dart';
import 'package:test/test.dart';
- Then we are going to create an instance of the flutter driver class. We will use the
setupAll() method from the test framework to connect the flutter driver to our application. Consequently, we will have to close that connection inside the tearDownAll() method.
void main() {
  late FlutterDriver driver;

  setUpAll(() async {
    driver = await FlutterDriver.connect();
  });

  tearDownAll(() {
    driver.close();
  });
}
- Now we are going to test the Stream of Fibonacci numbers that we’ve created earlier and the addition method. So let’s write an integration test for both.
void main() {
  late FlutterDriver driver;

  setUpAll(() async {
    driver = await FlutterDriver.connect();
  });

  tearDownAll(() {
    driver.close();
  });

  test('the values of Fibonacci are 0, 1, 1, 2, 3, 5, 8, 13, 21', () async {
    await driver.waitFor(find.text('The latest known value is 0'));
    await driver.waitFor(find.text('The latest known value is 1'));
    await driver.waitFor(find.text('The latest known value is 1'));
    await driver.waitFor(find.text('The latest known value is 2'));
    await driver.waitFor(find.text('The latest known value is 3'));
    await driver.waitFor(find.text('The latest known value is 5'));
    await driver.waitFor(find.text('The latest known value is 8'));
    await driver.waitFor(find.text('The latest known value is 13'));
    await driver.waitFor(find.text('The latest known value is 21'));
  });

  test('adding 5 and 6 shows 11', () async {
    await driver.tap(find.byValueKey('textfield_top_plus'));
    await driver.enterText('5');
    await driver.tap(find.byValueKey('textfield_bottom_plus'));
    await driver.enterText('6');
    await driver.waitFor(find.text('Result: 11.0'));
  });
}
- As you can see in the first test, we are getting the stream of values. We are using the
waitFor() method in order to wait for the values to come and then find the exact text in the UI.
- Also in the second test we are first getting the TextField via ValueKey and then entering the values. After that, we are waiting for the result and finding the exact text that we’ve expected on the UI.
- In order to run this test run the following command in the terminal
flutter driver --target=test_driver/calculator_app.dart --driver=test_driver/calculator_app_test.dart
- This will run your app, run all the tests, and after successful completion you will get the message in the terminal that All tests passed!. Otherwise an error.

Wrapping Up
- I hope you enjoyed and learned something from this article. If you have any feedback/queries, leave them in the comments.
- The example is taken from the VGV testing guide.
- Thank you for spending time reading this article. See you in the next article. Until then...

Follow me on : Twitter, LinkedIn, Github