Xamarin.iOS Snippet: Create custom transitions
Ever wondered how those slick screen transitions are made by those other apps? Using transitions do give an app that extra polish. But what’s even more important it will give your app an edge when it comes to user experience (UX).
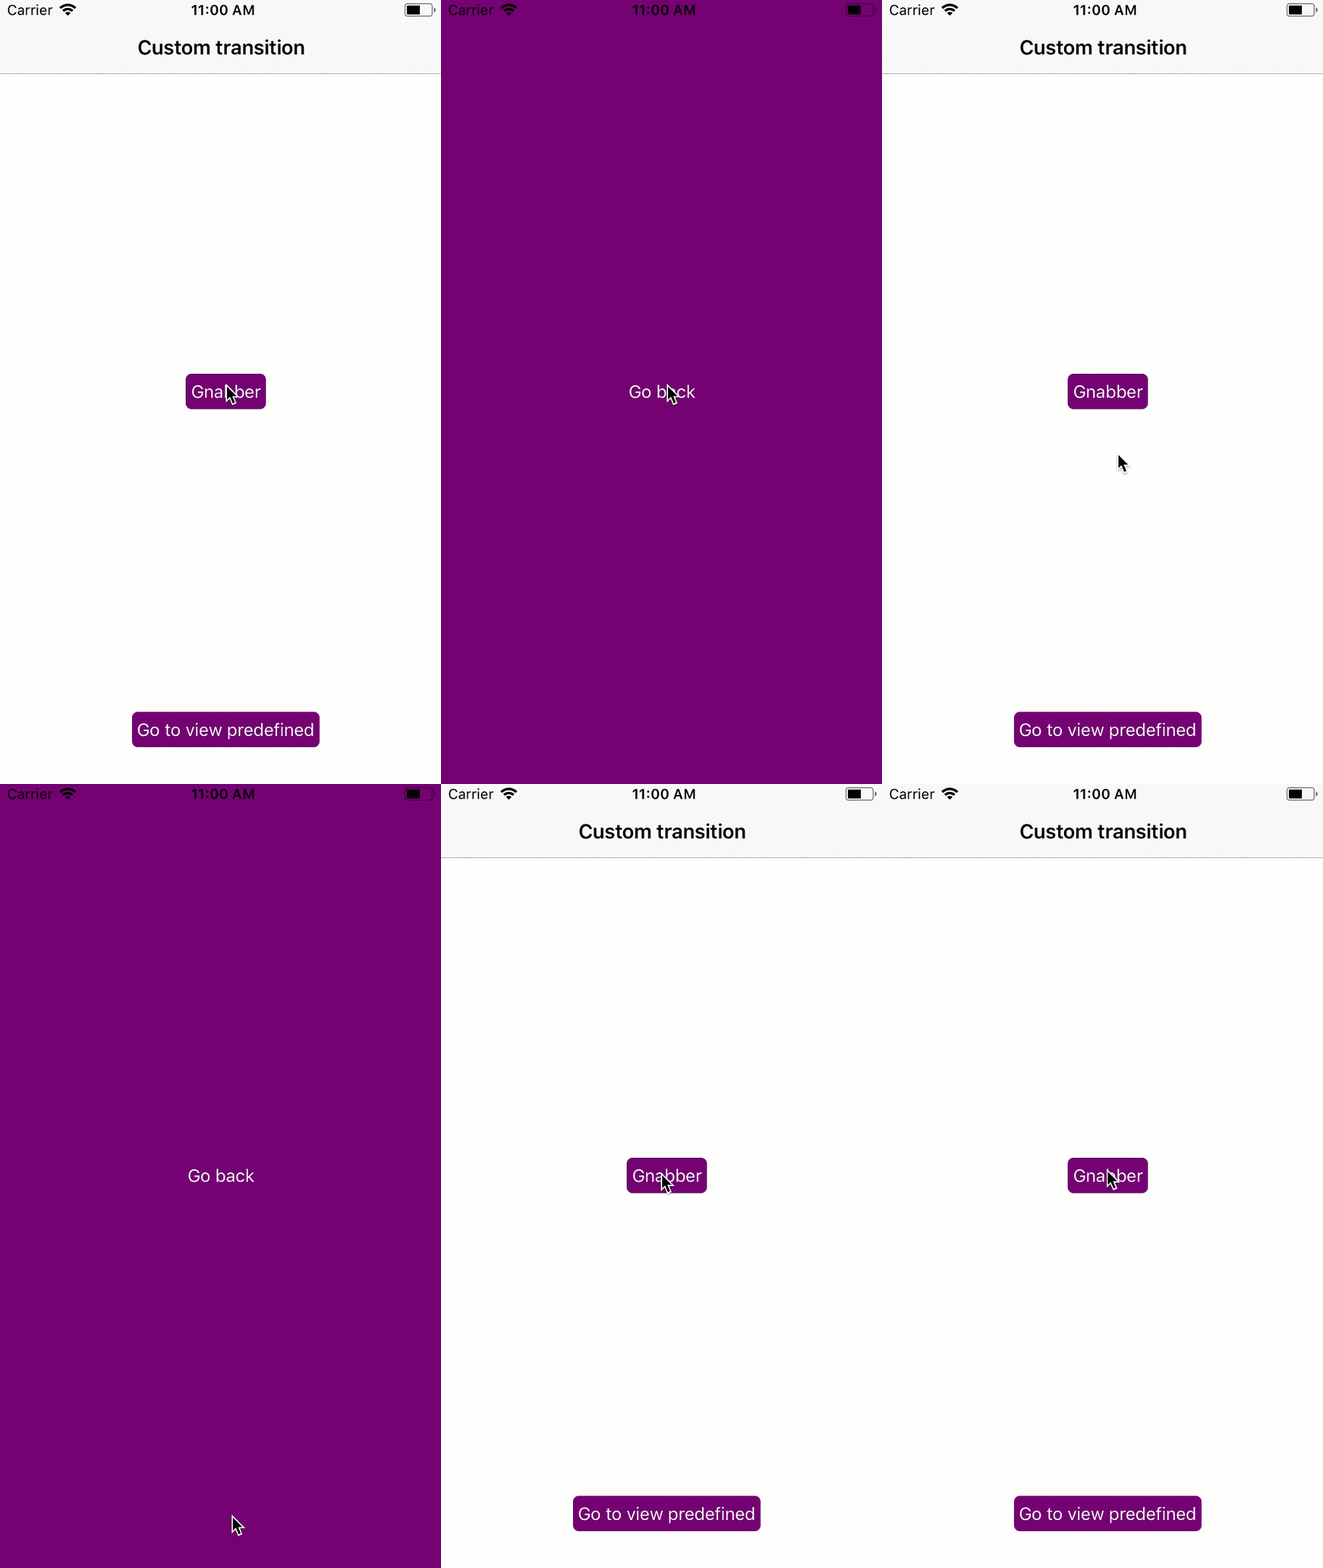
In this post we will implement the following transition:
Before we dive into the code. Be aware that every transition follows the following steps::
- Configure the transition on the destination View Controller
- Implement the transition delegate
- Implement the transition animation
- If applicable implement the dismiss transition animation
You do not have to implement the dismiss transition. But if you navigate back to the originating page. You really should do this.
Configuring the custom transition
Short digression: There is no consensus in the community what the best approach is to write your UI. Some prefer to do it in code (such as myself) others prefer to use the storyboards. So we will just look at both of them. The good thing is that apart from the configuration the rest of the code is identical.
Configure custom transitions with code
The transition in iOS is actually defined on the target View Controller. In our example we will navigate to the next View Controller as soon as the user selects the button:
_button.TouchUpInside += (e, s) =>
{
    var vc = new ModalViewController(this)
    {
        ModalPresentationStyle = UIModalPresentationStyle.Custom,
        TransitioningDelegate = new GrowTransitioningDelegate(_button)
    };

    NavigationController.PresentViewController(vc, true, null);
};
Note that we configure the ModalPresentationStyle and TransitionDelegate on the view controller that we are navigating to. The GrowTransitionDelegate takes the originating UIView. If you are not using Storyboards you can skip the section and dive right into how the GrowTransitioningDelegate is implemented.
Configure custom transitions with Storyboards
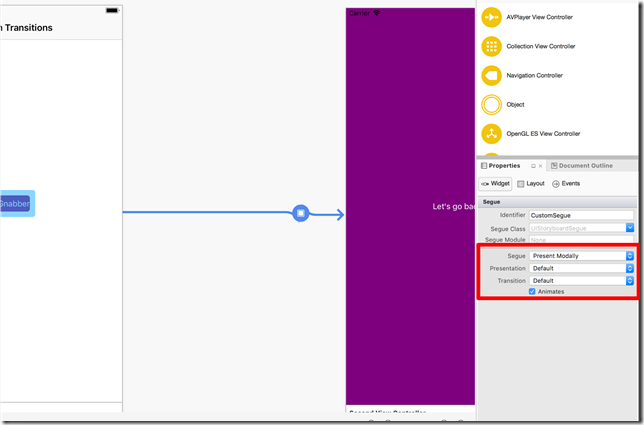
If you are using storyboards you will be familiar with segues. To define a custom transition animation you will have to configure your segue as follows:
Then in the originating view controller you can override the PrepareForSegue method:
public override void PrepareForSegue(UIStoryboardSegue segue, NSObject sender)
{
    base.PrepareForSegue(segue, sender);

    var destinationVC = segue.DestinationViewController as SecondViewController;
    destinationVC.Callee = this;
    destinationVC.TransitioningDelegate = new GrowTransitioningDelegate(sender as UIView);
    destinationVC.ModalPresentationStyle = UIModalPresentationStyle.Custom;
}
The target view controller in our case is name SecondViewController. It looks fairly similar to the event handler we defined before. On the destination view controller we set the TransitioningDelegate to GrowTransitioningDelegate which takes the originating UIView as constructor parameter. The only difference is that we do no longer pass the instance of the calling view controller as constructor parameter but use a property named Callee on the SecondViewController.
Setting up the delegate
The GrowTransitionDelegate inherits from UIViewControllerTransitioningDelegate from which we can override methods to add a custom animation for presenting as follows:
public class GrowTransitioningDelegate : UIViewControllerTransitioningDelegate
{
    readonly UIView _animationOrigin;

    public GrowTransitioningDelegate(UIView animationOrigin)
    {
        _animationOrigin = animationOrigin;
    }

    public override IUIViewControllerAnimatedTransitioning GetAnimationControllerForPresentedController(UIViewController presented, UIViewController presenting, UIViewController source)
    {
        var customTransition = new GrowTransitionAnimator(_animationOrigin);
        return customTransition;
    }
}
Let’s follow along the scenario of the user navigating to another page. The GetAnimationControllerForPresentedController provides an animation implementation that inherits from IUIViewControllerAnimatedTransitioning. The originating UIView, a button in this example, is passed to the animation in the constructor. And that is all the transitioning delegate has to implement. So let’s see how we implement the actual animation.
Implementing the transition animation
The animations are defined in a class that inherit from UIViewControllerAnimatedTransitioning. The following two methods have to implemented:
public class GrowTransitionAnimator : UIViewControllerAnimatedTransitioning
{
    readonly UIView _animationOrigin;

    public GrowTransitionAnimator(UIView animationOrigin)
    {
        _animationOrigin = animationOrigin;
    }

    public override async void AnimateTransition(IUIViewControllerContextTransitioning transitionContext)
    {
        // The animation
    }

    public override double TransitionDuration(IUIViewControllerContextTransitioning transitionContext)
    {
        return 0.3;
    }
}
The TransitionDuration method defines how long the animation will take. Usually this should be around 300 to 500 milliseconds. In the AnimateTransition method the actual transition and animation are defined.
The iOS SDK provides capabilities for creating animations such as transition animations. Using these will significantly reduce the effort required to create an animation to defining the initial and desired target state of a UI object. The rendering of the animation is performed by iOS on the GPU. So not only will your app look great it will also be snappy since GPUs eat transformations for breakfast
The AnimateTransition method usually follows the following pattern:
- Get your source and destination view controller and view
- Get the animations container view and add the destination
- Define the animation states
- The final state of the target view
- The initial state of the target view
- Perform the animation and inform the transition context when it is completed
So let’s go through this step by step. First let’s get the source and destination view controllers and view:
public override async void AnimateTransition(IUIViewControllerContextTransitioning transitionContext)
{
    // Get the from and to View Controllers and their views
    var fromVC = transitionContext.GetViewControllerForKey(UITransitionContext.FromViewControllerKey);
    var fromView = fromVC.View;

    var toVC = transitionContext.GetViewControllerForKey(UITransitionContext.ToViewControllerKey);
    var toView = toVC.View;

    // ...
}
Then get the animation container and add the destination to it:
public override async void AnimateTransition(IUIViewControllerContextTransitioning transitionContext)
{
    // ...

    // Add the to view to the transition container view
    var containerView = transitionContext.ContainerView;
    containerView.AddSubview(toView);

    // ...
}
Now comes the part where we will define the animation. We want to start our animation in the middle of the button that the user selected I.e. which our animation class has received over the constructor.
public override async void AnimateTransition(IUIViewControllerContextTransitioning transitionContext)
{
    // ...

    // Set the desired target for the transition
    var appearedFrame = transitionContext.GetFinalFrameForViewController(toVC);

    // Set how the animation shall start
    var initialFrame = new CGRect(_animationOrigin.Frame.GetMidX(), _animationOrigin.Frame.GetMidY(), 0, 0);
    var finalFrame = appearedFrame;
    toView.Frame = initialFrame;

    // ...
}
Now that is left to do is execute the animation and await the result. The result is then used to signal to the transition context that the animation has completed:
public override async void AnimateTransition(IUIViewControllerContextTransitioning transitionContext)
{
    // ...

    var isAnimationCompleted = await UIView.AnimateAsync(TransitionDuration(transitionContext), () => {
        toView.Frame = finalFrame;
    });

    transitionContext.CompleteTransition(isAnimationCompleted);
}
And our transition animation is completed. If you are looking to implement a different animation. For instance one where the animation starts from a corner. Changing the origin point of the animation will provide you with the desired effect.
Side effects While animations are great and you will perhaps notice that some UI elements are drawn early and then move into position during the transition. This can feel slightly off. So while working with animations it can make sense to move the layout code of the UI components to the
ViewDidAppearmethod.
Creating the dismiss animation
For having the inverse animation for dismissing the view. First the GetAnimationControllerForDismissedController method has to be overwritten in the delegate class (same one as before):
public class GrowTransitioningDelegate : UIViewControllerTransitioningDelegate
{
    readonly UIView _animationOrigin;

    public GrowTransitioningDelegate(UIView animationOrigin)
    {
        _animationOrigin = animationOrigin;
    }

    public override IUIViewControllerAnimatedTransitioning GetAnimationControllerForPresentedController(UIViewController presented, UIViewController presenting, UIViewController source)
    {
        // ...
    }

    public override IUIViewControllerAnimatedTransitioning GetAnimationControllerForDismissedController(UIViewController dismissed)
    {
        var customTransition = new ShrinkTransitionAnimator(_animationOrigin);
        return customTransition;
    }
}
Then create an implementation which inherits UIViewControllerAnimatedTransitioning and has the desired reverse animation.
public class ShrinkTransitionAnimator : UIViewControllerAnimatedTransitioning
{
    readonly UIView _animationOrigin;

    public ShrinkTransitionAnimator(UIView animationTarget)
    {
        _animationOrigin = animationTarget;
    }

    public override async void AnimateTransition(IUIViewControllerContextTransitioning transitionContext)
    {
        // Get the from and to View Controllers and their views
        var fromVC = transitionContext.GetViewControllerForKey(UITransitionContext.FromViewControllerKey);
        var fromView = fromVC.View;

        var toVC = transitionContext.GetViewControllerForKey(UITransitionContext.ToViewControllerKey);
        var toView = toVC.View;

        // Add the to view to the transition container view
        var containerView = transitionContext.ContainerView;

        // Set the desired target for the transition
        var appearedFrame = transitionContext.GetFinalFrameForViewController(fromVC);

        // Set how the animation shall end
        var finalFrame = new CGRect(_animationOrigin.Frame.GetMidX(), _animationOrigin.Frame.GetMidY(), 0, 0);
        fromView.Frame = appearedFrame;

        var isAnimationCompleted = await UIView.AnimateAsync(TransitionDuration(transitionContext), () => {
            fromView.Frame = finalFrame;
        });

        fromView.RemoveFromSuperview();

        transitionContext.CompleteTransition(isAnimationCompleted);
    }

    public override double TransitionDuration(IUIViewControllerContextTransitioning transitionContext)
    {
        return 0.3;
    }
}
Though looking similar there are a few key points. For one the origin this time is the view controller that we want to dismiss. Since it is already part of the View tree it no longer has to be added. Quite the contrary you will actually want to remove it once the animation is completed.
Conclusion
In this post we went through the steps required to create a custom transition. Further we looked at how we can implement the dismiss animation. The steps can be reused for different kind of animations which are defined in the implementation of the UIViewControllerAnimatedTransitioning class.
You can find the complete code sample on GitHub.


