Watch Now This tutorial has a related video course created by the Real Python team. Watch it together with the written tutorial to deepen your understanding: Deploy a Django App With Gunicorn and Nginx
Taking a Django app from development to production is a demanding but rewarding process. This tutorial will take you through that process step by step, providing an in-depth guide that starts at square one with a no-frills Django application and adds in Gunicorn, Nginx, domain registration, and security-focused HTTP headers. After going over this tutorial, you’ll be better equipped to take your Django app into production and serve it to the world.
In this tutorial, you’ll learn:
- How you can take your Django app from development to production
- How you can host your app on a real-world public domain
- How to introduce Gunicorn and Nginx into the request and response chain
- How HTTP headers can fortify your site’s HTTPS security
To make the most out of this tutorial, you should have an introductory-level understanding of Python, Django, and the high-level mechanics of HTTP requests.
You can download the Django project used in this tutorial by following the link below:
Get Source Code: Click here to get the companion Django project used in this tutorial.
Starting With Django and WSGIServer
You’ll use Django as the framework at the core of your web app, using it for URL routing, HTML rendering, authentication, administration, and backend logic. In this tutorial, you’ll supplement the Django component with two other layers, Gunicorn and Nginx, in order to serve the application scalably. But before you do that, you’ll need to set up your environment and get the Django application itself up and running.
Setting Up a Cloud Virtual Machine (VM)
First, you’ll need to launch and set up a virtual machine (VM) on which the web application will run. You should familiarize yourself with at least one infrastructure as a service (IaaS) cloud service provider to provision a VM. This section will walk you through the process at a high level but won’t cover every step in detail.
Using a VM to serve a web app is an example of IaaS, where you have full control over the server software. Other options besides IaaS do exist:
- A serverless architecture allows you to compose the Django app only and let a separate framework or cloud provider handle the infrastructure side.
- A containerized approach allows multiple apps to run independently on the same host operating system.
For this tutorial, though, you’ll use the tried-and-true route of serving Nginx and Django directly on IaaS.
Two popular options for virtual machines are Azure VMs and Amazon EC2. To get more help with launching the instance, you should refer to the documentation for your cloud provider:
- For Azure VMs, follow their quickstart guide for creating a Linux virtual machine in the Azure portal.
- For Amazon EC2, learn how to get set up.
The Django project and everything else involved in this tutorial sit on a t2.micro Amazon EC2 instance running Ubuntu Server 20.04.
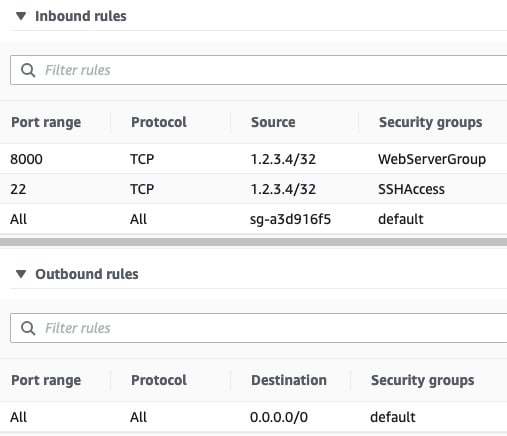
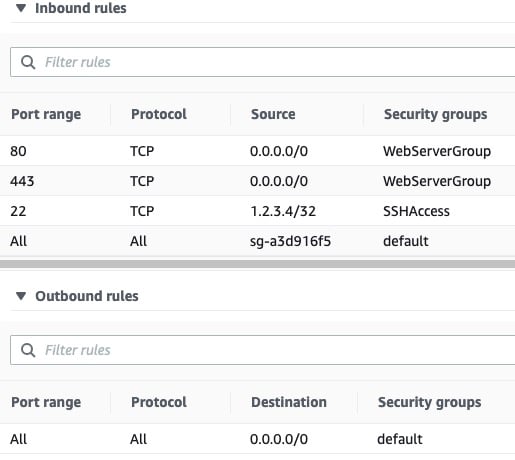
One important component of VM setup is inbound security rules. These are fine-grained rules that control the inbound traffic to your instance. Create the following inbound security rules for initial development, which you’ll modify in production:
| Reference | Type | Protocol | Port Range | Source |
|---|---|---|---|---|
| 1 | Custom | TCP | 8000 | my-laptop-ip-address/32 |
| 2 | Custom | All | All | security-group-id |
| 3 | SSH | TCP | 22 | my-laptop-ip-address/32 |
Now you’ll walk through these one at a time:
- Rule 1 allows TCP over port 8000 from your personal computer’s IPv4 address, allowing you to send requests to your Django app when you serve it in development over port 8000.
- Rule 2 allows inbound traffic from network interfaces and instances that are assigned to the same security group, using the security group ID as the source. This is a rule included in the default AWS security group that you should tie to your instance.
- Rule 3 allows you to access your VM via SSH from your personal computer.
You’ll also want to add an outbound rule to allow outbound traffic to do things such as install packages:
| Type | Protocol | Port Range | Source |
|---|---|---|---|
| Custom | All | All | 0.0.0.0/0 |
Tying that all together, your initial AWS security rule set can consist of three inbound rules and one outbound rule. These, in turn, come from three separate security groups—the default group, a group for HTTP access, and a group for SSH access:
From your local computer, you can then SSH into the instance:
$ ssh -i ~/.ssh/<privkey>.pem ubuntu@<instance-public-ip-address>
This command logs you in to your VM as the user ubuntu. Here, ~/.ssh/<privkey>.pem is the path to the private key that’s part of the set of security credentials that you tied to the VM. The VM is where the Django application code will sit.
With that, you should be all ready to move forward with building your application.
Creating a Cookie-Cutter Django App
You’re not concerned with making a fancy Django project with complex URL routing or advanced database features for this tutorial. Instead, you want something that’s plain, small, and understandable, allowing you to test quickly whether your infrastructure is working.
To that end, you can take the following steps to set up your app.
First, SSH into your VM and make sure that you have the latest patch versions of Python 3.8 and SQLite3 installed:
$ sudo apt-get update -y
$ sudo apt-get install -y python3.8 python3.8-venv sqlite3
$ python3 -V
Python 3.8.10
Here, Python 3.8 is the system Python, or the python3 version that ships with Ubuntu 20.04 (Focal). Upgrading the distribution ensures you receive bug and security fixes from the latest Python 3.8.x release. Optionally, you could install another Python version entirely—such as python3.9—alongside the system-wide interpreter, which you would need to invoke explicitly as python3.9.
Next, create and activate a virtual environment:
$ cd  # Change directory to home directory
$ python3 -m venv env
$ source env/bin/activate
Now, install Django 3.2:
$ python -m pip install -U pip 'django==3.2.*'
You can now bootstrap the Django project and app using Django’s management commands:
$ mkdir django-gunicorn-nginx/
$ django-admin startproject project django-gunicorn-nginx/
$ cd django-gunicorn-nginx/
$ django-admin startapp myapp
$ python manage.py migrate
$ mkdir -pv myapp/templates/myapp/
This creates the Django app myapp alongside the project named project:
/home/ubuntu/
│
├── django-gunicorn-nginx/
│    │
│    ├── myapp/
│    │   ├── admin.py
│    │   ├── apps.py
│    │   ├── __init__.py
│    │   ├── migrations/
│    │   │   └── __init__.py
│    │   ├── models.py
│    │   ├── templates/
│    │   │   └── myapp/
│    │   ├── tests.py
│    │   └── views.py
│    │
│    ├── project/
│    │   ├── asgi.py
│    │   ├── __init__.py
│    │   ├── settings.py
│    │   ├── urls.py
│    │   └── wsgi.py
|    |
│    ├── db.sqlite3
│    └── manage.py
│
└── env/  ← Virtual environment
Using a terminal editor such as Vim or GNU nano, open project/settings.py and append your app to INSTALLED_APPS:
# project/settings.py
INSTALLED_APPS = [
    "django.contrib.admin",
    "django.contrib.auth",
    "django.contrib.contenttypes",
    "django.contrib.sessions",
    "django.contrib.messages",
    "django.contrib.staticfiles",
    "myapp",
]
Next, open myapp/templates/myapp/home.html and create a short and sweet HTML page:
<!DOCTYPE html>
<html lang="en-US">
  <head>
    <meta charset="utf-8">
    <title>My secure app</title>
  </head>
  <body>
    <p>Now this is some sweet HTML!</p>
  </body>
</html>
After that, edit myapp/views.py to render that HTML page:
from django.shortcuts import render

def index(request):
    return render(request, "myapp/home.html")
Now create and open myapp/urls.py to associate your view with a URL pattern:
from django.urls import path
from . import views

urlpatterns = [
    path("", views.index, name="index"),
]
After that, edit project/urls.py accordingly:
from django.urls import include, path

urlpatterns = [
    path("myapp/", include("myapp.urls")),
    path("", include("myapp.urls")),
]
You can do one more thing while you’re at it, which is to make sure the Django secret key used for cryptographic signing isn’t hard-coded in settings.py, which Git will likely track. Remove the following line from project/settings.py:
SECRET_KEY = "django-insecure-o6w@a46mx..." # Remove this line
Replace it with the following:
import os

# ...

try:
    SECRET_KEY = os.environ["SECRET_KEY"]
except KeyError as e:
    raise RuntimeError("Could not find a SECRET_KEY in environment") from e
This tells Django to look in your environment for SECRET_KEY rather than including it in your application source code.
Note: For larger projects, check out django-environ to configure your Django application with environment variables.
Finally, set the key in your environment. Here’s how you could do that on Ubuntu Linux using OpenSSL to set the key to an eighty-character string:
$ echo "export SECRET_KEY='$(openssl rand -hex 40)'" > .DJANGO_SECRET_KEY
$ source .DJANGO_SECRET_KEY
You can cat the contents of .DJANGO_SECRET_KEY to see that openssl has generated a cryptographically secure hex string key:
$ cat .DJANGO_SECRET_KEY
export SECRET_KEY='26a2d2ccaf9ef850...'
Alright, you’re all set. That’s all you need to have a minimally functioning Django app.
Using Django’s WSGIServer in Development
In this section, you’ll test Django’s development web server using httpie, an awesome command-line HTTP client for testing requests to your web app from the console:
$ pwd
/home/ubuntu
$ source env/bin/activate
$ python -m pip install httpie
You can create an alias that will let you send a GET request using httpie to your application:
$ # Send GET request and follow 30x Location redirects
$ alias GET='http --follow --timeout 6'
This aliases GET to an http call with some default flags. You can now use GET docs.python.org to see the response headers and body from the Python documentation’s homepage.
Before starting the Django development server, you can check your Django project for potential problems:
$ cd django-gunicorn-nginx/
$ python manage.py check
System check identified no issues (0 silenced).
If your check doesn’t identify any issues, then tell Django’s built-in application server to start listening on localhost, using the default port of 8000:
$ # Listen on 127.0.0.1:8000 in the background
$ nohup python manage.py runserver &
$ jobs -l
[1]+ 43689 Running                 nohup python manage.py runserver &
Using nohup <command> & executes command in the background so that you can continue to use your shell. You can use jobs -l to see the process identifier (PID), which will let you bring the process to the foreground or terminate it. nohup will redirect standard output (stdout) and standard error (stderr) to the file nohup.out.
Note: If it appears that nohup hangs and leaves you without a cursor, press Enter to get your terminal cursor and shell prompt back.
Django’s runserver command, in turn, uses the following syntax:
$ python manage.py runserver [address:port]
If you leave the address:port argument unspecified as done above, Django will default to listening on localhost:8000. You can also use the lsof command to verify more directly that a python command was invoked to listen on port 8000:
$ sudo lsof -n -P -i TCP:8000 -s TCP:LISTEN
COMMAND   PID   USER   FD   TYPE DEVICE SIZE/OFF NODE NAME
python  43689 ubuntu    4u  IPv4  45944      0t0  TCP 127.0.0.1:8000 (LISTEN)
At this point in the tutorial, your app is only listening on localhost, which is the address 127.0.0.1. It’s not yet accessible from a browser, but you can still give it its first visitor by sending it a GET request from the command line within the VM itself:
$ GET :8000/myapp/
HTTP/1.1 200 OK
Content-Length: 182
Content-Type: text/html; charset=utf-8
Date: Sat, 25 Sep 2021 00:11:38 GMT
Referrer-Policy: same-origin
Server: WSGIServer/0.2 CPython/3.8.10
X-Content-Type-Options: nosniff
X-Frame-Options: DENY

<!DOCTYPE html>
<html lang="en-US">
  <head>
    <meta charset="utf-8">
    <title>My secure app</title>
  </head>
  <body>
    <p>Now this is some sweet HTML!</p>
  </body>
</html>
The header Server: WSGIServer/0.2 CPython/3.8.10 describes the software that generated the response. In this case, it’s version 0.2 of WSGIServer alongside CPython 3.8.10.
WSGIServer is nothing more than a Python class defined by Django that implements the Python WSGI protocol. What this means is that it adheres to the Web Server Gateway Interface (WSGI), which is a standard that defines a way for web server software and web applications to interact.
In our example so far, the django-gunicorn-nginx/ project is the web application. Since you’re serving the app in development, there’s actually no separate web server. Django uses the simple_server module, which implements a lightweight HTTP server, and fuses the concept of web server versus application server into one command, runserver.
Next, you’ll see how to begin introducing your app to the big time by associating it with a real-world domain.
Putting Your Site Online With Django, Gunicorn, and Nginx
At this point, your site is accessible locally on your VM. If you want your site to be accessible at a real-looking URL, you’ll need to claim a domain name and tie it to the web server. This is also necessary to enable HTTPS, since some certificate authorities won’t issue a certificate for a bare IP address or a subdomain that you don’t own. In this section, you’ll see how to register and configure a domain.
Setting a Static Public IP Address
It’s ideal if you can point your domain’s configuration to a public IP address that’s guaranteed not to change. One sub-optimal property of cloud VMs is that their public IP address may change if the instance is put into a stopped state. Alternatively, if you need to replace your existing VM with a new instance for some reason, the resulting change in IP address would be problematic.
The solution to this dilemma is to tie a static IP address to the instance:
- AWS calls this an Elastic IP address.
- Azure calls this a Reserved IP.
Follow your cloud provider’s documentation to associate a static IP address with your cloud VM. In the AWS environment used for the example in this tutorial, the Elastic IP address 50.19.125.152 was associated to the EC2 instance.
Note: Remember that this means you’ll need to change the target IP of ssh in order to SSH into your VM:
$ ssh [args] my-new-static-public-ip
After you’ve updated the target IP, you’ll be able to connect to your cloud VM.
With a more stable public IP in front of your VM, you’re ready to link to a domain.
Linking to a Domain
In this section, you’ll walk through how to purchase, set up, and link a domain name to your existing application.
These examples use Namecheap, but please don’t take that as an unequivocal endorsement. There are more than a handful of other options, such as domain.com, GoDaddy, and Google Domains. As far as partiality is concerned, Namecheap has paid exactly $0 for being featured as the domain registrar of choice in this tutorial.
Warning: If you want to serve your site in development on a public domain with DEBUG set to True, you need to have created custom inbound security rules to only allow your personal computer’s and VM’s IP addresses. You should not open up any HTTP or HTTPS inbound rules to 0.0.0.0 until you’ve turned off DEBUG at the very least.
Here’s how you can get started:
- Create an account on Namecheap, making sure to set up two-factor authentication (2FA).
- From the homepage, start searching for a domain name that suits your budget. You’ll find that prices can vary drastically with both the top-level domain (TLD) and hostname.
- Purchase the domain when you’re happy with a choice.
This tutorial uses the domain supersecure.codes, but you’ll have your own.
Note: As you go through this tutorial, remember that supersecure.codes is just an example domain and isn’t actively maintained.
When picking out your own domain, keep in mind that choosing a more esoteric site name and top-level domain (TLD) typically leads to a cheaper sticker price to purchase the domain. This can be especially helpful for testing purposes.
Once you have your domain, you’ll want to turn on WithheldForPrivacy protection, formally called WhoisGuard. This will mask your personal information when someone runs a whois search on your domain. Here’s how to do this:
- Select Account → Domain List.
- Select Manage next to your domain.
- Enable WithheldForPrivacy protection.
Next, it’s time to set up the DNS record table for your site. Each DNS record will become a row in a database that tells a browser what underlying IP address a fully qualified domain name (FQDN) points to. In this case, we want supersecure.codes to route to 50.19.125.152, the public IPv4 address at which the VM can be reached:
- Select Account → Domain List.
- Select Manage next to your domain.
- Select Advanced DNS.
- Under Host Records, add two A Records for your domain.
Add the A Records as follows, replacing 50.19.125.152 with your instance’s public IPv4 address:
| Type | Host | Value | TTL |
|---|---|---|---|
| A Record | @ |
50.19.125.152 | Automatic |
| A Record | www |
50.19.125.152 | Automatic |
An A record allows you to associate a domain name or subdomain with the IPv4 address of the web server where you serve your application. Above, the Value field should use the public IPv4 address of your VM instance.
You can see that there are two variations for the Host field:
- Using
@points to the root domain,supersecure.codesin this case. - Using
wwwmeans thatwww.supersecure.codeswill point to the same place as justsupersecure.codes. Thewwwis technically a subdomain that can send users to the same place as the shortersupersecure.codes.
Once you’ve set the DNS host record table, you’ll need to wait for up to thirty minutes for the routes to take effect. You can now kill the existing runserver process:
$ jobs -l
[1]+ 43689 Running                 nohup python manage.py runserver &
$ kill 43689
[1]+  Done                    nohup python manage.py runserver
You can confirm that the process is gone with pgrep or by checking active jobs again:
$ pgrep runserver  # Empty
$ jobs -l  # Empty or 'Done'
$ sudo lsof -n -P -i TCP:8000 -s TCP:LISTEN  # Empty
$ rm nohup.out
With these things in place, you also need to tweak a Django setting, ALLOWED_HOSTS, which is the set of domain names that you let your Django app serve:
# project/settings.py
# Replace 'supersecure.codes' with your domain
ALLOWED_HOSTS = [".supersecure.codes"]
The leading dot (.) is a subdomain wildcard, allowing both www.supersecure.codes and supersecure.codes. Keep this list tight to prevent HTTP host header attacks.
Now you can restart the WSGIServer with one slight change:
$ nohup python manage.py runserver '0.0.0.0:8000' &
Notice the address:port argument is now 0.0.0.0:8000, while none was previously specified:
-
Specifying no
address:portimplies serving the app onlocalhost:8000. This means that the application was only accessible from within the VM itself. You could talk to it by callinghttpiefrom the same IP address, but you couldn’t reach your application from the outside world. -
Specifying an
address:portof'0.0.0.0:8000'makes your server viewable to the outside world, though still on port 8000 by default. The0.0.0.0is shorthand for “bind to all IP addresses this computer supports.” In the case of an out-of-the-box cloud VM with one network interface controller (NIC) namedeth0, using0.0.0.0acts as a stand-in for the public IPv4 address of the machine.
Next, turn on output from nohup.out to view any incoming logs from Django’s WSGIServer:
$ tail -f nohup.out
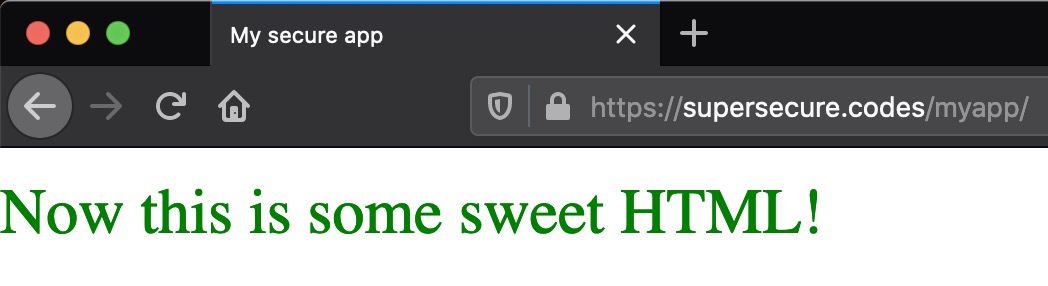
Now for the moment of truth. It’s time to give your site its first visitor. From your personal machine, enter the following URL in a web browser:
http://www.supersecure.codes:8000/myapp/
Replace the domain name above with your own. You should see the page respond quickly in all its glory:
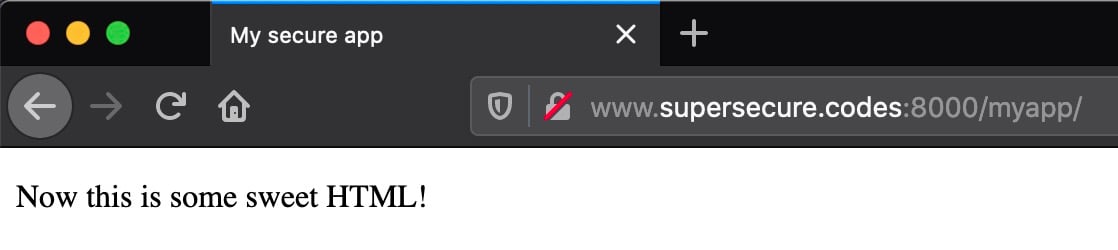
This URL is accessible to you—but not to others—because of the inbound security rule that you created previously.
If you can’t reach your site, there can be a few common culprits:
- If the connection hangs up, check that you’ve opened up an inbound security rule to allow
TCP:8000formy-laptop-ip-address/32. - If the connection shows as refused or unable to connect, check that you’ve invoked
manage.py runserver 0.0.0.0:8000rather than127.0.0.1:8000.
Now return to the shell of your VM. In the continuous output of tail -f nohup.out, you should see something like this line:
[<date>] "GET /myapp/ HTTP/1.1" 200 182
Congratulations, you’ve just taken the first monumental step towards hosting your own website! However, pause here and take note of a couple of big gotchas embedded in the URL http://www.supersecure.codes:8000/myapp/:
-
The site is served only over HTTP. Without enabling HTTPS, your site is fundamentally insecure if you want to transmit any sensitive data from client to server or vice versa. Using HTTP means that requests and responses are sent in plain text. You’ll fix that soon.
-
The URL uses the non-standard port 8000 versus the standard default HTTP port number 80. It’s unconventional and a bit of an eyesore, but you can’t use 80 yet. That’s because port 80 is privileged, and a non-root user can’t—and shouldn’t—bind to it. Later on, you’ll introduce a tool into the mix that allows your app to be available on port 80.
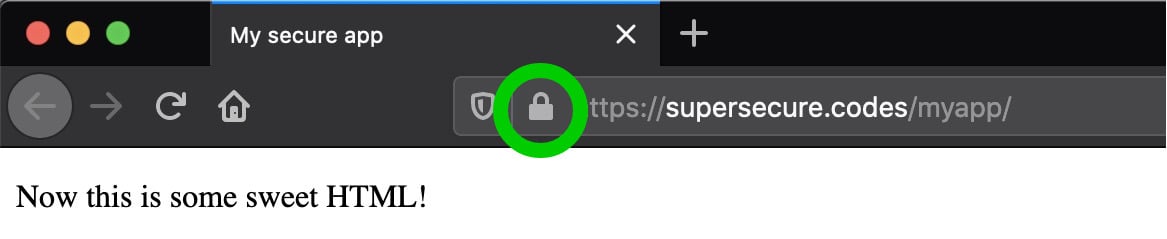
If you check in your browser, you’ll see your browser URL bar hinting at this. If you’re using Firefox, a red lock icon will appear indicating that the connection is over HTTP rather than HTTPS:
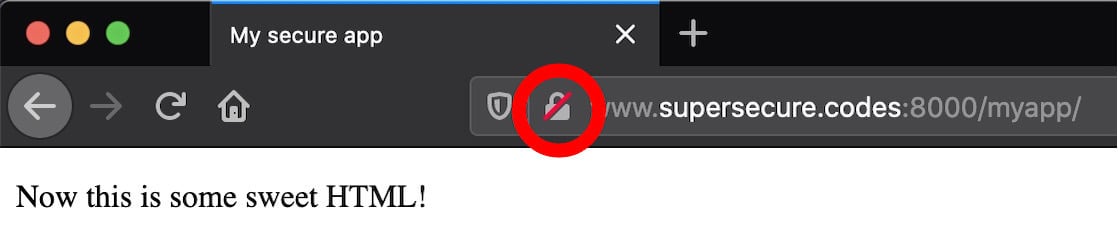
Going forward, you want to legitimize the operation. You could start serving over standard port 80 for HTTP. Better yet, start serving HTTPS (443) and redirect HTTP requests there. You’ll see how to progress through these steps soon.
Replacing WSGIServer With Gunicorn
Do you want to start moving your app towards a state where it’s ready for the outside world? If so, then you should replace Django’s built-in WSGIServer, which is the application server used by manage.py runserver, with a separate dedicated application server. But wait a minute: WSGIServer seemed to be working just fine. Why replace it?
To answer this question, you can read what the Django documentation has to say:
DO NOT USE THIS SERVER IN A PRODUCTION SETTING. It has not gone through security audits or performance tests. (And that’s how it’s gonna stay. We’re in the business of making Web frameworks, not Web servers, so improving this server to be able to handle a production environment is outside the scope of Django.) (Source)
Django is a web framework, not a web server, and its maintainers want to make that distinction clear. In this section, you’ll replace Django’s runserver command with Gunicorn. Gunicorn is first and foremost a Python WSGI app server, and a battle-tested one at that:
- It’s fast, optimized, and designed for production.
- It gives you more fine-grained control over the application server itself.
- It has more complete and configurable logging.
- It’s well-tested, specifically for its functionality as an application server.
You can install Gunicorn through pip into your virtual environment:
$ pwd
/home/ubuntu
$ source env/bin/activate
$ python -m pip install 'gunicorn==20.1.*'
Next, you need to do some level of configuration. The cool thing about a Gunicorn config file is that it just needs to be valid Python code, with variable names corresponding to arguments. You can store multiple Gunicorn configuration files within a project subdirectory:
$ cd ~/django-gunicorn-nginx
$ mkdir -pv config/gunicorn/
mkdir: created directory 'config'
mkdir: created directory 'config/gunicorn/'
Next, open a development configuration file, config/gunicorn/dev.py, and add the following:
"""Gunicorn *development* config file"""

# Django WSGI application path in pattern MODULE_NAME:VARIABLE_NAME
wsgi_app = "project.wsgi:application"
# The granularity of Error log outputs
loglevel = "debug"
# The number of worker processes for handling requests
workers = 2
# The socket to bind
bind = "0.0.0.0:8000"
# Restart workers when code changes (development only!)
reload = True
# Write access and error info to /var/log
accesslog = errorlog = "/var/log/gunicorn/dev.log"
# Redirect stdout/stderr to log file
capture_output = True
# PID file so you can easily fetch process ID
pidfile = "/var/run/gunicorn/dev.pid"
# Daemonize the Gunicorn process (detach & enter background)
daemon = True
Before starting Gunicorn, you should halt the runserver process. Use jobs to find it and kill to stop it:
$ jobs -l
[1]+ 26374 Running                 nohup python manage.py runserver &
$ kill 26374
[1]+  Done                    nohup python manage.py runserver
Next, make sure that log and PID directories exist for the values set in the Gunicorn configuration file above:
$ sudo mkdir -pv /var/{log,run}/gunicorn/
mkdir: created directory '/var/log/gunicorn/'
mkdir: created directory '/var/run/gunicorn/'
$ sudo chown -cR ubuntu:ubuntu /var/{log,run}/gunicorn/
changed ownership of '/var/log/gunicorn/' from root:root to ubuntu:ubuntu
changed ownership of '/var/run/gunicorn/' from root:root to ubuntu:ubuntu
With these commands, you’ve ensured that the necessary PID and log directories exist for Gunicorn and that they are writable by the ubuntu user.
With that out of the way, you can start Gunicorn using the -c flag to point to a configuration file from your project root:
$ pwd
/home/ubuntu/django-gunicorn-nginx
$ source .DJANGO_SECRET_KEY
$ gunicorn -c config/gunicorn/dev.py
This runs gunicorn in the background with the development configuration file dev.py that you specified above. Just as before, you can now monitor the output file to see the output logged by Gunicorn:
$ tail -f /var/log/gunicorn/dev.log
[2021-09-27 01:29:50 +0000] [49457] [INFO] Starting gunicorn 20.1.0
[2021-09-27 01:29:50 +0000] [49457] [DEBUG] Arbiter booted
[2021-09-27 01:29:50 +0000] [49457] [INFO] Listening at: http://0.0.0.0:8000 (49457)
[2021-09-27 01:29:50 +0000] [49457] [INFO] Using worker: sync
[2021-09-27 01:29:50 +0000] [49459] [INFO] Booting worker with pid: 49459
[2021-09-27 01:29:50 +0000] [49460] [INFO] Booting worker with pid: 49460
[2021-09-27 01:29:50 +0000] [49457] [DEBUG] 2 workers
Now visit your site’s URL again in a browser. You will still need the 8000 port:
http://www.supersecure.codes:8000/myapp/
Check your VM terminal again. You should see one or more lines like the following from Gunicorn’s log file:
67.xx.xx.xx - - [27/Sep/2021:01:30:46 +0000] "GET /myapp/ HTTP/1.1" 200 182
These lines are access logs that tell you about incoming requests:
| Component | Meaning |
|---|---|
67.xx.xx.xx |
User IP address |
27/Sep/2021:01:30:46 +0000 |
Timestamp of request |
GET |
Request method |
/myapp/ |
URL path |
HTTP/1.1 |
Protocol |
200 |
Response status code |
182 |
Response content length |
Excluded above for brevity is the user agent, which may also show up in your log. Here’s an example from a Firefox browser on macOS:
Mozilla/5.0 (Macintosh; Intel Mac OS X ...) Gecko/20100101 Firefox/92.0
With Gunicorn up and listening, it’s time to introduce a legitimate web server into the equation as well.
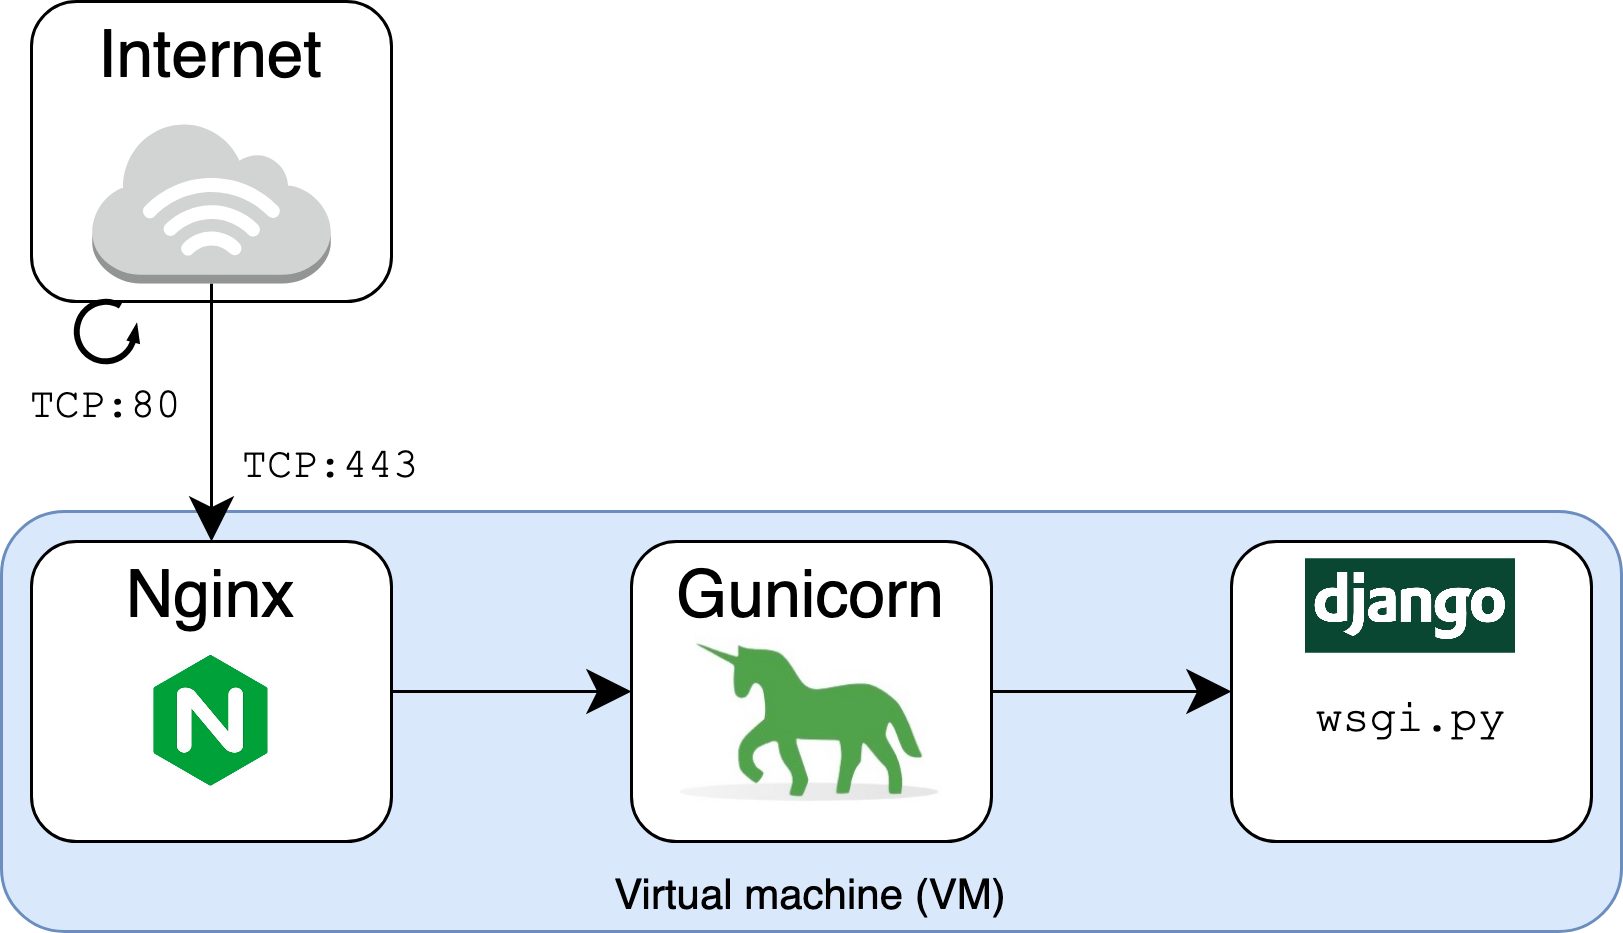
Incorporating Nginx
At this point, you’ve swapped out Django’s runserver command in favor of gunicorn as the application server. There’s one more player to add to the request chain: a web server like Nginx.
Hold up—you’ve already added Gunicorn! Why do you need to add something new into the picture? The reason for this is that Nginx and Gunicorn are two different things, and they coexist and work as a team.
Nginx defines itself as a high-performance web server and a reverse proxy server. It’s worth breaking this down because it helps explain Nginx’s relation to Gunicorn and Django.
Firstly, Nginx is a web server in that it can serve files to a web user or client. Files are literal documents: HTML, CSS, PNG, PDF—you name it. In the old days, before the advent of frameworks such as Django, it was common for a website to function essentially as a direct view into a file system. In the URL path, slashes represented directories on a limited part of the server’s file system that you could request to view.
Note the subtle difference in terminology:
-
Django is a web framework. It lets you build the core web application that powers the actual content on the site. It handles HTML rendering, authentication, administration, and backend logic.
-
Gunicorn is an application server. It translates HTTP requests into something Python can understand. Gunicorn implements the Web Server Gateway Interface (WSGI), which is a standard interface between web server software and web applications.
-
Nginx is a web server. It’s the public handler, more formally called the reverse proxy, for incoming requests and scales to thousands of simultaneous connections.
Part of Nginx’s role as a web server is that it can more efficiently serve static files. This means that, for requests for static content such as images, you can cut out the middleman that is Django and have Nginx render the files directly. We’ll get to this important step later in the tutorial.
Nginx is also a reverse proxy server in that it stands in between the outside world and your Gunicorn/Django application. In the same way that you might use a proxy to make outbound requests, you can use a proxy such as Nginx to receive them:
To get started using Nginx, install it and verify its version:
$ sudo apt-get install -y 'nginx=1.18.*'
$ nginx -v  # Display version info
nginx version: nginx/1.18.0 (Ubuntu)
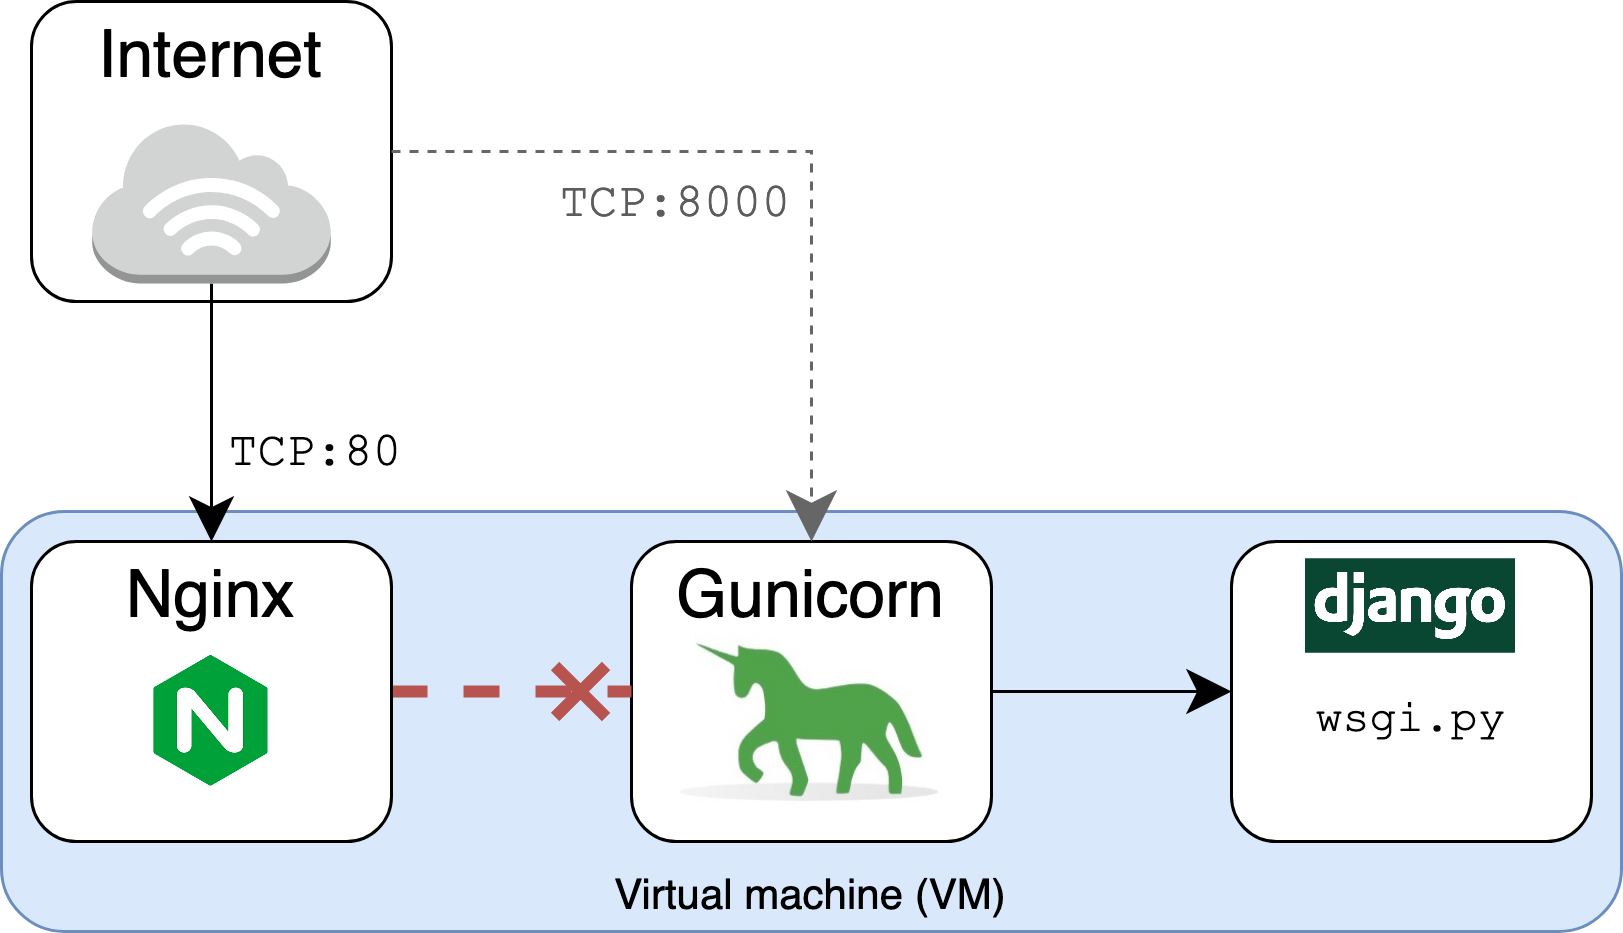
You should then change the inbound-allow rules that you’ve set for port 8000 to port 80. Replace the inbound rule for TCP:8000 with the following:
| Type | Protocol | Port Range | Source |
|---|---|---|---|
| HTTP | TCP | 80 | my-laptop-ip-address/32 |
Other rules, such as that for SSH access, should remain unchanged.
Now, start the nginx service and confirm that its status is running:
$ sudo systemctl start nginx
$ sudo systemctl status nginx
● nginx.service - A high performance web server and a reverse proxy server
   Loaded: loaded (/lib/systemd/system/nginx.service; enabled; ...
   Active: active (running) since Mon 2021-09-27 01:37:04 UTC; 2min 49s ago
...
Now you can make a request to a familiar-looking URL:
http://supersecure.codes/
That’s a big difference compared to what you had previously. You no longer need port 8000 in the URL. Instead, the port defaults to port 80, which looks a lot more normal:
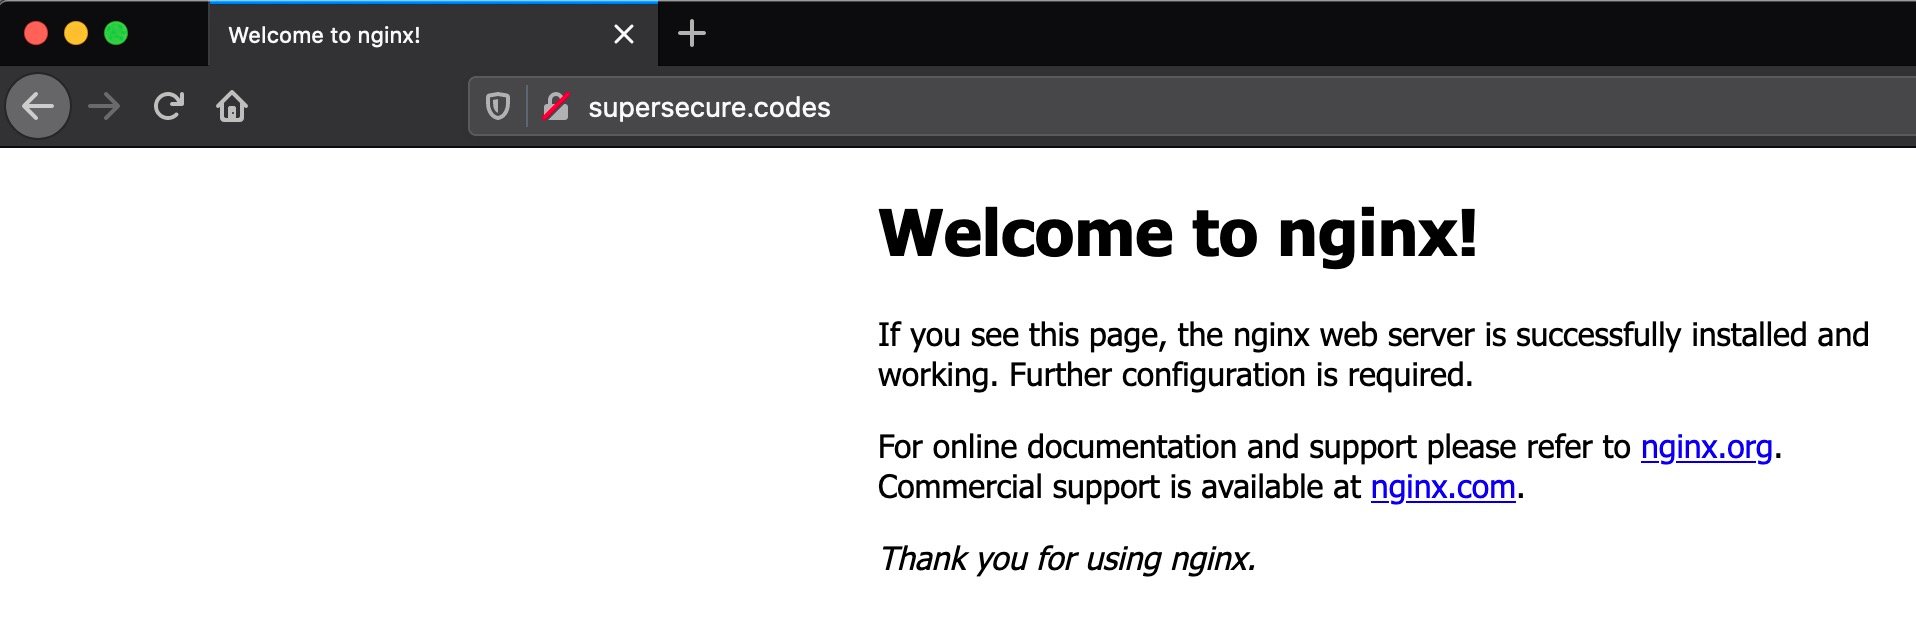
This is a friendly feature of Nginx. If you start Nginx with zero configuration, it serves a page to you indicating that it’s listening. Now try the /myapp page at the following URL:
http://supersecure.codes/myapp/
Remember to replace supersecure.codes with your own domain name.
You should see a 404 response, and that’s okay:
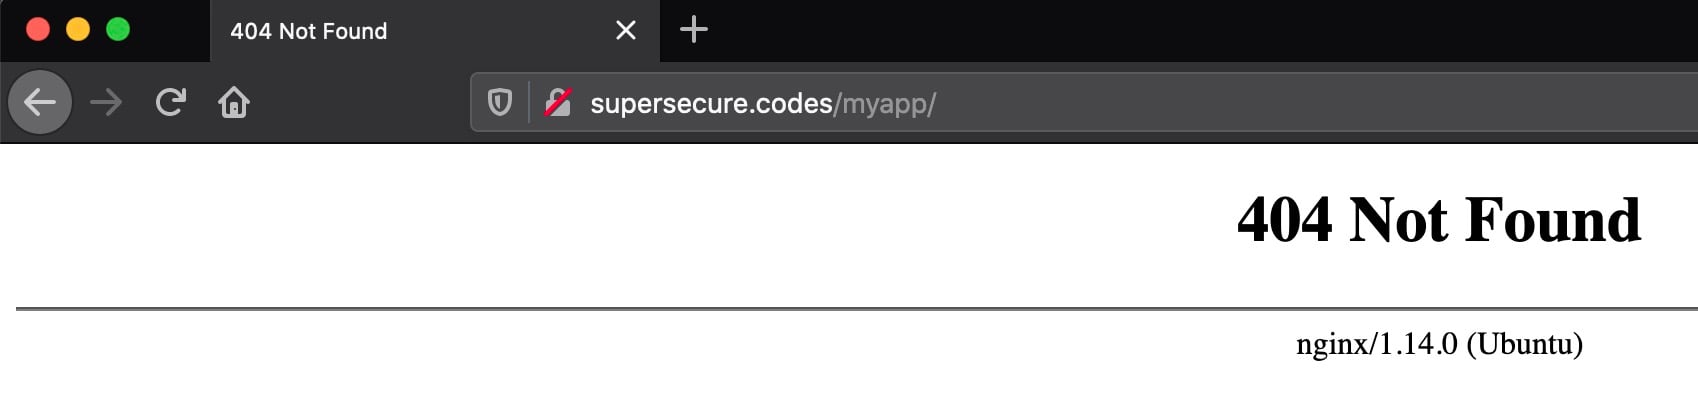
This is because you’re requesting the /myapp path over port 80, which is where Nginx, rather than Gunicorn, is listening. At this point, you have the following setup:
- Nginx is listening on port 80.
- Gunicorn is listening, separately, on port 8000.
There’s no connection or tie between the two until you specify it. Nginx doesn’t know that Gunicorn and Django have some sweet HTML that they want the world to see. That’s why it returns a 404 Not Found response. You haven’t yet set it up to proxy requests to Gunicorn and Django:
You need to give Nginx some bare-bones configuration to tell it to route requests to Gunicorn, which will then feed them to Django. Open /etc/nginx/sites-available/supersecure and add the following content:
server_tokens               off;
access_log                  /var/log/nginx/supersecure.access.log;
error_log                   /var/log/nginx/supersecure.error.log;

# This configuration will be changed to redirect to HTTPS later
server {
  server_name               .supersecure.codes;
  listen                    80;
  location / {
    proxy_pass              http://localhost:8000;
    proxy_set_header        Host $host;
  }
}
Remember that you need to replace supersecure in the file name with your site’s hostname, and make sure to replace the server_name value of .supersecure.codes with your own domain, prefixed by a dot.
Note: You will likely need sudo to open files under /etc.
This file is the “Hello World” of Nginx reverse proxy configuration. It tells Nginx how to behave:
- Listen on port 80 for requests that use a host for
supersecure.codesand its subdomains. - Pass those requests on to
http://localhost:8000, which is where Gunicorn is listening.
The proxy_set_header field is important. It ensures that Nginx passes through the Host HTTP request header sent by the end user on to Gunicorn and Django. Nginx would otherwise use Host: localhost by default, ignoring the Host header field sent by the end user’s browser.
You can validate your configuration file using nginx configtest:
$ sudo service nginx configtest /etc/nginx/sites-available/supersecure
 * Testing nginx configuration                                  [ OK ]
The [ OK ] output indicates that the configuration file is valid and can be parsed.
Now you need to symlink this file to the sites-enabled directory, replacing supersecure with your site domain:
$ cd /etc/nginx/sites-enabled
$ # Note: replace 'supersecure' with your domain
$ sudo ln -s ../sites-available/supersecure .
$ sudo systemctl restart nginx
Before making a request to your site with httpie, you’ll need to add one more inbound security rule. Add the following inbound rule:
| Type | Protocol | Port Range | Source |
|---|---|---|---|
| HTTP | TCP | 80 | vm-static-ip-address/32 |
This security rule allows inbound HTTP traffic from the public (elastic) IP address of the VM itself. That might seem like overkill at first, but you need to do it because requests will now be routed over the public Internet, meaning that the self-referential rule using the security group ID will no longer be enough.
Now that it’s using Nginx as a web server frontend, re-send a request to the site:
$ GET http://supersecure.codes/myapp/
HTTP/1.1 200 OK
Connection: keep-alive
Content-Encoding: gzip
Content-Type: text/html; charset=utf-8
Date: Mon, 27 Sep 2021 19:54:19 GMT
Referrer-Policy: same-origin
Server: nginx
Transfer-Encoding: chunked
X-Content-Type-Options: nosniff
X-Frame-Options: DENY

<!DOCTYPE html>
<html lang="en-US">
  <head>
    <meta charset="utf-8">
    <title>My secure app</title>
  </head>
  <body>
    <p>Now this is some sweet HTML!</p>
  </body>
</html>
Now that Nginx is sitting in front of Django and Gunicorn, there are a few interesting outputs here:
- Nginx now returns the
Serverheader asServer: nginx, indicating that Nginx is the new front-end web server. Settingserver_tokensto a value ofofftells Nginx not to emit its exact version, such asnginx/x.y.z (Ubuntu). From a security perspective, that would be disclosing unnecessary information. - Nginx uses
chunkedfor theTransfer-Encodingheader instead of advertisingContent-Length. - Nginx also asks to keep open the network connection with
Connection: keep-alive.
Next, you’ll leverage Nginx for one of its core features: the ability to serve static files quickly and efficiently.
Serving Static Files Directly With Nginx
You now have Nginx proxying requests on to your Django app. Importantly, you can also use Nginx to serve static files directly. If you have DEBUG = True in project/settings.py, then Django will render the files, but this is grossly inefficient and probably insecure. Instead, you can have your web server render them directly.
Common examples of static files include local JavaScript, images, and CSS—anything where Django isn’t really needed as part of the equation in order to dynamically render the response content.
To begin, from within your project’s directory, create a place to hold and track JavaScript static files in development:
$ pwd
/home/ubuntu/django-gunicorn-nginx
$ mkdir -p static/js
Now open a new file static/js/greenlight.js and add the following JavaScript:
// Enlarge the #changeme element in green when hovered over
(function () {
    "use strict";
    function enlarge() {
        document.getElementById("changeme").style.color = "green";
        document.getElementById("changeme").style.fontSize = "xx-large";
        return false;
    }
    document.getElementById("changeme").addEventListener("mouseover", enlarge);
}());
This JavaScript will make a block of text blow up in big green font if it’s hovered over. Yes, it’s some cutting-edge front-end work!
Next, add the following configuration to project/settings.py, updating STATIC_ROOT with your domain name:
STATIC_URL = "/static/"
# Note: Replace 'supersecure.codes' with your domain
STATIC_ROOT = "/var/www/supersecure.codes/static"
STATICFILES_DIRS = [BASE_DIR / "static"]
You’re telling Django’s collectstatic command where to search for and place the resulting static files that are aggregated from multiple Django apps, including Django’s own built-in apps, such as admin.
Last but not least, modify the HTML in myapp/templates/myapp/home.html to include the JavaScript that you just created:
<!DOCTYPE html>
<html lang="en-US">
  <head>
    <meta charset="utf-8">
    <title>My secure app</title>
  </head>
  <body>
    <p><span id="changeme">Now this is some sweet HTML!</span></p>
    <script src="/static/js/greenlight.js"></script>
  </body>
</html>
By including the /static/js/greenlight.js script, the <span id="changeme"> element will have an event listener attached to it.
Note: To keep this example straightforward, you’re hard-coding the URL path to greenlight.js instead of using Django’s static template tag. You’d want to take advantage of that feature in a larger project.
The next step is to create a directory path that will house your project’s static content for Nginx to serve:
$ sudo mkdir -pv /var/www/supersecure.codes/static/
mkdir: created directory '/var/www/supersecure.codes'
mkdir: created directory '/var/www/supersecure.codes/static/'
$ sudo chown -cR ubuntu:ubuntu /var/www/supersecure.codes/
changed ownership of '/var/www/supersecure.codes/static' ... to ubuntu:ubuntu
changed ownership of '/var/www/supersecure.codes/' ... to ubuntu:ubuntu
Now run collectstatic as your non-root user from within your project’s directory:
$ pwd
/home/ubuntu/django-gunicorn-nginx
$ python manage.py collectstatic
129 static files copied to '/var/www/supersecure.codes/static'.
Finally, add a location variable for /static in /etc/nginx/sites-available/supersecure, your site configuration file for Nginx:
server {
  location / {
    proxy_pass          http://localhost:8000;
    proxy_set_header    Host $host;
    proxy_set_header    X-Forwarded-Proto $scheme;
  }

  location /static {
    autoindex on;
    alias /var/www/supersecure.codes/static/;
  }
}
Remember that your domain probably isn’t supersecure.codes, so you’ll need to customize these steps to work for your own project.
You should now turn off DEBUG mode in your project in project/settings.py:
# project/settings.py
DEBUG = False
Gunicorn will pick up this change since you specified reload = True in config/gunicorn/dev.py.
Then restart Nginx:
$ sudo systemctl restart nginx
Now, refresh your site page again, and hover over the page text:
This is clear evidence that the JavaScript function enlarge() has kicked in. To get this result, the browser had to request /static/js/greenlight.js. The key here is that the browser got that file directly from Nginx without Nginx needing to ask Django for it.
Notice something different about the process above: nowhere did you add a new Django URL route or view for delivering the JavaScript file. That’s because, after running collectstatic, Django is no longer responsible for determining how to map the URL to a complex view and render that view. Nginx can just hand the file off directly to the browser.
In fact, if you navigate to your domain’s equivalent of https://supersecure.codes/static/js/, you’ll see a traditional file-system tree view of /static created by Nginx. This means faster and more efficient delivery of static files.
At this point, you’ve got a great foundation for a scalable site using Django, Gunicorn, and Nginx. One more giant leap forward is to enable HTTPS for your site, which you’ll do next.
Making Your Site Production-Ready With HTTPS
You can take your site’s security from good to great with a few more steps, including enabling HTTPS and adding a set of headers that help web browsers work with your site in a more secure fashion. Enabling HTTPS increases the trustworthiness of your site, and it’s a necessity if your site uses authentication or exchanges sensitive data with users.
Turning on HTTPS
To allow visitors to access your site over HTTPS, you’ll need an SSL/TLS certificate that sits on your web server. Certificates are issued by a Certificate Authority (CA). In this tutorial, you’ll use a free CA called Let’s Encrypt. To actually install the certificate, you can use the Certbot client, which gives you an utterly painless step-by-step series of prompts.
Before starting with Certbot, you can tell Nginx up front to disable TLS version 1.0 and 1.1 in favor of versions 1.2 and 1.3. TLS 1.0 is end-of-life (EOL), while TLS 1.1 contained several vulnerabilities that were fixed by TLS 1.2. To do this, open the file /etc/nginx/nginx.conf. Find the following line:
# File: /etc/nginx/nginx.conf
ssl_protocols TLSv1 TLSv1.1 TLSv1.2;
Replace it with the more recent implementations:
# File: /etc/nginx/nginx.conf
ssl_protocols TLSv1.2 TLSv1.3;
You can use nginx -t to confirm that your Nginx supports version 1.3:
$ sudo nginx -t
nginx: the configuration file /etc/nginx/nginx.conf syntax is ok
nginx: configuration file /etc/nginx/nginx.conf test is successful
Now you’re ready to install and use Certbot. On Ubuntu Focal (20.04), you can use snap to install Certbot:
$ sudo snap install --classic certbot
$ sudo ln -s /snap/bin/certbot /usr/bin/certbot
Consult Certbot’s instructions guide to see installation steps for different operating systems and web servers.
Before you can obtain and install HTTPS certificates with certbot, there’s another change you need to make to your VM’s security group rules. Because Let’s Encrypt requires an Internet connection for validation purposes, you’ll need to take the important step of opening up your site to the public Internet.
Modify your inbound security rules to align with the following:
| Reference | Type | Protocol | Port Range | Source |
|---|---|---|---|---|
| 1 | HTTP | TCP | 80 | 0.0.0.0/0 |
| 2 | Custom | All | All | security-group-id |
| 3 | SSH | TCP | 22 | my-laptop-ip-address/32 |
The key change here is the first rule, which allows HTTP traffic over port 80 from all sources. You can remove the inbound rule for TCP:80 that whitelisted your VM’s public IP address since that’s now redundant. The other two rules remain unchanged.
You can then issue one more command, certbot, to install the certificate:
$ sudo certbot --nginx --rsa-key-size 4096 --no-redirect
Saving debug log to /var/log/letsencrypt/letsencrypt.log
...
This creates a certificate with an RSA key size of 4096 bytes. The --no-redirect option tells certbot to not automatically apply configuration related to an automatic HTTP to HTTPS redirect. For illustration purposes, you’ll see how to add this yourself soon.
You’ll go through a series of setup steps, most of which should be self-explanatory, such as entering your email address. When prompted to enter your domain names, enter the domain and the www subdomain separated by a comma:
www.supersecure.codes,supersecure.codes
Once you’ve walked through the steps, you should see a success message like the following:
Successfully received certificate.
Certificate is saved at: /etc/letsencrypt/live/supersecure.codes/fullchain.pem
Key is saved at:         /etc/letsencrypt/live/supersecure.codes/privkey.pem
This certificate expires on 2021-12-26.
These files will be updated when the certificate renews.
Certbot has set up a scheduled task to automatically renew this
  certificate in the background.

Deploying certificate
Successfully deployed certificate for supersecure.codes
  to /etc/nginx/sites-enabled/supersecure
Successfully deployed certificate for www.supersecure.codes
  to /etc/nginx/sites-enabled/supersecure
Congratulations! You have successfully enabled HTTPS
  on https://supersecure.codes and https://www.supersecure.codes
If you cat out the configuration file at your equivalent of /etc/nginx/sites-available/supersecure, you’ll see that certbot has automatically added a group of lines related to SSL:
# Nginx configuration: /etc/nginx/sites-available/supersecure
server {
  server_name               .supersecure.codes;
  listen                    80;
  location / {
    proxy_pass              http://localhost:8000;
    proxy_set_header        Host $host;
  }

  location /static {
    autoindex on;
    alias /var/www/supersecure.codes/static/;
  }

  listen 443 ssl;
  ssl_certificate /etc/letsencrypt/live/www.supersecure.codes/fullchain.pem;
  ssl_certificate_key /etc/letsencrypt/live/www.supersecure.codes/privkey.pem;
  include /etc/letsencrypt/options-ssl-nginx.conf;
  ssl_dhparam /etc/letsencrypt/ssl-dhparams.pem;
}
Make sure that Nginx picks up those changes:
$ sudo systemctl reload nginx
To access your site over HTTPS, you’ll need one final security rule addition. You need to allow traffic over TCP:443, where 443 is the default port for HTTPS. Modify your inbound security rules to align with the following:
| Reference | Type | Protocol | Port Range | Source |
|---|---|---|---|---|
| 1 | HTTPS | TCP | 443 | 0.0.0.0/0 |
| 2 | HTTP | TCP | 80 | 0.0.0.0/0 |
| 2 | Custom | All | All | security-group-id |
| 3 | SSH | TCP | 22 | my-laptop-ip-address/32 |
Each of these rules has a specific purpose:
- Rule 1 allows HTTPS traffic over port 443 from all sources.
- Rule 2 allows HTTP traffic over port 80 from all sources.
- Rule 3 allows inbound traffic from network interfaces and instances that are assigned to the same security group, using the security group ID as the source. This is a rule included in the default AWS security group that you should tie to your instance.
- Rule 4 allows you to access your VM via SSH from your personal computer.
Now, re-navigate to your site in a browser, but with one key difference. Rather than http, specify https as the protocol:
https://www.supersecure.codes/myapp/
If all is well, you should see one of life’s beautiful treasures, which is your site being delivered over HTTPS:
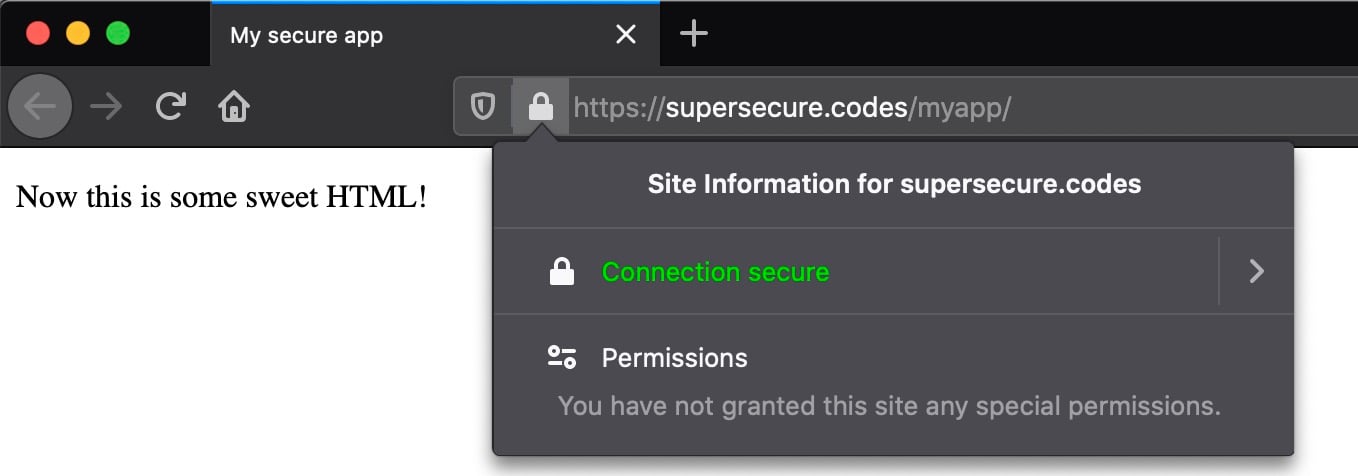
If you’re using Firefox and you click on the lock icon, you can view more detailed information about the certificate involved in securing the connection:
You’re one step closer to a secure website. At this point, the site is still accessible over HTTP as well as HTTPS. That’s better than before, but still not ideal.
Redirecting HTTP to HTTPS
Your site is now accessible over both HTTP and HTTPS. With HTTPS working, you can just about turn off HTTP—or at least come close to it in practice. You can add several features to automatically route any visitors attempting to access your site over HTTP to the HTTPS version. Edit your equivalent of /etc/nginx/sites-available/supersecure:
# Nginx configuration: /etc/nginx/sites-available/supersecure
server {
  server_name               .supersecure.codes;
  listen                    80;
  return                    307 https://$host$request_uri;
}

server {
  location / {
    proxy_pass              http://localhost:8000;
    proxy_set_header        Host $host;
  }

  location /static {
    autoindex on;
    alias /var/www/supersecure.codes/static/;
  }

  listen 443 ssl;
  ssl_certificate /etc/letsencrypt/live/www.supersecure.codes/fullchain.pem;
  ssl_certificate_key /etc/letsencrypt/live/www.supersecure.codes/privkey.pem;
  include /etc/letsencrypt/options-ssl-nginx.conf;
  ssl_dhparam /etc/letsencrypt/ssl-dhparams.pem;
}
The added block tells the server to redirect the browser or client to the HTTPS version of any HTTP URL. You can verify that this configuration is valid:
$ sudo service nginx configtest /etc/nginx/sites-available/supersecure
 * Testing nginx configuration                                  [ OK ]
Then, tell nginx to reload the configuration:
$ sudo systemctl reload nginx
Then send a GET request with the --all flag to your app’s HTTP URL to display any redirect chains:
$ GET --all http://supersecure.codes/myapp/
HTTP/1.1 307 Temporary Redirect
Connection: keep-alive
Content-Length: 164
Content-Type: text/html
Date: Tue, 28 Sep 2021 02:16:30 GMT
Location: https://supersecure.codes/myapp/
Server: nginx

<html>
<head><title>307 Temporary Redirect</title></head>
<body bgcolor="white">
<center><h1>307 Temporary Redirect</h1></center>
<hr><center>nginx</center>
</body>
</html>

HTTP/1.1 200 OK
Connection: keep-alive
Content-Encoding: gzip
Content-Type: text/html; charset=utf-8
Date: Tue, 28 Sep 2021 02:16:30 GMT
Referrer-Policy: same-origin
Server: nginx
Transfer-Encoding: chunked
X-Content-Type-Options: nosniff
X-Frame-Options: DENY

<!DOCTYPE html>
<html lang="en-US">
  <head>
    <meta charset="utf-8">
    <title>My secure app</title>
  </head>
  <body>
    <p><span id="changeme">Now this is some sweet HTML!</span></p>
    <script src="/static/js/greenlight.js"></script>
  </body>
</html>
You can see that there are actually two responses here:
- The initial request receives a 307 status code response redirecting to the HTTPS version.
- The second request is made to the same URI but with an HTTPS scheme rather than HTTP. This time, it receives the page content that it was looking for with a
200 OKresponse.
Next, you’ll see how to go one step beyond the redirect configuration by helping browsers remember that choice.
Taking It One Step Further With HSTS
There’s a small vulnerability in this redirect setup when used in isolation:
When a user enters a web domain manually (providing the domain name without the http:// or https:// prefix) or follows a plain http:// link, the first request to the website is sent unencrypted, using plain HTTP.
Most secured websites immediately send back a redirect to upgrade the user to an HTTPS connection, but a well‑placed attacker can mount a man‑in‑the‑middle (MITM) attack to intercept the initial HTTP request and can control the user’s session from then on. (Source)
To alleviate this, you can add an HSTS policy to tell browsers to prefer HTTPS even if the user tries to use HTTP. Here’s the subtle difference between using a redirect only in comparison with adding an HSTS header alongside it:
-
With a plain redirect from HTTP to HTTPS, the server is answering the browser by saying, “Try that again, but with HTTPS.” If the browser makes 1,000 HTTP requests, it will be told 1,000 times to retry with HTTPS.
-
With the HSTS header, the browser does the up-front work of effectively replacing HTTP with HTTPS after the first request. There is no redirect. In this second scenario, you can think of the browser as upgrading the connection. When a user asks their browser to visit the HTTP version of your site, their browser will respond curtly, “Nope, I’m taking you to the HTTPS version.”
To remedy this, you can tell Django to set the Strict-Transport-Security header. Add these lines to your project’s settings.py:
# Add to project/settings.py
SECURE_HSTS_SECONDS = 30  # Unit is seconds; *USE A SMALL VALUE FOR TESTING!*
SECURE_HSTS_PRELOAD = True
SECURE_HSTS_INCLUDE_SUBDOMAINS = True
SECURE_PROXY_SSL_HEADER = ("HTTP_X_FORWARDED_PROTO", "https")
Take note that the SECURE_HSTS_SECONDS value is short-lived at 30 seconds. That is deliberate in this example. When you move to real production, you should increase this value. The Security Headers website recommends a minimum value of 2,592,000, equal to 30 days.
Warning: Before you increase the value of SECURE_HSTS_SECONDS, read Django’s explanation of HTTP strict transport security. Before you set the HSTS time window to a big value, you should first be sure that HTTPS is working for your site. After seeing the header, browsers will not easily let you reverse that decision and will insist on HTTPS over HTTP.
Some browsers such as Chrome may let you override this behavior and edit HSTS policy lists, but you shouldn’t depend on that trick. It wouldn’t be a very smooth experience for a user. Instead, keep a small value for SECURE_HSTS_SECONDS until you’re confident your site has not had any regressions being served over HTTPS.
When you’re ready to take the plunge, you’ll need to add one more line of Nginx configuration. Edit your equivalent of /etc/nginx/sites-available/supersecure to add a proxy_set_header directive:
  location / {
    proxy_pass          http://localhost:8000;
    proxy_set_header    Host $host;
    proxy_set_header    X-Forwarded-Proto $scheme;
  }
Then tell Nginx to reload the updated configuration:
$ sudo systemctl reload nginx
The effect of this added proxy_set_header is for Nginx to send Django the following header included in intermediary requests that are originally sent to the web server through HTTPS on port 443:
X-Forwarded-Proto: https
This directly hooks in to the SECURE_PROXY_SSL_HEADER value that you added above in project/settings.py. This is needed because Nginx actually sends plain HTTP requests to Gunicorn/Django, so Django has no other way of knowing if the original request was HTTPS. Since the location block from the Nginx configuration file above is for port 443 (HTTPS), all requests coming through this port should let Django know that they are indeed HTTPS.
The Django documentation explains this quite well:
If your Django app is behind a proxy, though, the proxy may be “swallowing” whether the original request uses HTTPS or not. If there is a non-HTTPS connection between the proxy and Django then
is_secure()would always returnFalse—even for requests that were made via HTTPS by the end user. In contrast, if there is an HTTPS connection between the proxy and Django thenis_secure()would always returnTrue—even for requests that were made originally via HTTP. (Source)
How can you test that this header is working? Here’s an elegant way that lets you stay within your browser:
-
In your browser, open the developer tools. Navigate to the tab that shows network activity. In Firefox, this is Right Click → Inspect Element → Network.
-
Refresh the page. You should at first see a
307 Temporary Redirectresponse as part of the response chain. This is the first time that your browser is seeing theStrict-Transport-Securityheader. -
Change the URL in your browser back to the HTTP version, and request the page again. If you’re in Chrome, you should now see a
307 Internal Redirect. In Firefox, you should see a200 OKresponse because your browser automatically went straight to an HTTPS request even when you tried to tell it to use HTTP. While browsers display them differently, both of these responses show that the browser has performed an automatic redirect.
If you’re following along with Firefox, you should see something like the following:
Lastly, you can also verify the header’s presence with a request from the console:
$ GET -ph https://supersecure.codes/myapp/
...
Strict-Transport-Security: max-age=30; includeSubDomains; preload
This is evidence that you’ve effectively set the Strict-Transport-Security header using the corresponding values in project/settings.py. Once you’re ready, you can increase the max-age value, but remember that this will irreversibly tell a browser to upgrade HTTP for that length of time.
Setting the Referrer-Policy Header
Django 3.x also added the ability to control the Referrer-Policy header. You can specify SECURE_REFERRER_POLICY in project/settings.py:
# Add to project/settings.py
SECURE_REFERRER_POLICY = "strict-origin-when-cross-origin"
How does this setting work? When you follow a link from page A to page B, your request to page B contains the URL of page A under the header Referer. A server that sets the Referrer-Policy header, which you can set in Django through SECURE_REFERRER_POLICY, controls when and how much information is forwarded on to the target site. SECURE_REFERRER_POLICY can take a number of recognized values, which you can read about in detail in the Mozilla docs.
As an example, if you use "strict-origin-when-cross-origin" and a user’s current page is https://example.com/page, the Referer header is constrained in the following ways:
| Target Site | Referer Header |
|---|---|
| https://example.com/otherpage | https://example.com/page |
| https://mozilla.org | https://example.com/ |
| http://example.org (HTTP target) | [None] |
Here’s what happens case by case, assuming the current user’s page is https://example.com/page:
- If the user follows a link to
https://example.com/otherpage,Refererwill include the full path of the current page. - If the user follows a link to the separate domain of
https://mozilla.org,Refererwill exclude the path of the current page. - If the user follows a link to
http://example.orgwith anhttp://protocol,Refererwill be blank.
If you add this line to project/settings.py and re-request your app’s homepage, then you’ll see a new entrant:
$ GET -ph https://supersecure.codes/myapp/  # -ph: Show response headers only
HTTP/1.1 200 OK
Connection: keep-alive
Content-Encoding: gzip
Content-Type: text/html; charset=utf-8
Date: Tue, 28 Sep 2021 02:31:36 GMT
Referrer-Policy: strict-origin-when-cross-origin
Server: nginx
Strict-Transport-Security: max-age=30; includeSubDomains; preload
Transfer-Encoding: chunked
X-Content-Type-Options: nosniff
X-Frame-Options: DENY
In this section, you’ve taken yet another step towards protecting the privacy of your users. Next, you’ll see how to lock down your site’s vulnerability to cross-site scripting (XSS) and data injection attacks.
Adding a Content-Security-Policy (CSP) Header
One more crucial HTTP response header that you can add to your site is the Content-Security-Policy (CSP) header, which helps to prevent cross-site scripting (XSS) and data injection attacks. Django does not support this natively, but you can install django-csp, a small middleware extension developed by Mozilla:
$ python -m pip install django-csp
To turn on the header with its default value, add this single line to project/settings.py under the existing MIDDLEWARE definition:
# project/settings.py
MIDDLEWARE += ["csp.middleware.CSPMiddleware"]
How can you put this to the test? Well, you can include a link in one of your HTML pages and see if the browser will allow it to load with the rest of the page.
Edit the template at myapp/templates/myapp/home.html to include a link to a Normalize.css file, which is a CSS file that helps browsers render all elements more consistently and in line with modern standards:
<!DOCTYPE html>
<html lang="en-US">
  <head>
    <meta charset="utf-8">
    <title>My secure app</title>
    <link rel="stylesheet"
      href="https://cdn.jsdelivr.net/npm/normalize.css@8.0.1/normalize.css"
    >
  </head>
  <body>
    <p><span id="changeme">Now this is some sweet HTML!</span></p>
    <script src="/static/js/greenlight.js"></script>
  </body>
</html>
Now, request the page in a browser with the developer tools enabled. You’ll see an error like the following in the console:
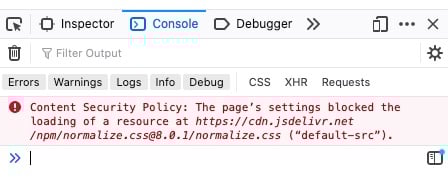
Uh-oh. You’re missing out on the power of normalization because your browser won’t load normalize.css. Here’s why it won’t load:
- Your
project/settings.pyincludesCSPMiddlewarein Django’sMIDDLEWARE. IncludingCSPMiddlewaresets the header to the defaultContent-Security-Policyvalue, which isdefault-src 'self', where'self'means your site’s own domain. In this tutorial, that’ssupersecure.codes. - Your browser obeys this rule and forbids
cdn.jsdelivr.netfrom loading. CSP is a default deny policy.
You must opt in and explicitly allow the client’s browser to load certain links embedded in responses from your site. To fix this, add the following setting to project/settings.py:
# project/settings.py
# Allow browsers to load normalize.css from cdn.jsdelivr.net
CSP_STYLE_SRC = ["'self'", "cdn.jsdelivr.net"]
Next, try requesting your site’s page again:
$ GET -ph https://supersecure.codes/myapp/
HTTP/1.1 200 OK
Connection: keep-alive
Content-Encoding: gzip
Content-Security-Policy: default-src 'self'; style-src 'self' cdn.jsdelivr.net
Content-Type: text/html; charset=utf-8
Date: Tue, 28 Sep 2021 02:37:19 GMT
Referrer-Policy: strict-origin-when-cross-origin
Server: nginx
Strict-Transport-Security: max-age=30; includeSubDomains; preload
Transfer-Encoding: chunked
X-Content-Type-Options: nosniff
X-Frame-Options: DENY
Note that style-src specifies 'self' cdn.jsdelivr.net as part of the value for the Content-Security-Policy header. This means that the browser should permit style sheets from only two domains:
supersecure.codes('self')cdn.jsdelivr.net
The style-src directive is one of many directives that can be part of Content-Security-Policy. There are many others, such as img-src, which specifies valid sources of images and favicons, and script-src, which defines valid sources for JavaScript.
Each of these has a corresponding setting for django-csp. For example, img-src and script-src are set by CSP_IMG_SRC and CSP_SCRIPT_SRC, respectively. You can check out the django-csp docs for the complete list.
Here’s a final tip on the CSP header: Set it early! When things break later on, it’s easier to pinpoint why, as you can more readily isolate the feature or link you’ve added that isn’t loading because you don’t have the corresponding CSP directive up to date.
Final Steps for Production Deployments
Now you’ll go through a few last steps that you can take as you get set to deploy your app.
First, make sure that you’ve set DEBUG = False in your project’s settings.py if you haven’t done so already. This ensures that server-side debugging information isn’t leaked in the case of a 5xx server-side error.
Second, edit SECURE_HSTS_SECONDS in your project’s settings.py to increase the expiration time for the Strict-Transport-Security header from 30 seconds to the recommended 30 days, which is equivalent to 2,592,000 seconds:
# Add to project/settings.py
SECURE_HSTS_SECONDS = 2_592_000  # 30 days
Next, restart Gunicorn with a production configuration file. Add the following contents to config/gunicorn/prod.py:
"""Gunicorn *production* config file"""

import multiprocessing

# Django WSGI application path in pattern MODULE_NAME:VARIABLE_NAME
wsgi_app = "project.wsgi:application"
# The number of worker processes for handling requests
workers = multiprocessing.cpu_count() * 2 + 1
# The socket to bind
bind = "0.0.0.0:8000"
# Write access and error info to /var/log
accesslog = "/var/log/gunicorn/access.log"
errorlog = "/var/log/gunicorn/error.log"
# Redirect stdout/stderr to log file
capture_output = True
# PID file so you can easily fetch process ID
pidfile = "/var/run/gunicorn/prod.pid"
# Daemonize the Gunicorn process (detach & enter background)
daemon = True
Here, you’ve made a few changes:
- You turned off the
reloadfeature used in development. - You made the number of workers a function of the VM’s CPU count instead of hard-coding it.
- You allowed
loglevelto default to"info"rather than the more verbose"debug".
Now you can stop the current Gunicorn process and start a new one, replacing the development configuration file with its production counterpart:
$ # Stop existing Gunicorn dev server if it is running
$ sudo killall gunicorn

$ # Restart Gunicorn with production config file
$ gunicorn -c config/gunicorn/prod.py
After making this change, you don’t need to restart Nginx since it’s just passing off requests to the same address:host and there shouldn’t be any visible changes. However, running Gunicorn with production-oriented settings is healthier in the long run as the app scales up.
Finally, make sure that you’ve fully built out your Nginx file. Here’s the file in full, including all the components you’ve added so far, as well as a few extra values:
# File: /etc/nginx/sites-available/supersecure
# This file inherits from the http directive of /etc/nginx/nginx.conf

# Disable emitting nginx version in the "Server" response header field
server_tokens             off;

# Use site-specific access and error logs
access_log                /var/log/nginx/supersecure.access.log;
error_log                 /var/log/nginx/supersecure.error.log;

# Return 444 status code & close connection if no Host header present
server {
  listen                  80 default_server;
  return                  444;
}

# Redirect HTTP to HTTPS
server {
  server_name             .supersecure.codes;
  listen                  80;
  return                  307 https://$host$request_uri;
}

server {

  # Pass on requests to Gunicorn listening at http://localhost:8000
  location / {
    proxy_pass            http://localhost:8000;
    proxy_set_header      Host $host;
    proxy_set_header      X-Forwarded-Proto $scheme;
    proxy_set_header      X-Forwarded-For $proxy_add_x_forwarded_for;
    proxy_redirect        off;
  }

  # Serve static files directly
  location /static {
    autoindex             on;
    alias                 /var/www/supersecure.codes/static/;
  }

  listen 443 ssl;
  ssl_certificate /etc/letsencrypt/live/www.supersecure.codes/fullchain.pem;
  ssl_certificate_key /etc/letsencrypt/live/www.supersecure.codes/privkey.pem;
  include /etc/letsencrypt/options-ssl-nginx.conf;
  ssl_dhparam /etc/letsencrypt/ssl-dhparams.pem;
}
As a refresher, the inbound security rules tied to your VM should have a certain setup:
| Type | Protocol | Port Range | Source |
|---|---|---|---|
| HTTPS | TCP | 443 | 0.0.0.0/0 |
| HTTP | TCP | 80 | 0.0.0.0/0 |
| Custom | All | All | security-group-id |
| SSH | TCP | 22 | my-laptop-ip-address/32 |
Bringing that all together, your final AWS security rule set consists of four inbound rules and one outbound rule:
Compare the above to your initial security rule set. Take note that you’ve dropped access over TCP:8000, where the development version of the Django app was served, and opened up access to the Internet over HTTP and HTTPS on ports 80 and 443, respectively.
Your site is now ready for showtime:
Now that you’ve put all of the components together, your application is accessible through Nginx over HTTPS on port 443. HTTP requests on port 80 are redirected to HTTPS. The Django and Gunicorn components themselves are not exposed to the public Internet but rather sit behind the Nginx reverse proxy.
Testing Your Site’s HTTPS Security
Your site is now significantly more secure than when you started this tutorial, but don’t take my word for it. There are several tools that will give you an objective rating of security-related features of your site, focusing on response headers and HTTPS.
The first is the Security Headers app, which gives a grade rating to the quality of HTTP response headers coming back from your site. If you’ve been following along, your site should be ready to score an A rating or better there.
The second is SSL Labs, which will perform a deep analysis of your web server’s configuration as it relates to SSL/TLS. Enter the domain of your site, and SSL Labs will return a grade based on the strength of a variety of factors related to SSL/TLS. If you called certbot with --rsa-key-size 4096 and turned off TLS 1.0 and 1.1 in favor of 1.2 and 1.3, you should be set up nicely to receive an A+ rating from SSL Labs.
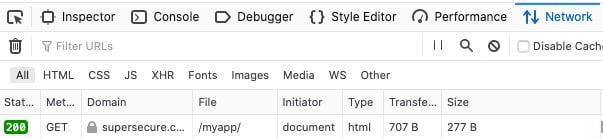
As a check, you can also request your site’s HTTPS URL from the command line to see a full overview of changes that you’ve added throughout this tutorial:
$ GET https://supersecure.codes/myapp/
HTTP/1.1 200 OK
Connection: keep-alive
Content-Encoding: gzip
Content-Security-Policy: style-src 'self' cdn.jsdelivr.net; default-src 'self'
Content-Type: text/html; charset=utf-8
Date: Tue, 28 Sep 2021 02:37:19 GMT
Referrer-Policy: no-referrer-when-downgrade
Server: nginx
Strict-Transport-Security: max-age=2592000; includeSubDomains; preload
Transfer-Encoding: chunked
X-Content-Type-Options: nosniff
X-Frame-Options: DENY

<!DOCTYPE html>
<html lang="en-US">
  <head>
    <meta charset="utf-8">
    <title>My secure app</title>
    <link rel="stylesheet"
      href="https://cdn.jsdelivr.net/npm/normalize.css@8.0.1/normalize.css"
    >
  </head>
  <body>
    <p><span id="changeme">Now this is some sweet HTML!</span></p>
    <script src="/static/js/greenlight.js"></script>
  </body>
</html>
That’s some sweet HTML, indeed.
Conclusion
If you’ve followed along with this tutorial, your site has made bounds of progress from its previous self as a fledging standalone development Django application. You’ve seen how Django, Gunicorn, and Nginx can come together to help you securely serve your site.
In this tutorial, you’ve learned how to:
- Take your Django app from development to production
- Host your app on a real-world public domain
- Introduce Gunicorn and Nginx into the request and response chain
- Work with HTTP headers to increase your site’s HTTPS security
You now have a reproducible set of steps for deploying your production-ready Django web application.
You can download the Django project used in this tutorial by following the link below:
Get Source Code: Click here to get the companion Django project used in this tutorial.
Further Reading
With site security, it’s a reality that you’re never 100% of the way there. There are always more features that you can add to secure your site further and produce better logging info.
Check out the following links for additional steps that you can take on your own:
- Django: Deployment Checklist
- Mozilla: Web Security
- Gunicorn: Deploying Gunicorn
- Nginx: Using the
Forwardedheader - Adam Johnson: How to Score A+ for Security Headers on Your Django Website
Watch Now This tutorial has a related video course created by the Real Python team. Watch it together with the written tutorial to deepen your understanding: Deploy a Django App With Gunicorn and Nginx


