


With the technology advancements, new application development frameworks are emerging to meet the ever increasing demand for the business needs. All these advancements focus on releasing the fully finished applications to the end user quickly, with quality and being able to adapt the new requirement changes as they come.
With the Native frameworks for Android and iOS like ReactNative, Ionic, Xamarin, Swift, etc. already topping the market charts, Flutter is the latest addition to the frameworks that helps in building cross platform applications.
And with the new frameworks comes the added responsibility of testing the applications as well. Without testing we cannot be sure if the application works as expected.
In this blog we will checking out the following points:
What is Flutter?
Flutter is an open source cross platform framework by Google that provides support for building beautiful multi-platform applications that can be natively compiled from a single codebase.
It was launched in May 2017, and since then it has proved to be a great cross platform framework and tool that can be used to develop high quality applications that look like native Android and iOS apps.
Flutter has 156K Stars on GitHub, 113K followers on reddit and 238.7K followers over Twitter. Flutter has proven itself a convenient toolkit that is easy for creating animations and high quality UI components.
Flutter stands in the top 4 app development frameworks available today. The increase in the popularity of Flutter over the years can be seen in the graph below –

What are Native applications?
Native applications are written to work on a specific device platform. The two main mobile Operating Systems are iOS and Android. For developing native Android applications languages like Kotlin, Java are used and for iOS platforms, languages like Swift and Objective-C are used.
Native applications can be installed on the mobile devices using major app stores such as Google Play for Android and App Store for iOS. With native applications users can take advantage of its features such as an accelerometer, camera and GPS.
Testing Native v/s Flutter applications
When it comes to testing, Android has the Espresso framework for testing its native application. Likewise, the XCTest framework can be used to test iOS applications.
Over and above these two respective frameworks, we have various other mobile test automation frameworks like Appium and WebDriverIO that can be used to test thoroughly. Recently, Appium released a version 2.0 with more rich and advanced features making it a more robust framework to work on. All these testing tools help in making mobile testing easier.
With Flutter SDK, flutter_driver comes pre installed in the package. This can be used to write the tests for Flutter application. However, the major problem is that the test engineer should know Dart programming language in order to write tests using flutter_driver.
As using flutter_driver is tedious and an additional language exposure is necessary, hence, to overcome this problem, the Appium Community has developed a driver called Appium Flutter Driver that has opened new ways to automate the Flutter mobile application.
The additional tedious task for automating flutter applications is that we can not locate the selectors using Appium Inspector tool. We would need access to the Flutter application’s code base. Next, we need to start the Flutter Inspector to locate the elements. We would also need to ask the developers to add the respective locators so that it could be used in the tests for easily interacting with the mobile elements.
The following is a summarized list that shows the difference between testing the Native and Flutter applications:
| Criteria | Native Application | Flutter Application |
| Programming Language | Java, Kotlin, Swift and Objective-C | Dart |
| Driver used for Android app automation | Appium UiAutomator2 driver. | Appium Flutter driver |
| Driver used for iOS app automation | Appium xcuitest driver | Appium Flutter driver |
| Unit Testing Frameworks | Espresso for Android and XCTest for iOS | flutter_driver |
| Inspecting elements | Appium Inspector | Flutter Inspector |
| Locator Strategies | For Android we can use
For iOS we can use
| Using Appium Flutter Finder, following can be used:
|
| Access to Code base | Not required | Required for using Flutter Inspector |
Having understood the difference between Native and Flutter app testing, let’s now delve into the testing part and understand how to perform testing of flutter applications.
Getting Started with Flutter
As we learnt in the earlier section of this blog, we need to have access to the code base of the Flutter application. It is needed for running the Flutter Inspector as the Appium Inspector tool is incapable of locating the Flutter application’s mobile elements.
We need to take care of the following steps in order to run Flutter successfully on local machine
Download and Install Flutter SDK
Flutter SDK needs to be downloaded and installed on respective platforms like macOS, Windows, etc. using its official website.
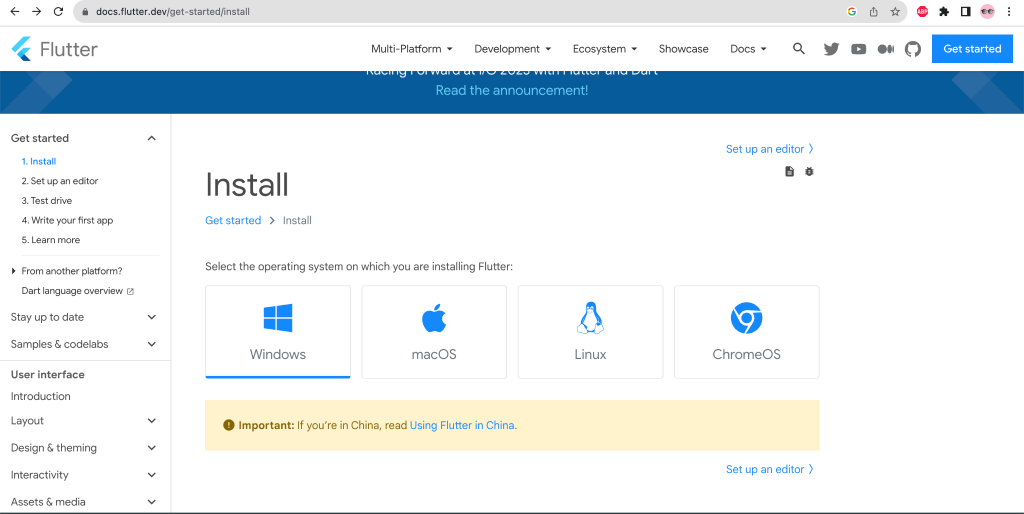
As I am using macOS, I will be downloading the Flutter SDK for macOS and installing it. The installation steps can be found in the documentation which are quite easy to perform step by step.
Don’t forget to add the Flutter SDK to the environment variable path to use it seamlessly from the command line.
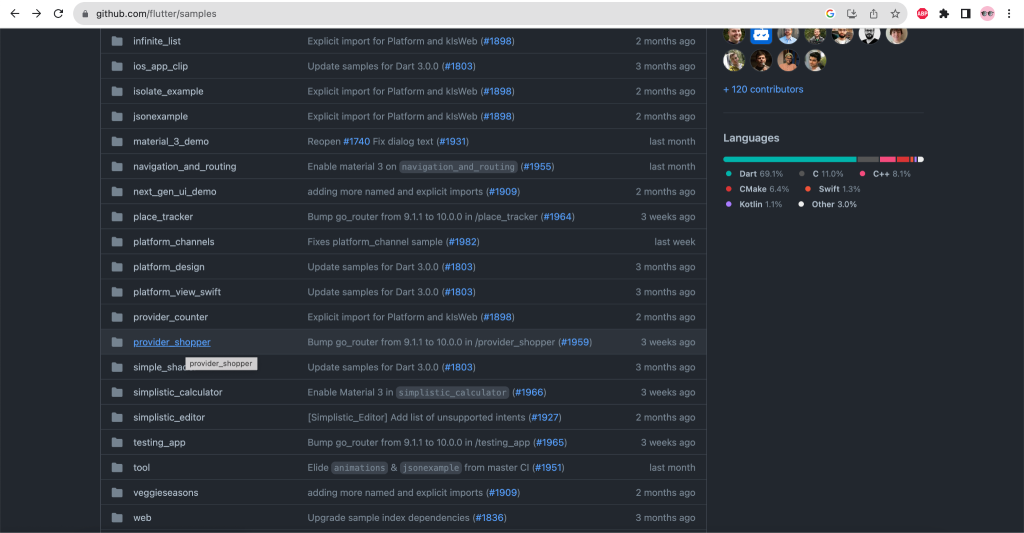
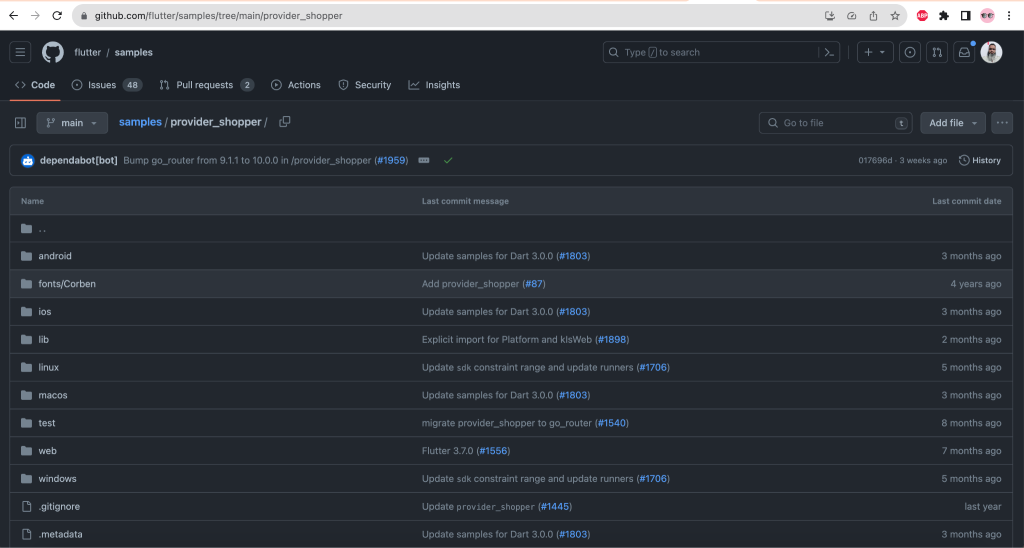
Once the Flutter SDK installation is complete, we need to clone the Flutter Sample mobile app from the flutter/samples repository.
Clone the Flutter sample mobile app
The following command can be used to clone the flutter sample repository
| git clone git@github.com:flutter/samples.git |
Open the Flutter Sample Application project in Android Studio
We will be using the provider-shopper sample application here.
Once the cloning of the flutter sample repository is complete, Start Android Studio and open the flutter sample project in it.
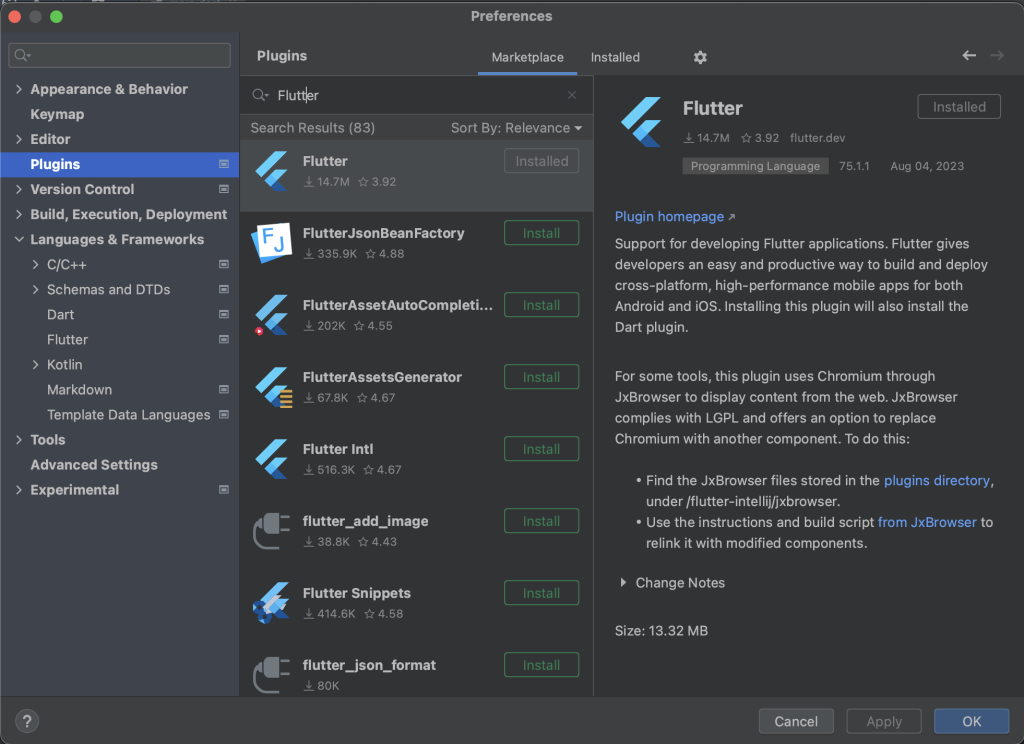
Add the Flutter Plugin in Android Studio
We need to add the Flutter Plugin to Android Studio to compile and run the app. Flutter Plugin can be installed by navigating to the Android Studio >> Settings >> Plugins menu.
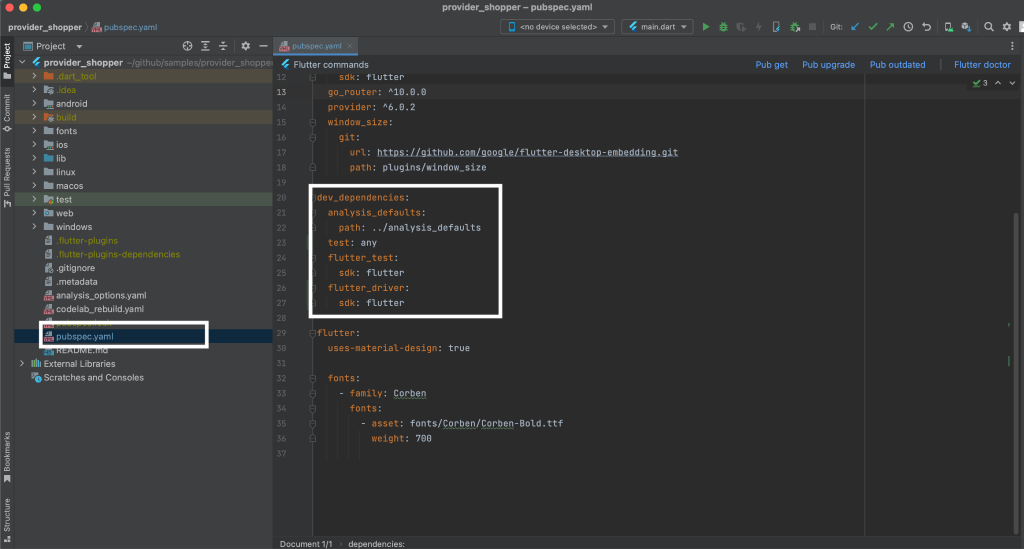
Update the dev dependencies in the pubspec.yaml file
After the Flutter plugin is installed successfully we need to add the dev_dependencies for flutter_test, test and flutter_driver in the pubspec.yml file.
| dev_dependencies: test: any flutter_test: sdk: flutter flutter_driver: sdk: flutter |
Following screenshot is from Android Studio showing the pubspec.yml file after the above mentioned dev_dependencies are added.
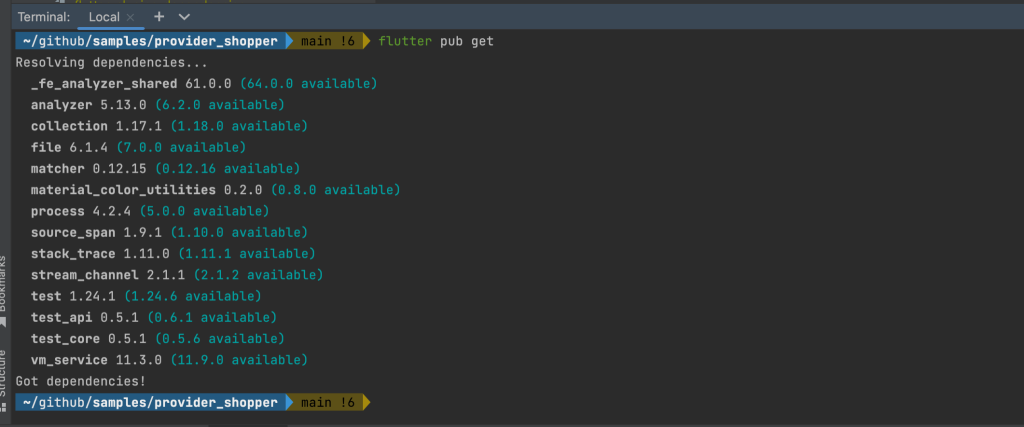
Import the dev dependencies
After updating the pubspec.yml file, Open the terminal and run the following command to import the dev dependencies.
| flutter pub get |
All the dev_dependencies should be imported successfully as seen in the screenshot below
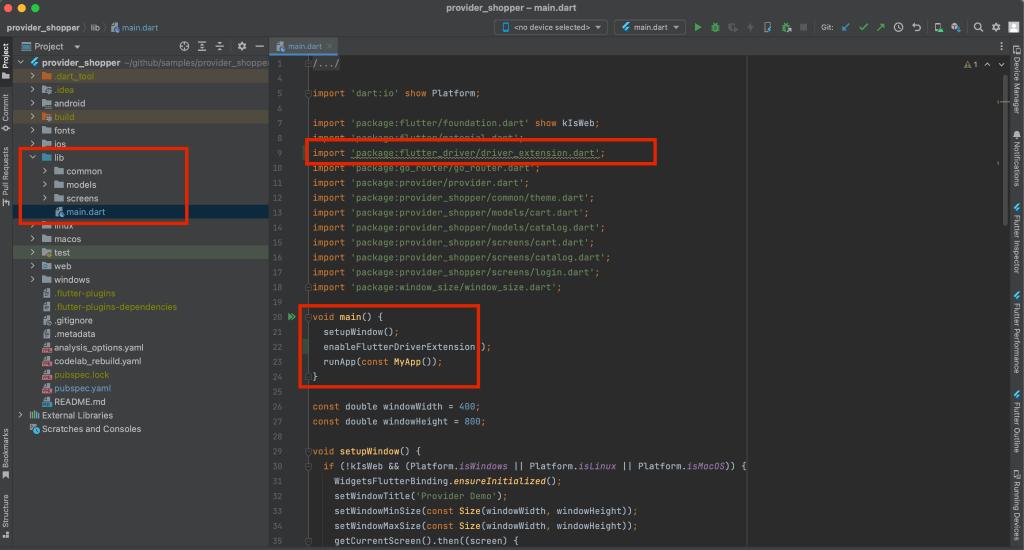
Update the main.dart file
Add the following statement in main.dart file for importing the flutter_driver_extension
| import ‘package:flutter_driver/driver_extension.dart’; |
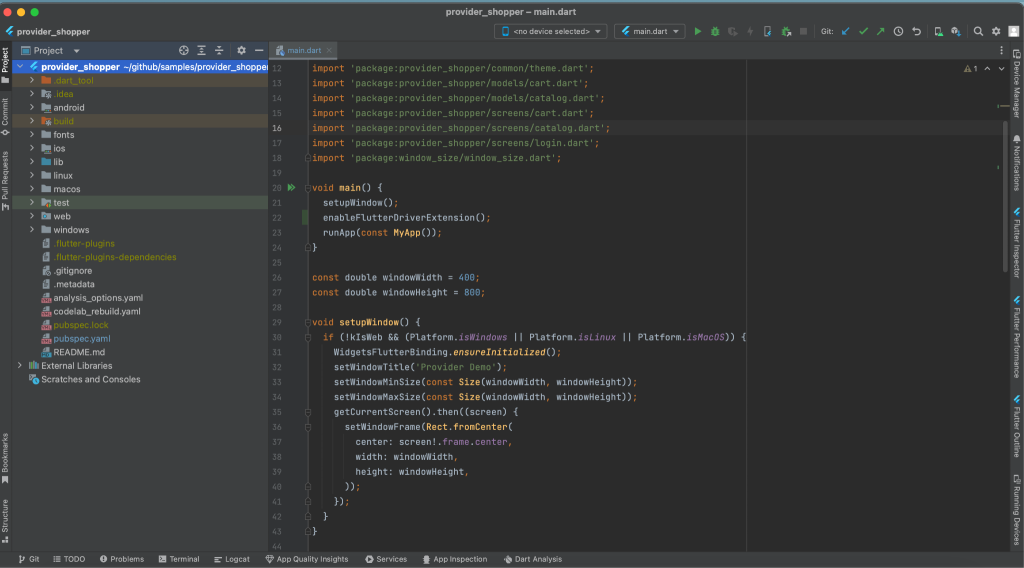
Add the enableFlutterDriverExtension() before the runApp statement in the main.dart file.
| void main() { enableFlutterDriverExtension(); runApp(MyApp()); } |
Once the above code is added in the main.dart file, it should look as shown in the screenshot below:
Next, we need to start the Android Emulator. After Android Emulator is started, select the Android Emulator name and click on the Play icon on the toolbar to build the Provider Shopper application locally and run it in the Android Emulator.
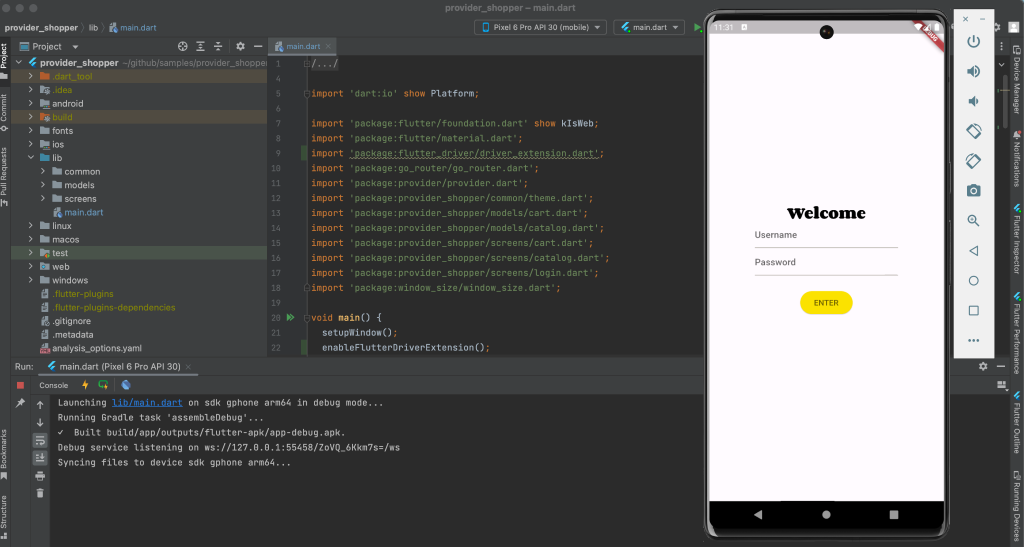
The Flutter application should be started in the Android Emulator as shown in the image above.
How to test Android Flutter applications using Appium Flutter Driver ?
Before we begin to discuss writing and running the automation tests for Flutter app, let’s talk about the tech stack that we will be using for writing the mobile tests.
Programming Language – Java 17 Mobile app development tool – Android Studio Sample Flutter App – Provider Shopper Tool for inspecting mobile elements – Flutter Inspector Driver to run mobile automation tests – Appium Flutter Driver Mobile automation framework – Appium 2.0 Mobile automation tool to locate Flutter Elements – Appium Flutter Finder – Java Build Tool – Maven Test Runner – TestNG |
To automate any mobile application we will first have to locate the mobile elements so we could use it and perform interactions on them. In case of Flutter applications, we will be locating elements using the Flutter Inspector which comes as an inbuilt tool with Flutter.
In the previous steps we configured and started the app to run locally on the Android Emulator, now, lets now check out Flutter Inspector. As discussed earlier, Appium Inspector is incapable of inspecting the Flutter mobile elements hence we will be using Flutter Inspector.
What is Flutter Inspector?
Widgets are used as core building blocks in the Flutter framework. Form controls like text, buttons, toggles and also Layouts such as centering, padding, rows, etc are all widgets in the Flutter framework.
Flutter inspector is a tool that helps in exploring and visualizing the Flutter widget trees. It helps in understanding the existing layouts and diagnosing the layout issues. It can also help in locating the selectors for the mobile elements that accordingly can be used in the mobile automation tests.
How to use Flutter Inspector?
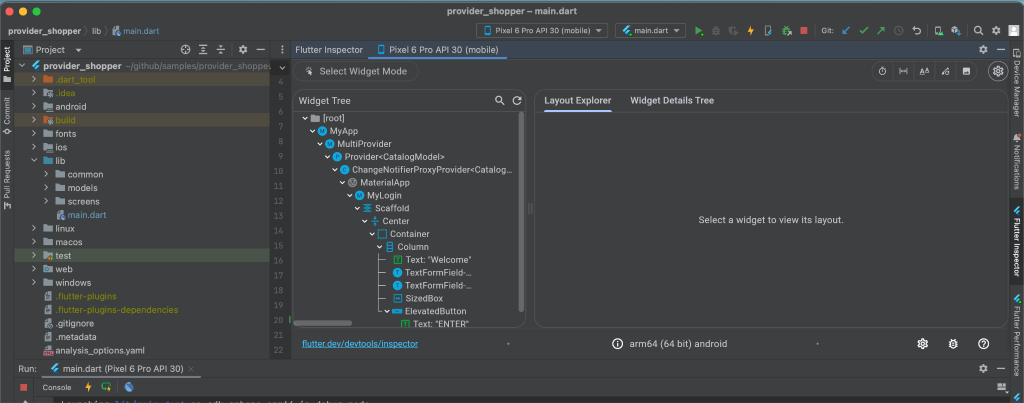
Once we have created the local build and started the app on Android Emulator,Click on the Flutter Inspector toolbar on the extreme right of the Android Studio screen.
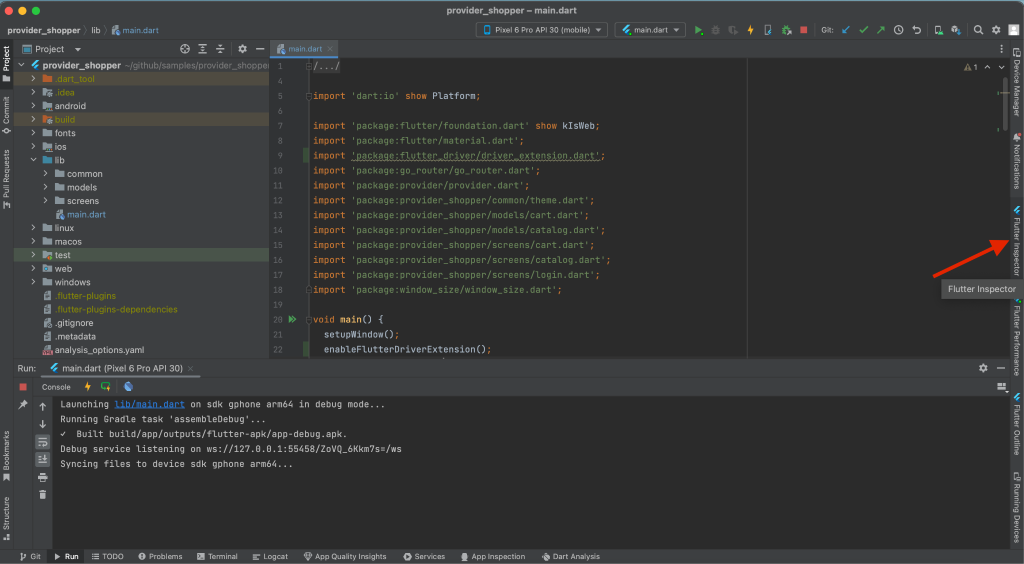
It will open the Flutter Inspector window as shown in the screenshot below
Now, to locate the mobile elements, we need to follow the below steps:
- Click on the Select Widget Mode button in Flutter Inspector.
- Navigate to the Android Emulator and select the field for which the mobile element needs to be located.
Here, let’s check the mobile locator for the UserName field of the Provider Shopper app.
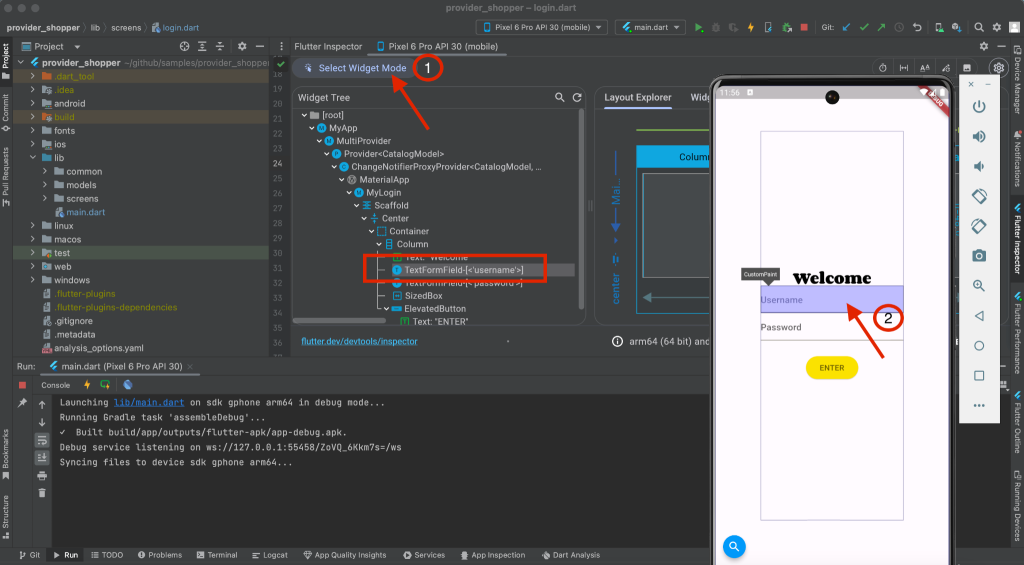
As we can see in the Flutter Inspector, the mobile element located for the UserName field is TextFormField key and its value is “username”.
Similarly, we can check for the mobile element for the Password field.
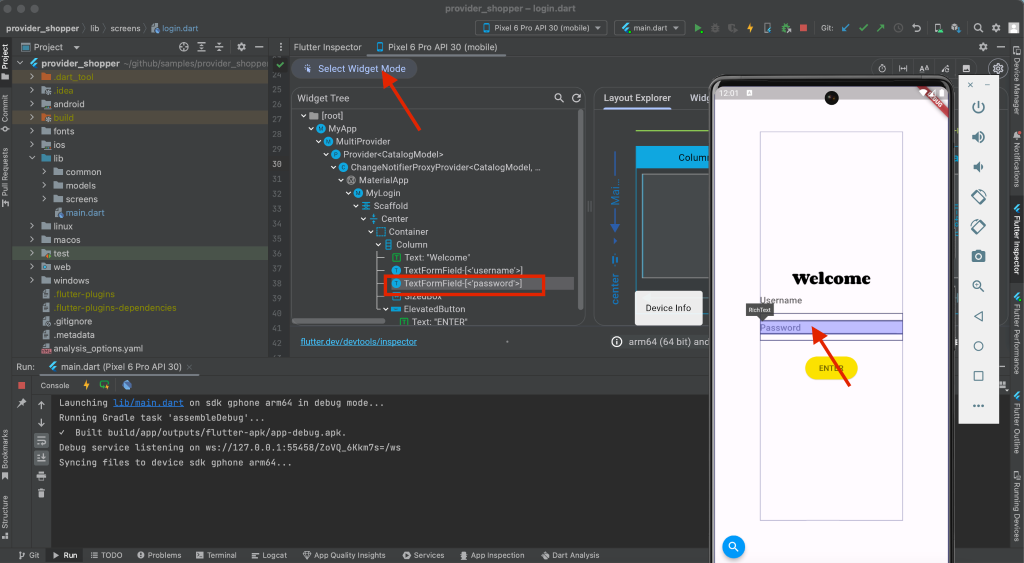
For the Password field, the mobile element located is TextFormField key and its value is “password”.
Let’s now check the locator for the ENTER button.
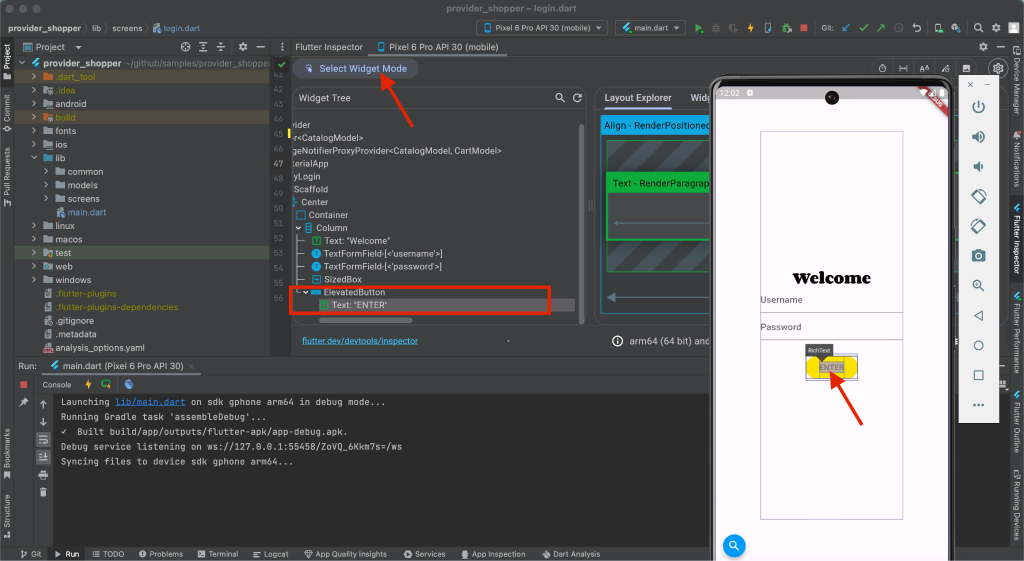
For the ENTER button, the mobile element located is Text and its value is “ENTER”.
We have completed inspecting the fields and buttons and found the locators for the Login page of the Provider Shopper application. However, to run the automation tests, we would require the apk files to be generated so that it could be used in running the automated tests.
As we will be using Appium Flutter Driver to locate mobile elements and write automation tests, we need to compile and generate the Flutter build in `debug` or `profile` mode as Appium Flutter Driver does not support the apps in `release` mode.
Generating the Build for Android and iOS
Here is the list of commands to generate the Flutter app build in debug, profile mode for Android and debug, profile and simulator mode for iOS.
| Operating System | Build Type | Flutter Command to generate build |
| Android | debug | flutter build apk –debug |
| profile | flutter build apk –profile | |
| iOS | debug | flutter build ios –debug |
| simulator | flutter build ios –simulator | |
| profile | flutter build ios –profile |
Before generating the build, press the Stop button on the toolbar if the local instance of the app is already running.
Open the Terminal and run the command given below to generate the Android build in debug mode –
| flutter build apk –debug |
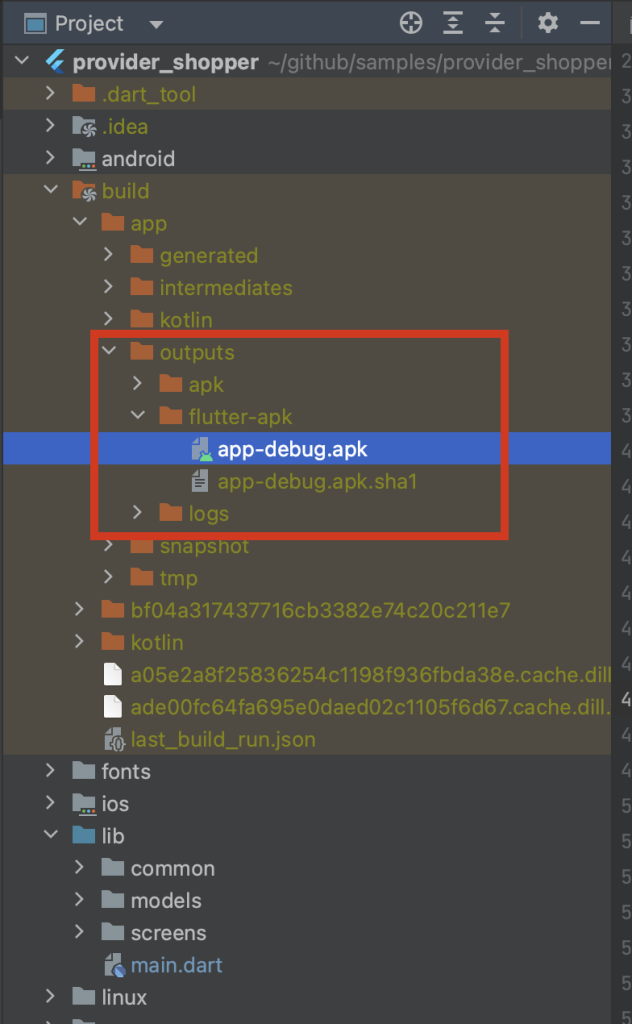
Once the build generation is finished, the build output path will be printed in the console.

Lets navigate to the path printed in the console and copy the apk file generated to use it in our automation tests.
Writing the Automated Tests for Flutter App
Phew!! Finally after configuring Flutter SDK, setting up the Flutter App project in Android Studio, locating the elements using Flutter Inspector and finally generating the Android build, we are in the last stage of this article where we will be writing the automated tests for the Provider Shopper – A sample app by Flutter.
We would be using the same debug apk for test purposes and run the mobile automation tests. The following test scenario in the will be automated using the Provider Shopper sample app
Test Scenario
|
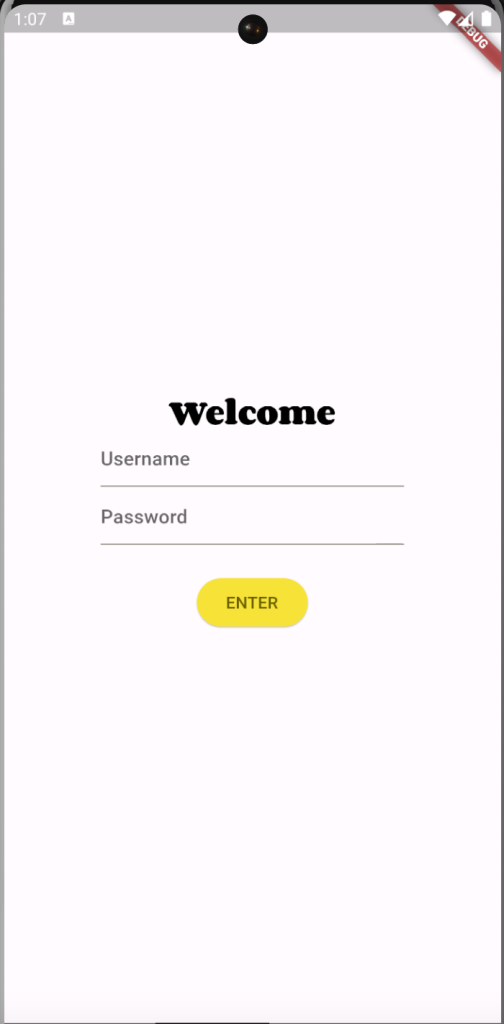
Following are the screenshots from the Provider Shopper app that will help you get familiar with the app and understand the test scenario better.
Login Page of Provider Shopper app
Catalog Page of Provider Shopper app
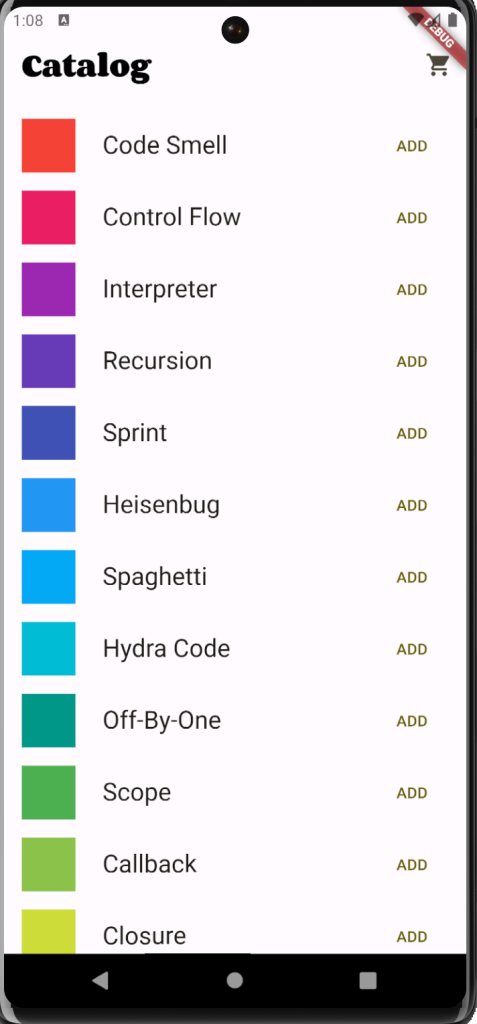
Implementation of the Test Scenario
To implement this scenario we will first have to download and install the Flutter driver. It can be installed using the following command using the terminal.
| appium driver install –source=npm appium-flutter-driver |
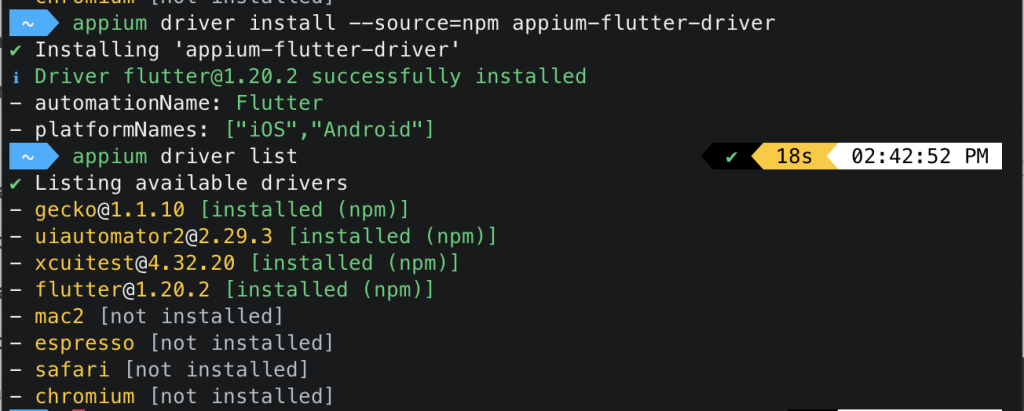
We are now ready to move ahead with writing the test automation scripts for the Provider Shopper Flutter app.
All the code shown in this article is available on Github in the flutter-appium-demo repository
Let’s create a Maven project and update the dependencies for Appium, Appium Flutter Finder and TestNG in the pom.xml file.
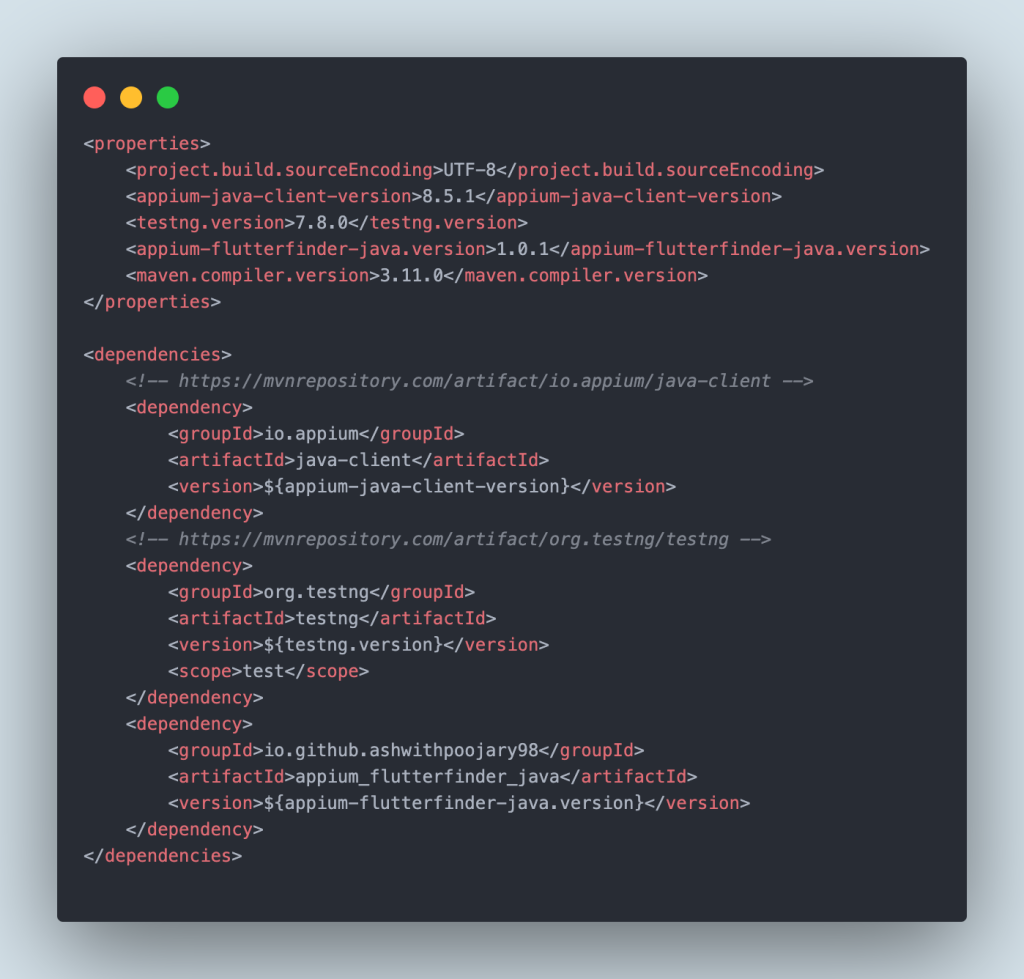
The versions for the dependencies are updated in the Properties block in pom.xml as best practice for maintainability.
Next, we will be setting up the desired capabilities for the Android Driver. For this, we will be creating a new Class named AndroidDriverManager that will hold the configuration setting for the AndroidDriver.

In AndroidDriverManager class, createFlutterDriver() method has been created that has the desired capabilities of setting the automationName to “Flutter” and accordingly providing the other capabilities like deviceName, platformName, and app path.
Two more methods are created in this class. The get() method will be used for getting the Android driver instance and quitDriver() method will be used for quitting the driver.
We will be using Page Object Model in this project as it helps in enhancing the code maintainability, readability and reusability. Using the Page Object model, we will be creating two different classes for maintaining the objects of Login Page and Catalog Page.
LoginPage class has been created to handle the page objects for Login Page.
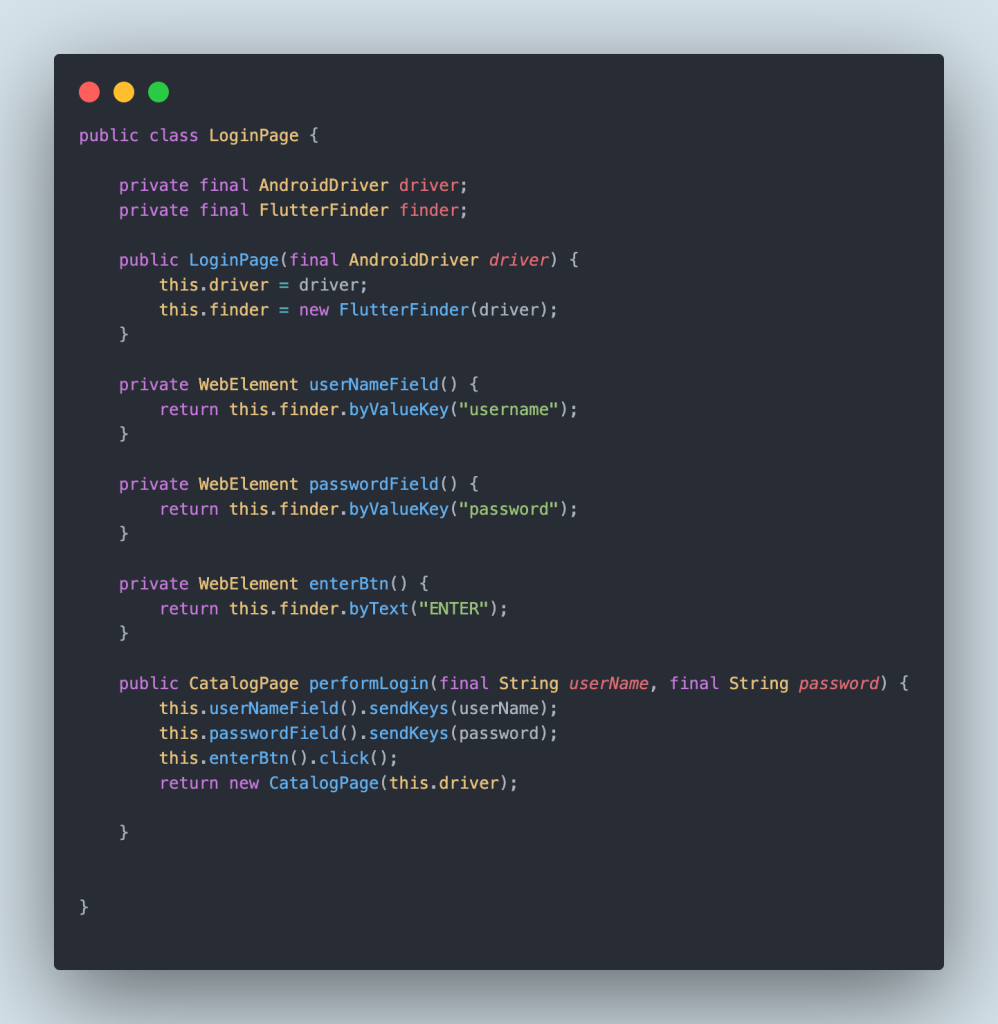
The userNameField() and passwordField() methods return the mobile element for UserName and Password fields respectively using the byValuKey() method of Appium Flutter Finder.
Similarly, enterBtn() method returns the mobile element for the ENTER button. The performLogin() method is created that will help in interacting with the UserName and Password field and enter the respective values in the fields, and, clicking on the ENTER button. This method returns a new instance of CatalogPage class as after Login, the app will move to Catalog Page.
The CatalogPage class is created to handle the page objects of the Catalog Page.
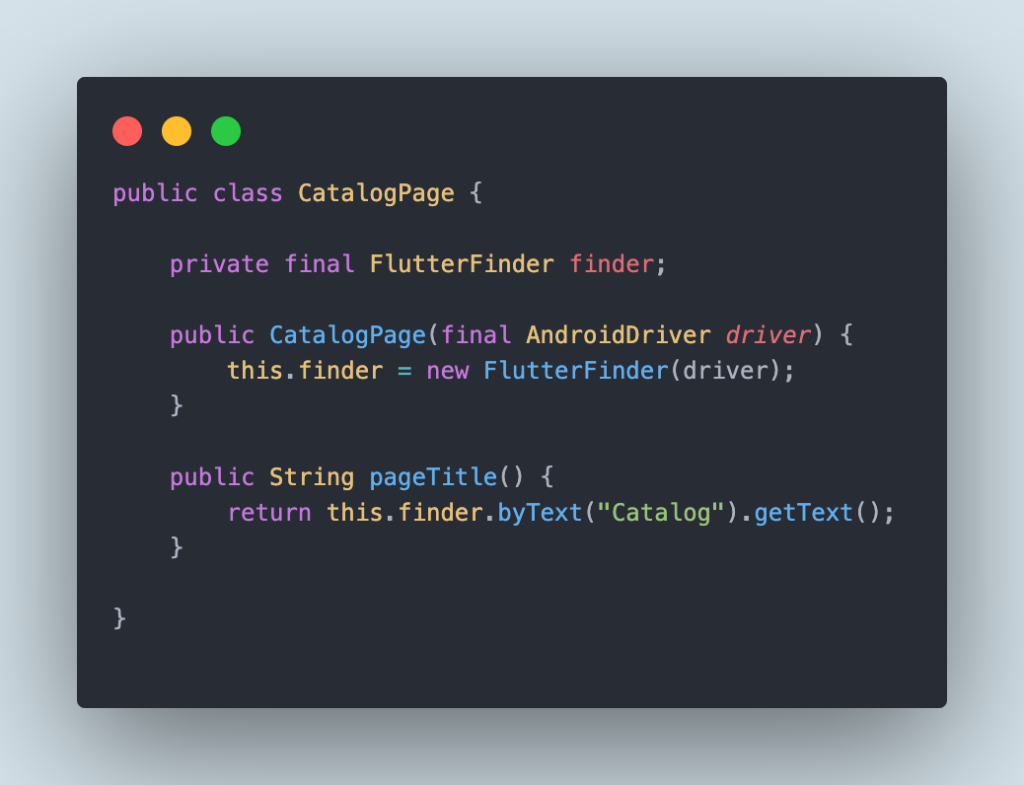
The pageTitle() method will locate the Page title using the byText() method of Appium Flutter Finder and will return its text in String format. With this, we are done with the page objects for the Login and Catalog Page.
Setting up the Tests
Now, let’s write the test to verify the scenario that we discussed in the earlier section.
But before we write the actual tests, let’s create a BaseTest class that will initialize the Android driver, start the app and also contain a method to gracefully quit the driver after the tests are run.
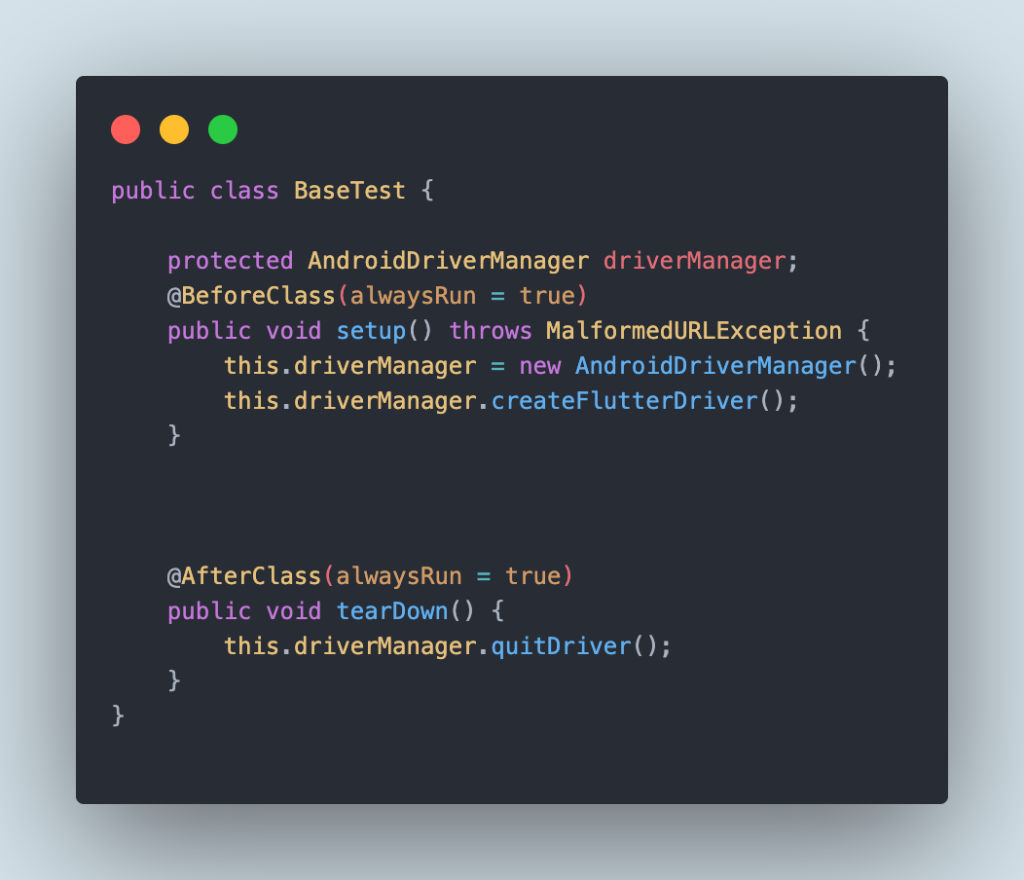
The BaseTest class has the setup() method that will run before any test is invoked. The setup() method will instantiate the AndroidDriverManager class and call the createFlutterDriver() method to set the Android Driver for running tests.
Similarly, tearDown() method will gracefully quit the driver once all the tests are run.
Writing the Automation Tests
As discussed in the earlier section, we need to write a test for opening the Flutter app, perform login by entering UserName and Password and clicking on the ENTER button. We will be verifying that the Catalog Page shows the title Catalog.
The following is the code implementation of the test scenario
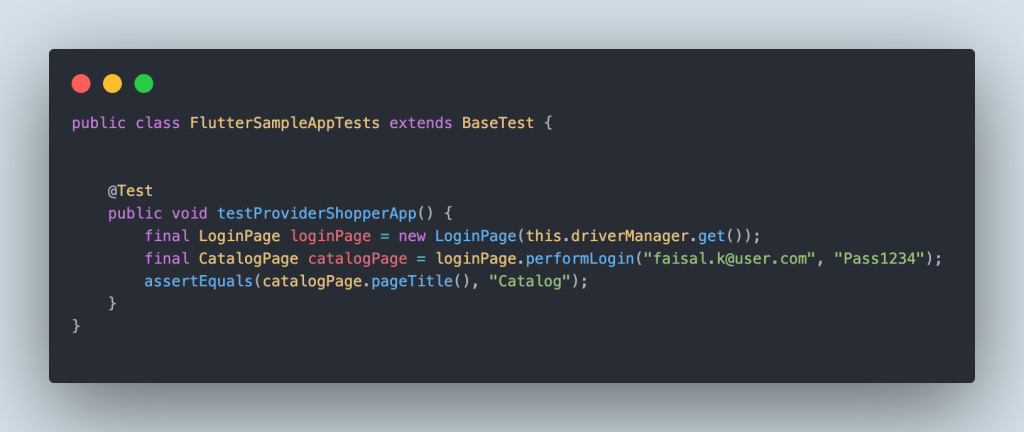
FlutterSampleAppTests class is created to write the test. The BaseTest class is extended by the FlutterSampleAppTests class so we can inherit the instance of Android driver from it. The test steps are written in the testProviderShopperApp() method.
LoginPage class will be instantiated first where the driver instance is passed. The performLogin() method returns a new instance of CatalogPage class hence we will be declaring the CatalogPage class and calling the performLogin() method in the test.
The assertEquals() method of TestNG helps in performing assertion to check that the page title is displayed as “Catalog”.
Test Execution
Let’s run the test using the testng.xml file.
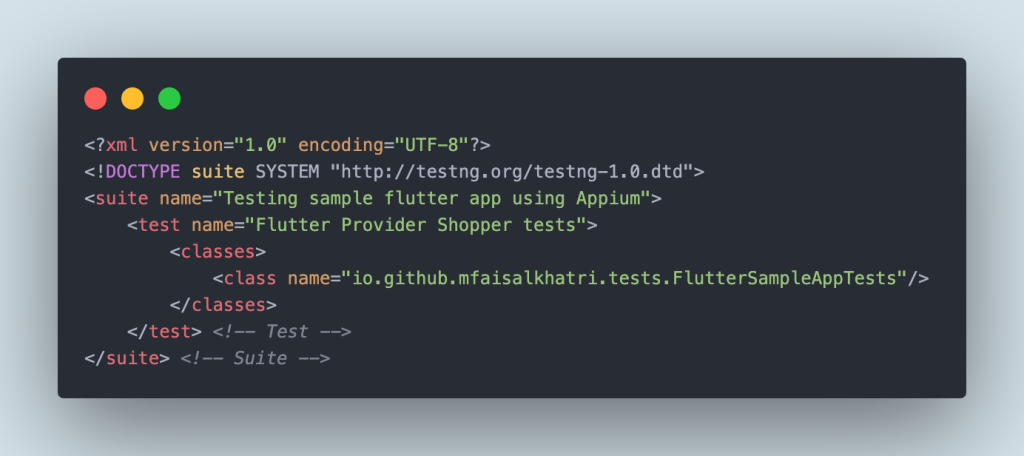
Before running the tests, make sure the apk file is placed in the path mentioned in the Desired Capabilities in the AndroidDriverManager class and the Android Emulator is up and running.
Also, if you are running the tests on local machine, make sure to start the Appium server with the Flutter Driver using the following command in the terminal:
| appium server –use-drivers appium-flutter-driver |
Appium server with Flutter Driver can also be started using the following command:
| appium server –use-drivers flutter |
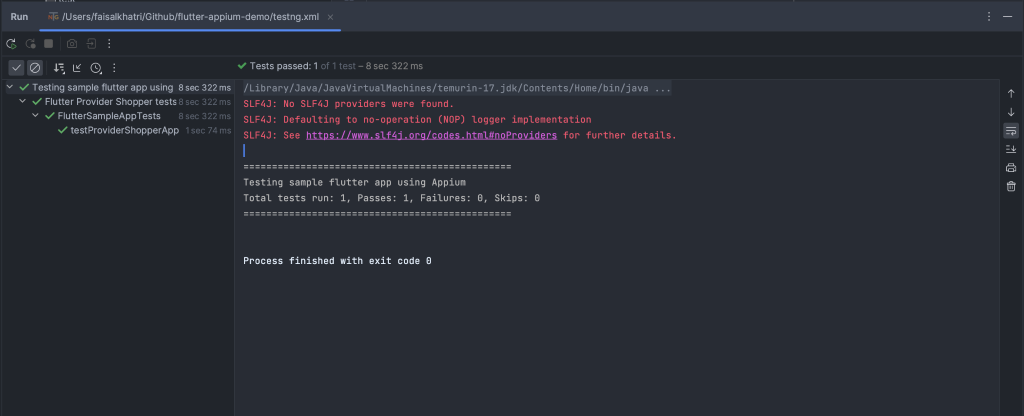
To run the test using IntelliJ, right click on the testng.xml file and select the option Run `../testng.xml`.
Here is the screenshot of the test run using IntelliJ:
Summary
Performing test automation of native applications is easy as compared to Flutter application as for Native applications there are multiple options of test automation framework that can be used. Also Appium framework can be used to perform test automation with the Android and iOS drivers for the respective native apps. The Appium Inspector tool can be used to locate the mobile elements for native apps and we don’t need to have access to source code for performing test automation.
On the other hand, to perform test automation of Flutter applications, we need to have access to source code for using the Flutter Inspector to inspect mobile elements. The locator strategy for Flutter app is totally different from the Native applications.
The tester also needs to have some basic knowledge of Dart programming language to configure and set up the Flutter app project so it could be compiled and respective Android and iOS debug/profile builds could be generated. Appium Flutter Driver and Appium Flutter Finder can be used to write and run the automation tests for Flutter apps.
In my experience, it takes lots of effort and is a very tedious task to perform mobile test automation for Flutter applications as compared to Native apps. I hope this detailed tutorial on Flutter app test automation will guide you to perform the testing of Flutter applications.
Happy Testing!

 September 22, 2023
 September 15, 2023


