
Step-by-Step Guide: Migrating from Jest to Node.js Native Test Runner
Learn how to migrate your current test suites from Jest to Node.js test runner and check out what's different between both approaches.


Are you looking for a native testing solution that's faster and more efficient than Jest?
Then this post is for you!
In this step-by-step guide, you'll learn how to migrate from Jest to Node.js native test runner.
You'll walk through the process, from setting up your environment to running your tests.
By the end of this post, you'll have the knowledge and confidence to take advantage of the full power of Node.js native test runner and simplify your testing workflow.
I'll also show you the news for the Node.js test runner that I'm personally working on.
So let's dive in and take your testing game to the next level!
Are you ready? Grab a drink and let's begin!
Intro
Jest has become big in the JavaScript ecosystem.
It solves a lot of problems for frontend and backend applications. It contains all the toolsets needed for testing JavaScript applications and as far as I know, it's part of the standard in React Applications.
Well, Node.js is evolving fast and a native solution for testing has been added.
In Node.js v20, the native test runner was promoted to the stable stage.
However, this doesn't mean the test runner has everything that Jest has and a lot of features are still in Progress.
I'm a Node.js core team developer and I've been working on improving the mocking and test runner in general.
Something I missed in the native test runner is Fake Timers.
The Fake timers feature helps us to stub functions such as setTimeout, setInterval, and others.
Imagine your function has a setTimeout function that must wait for twenty seconds to execute a callback.
This will make the test suite slow and remember unit test suites must not rely on the environment it's being executed.
This means timers are part of the operating system and could have different behaviors depending on the JavaScript code is being executed.
In summary, The Fake timers feature helps us to trigger timers without having to wait for them.
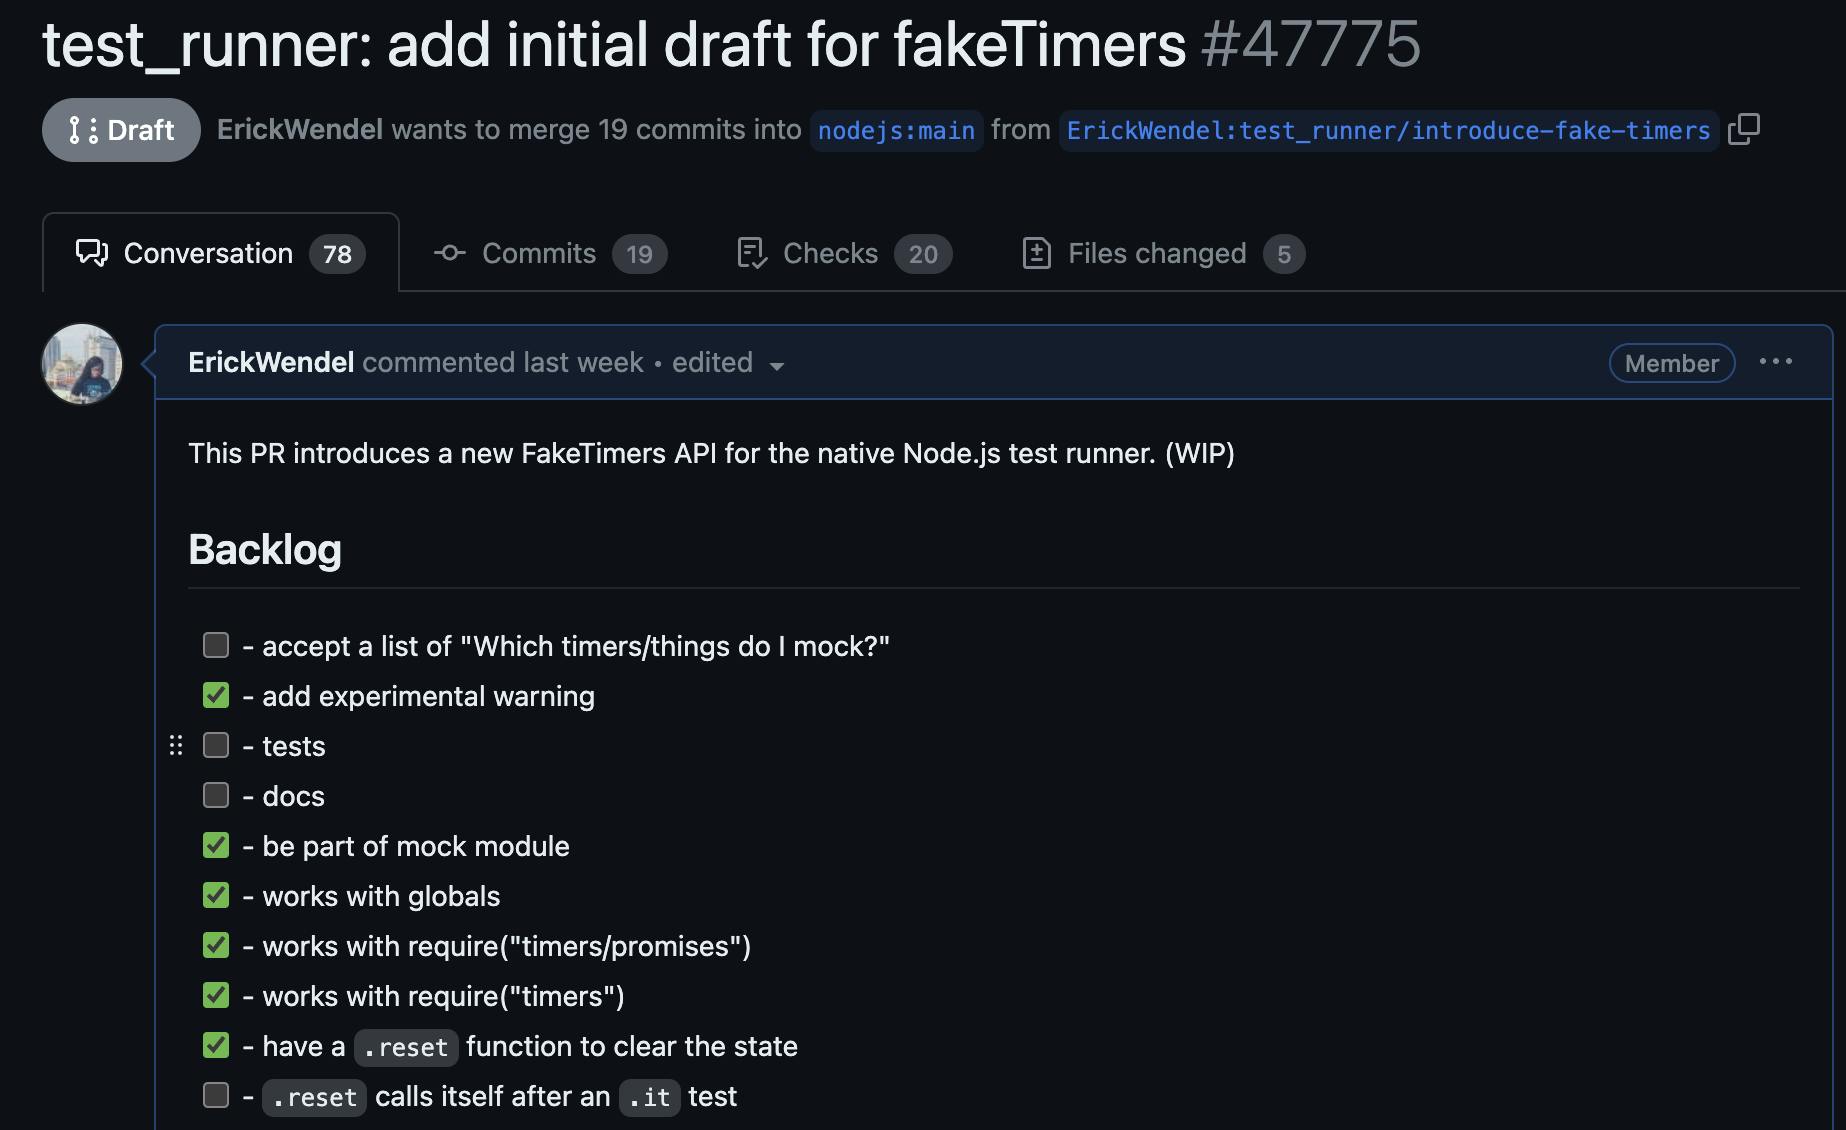
I've started this draft pull request implementing the first experimental version and you can check it out here.
For this post, I've prepared a demo in that I'll first do all the examples using Jest and then I'll migrate all the examples to the Node.js test runner.
My goal here is not to say that one approach is better than another but to show you how can you migrate from Jest to Node.js and what is the difference between one and another.
Well, I'll be using Node.js in version 20 to experiment with all the new features and I'll assume that you have previous experience working with libraries such as Jest.
TLDR;
You can check out the source code on GitHub and also check out this content as a video tutorial.
Getting Started
I'll split it into two different folders. One for the Jest implementation and the other for the Node.js migration.
Create two folders there running the command below:
mkdir jest nodejs
Working with Jest
Go to the jest folder, initialize the project, install jest and then create the test folder as follows:
cd jest/
npm init -y
npm i -D jest@29.5.0
mkdir test
To be able to use ECMAScript modules let's change the package.json file and add a type property with the value module.
Also, Jest by default doesn't work with ECMAScript modules so you're gonna need to pass a custom environment configuration.
Copy the package.json below it contains everything you need to start working with it.
{
  "name": "jest",
  "version": "0.0.1",
  "description": "",
  "main": "index.js",
  "type": "module",
  "scripts": {
    "test:dev": "NODE_OPTIONS=--experimental-vm-modules npx jest --watch",
    "test": "NODE_OPTIONS=--experimental-vm-modules npx jest"
  },
  "engines": {
    "node": "20"
  },
  "keywords": [],
  "author": "",
  "license": "ISC",
  "devDependencies": {
    "jest": "^29.5.0"
  }
}
Jest Spies
One common concept used in unit testing is Spies.
It helps you to track how many times a function was called, its parameters, and its results.
The code below will assert that a mocking function was called two times with the correct parameters.
Create a file in the test directory named 01-spies.test.js and paste the code below:
// 01-spies.test.js
import {
  describe,
  it,
  jest,
  expect
} from '@jest/globals'

function run({ fn, times }) {
  for (let i = 0; i < times; i++) {
    fn({ current: i * 5 })
  }
}

describe('Spies Test Suite', () => {
  it('should verify calls in a mock', () => {
    const spy = jest.fn()
    run({ fn: spy, times: 2 })
    expect(spy).toHaveBeenNthCalledWith(1, { current: 0 })
    expect(spy).toHaveBeenNthCalledWith(2, { current: 5 })
  })
})
Notice that using Jest you'd use the jest.fn to create a function that will be monitored and utility functions such as .toHaveBeenNthCalledWith to track the caller order and current params.
After that, run npm run test:dev to run the whole testing suite and keep waiting for changes as follows:
npm run test:dev

> jest@0.0.1 test
> NODE_OPTIONS=--experimental-vm-modules npx jest

(node:53040) ExperimentalWarning: VM Modules is an experimental feature and might change at any time
(Use `node --trace-warnings ...` to show where the warning was created)
 PASS  test/01-spies.test.js
  Spies Test Suite
    ✓ should verify calls in a mock (2 ms)

Test Suites: 1 passed, 1 total
Tests:       1 passed, 1 total
Snapshots:   0 total
Time:        0.128 s, estimated 1 s
Ran all test suites related to changed files.

Watch Usage
 › Press a to run all tests.
 › Press f to run only failed tests.
 › Press p to filter by a filename regex pattern.
 › Press t to filter by a test name regex pattern.
 › Press q to quit watch mode.
 › Press Enter to trigger a test run.
Jest Stubs
Stubbing a function means that you'd prevent a function from using the internet or external resources to make the test work.
Usually, while unit testing you'd never rely on external resources such as Databases, external APIs, Operating Systems, or the internet.
For unit testing, this means that tests would validate the functions being called and return a fixed value for that.
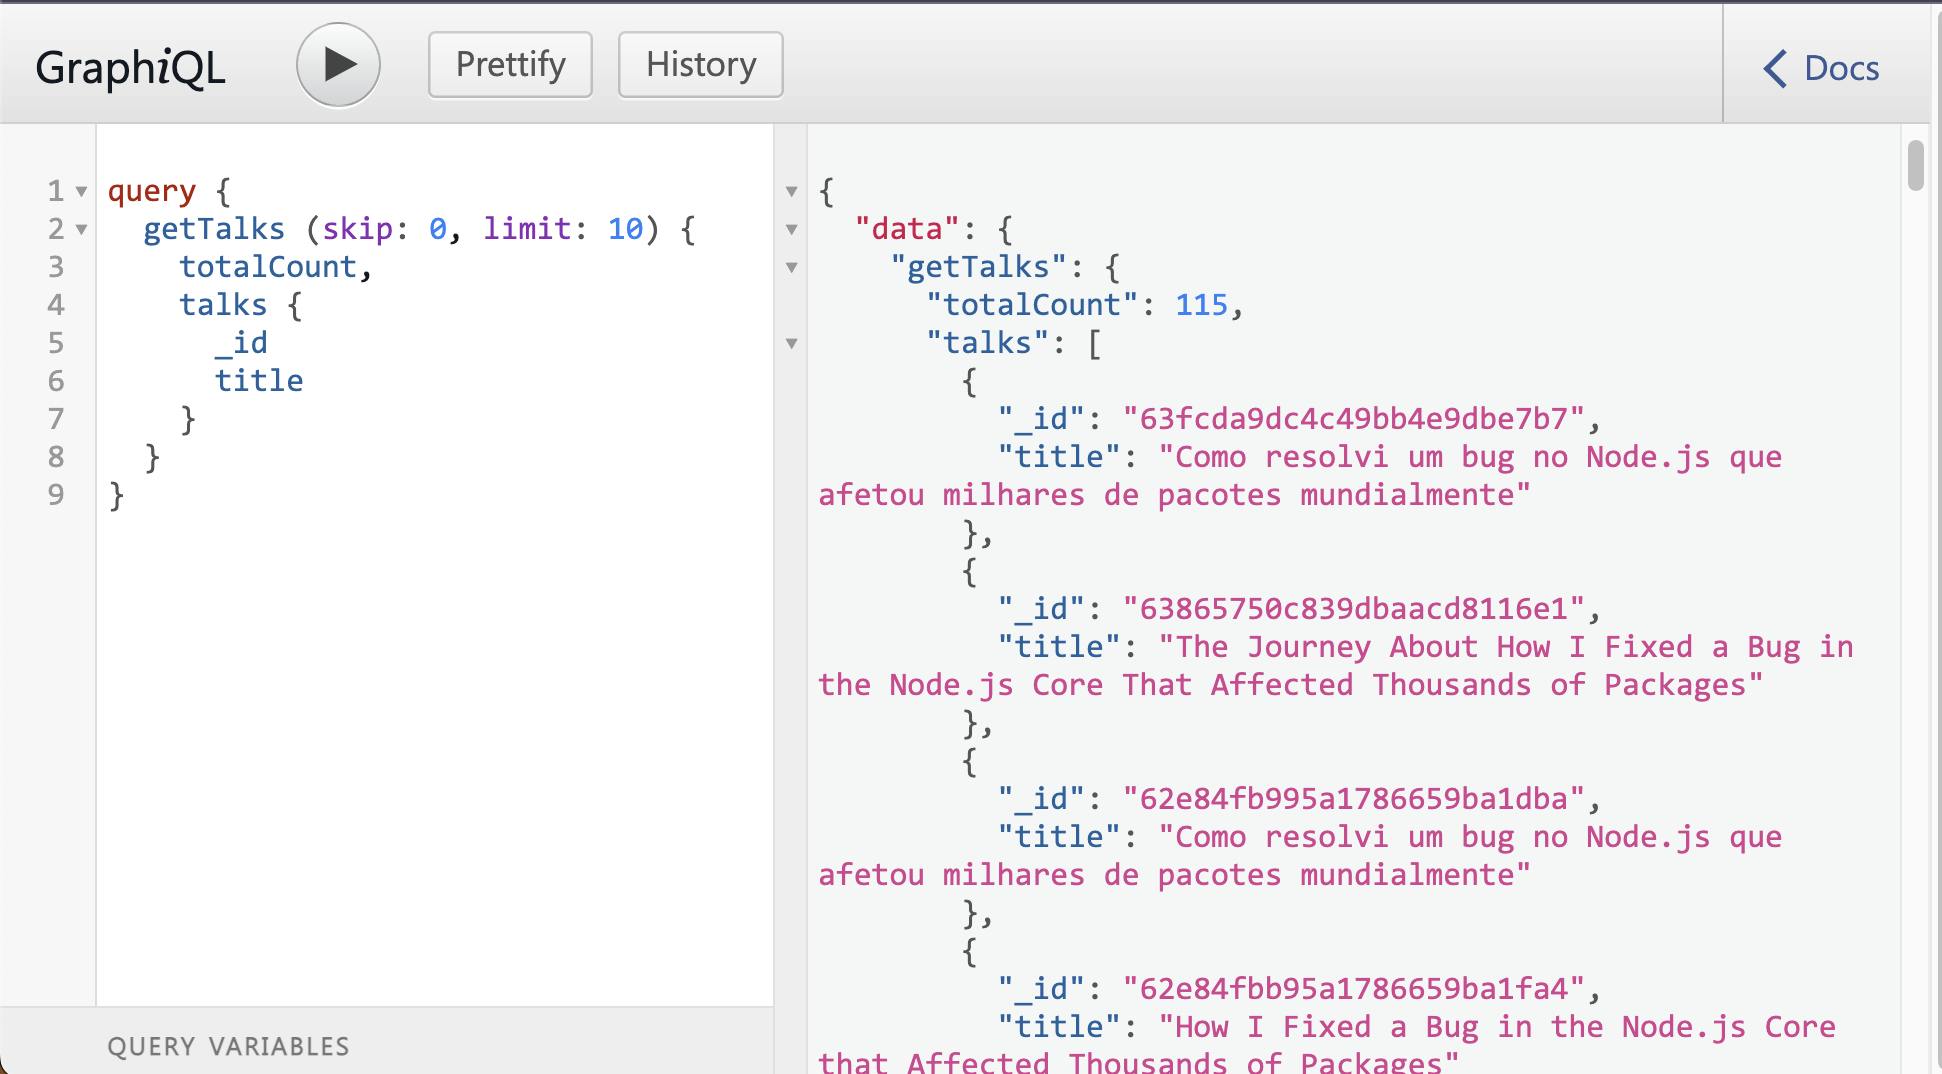
To make things more interesting, I'll consume my public GraphQL API used on my website to show my contributions, and in the test, I'll make sure that my functions will map data correctly independently if I have access to the internet.
You'd use any Web API you want. If you wanna play with my GraphQL API go to https://tml-api.herokuapp.com/graphiql and play with the intellisense.
If you copy the code below:
query {
  getTalks (skip: 0, limit: 10) {
    totalCount,
    talks {
      _id
      title
    }
  }
}
And paste it in the text area and trigger the play button. You'd see the results below:
Now, create a file in the test folder as 02-stubs.test.js and paste the initial setup plus a custom class I made to consume the GraphQL API mentioned above.
// 02-stubs.test.js
import {
  describe,
  it,
  jest,
  expect,
  beforeEach
} from '@jest/globals'

class Service {
  static async getTalks({ skip, limit }) {
    const items = await fetch('https://tml-api.herokuapp.com/graphql',          {
      method: 'POST',
      headers: {
        'Content-Type': 'application/json'
      },
      body: JSON.stringify({
        query: `
        {
          getTalks (skip: ${skip}, limit: ${limit}) {
            totalCount,
            talks {
              _id
              title
            }
          }
        }
        `
      })
    })
    return (await items.json()).data.getTalks.talks
  }
}

function mapResponse(data) {
  return data
    .map(({ _id, title }, index) => `[${index}] id: ${_id}, title: ${title}`)
    .join('\n')
}

async function run({ skip = 0, limit = 10 }) {
  const talks = mapResponse(await Service.getTalks({ skip, limit }))
  return talks
}

describe('Stub Test Suite', () => {
  beforeEach(() => jest.restoreAllMocks())

  it('should stub APIs', async () => {
    jest.spyOn(
      Service,
      Service.getTalks.name,
    ).mockResolvedValue([
      {
        _id: '63865750c839dbaacd8116e1',
        title: 'The Journey About How I Fixed a Bug in the Node.js Core That Affected Thousands of Packages'
      }
    ])

    const result = await run({ limit: 1 })
    const expected = `[0] id: 63865750c839dbaacd8116e1, title: The Journey About How I Fixed a Bug in the Node.js Core That Affected Thousands of Packages`

    expect(Service.getTalks).toHaveBeenCalledTimes(1)
    expect(Service.getTalks).toHaveBeenCalledWith({ skip: 0, limit: 1})
    expect(result).toEqual(expected)
  })
})
In this file, I'm using a few interesting Jest functions to make it work.
Let's break it into pieces:
beforeEach: There you'd put everything that must be executed before each it statement. Usually, you'd use functions to clean up the application state
jest.restoreAllMocks(): this function will make sure that Stubs and Spies will be cleaned. That's why I used it on the beforeEach function
.mockResolvedValue: Jest will intercept (Stub) what the Service.getTalks do which is request the GraphQL API using the internet and return a default value. This will help you make sure that functions such as run and mapResponse will correctly map and return data as expected.
Check your terminal output, all the tests should be passing and the output should be looking as follows:
 PASS  test/01-spies.test.js
(node:54573) ExperimentalWarning: VM Modules is an experimental feature and might change at any time
(Use `node --trace-warnings ...` to show where the warning was created)
 PASS  test/02-stubs.test.js

Test Suites: 2 passed, 2 total
Tests:       2 passed, 2 total
Snapshots:   0 total
Time:        0.366 s, estimated 1 s
Ran all test suites related to changed files.

Watch Usage: Press w to show more.
Jest Stubbing individual calls
One last thing about Jest Stubs is the ability to intercept calls in order. You'd return different results for each individual call.
Paste the code below inside the describe block right after the it block:
it('should stub different values for API calls', async () => {
    jest.spyOn(
      Service,
      Service.getTalks.name,
    )

    .mockResolvedValueOnce([
      {
        _id: '63865750c839dbaacd8116e1',
        title: 'The Journey About How I Fixed a Bug in the Node.js Core That Affected Thousands of Packages'
      }
    ])
    .mockResolvedValueOnce([
      {
        _id: '01',
        title: 'Mock 01'
      }
    ])
    .mockResolvedValueOnce([
      {
        _id: '02',
        title: 'Mock 02'
      }
    ])

    {
      const result = await run({ skip: 0, limit: 1 })
      const expected = `[0] id: 63865750c839dbaacd8116e1, title: The Journey About How I Fixed a Bug in the Node.js Core That Affected Thousands of Packages`
      expect(result).toEqual(expected)
    }
    {
      const result = await run({ skip: 1, limit: 1 })
      const expected = `[0] id: 01, title: Mock 01`
      expect(result).toEqual(expected)
    }
    {
      const result = await run({ skip: 2, limit: 1 })
      const expected = `[0] id: 02, title: Mock 02`
      expect(result).toEqual(expected)
    }

    expect(Service.getTalks).toHaveBeenCalledTimes(3)
    expect(Service.getTalks).toHaveBeenNthCalledWith(1, { skip: 0, limit: 1 })
    expect(Service.getTalks).toHaveBeenNthCalledWith(2, { skip: 1, limit: 1 })
    expect(Service.getTalks).toHaveBeenNthCalledWith(3, { skip: 2, limit: 1 })
  })
As you're working with Web APIs, paged data would return different items so it makes sense to return different values depending on what you set on the skip and limit properties.
Using the jest.mockResolvedValueOnce it does the job. As you're on the watch mode saving this file will make the test suite be restarted and show the output as below:
 PASS  test/01-spies.test.js
(node:55115) ExperimentalWarning: VM Modules is an experimental feature and might change at any time
(Use `node --trace-warnings ...` to show where the warning was created)
 PASS  test/02-stubs.test.js

Test Suites: 2 passed, 2 total
Tests:       3 passed, 3 total
Snapshots:   0 total
Time:        0.341 s, estimated 1 s
Jest FakeTimers
The last piece for working with unit tests using Jest is understanding what FakeTimers are.
Imagine for some reason your application needs to use timer functions such as setTimeout, setInterval, process.nextTick, and others and they'd define long times like "wait here for 5 minutes" or "execute this function every 10 seconds".
This would make your testing environment slow and make the application never stop working (as the setInterval will keep running unless you stop it using clearInterval).
That's where FakeTimers helps us!
Jest has a built-in solution for stubbing native timers functions and it actually comes from the sinonjs library.
Let's use it for the last example using Jest.
Create a file named 03-fakeTimers.test.js and paste the code below:
// 03-fakeTimers.test.js
import {
  describe,
  it,
  jest,
  expect
} from '@jest/globals'

describe('Spies Test Suite', () => {
  it('should verify calls in a mock', () => {
    jest.useFakeTimers()
    const spy = jest.fn(() => console.log('I was called!'))
    setTimeout(spy, 9000)
    jest.advanceTimersByTime(9000)
    expect(spy).toHaveBeenCalled()
  })
})
The global setTimeout defined above would make your application wait for 9 seconds but calling the functions jest.useFakeTimers() and jest.advanceTimersByTime(9000) will make sure Jest replaces the native Node.js functions and advance in time so all pending timers would be triggered.
Now you have most of the functions commonly used to unit test JavaScript applications and in the following sections you're gonna migrate them to use the native Node.js test runner.
Before that, just make sure the tests are passing on your terminal.
The output should look like mine:
 PASS  test/03-fakeTimers.test.js
  ● Console

    console.log
      I was called!

      at log (test/03-fakeTimers.test.js:11:39)


Test Suites: 3 passed, 3 total
Tests:       4 passed, 4 total
Snapshots:   0 total
Time:        0.404 s, estimated 1 s
Ran all test suites related to changed files.
Quick break
Just a quick break, I've released my first ebook and it's the first content on the internet showing you how to understand what's behind the scenes of the Node.js core.

There you'll make your own Node.js runtime version from scratch and I'll show you the relationship between Chrome V8 engine, Libuv, and the C++ bridge.
This will help you understand and troubleshoot current problems that your Node.js applications might have such as bottlenecks, performance, and much more.
Also, follow me on Instagram, Twitter, and LinkedIn, and check out my website where I gather all the training courses I've launched.
There's a lot of information that can help you, and of course, many free content for you.
Working with Node.js test runner
All right!
The best thing about the Node.js test runner is that you don't need to install any third libraries to make it work.
Just make sure you're using the Node.js v20 as I'm using it to make this tutorial.
Stop the current process on your terminal by pressing Ctrl+C and go to the nodejs folder you've created in the root folder. Then initialize a Node.js project with the command below:
cd ../nodejs
npm init -y
mkdir test
For this project, you'd only add the type: module property in your package.json and add the testing scripts for Node.js. Copy the code below and paste it on your package.json file:
{
  "name": "nodejs",
  "version": "0.0.1",
  "description": "",
  "main": "index.js",
  "type": "module",
  "scripts": {
    "test:dev": "node --watch --test test/",
    "test": "node --test test/"
  },
  "keywords": [],
  "author": "erickwendel",
  "license": "ISC"
}
Node.js Spies
To use both Spies and Stubs in the Node.js test runner you'd use the mock instance from the node:test module.
Create a file in the test folder named 01-spies.test.js. And paste the code below:
// 01-spies.test.js
import {
  describe,
  it,
  mock
} from 'node:test'
import assert from 'node:assert'

function run({ fn, times }) {
  for (let i = 0; i < times; i++) {
    fn({ current: i * 5 })
  }
}

describe('Spies Test Suite', () => {
  it('should verify calls in a mock', () => {
    const spy = mock.fn()
    run({ fn: spy, times: 2 })

    assert.strictEqual(spy.mock.callCount(), 2)
    const calls = spy.mock.calls
    assert.deepStrictEqual(calls[0].arguments[0], { current: 0 })
    assert.deepStrictEqual(calls[1].arguments[0], { current: 5 })
  })
})
Notice that I've copied the contents from the jest/test/01-spies.test.js and replaced everything that was using Jest to use the native mock instance.
Now, the native function uses a different approach in comparison to Jest.
To assert results, you'd use the assert module and make your assertions.
Currently, there are not many helpers and descriptive functions to get the current call and arguments.
It returns an array of calls that contains results, arguments, and the current context.
It's more than enough to track the function but still, I think it could've been more dev friendly as Jest is.
Similar to what you did on Jest run the testing command and see the results.
Mine looks like this:
npm run test:dev

> nodejs@0.0.1 test:dev
> node --watch --test test/

▶ Spies Test Suite
  ✔ should verify calls in a mock (0.717042ms)
▶ Spies Test Suite (1.716583ms)
Node.js Stubs
Similarly, as I did in the last example, I'm gonna copy all the contents from jest/test/02-stubs.test.js and create a file in the Node.js test folder with the same name 02-stubs.test.js.
The code with the migration will be like the below:
// 02-stubs.test.js
import {
  describe,
  it,
  beforeEach,
  mock
} from 'node:test'
import assert from 'node:assert'

class Service {
  static async getTalks({ skip, limit }) {
    const items = await fetch('https://tml-api.herokuapp.com/graphql', {
      method: 'POST',
      headers: {
        'Content-Type': 'application/json'
      },
      body: JSON.stringify({
        query: `
        {
          getTalks (skip: ${skip}, limit: ${limit}) {
            totalCount,
            talks {
              _id
              title
            }
          }
        }
        `
      })
    })
    return (await items.json()).data.getTalks.talks
  }
}

function mapResponse(data) {
  return data
    .map(({ _id, title }, index) => `[${index}] id: ${_id}, title: ${title}`)
    .join('\n')
}

async function run({ skip = 0, limit = 10 }) {
  const talks = mapResponse(await Service.getTalks({ skip, limit }))
  return talks
}

describe('Stub Test Suite', () => {
  // only needed if you're not using the context variable
  // in the it() calls
  beforeEach(() => mock.restoreAll())

  it('should stub APIs', async (context) => {
    context.mock.method(
      Service,
      Service.getTalks.name,
    ).mock.mockImplementation(async () => [
      {
        _id: '63865750c839dbaacd8116e1',
        title: 'The Journey About How I Fixed a Bug in the Node.js Core That Affected Thousands of Packages'
      }
    ])

    const result = await run({ limit: 1 })
    const expected = `[0] id: 63865750c839dbaacd8116e1, title: The Journey About How I Fixed a Bug in the Node.js Core That Affected Thousands of Packages`

    assert.deepStrictEqual(Service.getTalks.mock.callCount(), 1)
    const calls = Service.getTalks.mock.calls

    assert.deepStrictEqual(calls[0].arguments[0], { skip: 0, limit: 1 })
    assert.strictEqual(result, expected)
  })
})
Notice that for Jest you'd have functions such as .mockResolvedValue for stubbing async results and .mockReturnValue to anything else.
Jest also has a .mockImplementation function which enables you to put in a custom function and perform some action before returning values.
In Node.js, currently, only the .mockImplementation is available.
If you need to return a Promisified result you'd write a function like .mockImplementation(async () => ({data: 1})) and for regular results only remove the async keyword such as .mockImplementation(() => ({data: 1})
The Node.js test runner enables you to access the current context and clean it up right after the it function has been executed.
In this case, you might not need to import the mock function directly from the node:test module, instead you'd consume it from the context instance.
Just in case you'd like to use the same approach as Jest, you'd also use the mock instance imported from the node:test module and restore the mock using the beforeEach(() => mock.restoreAll()) call.
Restart the process on the terminal with Ctrl+C if it didn't recognize the new file and run the npm run test:dev again.
Your terminal should look like mine:
npm run test:dev

> nodejs@0.0.1 test:dev
> node --watch --test test/

▶ Spies Test Suite
  ✔ should verify calls in a mock (0.721958ms)
▶ Spies Test Suite (1.74925ms)

▶ Stub Test Suite
  ✔ should stub APIs (0.953125ms)
▶ Stub Test Suite (1.944584ms)
Node.js Stubbing individual calls
For individual calls, Node.js also uses a different approach compared to Jest.
You'd use the mock.method and keep the mock instance on a variable and then use the m.mockImplementationOnce with the function that is gonna replace the original function and a number that represents which call will it be applied.
Copy the code below and paste it on the describe block right after the current it function:
it('should stub different values for API calls', async () => {
    const m = mock.method(
      Service,
      Service.getTalks.name,
    ).mock

    m.mockImplementationOnce(async () => [
      {
        _id: '63865750c839dbaacd8116e1',
        title: 'The Journey About How I Fixed a Bug in the Node.js Core That Affected Thousands of Packages'
      }
    ], 0)

    m.mockImplementationOnce(async () => [
      {
        _id: '01',
        title: 'Mock 01'
      }
    ], 1)

    m.mockImplementationOnce(async () => [
      {
        _id: '02',
        title: 'Mock 02'
      }
    ], 2)

    {
      const result = await run({ skip: 0, limit: 1 })
      const expected = `[0] id: 63865750c839dbaacd8116e1, title: The Journey About How I Fixed a Bug in the Node.js Core That Affected Thousands of Packages`
      assert.strictEqual(result, expected)
    }
    {
      const result = await run({ skip: 1, limit: 1 })
      const expected = `[0] id: 01, title: Mock 01`
      assert.strictEqual(result, expected)
    }
    {
      const result = await run({ skip: 2, limit: 1 })
      const expected = `[0] id: 02, title: Mock 02`
      assert.strictEqual(result, expected)
    }

    const calls = Service.getTalks.mock.calls
    assert.strictEqual(Service.getTalks.mock.callCount(), 3)
    assert.deepStrictEqual(calls[0].arguments[0], { skip: 0, limit: 1 })
    assert.deepStrictEqual(calls[1].arguments[0], { skip: 1, limit: 1 })
    assert.deepStrictEqual(calls[2].arguments[0], { skip: 2, limit: 1 })
  })
Something interesting you might notice is that on your terminal only the Stub test suite was restarted.
The Node.js watch mode has an amazing incremental watching mode which makes the process restart only the code that has changed.
Amazing isn't it? Looking at the terminal now, you'd see the incremental watch mode working like mine is:
▶ Stub Test Suite
  ✔ should stub APIs (0.958292ms)
  ✔ should stub different values for API calls (0.310209ms)
▶ Stub Test Suite (2.269958ms)
Node.js FakeTimers
Well... as I told you at the beginning of this post, I'm working on the FakeTimers implementation for the node:test module.
It's the last piece of the puzzle for you to be able to migrate from Jest/any other framework to the Node.js test runner without the need of installing any other library.
If you look at the files, you'd see how this API would look like soon and all current discussions and code reviews (and for sure all the amazing help I've been receiving from other Node.js collaborators).
The API will look like previous Sinon's implementation using .tick calls to advance in time.
An example of how the fakeTimers for using setTimeout would be in the near future:
it('should advance in time and trigger timers when calling the .tick function multiple times', (t) => {
  t.mock.timers.enable()
  const fn = t.mock.fn()

  setTimeout(fn, 2000)

  t.mock.timers.tick(1000)
  t.mock.timers.tick(500)
  t.mock.timers.tick(500)

  assert.strictEqual(fn.mock.callCount(), 1)
  t.mock.timers.reset()
})
Something interesting is that Sinon and Jest FakeTimers feature only replaces the global setTimeout and other timer functions from the global object.
However, for Node.js it'd also stub natively modules from require('timers'), require('timers/promises'), and the global object like the others.
Just as a matter of curiosity, the async setInterval from node:timers/promises is an async generator function and it's already working on my current draft.
The code below, I copied from the there so you'd have an idea of how it'd be in the future:
const nodeTimersPromises = require('node:timers/promises');
it('should tick five times testing a real use case', async (t) => {
  t.mock.timers.enable()

  const expectedIterations = 5
  const interval = 1000

  async function run() {
    const timers = []
    for await (const startTime of nodeTimersPromises.setInterval(interval, Date.now())) {
      timers.push(startTime)
      if (timers.length === expectedIterations) break

    }
    return timers
  }

  const r = run()
  t.mock.timers.tick(interval)
  t.mock.timers.tick(interval)
  t.mock.timers.tick(interval)
  t.mock.timers.tick(interval)
  t.mock.timers.tick(interval)

  const timersResults = await r
  assert.strictEqual(timersResults.length, expectedIterations)
  t.mock.timers.reset()
})
Access the current work on the official link.
Wrapping up
The Node.js native runner is on fire and you can start using it right away as it's promoted to the stable state on the Node v20.
I always prefer something that is in the Node.js core as I wouldn't need to install and keep up to date with any additional libraries.
Let me know what you thought about this tutorial and what ideas you had about it.
That's it for today.
If you want to see more content like this, keep an eye on the blog as I've been posting a lot of content here, and of course, subscribe to my Youtube channel.
I hope this content has exceeded your expectations.
I'm Erick Wendel and I'll see you in the next post!