
My Google analytics tell me that the small section about Pre-commit hooks I had in my post How to lint K6 tests and add a pre-commit hook has been catching your attention. Particularly from queries related specifically to pre-commit hooks and how to use them. I figured that meant the internet wants another post with a deeper dive into pre-commit hooks, so here it is!
What are pre-commit hooks?
In simple terms, they are a small piece of code that enforces running a script when you try to commit code changes. What that script does is up to you! Most commonly you would do things like run unit tests, or a linter etc. The idea is that you are getting the fastest possible feedback on your code changes, which is why I call them Gits Gift for Quality Code!
What can pre-commit hooks do?
Essentially, anything! They are simply executing the script you tell it to. Common uses of pre-commit hooks include:
- Linting – Whatever linter you run, pre-commit is the perfect time to run it.
- Formatting – tools like Prettier are often mistaken for a Linter, but where as linters catch bugs, Prettier and the likes are about consistent formatting.
- Execute unit tests – If your unit tests are light weight enough, running them as a pre-commit step could save future headache!
- File verification – Run a script that ensures certain files have not been edited. Ideal if you have local config files that you don’t want to push changes of.
- Security Checks – Regular readers will know I am a big fan of Meterian, you could execute a scan as part of a pre-commit hook.
and literally anything else you can think of! A word of warning though, be mindful of how long these checks take to run. Anything taking more than a few seconds will quickly become a source of frustration to you and anyone else working in the code base!
How do you setup a pre-commit hook?
As with anything like this, there are a number of ways to setup a pre-commit hook. You can do it manually, or you can use one of a selection of tools. Below I will cover off setting it up manually, and using Husky or Left-Hook.
Creating a pre-commit hook manually
If you are comfortable writing Bash scripts, then setting up a pre-commit hook manually is simple. In your .git/hooks folder, create a new file called pre-commit and write a bash script in here. This will now run as your pre-commit hook. Below is an example that checks for trailing white space.

Don’t want to write your own Bash script? Use one of the tools below instead.
Using Husky
I wrote about Husky before, but for those new here, this is how to use it.
First up, install Husky at the root of your project file. To do this simply run the below command from your command line at the root of your project. If you haven’t got npm setup already, go take a look at this post.
npm install husky -D
Next we need to run the configuration. First up run the below commands to get started
npm pkg set scripts.prepare="husky install"
npm run prepare
If all is successfully setup you will get a message that confirms
husky - Git hooks installed
Creating our pre-commit hooks
Another really simple step, to do this we have to tell Husky what to do when we try to commit. This is as simple as
npx husky add .husky/pre-commit "command goes here"
Where you would replace command goes here with what ever command line instruction you want to run. A simple example example that runs ESlint would look like this.
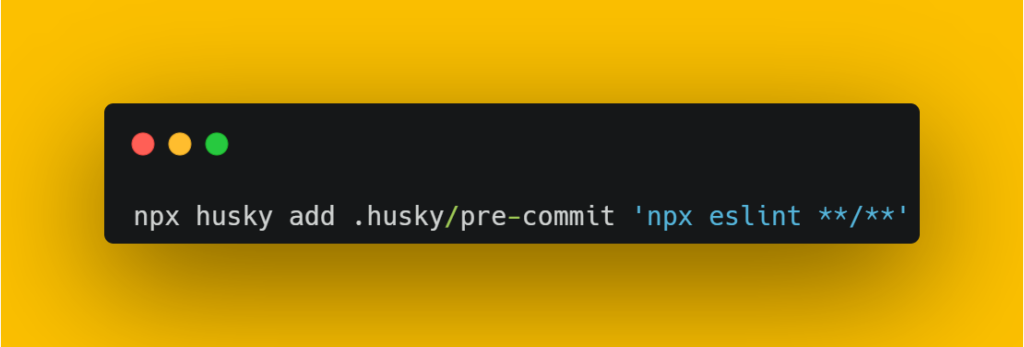
And that’s it, your pre-commit hook is now successfully configured and will run a check against your code before every commit!
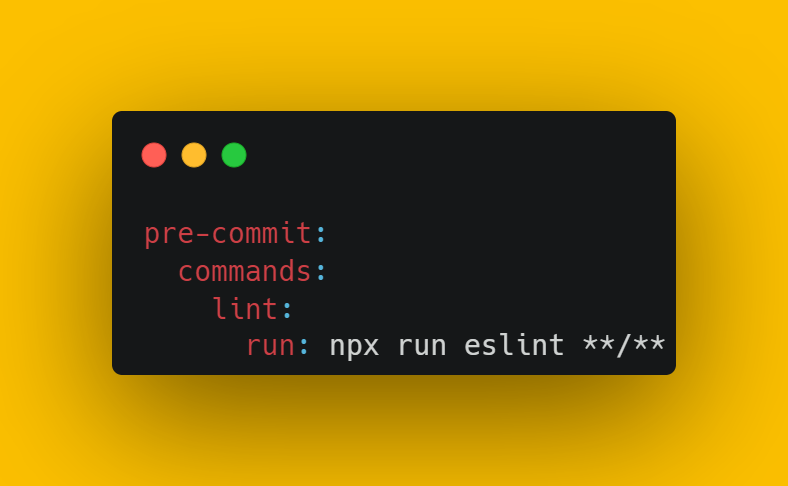
Using Left-Hook
Setup is similar to Husky. To install, run the following command from the root of your project using the command line.
npm install lefthook --save-dev
Now you need to create a lefthook.yaml file in the root folder of your project. The basic structure of which might looks like this.
Summary
Pre-commit hooks are just the tip of the Git Hooks iceberg. There are a whole host of other hooks you can run, including post-commit, pre-receive, post-merge and many more. I might write about some of them in the future. For now, if you would like to read more, take a look at Matthew Hudson’s githooks.com it’s nicely laid out and includes links to all the documentation and tools you might ever need, and a few that you don’t need, but you might want!
Subscribe to The Quality Duck
Did you know you can now subscribe to The Quality Duck? Never miss a post but getting them delivered direct to your mailbox whenever I create a new post. Don’t worry, you won’t get flooded with emails, I post at most once a week.
March 4, 2023 at 10:52 am
Very nice post. I just stumbled upon your blog and wanted to say that I’ve really enjoyed browsing your blog posts. In any case I’ll be subscribing to your feed and I hope you write again soon!