As an iOS developer, it’s crucial to translate the design provided by UX/UI designers into a functional mobile app. A single screen also can adopt various UI configurations, such as hiding views or adjusting layouts based on different available data.
But how do you ensure the screen displays correctly with complex UI requirements? An efficient method to guarantee the correctness of your app’s UI is through the implementation of snapshot tests.
Snapshot tests capture an image of your app’s UI, which is then compared to a previously validated snapshot. Moreover, there are additional benefits to incorporating snapshot tests into your development workflow:
- Faster UI Development Iteration:
- Unlike running the simulator, snapshot tests provide a quicker iteration cycle, saving valuable development time.
- Ensuring Correctness Across Different UI Configurations:
- Snapshot tests allow you to validate the correctness of various UI configurations simultaneously.
- Effortless Mocking of Different Data:
- Easily simulate different presentation data using individual test.
- Preventing Undesired Changes to UI:
- By comparing UI changes between the current and previous test runs, snapshot tests act as a safeguard against unintentional changes.
Case Example
Consider a user profile screen within your app. A user may have the following properties and some properties are optional:
- Full name
- Image (Optional)
- Multiple Phone numbers (Optional)
- Address (Optional)
This is the design provided by UI designer:
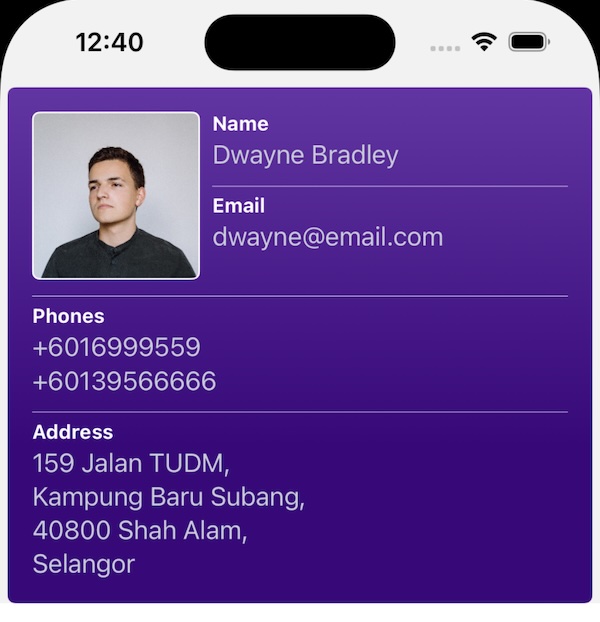
The design appears simple at first glance. However, depending on the available properties, various UI configurations may exist which means there are different ways in which the UI could be displayed to the user.
For instance, the UI will vary based on the following conditions:
- View with optional properties should be hidden when the property is not available.
- Max number of lines for name is 2
- Max number of lines for address is 4
- A user can have multiple phone numbers
Snapshot tests can be used to track these different UI configurations.
Now, let’s look into a Swift code example:
UI Code
The UserViewModel is a class that holds presentation data for the UI, while UserDetailVC is a class responsible for displaying the UI based on the UserViewModel. The code is provided below; for simplicity, we have omitted the implementation details of the UI.
public struct UserViewModel{
    let fullname: String
    let email: String
    let image: UIImage?
    let phoneNumbers: [String]?
    let address: String?
}

public class UserDetailVC: UIViewController{
    public let viewModel: UserViewModel

    public init(viewModel: UserViewModel) {
        viewModel = viewModel
        super.init(nibName: nil, bundle: nil)
    }

    //Other unrelated variables are omitted
    //View are displayed based on the viewModel data
}
Snapshot Test Code
To prepare for snapshot tests, we utilize the Swift Snapshot Testing library. Here is how the test file looks with a single test to assess the UI with all user properties available. Additional information about the code is provided in comments within the code.
import XCTest
import SnapshotTesting
import UserDetailExample

final class UserDetailSnapshotTests: XCTestCase {

    func test_user_withAllProperties(){
        //We call a helper method to create an image with simply red color here. A simple image ensures that our tests running faster.
        let image = UIImage.make(withColor: .red)

        //Create view model to be displayed
        let user = UserViewModel(fullname: "Any name",
                                 email: "any@email.com",
                                 image: image,
                                 phoneNumbers: ["any phone"],
                                 address: "any address")

        //Make system under test (SUT) in this case, the SUT is UserDetailVC
        let sut = makeSUT(userViewModel: user)

        //This is a function by Swift Snapshot Testing library. You can specify which device dimension to run to, and record or compare it with previously saved screen.
        assertSnapshot(matching: sut, as: .image(on: .iPhone12), record: true)
    }

    // MARK: - Helpers

    private func makeSUT(userViewModel: UserViewModel) -> UserDetailVC {
        let sut = UserDetailVC(viewModel: userViewModel)
        return sut
    }
}
When running the snapshot test for the first time, we need to set record = true to capture the screen UI and save it to disk. We will encounter a test error as shown in the image below, although this is the expected behaviour.
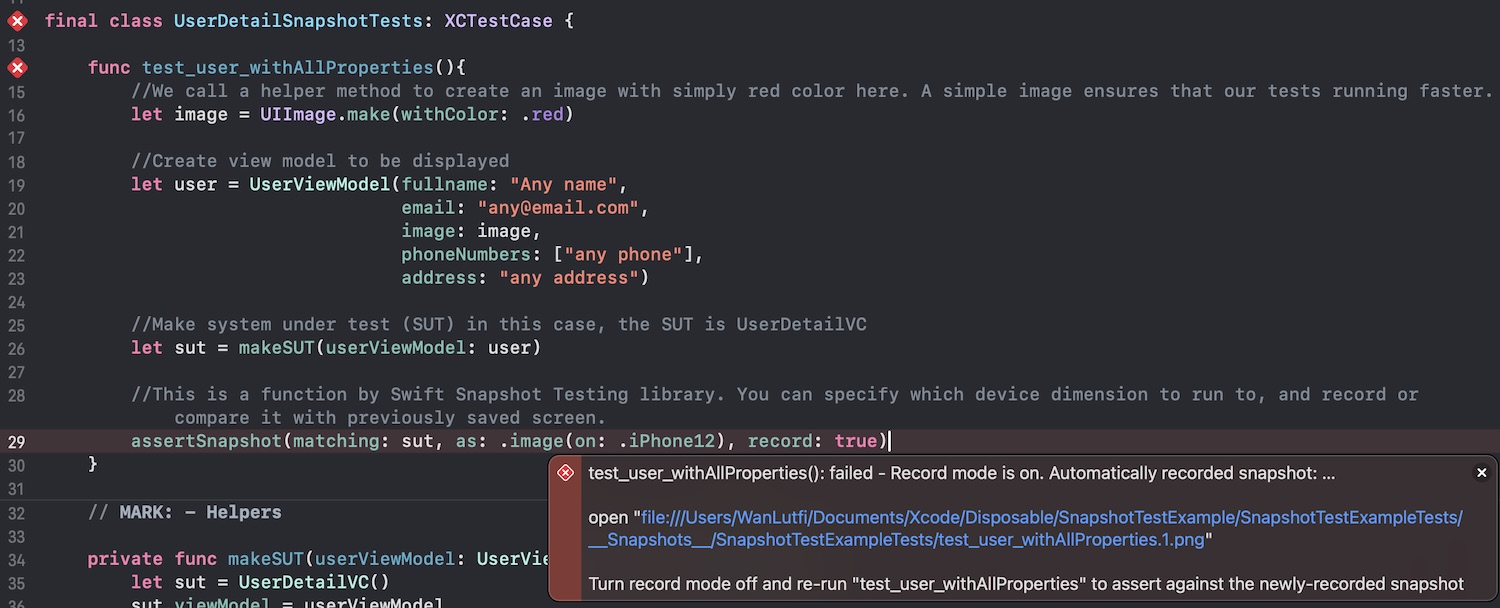
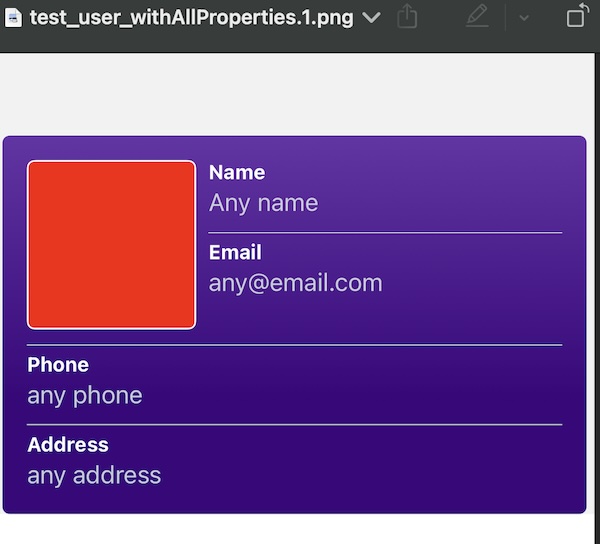
When clicked at the recorded url destination, we can then open the image to see the recorded snapshot.
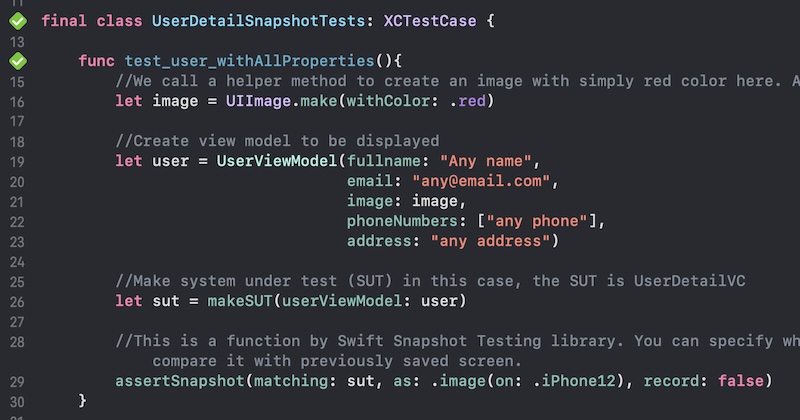
When we run the test again with record = false, we will get a successful test, indicating that the current UI we are testing is the same as the previously recorded snapshot. If you want to record a new snapshot, you can set record = true again.
Testing Different UI Configurations
Now that you understand how snapshot tests work, we can add more tests for different UI configurations. These are the display behaviours that we want to test:
- The view with optional properties should be hidden when the property is not available.
- The maximum number of lines for the name is 2.
- The maximum number of lines for the address is 4.
- Use the plural title “Phones” when we have 2 or more phone numbers.
- A user can have multiple phone numbers.
We can combine multiple behaviours into a single test, which can save disk space and test running time. Finally, we have four tests, as shown in the code below:
import XCTest
import SnapshotTesting
import UserDetailExample

final class UserDetailSnapshotTests: XCTestCase {

    func test_user_withAllProperties(){
        //We call a helper method to create an image with simply red color here. A simple image ensures that our tests running faster.
        let image = UIImage.make(withColor: .red)

        //Create view model to be displayed
        let user = UserViewModel(fullname: "Any name",
                                 email: "any@email.com",
                                 image: image,
                                 phoneNumbers: ["any phone"],
                                 address: "any address")

        //Make system under test (SUT) in this case, the SUT is UserDetailVC
        let sut = makeSUT(userViewModel: user)

        //This is a function by Swift Snapshot Testing library. You can specify which device dimension to run to, and record or compare it with previously saved snapshot.
        assertSnapshot(matching: sut, as: .image(on: .iPhone12), record: true)
    }

    func test_user_withImage_noOtherOptionalProperties(){
        let image = UIImage.make(withColor: .red)
        let user = UserViewModel(fullname: "Any name",
                                 email: "any@email.com",
                                 image: image,
                                 phoneNumbers: nil,
                                 address: nil)

        let sut = makeSUT(userViewModel: user)
        assertSnapshot(matching: sut, as: .image(on: .iPhone12), record: true)
    }

    func test_user_withImage_longNameLongAddress_onePhoneNumber(){
        let image = UIImage.make(withColor: .red)
        let user = UserViewModel(fullname: "This is a long text to test user with a very long name to ensure it is displayed correctly.",
                                 email: "any@email.com",
                                 image: image,
                                 phoneNumbers: ["0166669999"],
                                 address: "First line address,\nSecond line,\nThird line,\nFourth line,\nFifth line")

        let sut = makeSUT(userViewModel: user)
        assertSnapshot(matching: sut, as: .image(on: .iPhone12), record: true)
    }

    func test_user_noImage_longName_twoPhoneNumbers(){
        let user = UserViewModel(fullname: "This is a long text to test user with a very long name to ensure it is displayed correctly.",
                                 email: "any@email.com",
                                 image: nil,
                                 phoneNumbers: ["0166669999", "0135556666"],
                                 address: nil)

        let sut = makeSUT(userViewModel: user)
        assertSnapshot(matching: sut, as: .image(on: .iPhone12), record: true)
    }

    // MARK: - Helpers

    private func makeSUT(userViewModel: UserViewModel) -> UserDetailVC {
        let sut = UserDetailVC()
        sut.viewModel = userViewModel
        return sut
    }
}
Here are the recorded snapshots with its corresponding test name for final and completed UI:
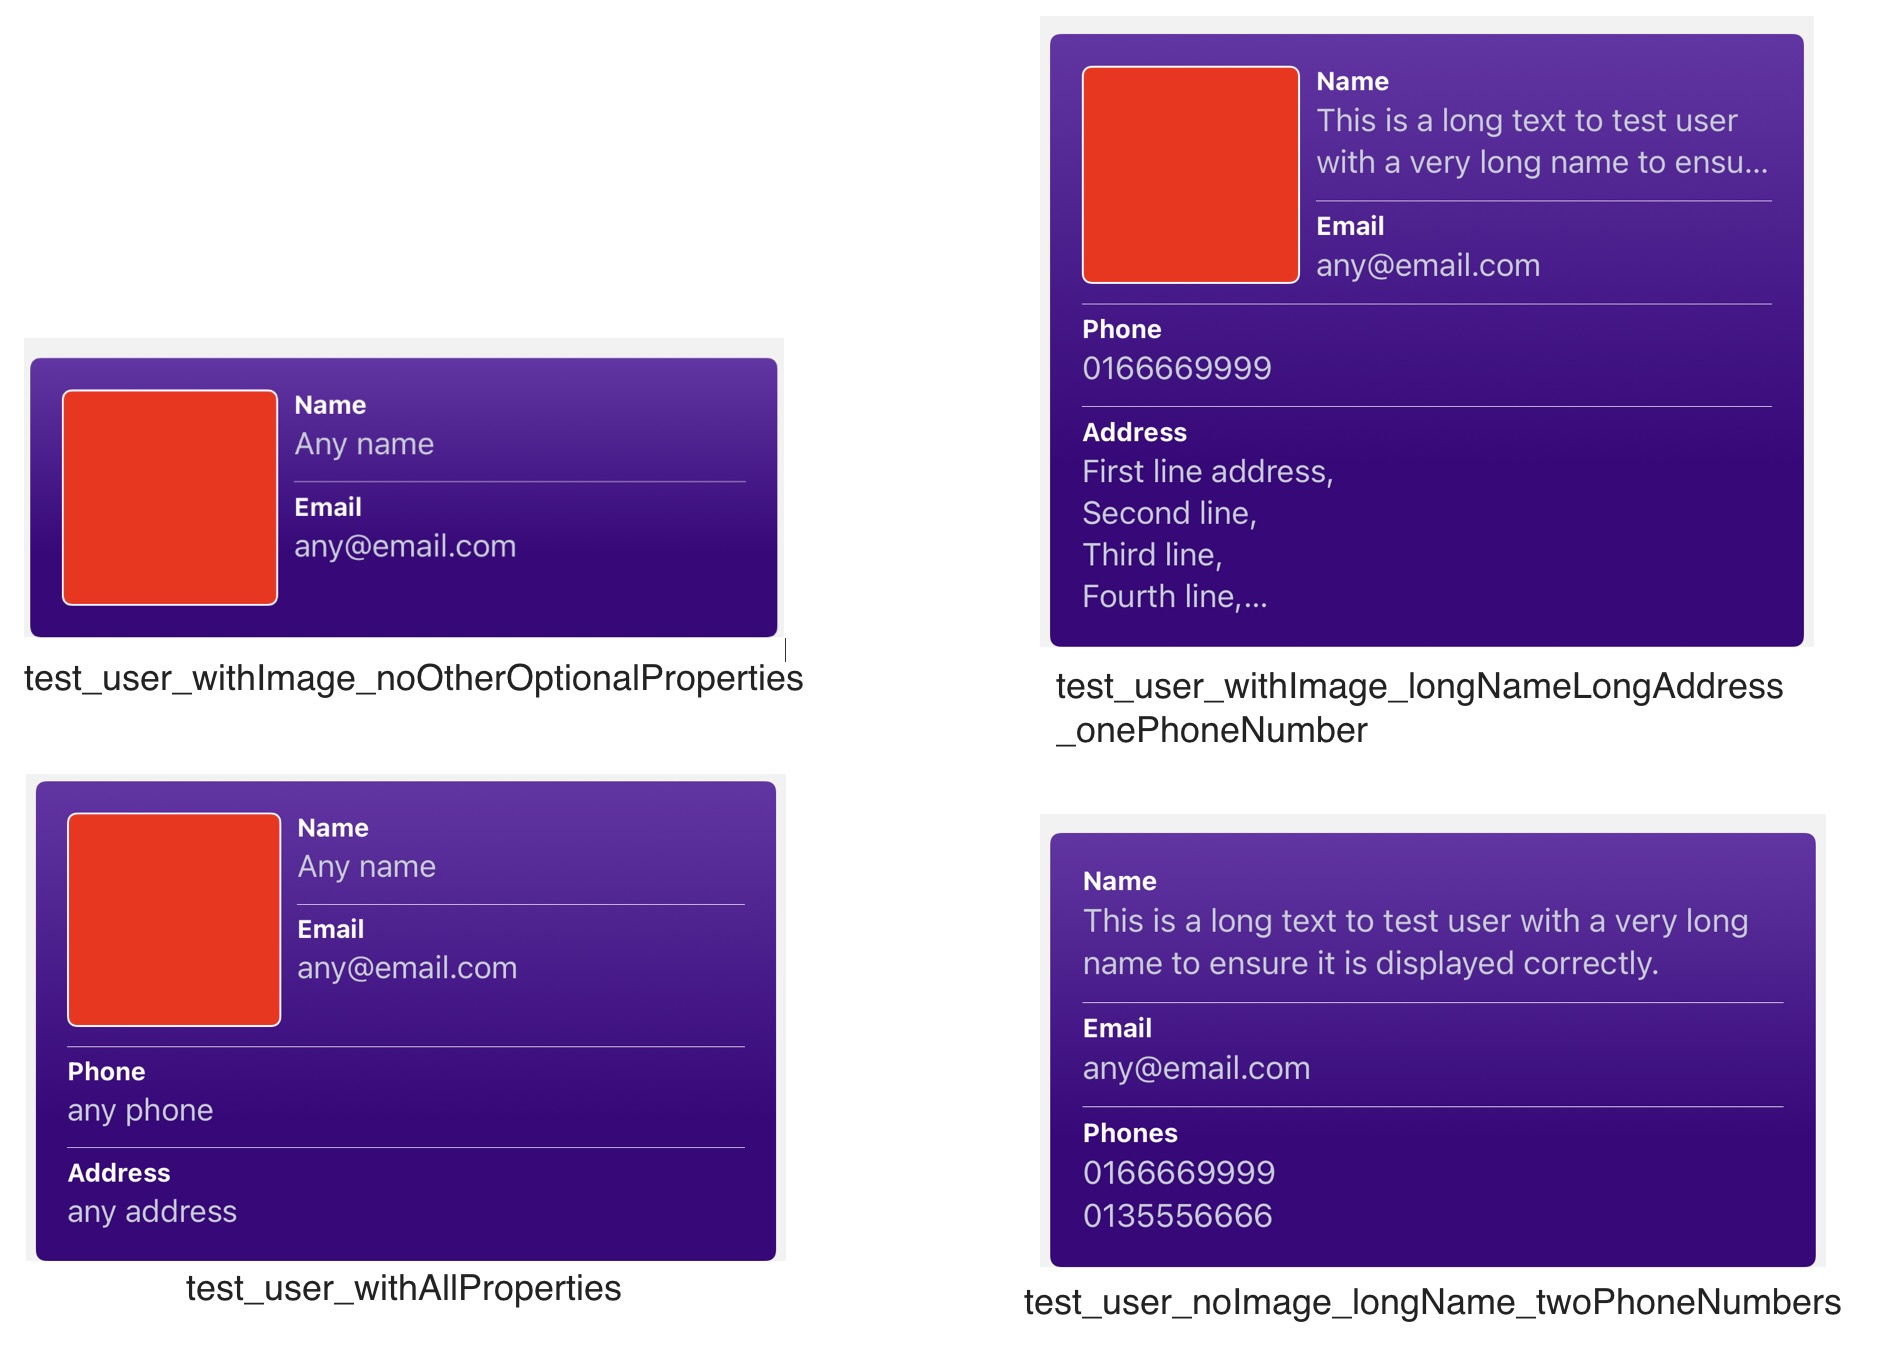
Note that we are only showing the final result here. The process of testing snapshot is usually done iteratively
- Write or improve UI code.
- Run snapshot tests.
- Open and review recorded snapshots to verify UI correctness.
- If the UI appears visually incorrect, repeat the process until it displays as expected
Tips: Since the saved snapshots are standard images, you can open all of them at once in the Preview app. This way, you can review any changes when you run subsequent tests without having to reopen them individually. This allows you to quickly observe any alterations in different UI configurations.
Conclusion
Snapshot tests are a valuable technique to efficiently ensure that your app’s UI is displayed as expected. By eliminating the need to run the simulator for every UI check, especially for screens deeply embedded in the app, they save valuable time. Additionally, they act as a safeguard against unintended changes and the ability to effortlessly test the UI with various configurations further boosts their effectiveness.
Rather than manually recording screenshots, consider using something like https://screenshotbot.io, which works with swift-snapshot-testing. This way you’ll just magically get notified on your Pull Request each time your UI changes.