Update – Official article published by DevExpress to use the Dashboard Control in XAF Blazor (Server – duh): https://supportcenter.devexpress.com/ticket/details/t959266/blazor-how-to-integrate-the-dashboard-designer-and-viewer-into-an-xaf-app/
DevExpress posted a nice article about how to use their Dashboard Controls for Blazor WebAssembly apps back in February.
Here is the Article:
Dashboard for Blazor – How to use Web Dashboard within your Blazor Apps
Following the above post let’s do the same for Blazor Server Side Apps.
How to Add Dashboard Control to Blazor
To get started, you must first create a new Blazor Server Application application using the Blazor Server App template.

Configure the Server Side
- Install the
DevExpress.AspNetCore.DashboardNuGet package. You can find a comprehensive installation guide in DevExpress documentation: Install DevExpress Controls Using NuGet Packages. -
Create the App_Data/Dashboards folder to store dashboards.
- Install the
Microsoft.AspNetCore.Mvc.NewtonsoftJsonNuGet package - Open the Startup.cs file to register and adjust DashboardConfigurator:
using DevExpress.AspNetCore;
public class Startup
  {
      public Startup(IConfiguration configuration, IWebHostEnvironment env)
      {
          Configuration = configuration;
          _physicalProvider = env.ContentRootFileProvider;
      }

      public IConfiguration Configuration { get; }

      // This method gets called by the runtime. Use this method to add services to the container.
      // For more information on how to configure your application, visit https://go.microsoft.com/fwlink/?LinkID=398940
      IFileProvider _physicalProvider;
      public void ConfigureServices(IServiceCollection services)
      {
          services.AddResponseCompression(opts =>
          {
              opts.MimeTypes = ResponseCompressionDefaults.MimeTypes.Concat(
                  new[] { "application/octet-stream" });
          });
          services.AddDevExpressControls();
          services.AddMvc()
          .AddDefaultDashboardController(configurator =>
          {
              // Register Dashboard Storage

              configurator.SetDashboardStorage(new DashboardFileStorage(_physicalProvider.GetFileInfo("App_Data/Dashboards").PhysicalPath));
              // Create a sample JSON data source
              DataSourceInMemoryStorage dataSourceStorage = new DataSourceInMemoryStorage();
              DashboardJsonDataSource jsonDataSourceUrl = new DashboardJsonDataSource("JSON Data Source (URL)");
              jsonDataSourceUrl.JsonSource = new UriJsonSource(new Uri("https://raw.githubusercontent.com/DevExpress-Examples/DataSources/master/JSON/customers.json"));
              jsonDataSourceUrl.RootElement = "Customers";
              jsonDataSourceUrl.Fill();
              dataSourceStorage.RegisterDataSource("jsonDataSourceUrl", jsonDataSourceUrl.SaveToXml());
              configurator.SetDataSourceStorage(dataSourceStorage);
              configurator.SetConnectionStringsProvider(new DashboardConnectionStringsProvider(Configuration));
              configurator.AllowExecutingCustomSql = true;
          });


          services.AddRazorPages();
          services.AddServerSideBlazor();
          services.AddSingleton<WeatherForecastService>();
      }

      // This method gets called by the runtime. Use this method to configure the HTTP request pipeline.
      public void Configure(IApplicationBuilder app, IWebHostEnvironment env)
      {
          if (env.IsDevelopment())
          {
              app.UseDeveloperExceptionPage();
          }
          else
          {
              app.UseExceptionHandler("/Error");
              // The default HSTS value is 30 days. You may want to change this for production scenarios, see https://aka.ms/aspnetcore-hsts.
              app.UseHsts();
          }

          app.UseHttpsRedirection();
          app.UseStaticFiles();

          app.UseDevExpressControls();

          app.UseRouting();

          app.UseEndpoints(endpoints =>
          {
              EndpointRouteBuilderExtension.MapDashboardRoute(endpoints, "api/dashboard");
              endpoints.MapBlazorHub();
              endpoints.MapFallbackToPage("/_Host");
          });
      }
  }
Configure the Client Side
- Add the
package.jsonconfiguration file and list the following npm packages required by the Dashboard component:
- Run the
npm installcommand to install these packages. - Create the Dashboard.razor file and add the code below to render the Web Dashboard:
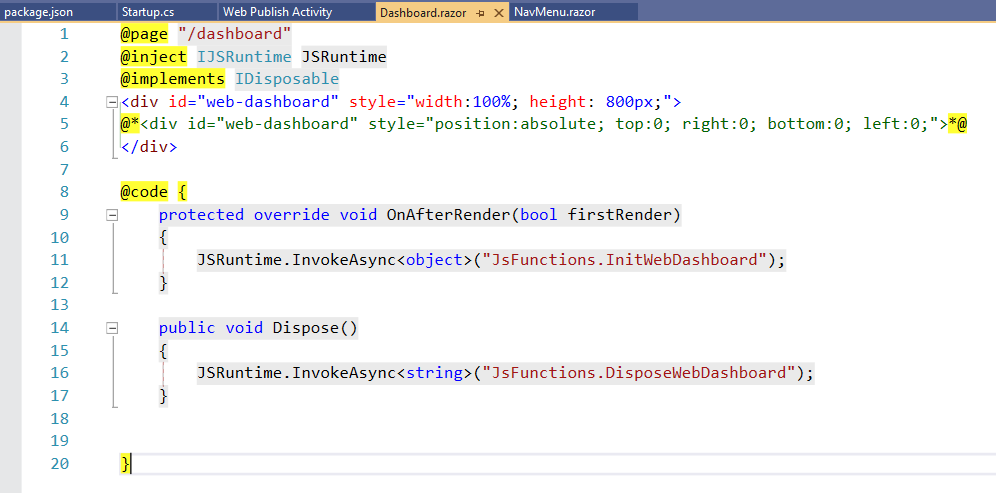 You should use the
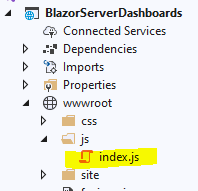
 OnAfterRenderlifecycle method for the dashboard component for initialization and theDisposemethod to release unused memory. - Add the index.js file and implement the logic to initialize and dispose the components:

- Install the
BuildBundlerMinifierNuGet package. Create a bundleconfig.json file to bundle scripts and styles required for Web Dashboard: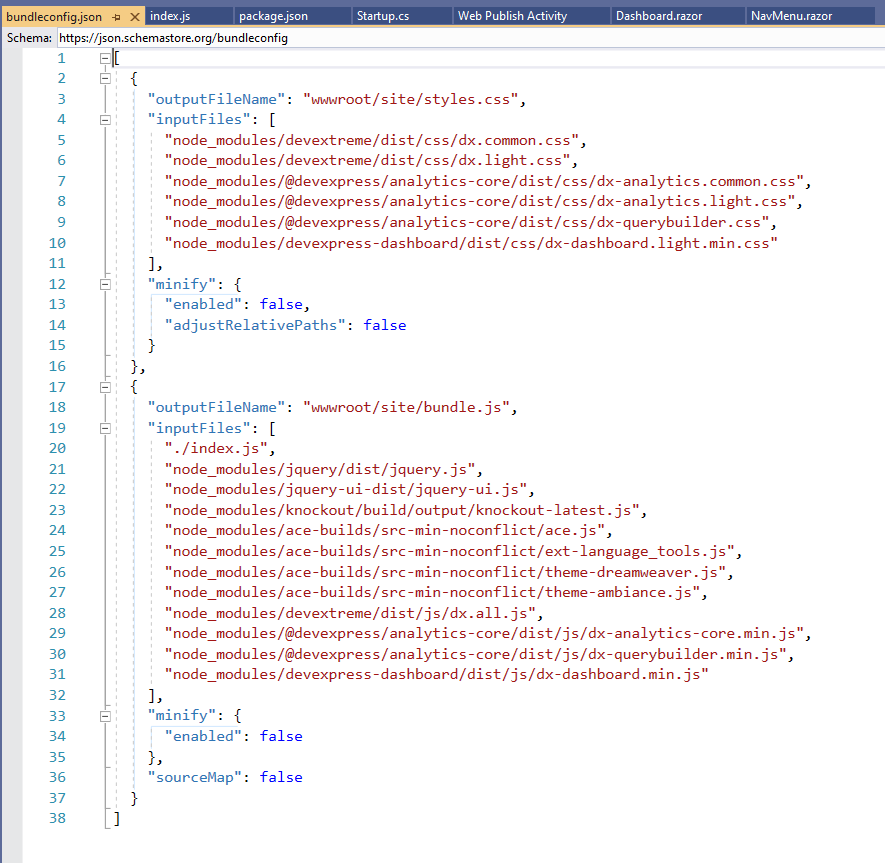
- Create the libman.json file in the root directory of the project and add the following LibMan configuration to copy icon fonts to the application’s static content folder:

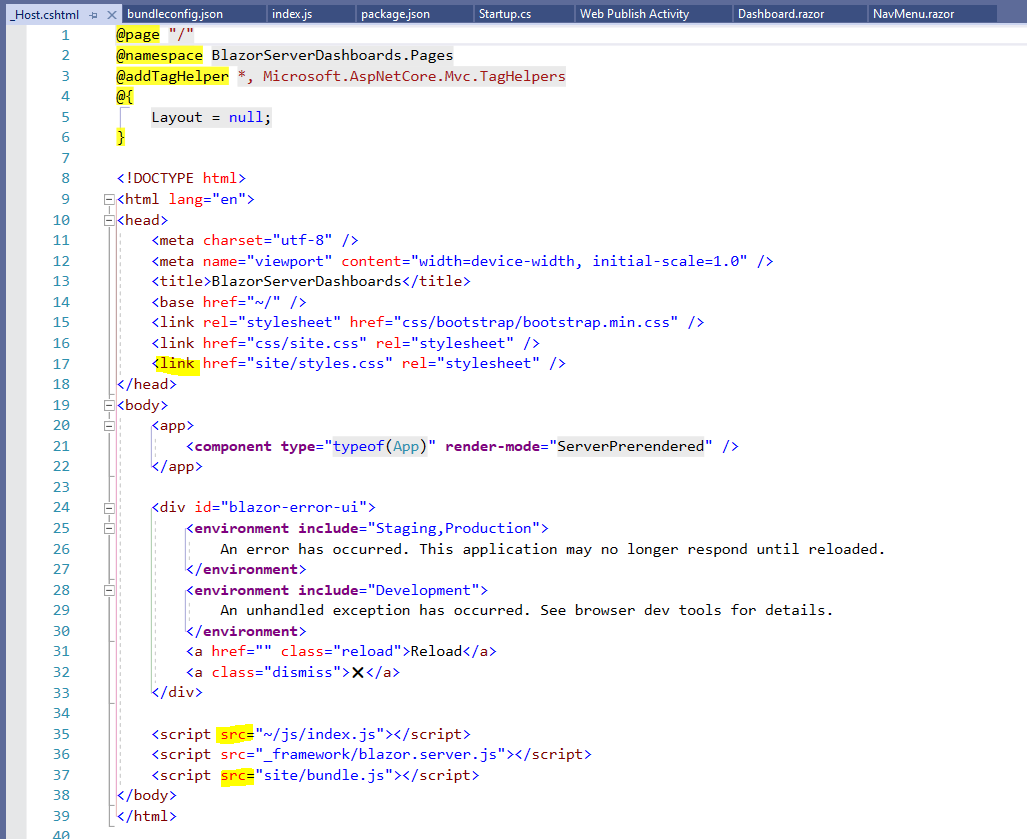
- Register the bundled resources in the _Host.cshtml file:
- Modify the NavMenu.razor file to add the Dashboard item to the menu:

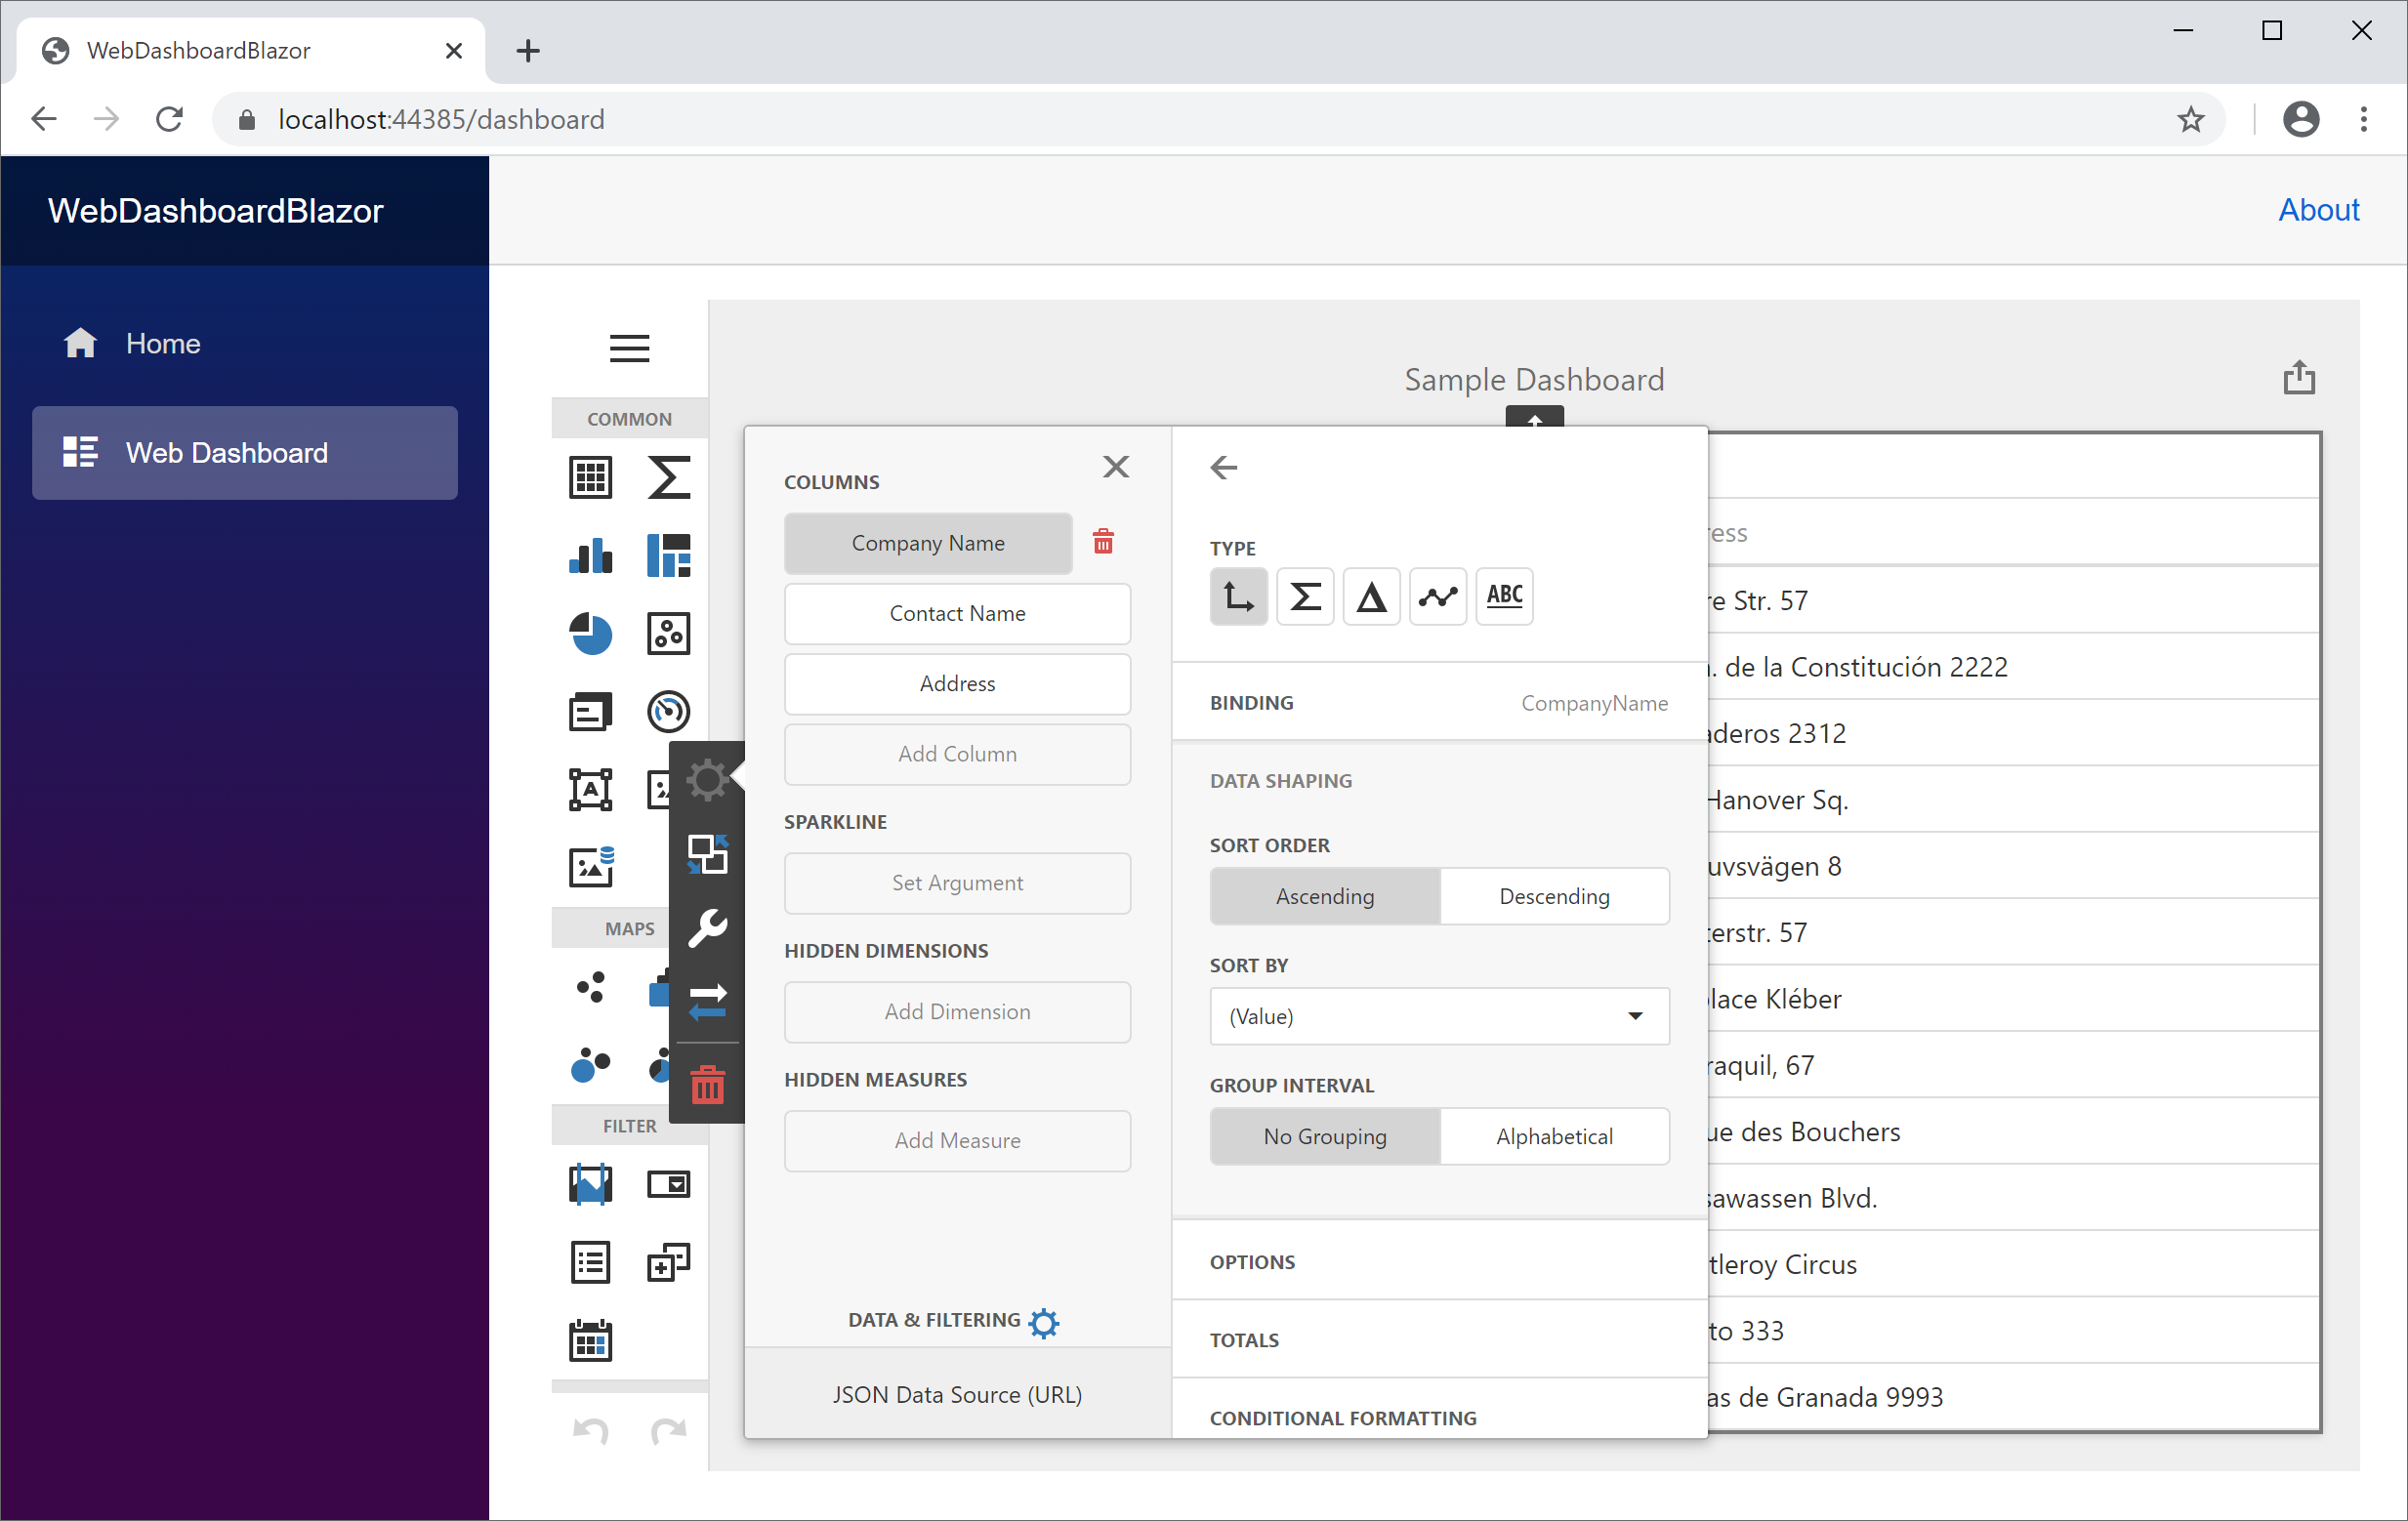
Run and View Dashboard
- Run the solution and view the sample in your browser:

Source Code: https://github.com/jjcolumb/BlazorServerDashboards
Blazor out!