
Hello everybody! I hope that you all had excellent Christmas & New Year parties and had a great time with your loved ones! ??Now is the time to continue learning! (Voice saying yes ?) In this article will be learning about Embedded Images.
So… ? I imagine that at some point in your developer life when you are adding images to your Xamarin project you ask to yourself something like a “Isn’t there a faster way to add the images in to my project without having to add them on each platform? ?” The answer is YES! And that’s what we’ will learn today !! Let’s see!
First, let’s clarify the following points
✔ What exactly are Embedded Images?
Like a a local Images, Embedded images are shipped with an application but it has the peculiarity that these are not contained in each application’s file structure, but file is embedded in the assembly project as a resource.
Removing the time we take converting our images into the formats required by each platform and then adding them, we’ll save development time and make our project lighter!
⚠ It’s important to know that this kind of image distribution is useful only if the images are used are identical for every platform.
Let’s start!!! ?
The first thing we have to do, is to add your needed images in to your Xamarin Forms project:
1⃣. Add folder preferably named “Images” (It’s not mandatory but it is good practice and makes your project more understandable and organized)
2⃣. Once image added, make a right click on your image and do the following steps:
➖ Go to Properties
➖ In the Build Action property, add EmbeddedResource as value.
Once image added, let’s create a class, in this case it will be named ImageResourceExtension.cs.
Now, let’s use it in our XAML!
As the image was added in the Xamarin root project, let’s add a namespace to refer to out local resources:
Then, just add an Image tags with the following structure:
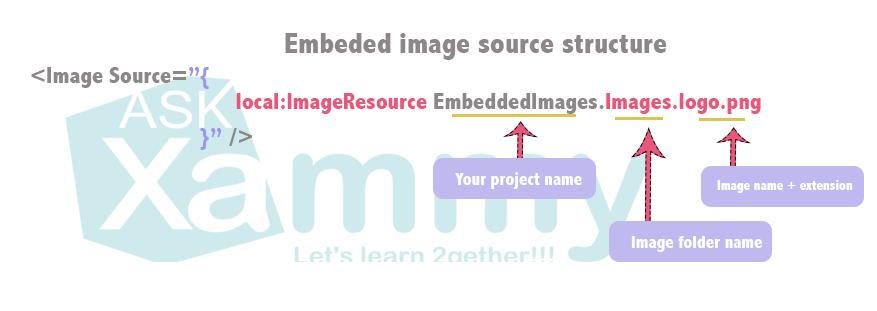
Translating into code, it’s just like this:
And finally, the result!

Done! Our Embedded Image is added! ?
Thanks for reading!!! 

References: https://channel9.msdn.com/Shows/XamarinShow/XamarinForms-101-Using-Embedded-Images


1 thought on “Learning about Embedded Images in Xamarin Forms”