
8 Very Useful Markup Extensions in .NET MAUI

Learn eight of the most common and useful XAML markup extensions for .NET MAUI.
Markup extensions are a XAML technique for getting a value that is neither a primitive nor a specific XAML type. Generally, for attribute usage, markup extensions are identified by being covered by a start and end brace. For example: {x:Static local:AppConstants.DefaultName}.
We have many extensions already created like x:Reference and x:Static, among others usually identifiable by the prefix “x:” in the syntax.
In this article, we will explore eight of the most used markup extensions so you can take advantage of them in .NET MAUI!
1. x:Null Markup Extension
The x:Null markup extension is equivalent to the null keyword in C#.
Let’s look at a use case:
Declare an implicit style for labels. (⚠ If you have not worked with implicit styles, you can check this link.)
<Style TargetType="Label">
     <Setter Property="FontAttributes"  Value="Bold" />
     <Setter Property="FontSize"  Value="21" />
     <Setter Property="FontFamily"  Value="OpenSansRegular" />
</Style>
Since implicit styles apply to all controls of the same type indicated in the style (in this case, Labels), here we need a specific Label not to take the same FontFamily as the others, so we will proceed to add the
x:Null.<StackLayout> <Label Text="Hello people!" /> <Label Text="Thanks for being here!" /> <Label Text="Welcome to this article" FontFamily="{x:Null}" /> </StackLayout>
2. x:Array Markup Extension
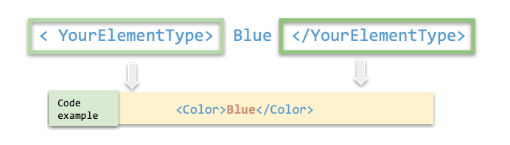
The x:Array markup extension enables you to define an array in markup. Unlike other extensions, we won’t see this one in braces. Instead, we identify it with its own start and end tags. For example: <x:Array Type="{x:Type Color}">... </x:Array>.
To use it, we need to add the following properties:
- Type allows us to indicate the type of the elements in the array. To use it, you must write the following structure:
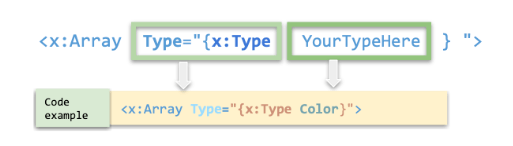
- Items is a collection of the elements that will make up your array. To send it, you must keep in mind the following structure:
And by merging the previous instructions, you will have an example like this:
<CollectionView.ItemsSource>
  <x:Array Type="{x:Type Color}">
    <Color>Pink</Color>
    <Color>Yellow</Color>
    <Color>Blue</Color>
  </x:Array>
</Collection.ItemsSource>
3. x:Type Markup Extension
x:Type is a XAML markup extension equivalent to the C# typeof keyword. It returns the Type object of that class or struct and is commonly used with the x:Array markup extension (as we saw in the example
above).
4. OnIdiom Markup Extension
OnIdiom allows you to adapt/customize the appearance of your app’s user interface based on the language of the device on which an application is running.
It is supported by the OnIdiomExtension class (you can also abbreviate it as OnIdiom), which defines the following properties:
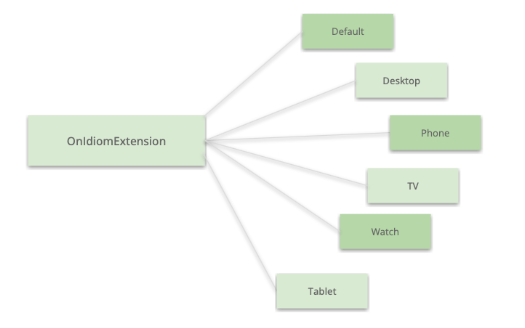
⚠ Additional information:
- If you are going to use the “Default,” you should not add it. Just add: “OnIdiom + the desired value.”
- You can also pass a Converter of type IValueConverter or a ConverterParameter of type object.
Let’s do an example in code:
In the following code, we show a Label that has a different FontSize depending on whether it is a phone or a tablet and a default value.
<Label Text="This is a test"
       FontSize="{OnIdiom 20,Tablet=25, Phone=28}"/>
5. OnPlatform Markup Extension
OnPlatform allows you to adapt/customize the appearance of your app’s user interface based on the platform on which an application is running.
It is supported by the OnPlatformExtension class (you can also abbreviate it as OnPlatform), which defines the following properties:

⚠ Like OnIdiom, you can just eliminate Default and add the property’s value. For example: OnPlatform Pink. And you can also use the Converters and ConverterParameters.
6. FontImage Markup Extension
The FontImage markup extension enables you to display a font icon in any view that can display an ImageSource.
It is supported by the FontImageExtension class (you can also abbreviate it as FontImage), which defines the following properties:
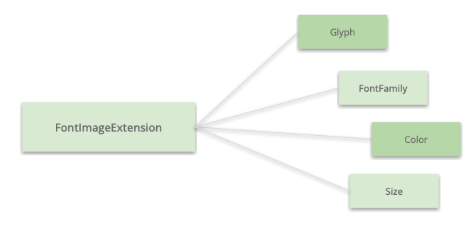
⚠ Additional information:
- If you are going to use the “Glyph,” you should not add it. Just add: “FontImage + the desired value.”
7. x:Static Markup Extension
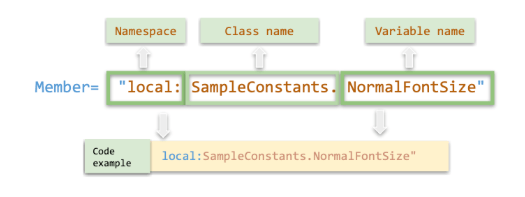
The x:Static class has a single property named Member, which is of type string, that you set to the name of a public constant, static property, static field or enumeration member.
It is supported by the StaticExtension class (you can also abbreviate it as Static).
An example of how we can use it:
Let’s create a class with a constant.
static class SampleConstants
 {
     public static double NormalFontSize = 18;
 }
Then, let’s get the value in the XAML.
<Label Text="This is a test.">
   <Label.FontSize>
      <x:StaticExtension Member="local:SampleConstants.NormalFontSize" />
   </Label.FontSize>
</Label>
And done! 😎 To obtain the value, it’s important to keep in mind the following structure:
8. x:Reference Markup Extension
The x:Reference markup extension has a single property called Name of type string that sets the name of an element on the page that has been given a name with x:Name, so that we can refer to that particular control
directly by its name. This extension is used exclusively with data bindings.
Let’s look at an example:
Let’s add a name to our page with
x:Name. In this case we will call it “page.”<ContentPage ... x:Class="MarkupExtensionsApp.MainPage" x:Name="page" xmlns:local="clr-namespace:MarkupExtensionsApp">Finally, let’s obtain the information from the
x:Nameusing thex:Referencemarkup extension.<Label Text="{Binding Source={x:Reference page}, StringFormat='The type of this page is {0}'}"/>
Conclusion
I hope this list of super useful markup extensions worked for you! I invite you to use them and to continue exploring other existing ones so that you can integrate them into your day-to-day life! 💚💕
See you next time! 💁♀️
References
This article was based on the official documentation:

Leomaris Reyes
Leomaris Reyes is a Software Engineer from the Dominican Republic, with more than 5 years of experience. A Xamarin Certified Mobile Developer, she is also the founder of Stemelle, an entity that works with software developers, training and mentoring with a main goal of including women in Tech. Leomaris really loves learning new things! 💚💕 You can follow her: Twitter, LinkedIn , AskXammy and Medium.
Related Posts
Comments
All articles
Topics
Latest Stories
in Your Inbox
Subscribe to be the first to get our expert-written articles and tutorials for developers!
All fields are required