After using Twitter’s iOS App for a while, I started looking at it with the developer’s eye and noticed that some of the subtle movements and component interactions are extremely interesting. This sparked my curiosity: how did you guys at Twitter do it?
More specifically, let’s talk about the profile view: isn’t it elegant? It looks like a default view, but if you look closely you’ll notice there’s much more. Layers overlap, scale and move in unison with the scrollview offset, creating an harmonic and smooth ensemble of transitions… I got carried away, but yes you guessed it, I love it.
So, let’s do it and recreate this effect right away!
First things first, here is a preview of the final result for this tutorial:
Structure’s description
Before diving into the code I want to give you a brief idea of how the UI is structured.
Open the Main.storyboard file. Inside the only View Controller’s view you can find two main Objects. The first is a view which represents the Header and the second is a Scrollview which contains the profile image (let’s call it Avatar) and the other information related to the account like the username, and the follow-me button. The view named Sizer is there just to be sure that the Scrollview content is big enough to enable vertical scrolling.
As you can see, the structure is really simple. Just note that I’ve put the Header outside the Scrollview, rather than place it together with the other elements, because, even though it might not be strictly necessary, it gives the structure more flexibility.
Let’s code
If you look carefully at the final animation you’ll notice you can manage two different possible actions:
1) User pulls down (when the Scrollview content is already at the top of the screen)
2) User scrolls down/up
This second action can in turn be split in four more steps:
2.1) Scrolling up, the header resizes down until it reaches Navigation Bar default size and then it sticks to the top of the screen.
2.2) Scrolling up, the Avatar becomes smaller.
2.3) When the header is fixed, the Avatar moves behind it.
2.4) When the top of the User’s name Label reaches the Header, a new white label is displayed from the bottom center of the Header. The Header image gets blurred.
Open ViewController.swift and let’s implement these steps one by one.
Setup the controller
The first thing to do is obviously to get information about the Scrollview offset. We can easily do that through the protocol UIScrollViewDelegate implementing the scrollViewDidScroll function.
The simplest way to perform a transformation on a view is using Core Animation homogeneous three-dimensional transforms, and applying new values to the layer.transform property.
This tutorial about Core Animation might come in handy: https://www.thinkandbuild.it/playing-around-with-core-graphics-core-animation-and-touch-events-part-1/.
These are the first lines for the scrollViewDidScroll function:
   var offset = scrollView.contentOffset.y
   var avatarTransform = CATransform3DIdentity
   var headerTransform = CATransform3DIdentity
Here we get the current vertical offset and we initialize two transformations that we are going to setup later on with this function.
Pull down
Let’s manage the Pull Down action:
if offset < 0 {

     let headerScaleFactor:CGFloat = -(offset) / header.bounds.height
     let headerSizevariation = ((header.bounds.height * (1.0 + headerScaleFactor)) - header.bounds.height)/2.0
     headerTransform = CATransform3DTranslate(headerTransform, 0, headerSizevariation, 0)
     headerTransform = CATransform3DScale(headerTransform, 1.0 + headerScaleFactor, 1.0 + headerScaleFactor, 0)

     header.layer.transform = headerTransform
}
First, we check that the offset is negative: it means the user is Pulling Down, entering the scrollview bounce-area.
The rest of the code is just simple math.
The Header has to scale up so that its top edge is fixed to the top of the screen and the image is scaled from the bottom.
Basically, the transformation is made by scaling and subsequently translating to the top for a value equal to the size variation of the view. In fact, you could achieve the same result moving the pivot point of the ImageView layer to the top and scaling it.
headerScaleFactor is calculated using a proportion. We want the Header to scale proportionally with the offset. In other words: when the offset reaches the double of the Header’s height, the ScaleFactor has to be 2.0.
The second action that we need to manage is the Scrolling Up/Down. Let’s see how to complete the transformation for the main elements of this UI one by one.
Header (First phase)
The current offset should be greater than 0. The Header should translate vertically following the offset until it reaches the desired height (we will speak about Header blur later).
headerTransform = CATransform3DTranslate(headerTransform, 0, max(-offset_HeaderStop, -offset), 0)
This time the code is really simple. We just transform the Header defining a minimum value that is the point at which the Header will stop its transition.
Shame on me: I’m lazy! so I’ve hardcoded numeric values like offset_HeaderStop inside variables. We could achieve the same result in other elegant ways, calculating UI element positions. Maybe next time.
Avatar
The Avatar is scaled with the same logic we used for the Pull Down but in this case attaching the image to the bottom rather than the top. The code is really similar except for the fact that we slow down the scaling animation by 1.4.
// Avatar -----------

let avatarScaleFactor = (min(offset_HeaderStop, offset)) / avatarImage.bounds.height / 1.4 // Slow down the animation
let avatarSizeVariation = ((avatarImage.bounds.height * (1.0 + avatarScaleFactor)) - avatarImage.bounds.height) / 2.0
avatarTransform = CATransform3DTranslate(avatarTransform, 0, avatarSizeVariation, 0)
avatarTransform = CATransform3DScale(avatarTransform, 1.0 - avatarScaleFactor, 1.0 - avatarScaleFactor, 0)
As you can see, we use the min function to stop the Avatar scaling when the Header transformation stops (offset_HeaderStop).
At this point, we define which is the frontmost layer depending on the current offset. Until the offset is less than or equal to offset_HeaderStop the frontmost layer is the Avatar; higher than offset_HeaderStop it’s the Header.
           if offset <= offset_HeaderStop {

                if avatarImage.layer.zPosition < header.layer.zPosition{
                    header.layer.zPosition = 0
                }

            }else {
                if avatarImage.layer.zPosition >= header.layer.zPosition{
                    header.layer.zPosition = 2
                }
            }
White Label
Here is the code to animate the white Label:
let labelTransform = CATransform3DMakeTranslation(0, max(-distance_W_LabelHeader, offset_B_LabelHeader - offset), 0)
headerLabel.layer.transform = labelTransform
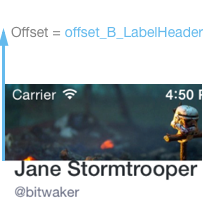
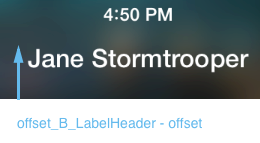
Here we introduce two new shame-on-me variables: when offset is equal to offset_B_LabelHeader , the black username label touches the bottom of the Header.
distance_W_LabelHeader is the distance needed between the bottom of the Header and the White Label to center the Label inside the Header.
The transformation is calculated using this logic: the White Label has to appear as soon as the Black label touches the Header and it stops when it reaches the middle of the header. So we create the Y transition using:
max(-distance_W_LabelHeader, offset_B_LabelHeader - offset)
Blur
The last effect is the blurred Header. It took me three different libraries to find the right solution… I’ve also tried building my super easy OpenGL ES helper. But updating the blur in realtime always ended up to be extremely laggy.
Then I realized I could calculate the blur just once, overlap the not-blurred and the blurred image and just play with alpha value. I’m pretty sure that’s what Twitter devs did.
In viewDidAppear we calculate the Blurred header and we hide it, setting its alpha to 0:
// Header - Blurred Image

headerBlurImageView = UIImageView(frame: header.bounds)
headerBlurImageView?.image = UIImage(named: "header_bg")?.blurredImage(withRadius: 10, iterations: 20, tintColor: UIColor.clear)
headerBlurImageView?.contentMode = UIViewContentMode.scaleAspectFill
headerBlurImageView?.alpha = 0.0
header.insertSubview(headerBlurImageView, belowSubview: headerLabel)
The blurred view is obtained using FXBlurView.
In the scrollViewDidScroll function we just update the alpha depending on the offset:
headerBlurImageView?.alpha = min (1.0, (offset - offset_B_LabelHeader)/distance_W_LabelHeader)
The logic behind this calculation is that the max value has to be 1, the blur has to start when Black Label reaches the header and it has to stop when the white label is at its final position.
That’s it!
I hope you’ve enjoyed this tutorial (despite the shame-on-me variables :P). Studying how to reproduce such a great animation was a lot of fun for me.
And poke me on Twitter if you have any interesting UIs you’d like to see x-rayed and rebuilt: we could work on it together! 🙂
A big thanks goes to Nicola who has taken time to review this article!
Yari D'areglia
https://www.thinkandbuild.itSenior iOS developer @ Neato Robotics by day, game developer and wannabe artist @ Black Robot Games by night.


