


The purpose of Software Testing is to validate the software functionalities and verifying the application as per the requirements. In the whole Software Development Life Cycle (SDLC) process, lots of defects arise as a consequence of coding fault, requirement misunderstanding and many more. Timely detection of these defects is a crucial point for a smooth delivery. In our Software Testing Life Cycle (STLC) jargon we address these defects as bugs. Besides the detection of bugs, proper management and reporting are necessary in the whole STLC process. Here, we are going to discuss two items related to defect/bug management: the lifecycle and the reporting of a bug.
Defect/Bug Lifecycle:

Figure 1: Bug Lifecycle
The procedure of reporting a defect/bug is wrapped around the whole STLC. Even if it’s not the sole purpose of software testing, detecting defects/bugs is one of the major action points of our testing process. So, to detect bugs we need to conduct thorough testing. It can be functional testing using our prepared test cases or it may be some exploratory level testing inside our STLC. This is our first step, Analyze. To summarize, in analyze step we are getting prepared to discover some bugs and we are going to take some measures before we report the bugs.
Before moving on with further process of analyzing, we need to cross check if the detected bug is already reported so that we can avoid duplication. Given that we are in an era of using Jira in our whole SDLC, our job is relatively easy to find out if our bug is duplicate or not. Though, at the time of functional testing of a feature or an API during sprint release it is highly unlikely that our bug is a duplicate one. Now lets talk about what means of analyzing we are going to follow. The answer is simple, whatever we need to do to execute our test, be it a prepared test case or an exploratory scenario. Personally, I believe that in terms of reporting bugs we should approach more of a grey or white box level testing rather than black box approach. Which means we should dig deep into the application log where the defect occurred if it’s a server side issue. If it’s a web or browser related issue we can check the console or the network log of our browser. If we are testing a mobile application, we can use the debug versions of our applications and monitor the device log. Sometimes this approach may prove to be a little bit of hard work but it’s worth it. We can realize its value when we go to the Retest step of our cycle. Analyzing the logs and knowing what actually went wrong will give us means to validate our bug in the Retest step. It will establish a benchmark based on which we can achieve the last step (Close) of our cycle. So, we have everything we need to Report our bug. When we Retest our reported bug, there are three possible outcomes. Firstly, the bug is fixed properly; secondly, the bug is not properly fixed and finally, the bug might be fixed but the given fix has created a new bug in the corresponding impact area. In the first outcome, Hurray! We do not have any more headaches, lets close the bug. The second one is bit of tricky for both development teams and testing teams as we will need to reopen the issue, analyze it again and repeat the whole cycle (Lets just hope this thing doesn’t happen frequently). The third one might prove to be a bit of tricky situation as we might need to test a bit more deeply in the impact area of our reported bug, analyze the reason again and report it and repeat the full cycle. The only silver lining is our original reported bug is resolved.
We haven’t talked about the Track step yet. It is where we keep track of the resolution and the progress of our reported bug, the development start date and the probable release date. Again, as most of us use Jira or probably any other bug tracking tool, this step is comparatively easy. If not, then the process is fully manual. It’s based on communication between the development team and test team about the impact, reason and resolution of the bug.
Defect/Bug Reporting:
We have found our bug and now we will report it in our tracking tool. Our goal in terms of reporting a bug should always be that we are clear and concise in our reporting. Which means we properly depict what went wrong, where it went wrong and how it can be reproduced again. To summarize the main properties of a bug report we can highlight the following points:
- The report should be in a simply described written format.
- The report should be complete and understandable.
- The report should explain the problem thoroughly.
- The report should mark the steps to regenerate the bug.
To achieve the aforementioned properties, we must ensure that our bug report contains all the required components. We can divide the necessary components of a bug report in six groups, which are: Identifying Information, Description, Status Indicators, Comments, Miscellaneous Information and Supporting Information.
Lets discuss these items in brief.
Identifying Information:
This section is the first part of our report body. It will start with the ID of our report. Since, most of us use a tracking tool, we do not need to worry about it. If we are not using a tracking tool, we can use a combination of the project name and a serial number, for example: Project_Name_0001. Next we have the name of the reporter and the date of reporting which are also automatically logged in by a tracking system. This section also includes the component or the feature against which the bug was raised. Lastly, we have the affecting version or the release number associated where the bug has been produced.
Description:
Description consists of two parts: Title and Content. Title is a meaningful summary of the bug which will state what went wrong in which part. We can relate this title to a topic sentence of a paragraph or the headline of an article. The more meaningful the topic sentence or the headline is, the more it peaks our interest to read it. It is a very good practice to avoid typos and grammatical mistakes when writing a title.
We can divide the Content part into some more sub-divisions. The first thing to mention here is the problem itself. It is the detailed translation of the title we have written. For better visibility and better understanding, it is suggested that we wrap the detail within 3 to 4 sentences. Another major part to be included here is Steps to Reproduce. This is the test steps followed where the bug was found. Adding it should be marked as mandatory as it will save time along further bug lifecycle for all the concerned parties. The next part will contain What Happens while following the steps we mentioned and What was Expected to Happen following the steps. In our day to day testing jargon these are also known as Actual Results and Expected Results respectively. Lastly, we can add our test case ID or the link to our test case here. Though it is not an utmost requirement, it can be added to maintain better process within the SQA team.
Status Indicators:
First part of this section is Bug Severity and Priority. The testers actually define the severity of the occurred issue. Priority is defined by the Business/Product Team. In Jira, we have Blocker, Highest, High, Medium, Low, Lowest. Marking the correct severity level is a big job from the part of a tester (Hopefully we will discuss about determining severity level in a separate article).
Next comes Resolution Status. This part is usually finalized in the closing stage of our bug lifecycle. When we close our bug we assign this status based on our decision with the bug. Resolution Status can be assigned any of the following values: i) Done, ii) Won’t Do, iii) Cannot Reproduce, iv) Duplicate, v) Not a Bug and vi) Deferred. Lets visualize these with the following diagram where different resolution is stated based on different resolution of a bug:
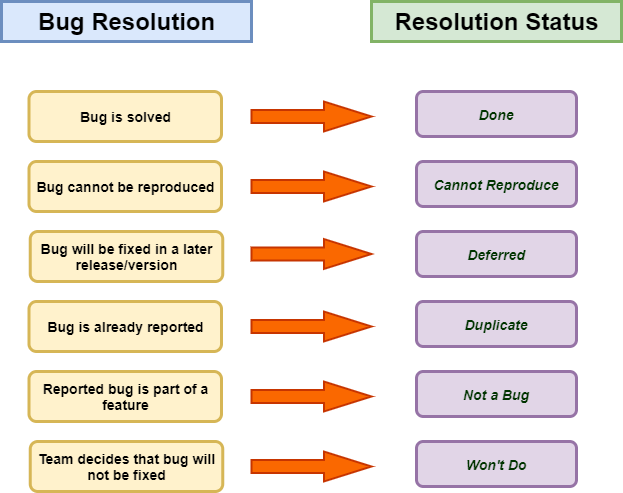
Figure 2: Resolution status mapping
Reporting Status is another part of this section. This status depicts the different states in the Track step of our bug lifecycle. Different status in a bug lifecycle can be described using the following the flow-chart diagram:
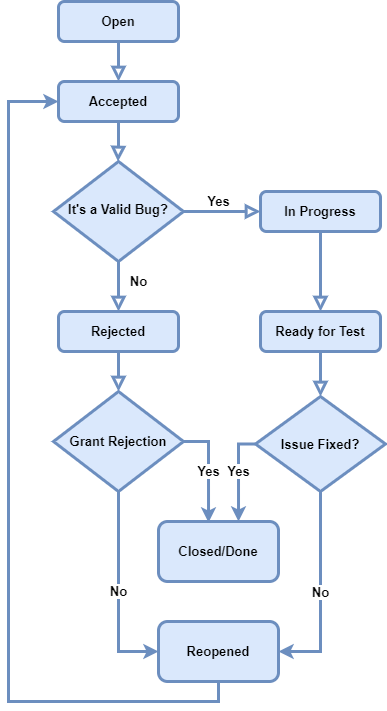
Figure 3: Bug reporting status flow-chart
After reporting a bug it’s created in Open state. After the corresponding developer acknowledges the issue, it moves to Accepted state. There are two outcomes from this state. If the bug is valid we move to In Progress state which means that the bug is in the process of being fixed. Otherwise, the bug is Rejected. After a bug is fixed it moves to Ready for Test state which indicates our Retest phase. If the bug is fixed or in case of rejected bugs, if the rejection reason is valid we move the status to Done or Closed. If the bug is not resolved or in case of rejection it’s invalid we take the status to Reopened. After this status, the full cycle is repeated.
Reporting Status is also associated with Resolution Status. For rejected bugs we can use any of the resolutions from Won’t Do, Cannot Reproduce, Duplicate, Not a Bug or Deferred as appropriate to our situation.
Comments:
This section includes any testing notes or suggestions from the side of testers. During Retest phase, we add comments with our resolution notes and retest logs.
Miscellaneous Information:
This section should be used for ease of access and better understanding. We can include our test environment (server information, mobile application platform and version etc.) and various dates like target date of the bug fix or release that includes the bug, closing date etc. Tester and developer name can be mentioned in this section along with their respective work logs (work hour, timetables etc.). Bug reason and resolution can be attached here. Also, if a bug is rejected, the rejection reason should be included here.
Supporting Information:
This section will include the test logs (application logs, browser or device logs etc.) and the corresponding UI screenshots (if any). We might add our test case here instead of adding it in Description section.
Lets see a sample bug report after posting it in a tracking system:
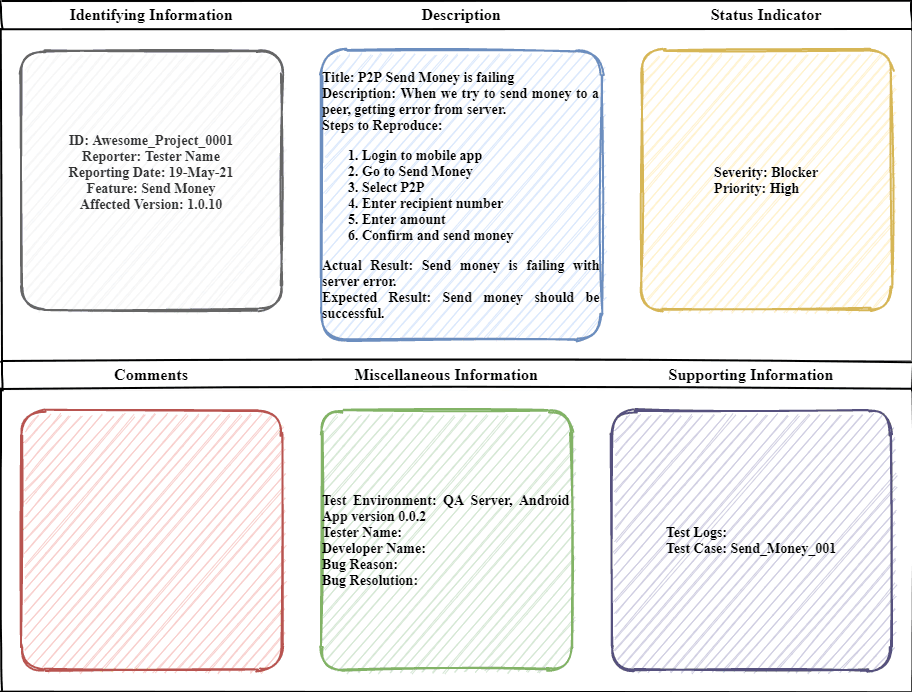
Figure 4: Sample bug report