Build an AI Search Engine Using FastAPI, Qdrant, and ChatGPT
In this tutorial, you'll learn how to use FastAPI, Qdrant, Sentence Transformers, and ChatGPT to create an AI search engine.

Table of Contents
- Prerequisites
- Designing a (Tiny) Search Engine with ChatGPT
- Set Up Your Local Environment
- Configure Qdrant and OpenAI
- Extract Data
- Vectorize and Index Data
- Create a Server with FastAPI
- Deploy Your App
- Conclusion
With all the buzz surrounding Bing AI and Bard, I was keen on building a (tiny) AI search engine myself. After a few days of tinkering, I released Ask Seneca. It's a small app that allows you to consult a GPT-based Seneca who answers your questions and cites his sources.
When a user asks a question, Ask Seneca searches for Seneca's most relevant writings to answer that question and then summarizes those writings into a coherent answer. I built it using FastAPI, Qdrant, Sentence Transformers, and GPT-3. I recently updated it to use the ChatGPT API.
Despite the setbacks that Bing AI and Bard are facing, the potential for this technology is vast - you could build tools for quick and efficient searches through legal documents, internal knowledge bases, product manuals, and more.
In this tutorial, I'll show you how to build your own AI search engine. You'll create an app that lets users ask questions to a GPT-based Marcus Aurelius, and provides them with concise answers and references to his Meditations.
Let's get to it!
Prerequisites
To make the most out of this tutorial, you should know:
- What semantic search is.
- What vector databases are.
- What FastAPI is and how to use it.
You don't have to be an expert in any of these areas, but familiarity with them will help you understand the sections that follow.
Designing a (Tiny) Search Engine with ChatGPT
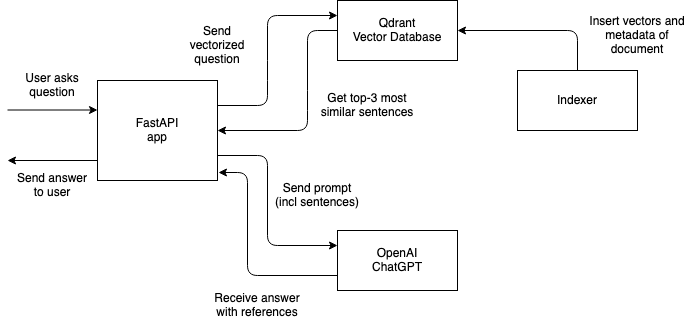
Before you get started, you should understand the overall approach you'll take to build your AI search engine. There are three parts to it:
- Extraction: This part consists of extracting the data that you want users to be able to search. In this case, that means parsing Meditations. I won't go into detail about this because it is very project-specific. The parsed data is available in the repository.
- Indexing: This entails indexing the extracted data so that it can be accessed later when running searches. In this case, you'll use a semantic search approach, which means you'll search the data based on its meaning rather than keywords. That is, if you search for "How can I be happy?" you should get passages from Meditations that discuss happiness or feeling good, not just those that contain the exact words from the query.
- Search: This consists of a backend service that processes the user's query, vectorizes it, finds vectors in the index that are the most similar to it, and then calls OpenAI's API to generate a summarized answer for the user.
Here's a visual representation of how the parts of the application you'll build in this tutorial fit together:
That's all. Let's continue!
FYI: If you found this content valuable, consider subscribing. I publish 1-2 tech articles every month. Subscribe so you can stay updated!
Set Up Your Local Environment
Take the following steps to prepare your local environment:
- Install Python 3.10.
- Install Poetry. It's not mandatory but I highly recommend it.
- Clone the repository with the sample app:
git clone https://github.com/dylanjcastillo/ai-search-fastapi-qdrant-chatgpt - Go to the root folder of the project and install the dependencies with:
- Poetry: Create the virtual environment in the same directory as the project and install the dependencies:
poetry config virtualenvs.in-project true poetry install - venv and pip: Create a virtual environment and install the dependencies listed in
requirements.txt:python3.10 -m venv .venv && source .venv/bin/activate pip install -r requirements.txt
- Poetry: Create the virtual environment in the same directory as the project and install the dependencies:
If everything went well, you should have a virtual environment with all of the necessary libraries and a project structure that looks like this:
ai-search-fastapi-qdrant-gpt3
│
├── README.md
├── config.py
├── data
│   ├── processed
│   │   └── Marcus_Aurelius_Antoninus...
│   │       └── Marcus_Aurelius_Antoninus...json
│   └── unzipped
│       └── Marcus_Aurelius_Antoninus...
│           ├── index.html
│           ├── metadata.opf
│           └── style.css
├── main.py
├── notebooks
│   ├── extract_text.ipynb
│   └── vectorize_text.ipynb
├── poetry.lock
├── pyproject.toml
├── requirements.txt
├── .env-example
└── .venv/
This is your project's structure. Let me explain the purpose of the most important files and directories:
config.py: This file contains project configuration specifications such as Qdrant's host, port, and API key (read from a.envfile)data/: This directory contains the project's data. It contains Meditations as originally downloaded from Wikisource as well as the processed file that you will use in the project.main.py: This file contains the code of the FastAPI application.notebooks/: This directory contains Jupyter notebooks for extracting, vectorizing, and indexing the data.extract_text.ipynbcontains code to parse the HTML file andvectorize_text.ipynbcontains code to vectorize and index the data.poetry.lockandpyproject.toml: These files contain information about the project's dependencies and are used by Poetry to replicate the environment.requirements.txt: This file contains a list of Python packages required by the project and their respective versions..env-example: This file is an example of the environment variables you must provide..venv/: This directory contains the project's virtual environment.
That's it! You're now ready to get started.
Configure Qdrant and OpenAI
Start by renaming .env-example to .env. Don't worry about filling in the values in .env. After you've created a cluster and the API keys for Qdrant and OpenAI, you'll fill in the blanks.
Qdrant
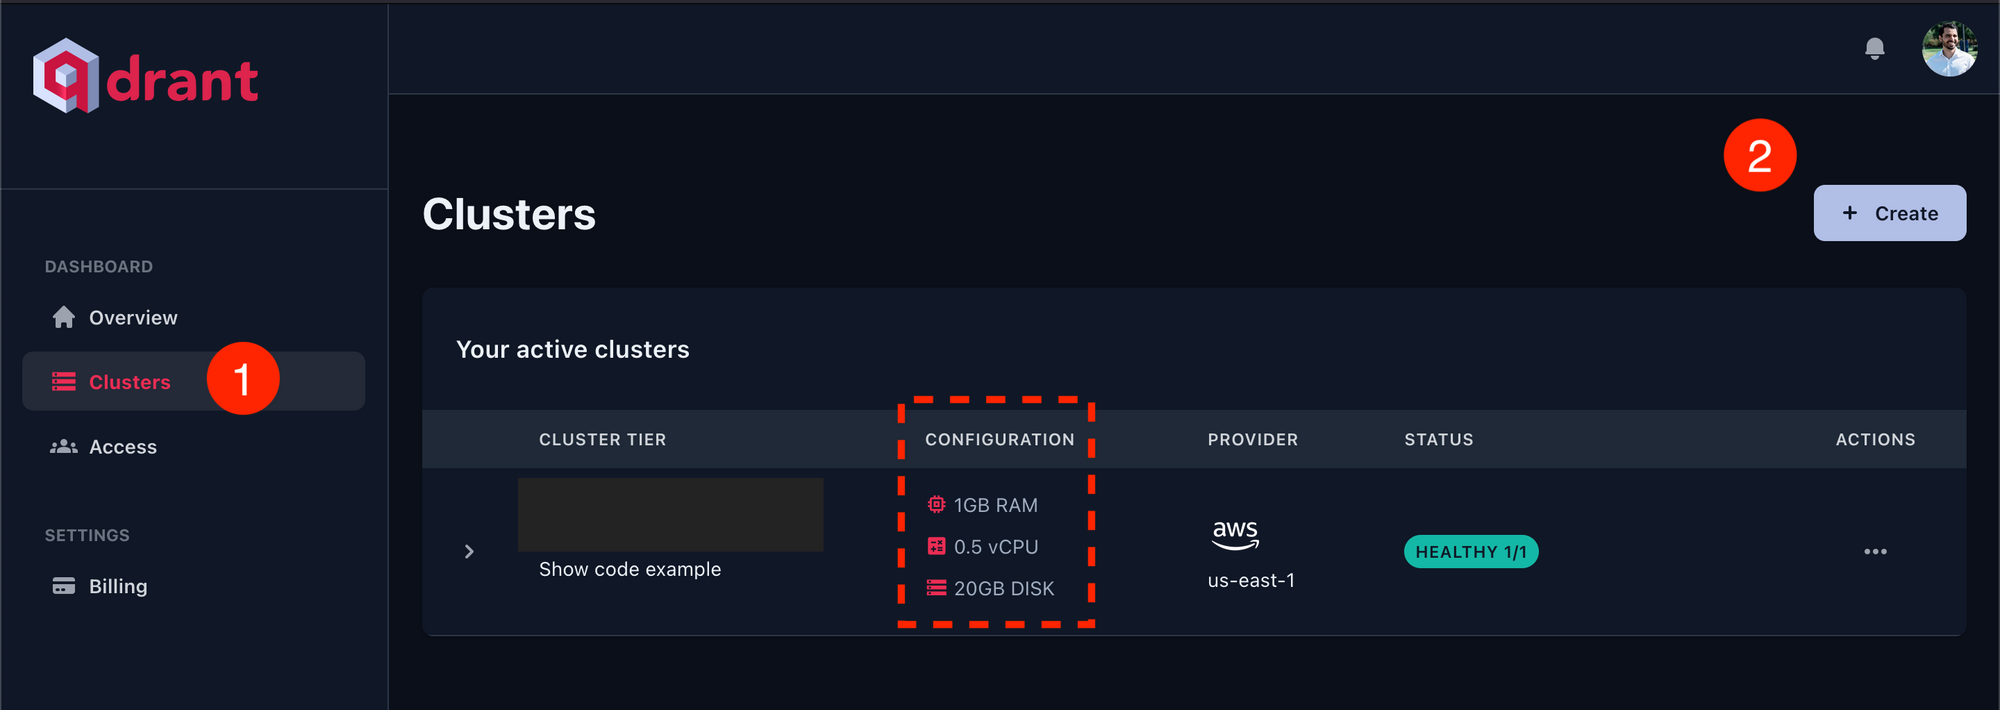
Create an account at Qdrant, if you don't already have one. Then, on your account page go to Clusters > Create, and create a cluster of 1GB of RAM, 0.5 vCPU, and 20GB Disk. Qdrant has a generous free tier, and it's free to run a cluster with those specifications.
Next, paste the host and API key you obtained when you created your cluster into .env:
QDRANT_PORT=6333
QDRANT_HOST=<your_qdrant_host>
QDRANT_API_KEY=<your_qdrant_api_key>
If you didn't copy the key, you can still create a new one in Access.
Finally, you can test that everything went well by running the first three cells in vectorize_data.ipynb.
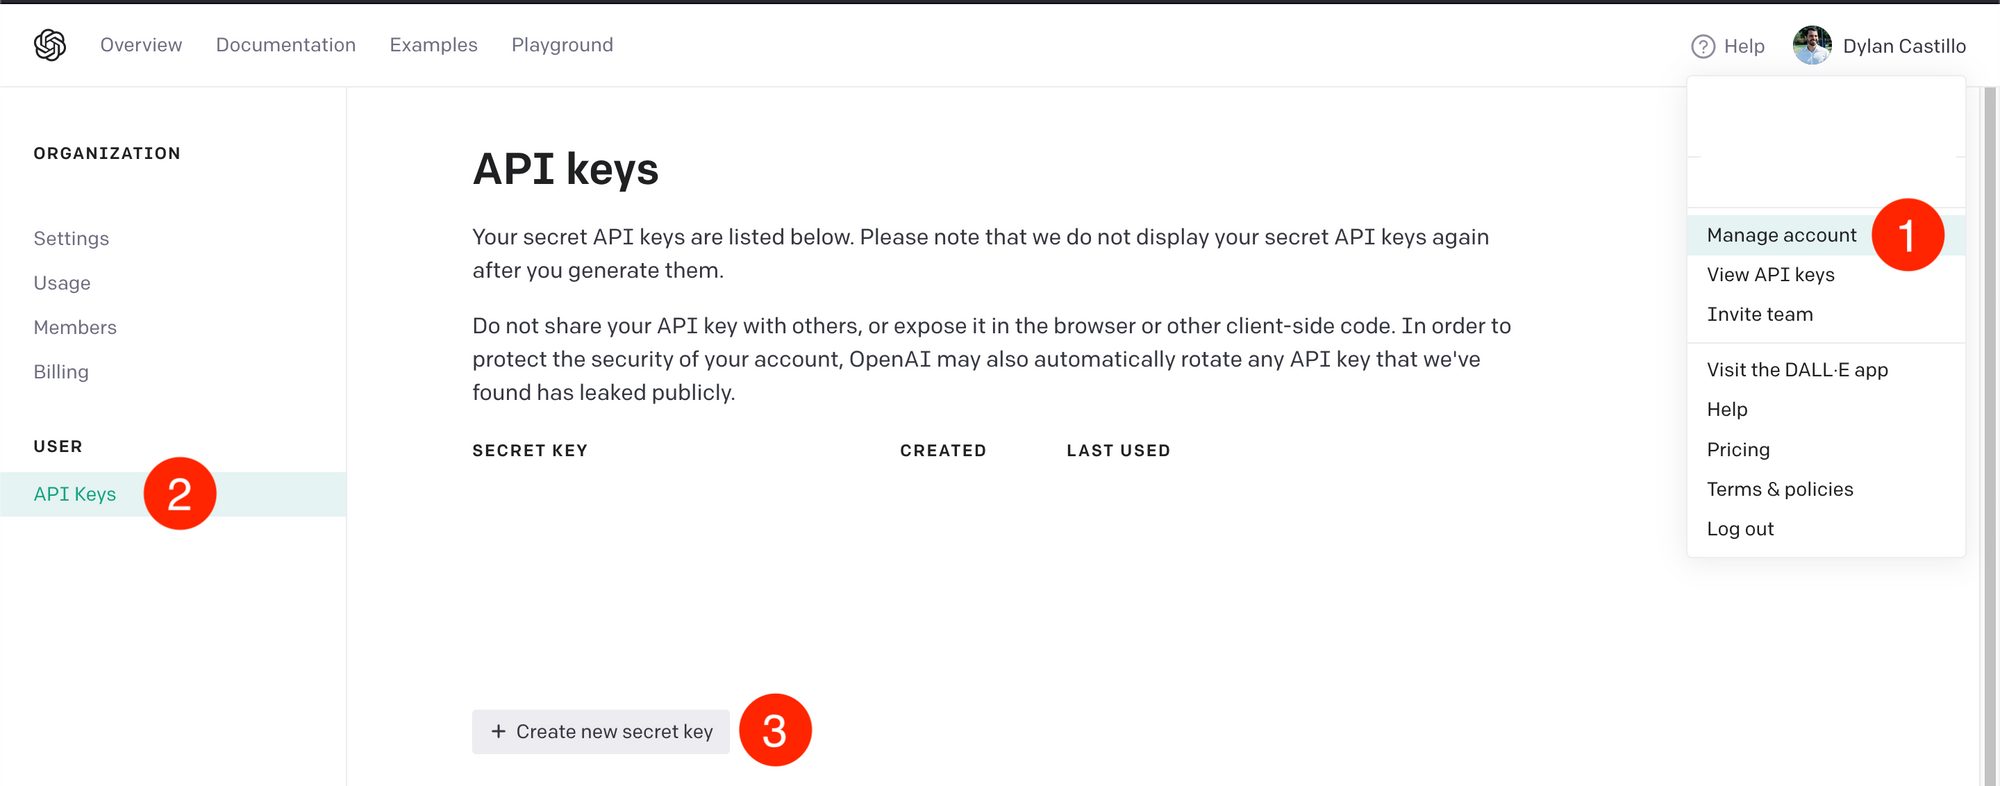
OpenAI
If you don't have an OpenAI account, create one. After that, go to Manage account > API keys > + Create new secret key.
Then, paste the generated key in .env:
QDRANT_PORT=6333
QDRANT_HOST=<your_qdrant_host>
QDRANT_API_KEY=<your_qdrant_api_key>
OPENAI_API_KEY=<your_openai_api_key> # new
That's it! Let's continue.
Extract Data
The data extraction pipeline will vary greatly between projects, so I won't go into too much detail here.
Here are some useful guidelines to keep in mind when doing so:
- Garbage in, garbage out: The quality of your data will heavily influence your search results, so take your time with this step.
- Splitting documents: When you do semantic search, you need to divide documents into smaller chunks so that you can compare the similarity of each chunk to the user's query. There is no right or wrong way to do this. In this case, I took a straightforward approach: divide the text into paragraphs, and if the paragraph is above a certain number of characters, divide it into multiple sentences.
- Production: For real-world scenarios, you should think about how frequently you'll be extracting and ingesting data, adapting your pipeline for different data sources (e.g., scraping, APIs), and building pipeline monitors, among other things. In this example, because data extraction is a one-time event, I'm using jupyter notebooks, which isn't always a good idea.
Here's a sneak peek at the data from this tutorial:
{
    "book_title": "Meditations by Marcus Aurelius",
    "url": "https://en.wikisource.org/wiki/Marcus_Aurelius_Antoninus_-_His_Meditations_concerning_himselfe",
    "data": [
        {
            "title": "THE FIRST BOOK",
            "url": "https://en.wikisource.org/wiki/Marcus_Aurelius_Antoninus_-_His_Meditations_concerning_himselfe#THE_FIRST_BOOK",
            "sentences": [
                "I. Of my grandfather Verus I have learned to be gentle and meek...",
                "II. Of him that brought me up, not to be fondly addicted...",
                "III. Of Diognetus, not to busy myself about vain things...",
                "IV. To Rusticus I am beholding, that I first entered into the...",
 	...
 		}
 	]
 }
The tutorial's data includes general metadata such as the book title and source URL, as well as information from each chapter with the sentences you'll index.
If you want to take a look at how I extracted the data used in this tutorial, check out the extract_data.ipynb.
Vectorize and Index Data
Once you've extracted the data, you'll want to index it in your vector database.
The process consists of two steps:
- Generate vectors for each sentence you extracted earlier.
- Insert those vectors in a collection (the set of vectors you can search in the vector database).
You can find the code for this section in notebooks/vectorize_data.ipynb.
As usual, you start by importing the required libraries:
import json

import numpy as np
import pandas as pd
import torch

from qdrant_client import QdrantClient
from qdrant_client.http import models
from sentence_transformers import SentenceTransformer

from tqdm.notebook import tqdm

from config import QDRANT_HOST, QDRANT_PORT, QDRANT_API_KEY, DATA, COLLECTION_NAME
This code imports all the libraries and configuration variables you need to vectorize and index the data. Here are some things worth mentioning:
qdrant_clientandqdrant_client.httplet you interact with Qdrant's client, so that you can insert and retrieve data from the collection.sentence_transformerslet you generate the vectors from text, using pretrained models.
Next, you read the data as follows:
BOOK_FILENAME = "Marcus_Aurelius_Antoninus_-_His_Meditations_concerning_himselfe"

with open(f"{DATA}/processed/{BOOK_FILENAME}/{BOOK_FILENAME}.json", "r") as file:
    meditations_json = json.load(file)

rows = []
for chapter in tqdm(meditations_json["data"]):
    for sentence in chapter["sentences"]:
        rows.append(
            (
                chapter["title"],
                chapter["url"],
                sentence,
            )
        )

df = pd.DataFrame(
    data=rows, columns=["title", "url", "sentence"]
)

df = df[df["sentence"].str.split().str.len() > 15]
This code reads the previously processed data and removes short sentences. It works as follows:
- Lines 1 to 4 read the JSON file you generated for Meditations, and save it as
meditations_json. - Lines 6 to 15 go through all the chapters of the book stored in the
datakey frommeditations_jsonand for each chapter, it extracts the relevant data (title of chapter, URL of chapter, and sentence), and adds it torows. - Lines 17 to 21 create a DataFrame with the data from
rowsand removes the sentences with less than 15 words.
Next, you create a collection in your vector database:
# Create collection
client = QdrantClient(
	host=QDRANT_HOST, port=QDRANT_PORT, api_key=QDRANT_API_KEY
)
client.recreate_collection(
    collection_name=COLLECTION_NAME,
    vectors_config=models.VectorParams(
    	size=384,
    	distance=models.Distance.COSINE
    ),
)
This code connects to your Qdrant's cluster and creates a collection based on the name and settings you provide. In this case, you set the size to 384 based on the needs of the model you'll use for vectorizing the sentences. You also set distance to use Cosine distance, which will define how the similarity between vectors is computed.
The next step is to generate the vectors (embeddings) from the text. You'll use a pretrained model from Sentence Transformers to generate them instead of OpenAI-based embeddings. The latter are more expensive and not necessarily better.
To accomplish this, you load the pretrained model, generate the embeddings from the DataFrame sentences, and insert them into the collection you created:
model = SentenceTransformer(
    "msmarco-MiniLM-L-6-v3",
    device="cuda"
    if torch.cuda.is_available()
    else "mps"
    if torch.backends.mps.is_available()
    else "cpu",
)

vectors = []
batch_size = 512
batch = []

for doc in tqdm(df["sentence"].to_list()):
    batch.append(doc)

    if len(batch) >= batch_size:
        vectors.append(model.encode(batch))
        batch = []

if len(batch) > 0:
    vectors.append(model.encode(batch))
    batch = []

vectors = np.concatenate(vectors)

book_name = meditations_json["book_title"]

client.upsert(
    collection_name=COLLECTION_NAME,
    points=models.Batch(
        ids=[i for i in range(df.shape[0])],
        payloads=[
            {
                "text": row["sentence"],
                "title": row["title"] + f", {book_name}",
                "url": row["url"],
            }
            for _, row in df.iterrows()
        ],
        vectors=[v.tolist() for v in vectors],
    ),
)
This code loads the model, generates vectors from the sentences in the DataFrame, and inserts them into the collection you created. Here's how it works:
- Lines 1 to 8 load the
msmarco-MiniLM-L-6-v3sentence transformer model, and set the correct device in case you have a GPU available. - Lines 10 to 23 generate an array of vectors using the model you loaded. Each vector is a numerical representation of the sentences from your DataFrame.
- Lines 29 to 43 insert the vectors and the additional data (actual sentence, book and chapter title, and URL) into the collection in your vector database.
Create a Server with FastAPI
Next, you will create the FastAPI application that will let the user interact with your vector database and ChatGPT. The code for this section is in main.py.
You start by importing the required dependencies, setting up your Qdrant client, and loading the model:
import openai
from fastapi import FastAPI
from qdrant_client import QdrantClient
from sentence_transformers import SentenceTransformer

from config import (
    COLLECTION_NAME,
    OPENAI_API_KEY,
    QDRANT_API_KEY,
    QDRANT_HOST,
    QDRANT_PORT,
)

openai.api_key = OPENAI_API_KEY

qdrant_client = QdrantClient(
    host=QDRANT_HOST,
    port=QDRANT_PORT,
    api_key=QDRANT_API_KEY,
)

retrieval_model = SentenceTransformer("msmarco-MiniLM-L-6-v3")

app = FastAPI()
This code imports the libraries and configuration settings, initializes the Qdrant client, and loads the model to memory (the same one you used for vectorizing the sentences). You load your model globally so that you don't slow down requests by loading it each time someone asks a question.
Next, you define a function to help you create the prompt that you'll use to get ChatGPT to generate a coherent answer based on the most relevant passages from Meditations:
def build_prompt(question: str, references: list) -> tuple[str, str]:
    prompt = f"""
    You're Marcus Aurelius, emperor of Rome. You're giving advice to a friend who has asked you the following question: '{question}'

    You've selected the most relevant passages from your writings to use as source for your answer. Cite them in your answer.

    References:
    """.strip()

    references_text = ""

    for i, reference in enumerate(references, start=1):
        text = reference.payload["text"].strip()
        references_text += f"\n[{i}]: {text}"

    prompt += (
        references_text
        + "\nHow to cite a reference: This is a citation [1]. This one too [3]. And this is sentence with many citations [2][3].\nAnswer:"
    )
    return prompt, references_text
This code will combine a prompt to make ChatGPT "simulate" Marcus Aurelius answering a user-supplied question with a list of references previously obtained from your vector database. Then it will return the generated prompt, and a list of the references to add to the answer sent to the user.
Then you create two endpoints as follows:
@app.get("/")
def read_root():
    return {
        "message": "Make a post request to /ask to ask a question about Meditations by Marcus Aurelius"
    }


@app.post("/ask")
def ask(question: str):
    similar_docs = qdrant_client.search(
        collection_name=COLLECTION_NAME,
        query_vector=retrieval_model.encode(question),
        limit=3,
        append_payload=True,
    )

    prompt, references = build_prompt(question, similar_docs)

    response = openai.ChatCompletion.create(
        model="gpt-3.5-turbo",
        messages=[
            {"role": "user", "content": prompt},
        ],
        max_tokens=250,
        temperature=0.2,
    )

    return {
        "response": response["choices"][0]["text"],
        "references": references,
    }
These are the two endpoints that you'll use in your app. Here's what each line does:
- Lines 1 to 5 set up an endpoint that accepts GET requests on "/". It returns a JSON response with a
messagekey telling the user to use the "/ask" endpoint. - Lines 8 to 17 define an endpoint that takes accepts POST requests on "/ask", with a single parameter,
questionofstringtype. Once the user submits a request, you vectorize the question using the model you loaded previously, then you get the 3 most similar documents from your vector database. - Lines 19 to 32 combine the documents you got from the vector database with your prompt and make a request to the ChatGPT API. You set
max_tokens=250to keep answers short and settemperature=0.2, to prevent the model from getting "too creative" with its responses. Finally, you extract the answer from the ChatGPT API response and return it to the user, along with the references.
If you want to test it locally, type the following command into a terminal (inside the project's virtual environment):
uvicorn main:app --reloadIn your browser, navigate to localhost:8000/docs to test your /ask endpoint:

A successful response will look as follows:

That's it! You have a working version of your AI search engine. Next, I'll mention some ideas about deployment.
Deploy Your App
There are many different ways to deploy an app, so you choose whatever approach you prefer. In my case, I like to use a VPS with NGINX acting as a reverse proxy and using Gunicorn as a process manager with Uvicorn workers. If you'd like to follow that approach, check a tutorial I wrote about it.
If you choose that route, keep the following points in mind:
- You should use
--preloadif you want to share the same model across all the processes and use less RAM memory. - There are memory leak issues when serving some types of models. A workaround that has worked for me is setting
--max-requestsand--max-requests-jitterto low numbers.
Conclusion
Way to go! In this tutorial, you've built a (tiny) AI search engine. You've learned:
- How to structure the project.
- How to set up a vector database using Qdrant.
- How to vectorize your data using Sentence Transformers.
- How to use ChatGPT to combine references into a coherent answer.
Hope you found this tutorial useful. Let me know if you have any questions!
All the code for this tutorial is available on GitHub.