In the first article in this series, learn how to get started with Appium. We’ll dig into what Appium is, the essentials of the Appium architecture and how you can use Appium to solve your mobile test automation issues today. You can also skip ahead to read about how to set up your first Appium Android test and how to set up your first Appium iOS test.
I recently had the privilege to speak at Appium Conf 2021 on a topic quite near to my heart: Getting started with Appium.
Why? Isn’t this Quite Basic?
If you are an intermediate or advanced Appium user, then sure, ??♂️ you may be familiar with this already.
However, I’m a fan of a concept called Shoshin (loosely translated as “Beginner’s mind”) and believe that relearning something opens up new ways of solidifying concepts and often enlightens you about the gaps in your knowledge.
When I started learning Appium back in 2018, I remember I had to struggle a lot to figure out where to start, what setups are needed to run my first test, or just even the underlying architecture.
This was a lot of initial friction and I remember thinking to myself:
It shouldn’t be this hard just to get started, eh?
Appium is a great automation tool and now having used it for a few years and having gone through the trenches I wanted to improve this experience for beginners. Hence the reason for my talk and this blog series. If you are curious about the Appium talk, the video is out on YouTube and slides over a static site.
Key Takeaways
In this 3 part series we’ll deep dive into:
- Introduction to Appium
- Understand what Appium is, what problems does it solve?
- Understand its architecture and tooling needed
- Set up an Android test from scratch including dependencies
- Set up an iOS test from scratch including dependencies
Let’s begin.
Table of Contents
What is Appium?
Appium is an open source ecosystem of tools and libraries that help you drive your mobile apps (native, hybrid, and mobile web on platforms such as Android, iOS), desktop apps (Windows, Mac), and now even on platforms like Smart TV and much more ?.
Appium Core Philosophy
Language agnostic: With Appium you can choose the language binding of your choice (Such as Java, Kotlin, Python, JavaScript, Ruby, C# … ?) and don’t have to be tied to the programming language of the platform vendors (Kotlin, Swift, etc.).
Does not reinvent the wheel: Appium provides a convenient API compliant with Web driver protocol that wraps automation libraries from vendors (Google UIAutomator2/Espresso, Apple XCUITest/UIAutomation, Windows WinApp) and allows you to write cross-platform tests.
No requirement of SDK or recompilation of the app: Appium can drive the app from a grey box user perspective but does not need any app compilation step.
Cross-platform: Drives apps on different platforms and provided apps have the same business logic, could drive them with a single cross-platform test.
Core Concepts
Before diving into practical setup and tests, it’s important to understand the Appium ecosystem in a birds-eye so that you can make sense of all the different components at play
The below high-level architecture diagram gives the perspective:

The core components are:
- Client-server architecture
- Session
- Desired capabilities
- Appium Server
- Appium Clients
- Appium Desktop
Client-Server Architecture
Appium Server
- Appium is a NodeJS-based web server that exposes REST APIs and bridges commands to native frameworks from vendors (Google, Apple)
Appium Clients
- Appium provides client bindings in different languages that adhere to WebDriver protocol and exposes actions and behaviours for automation
- Test code makes use of these clients to perform desired actions on devices
E2E Request Flow
A typical request in Appium loosely looks like below:
- The server receives a connection request from the client
- The server listens for commands
- The client makes a request to server
- Server talks to different platform drivers
- Drivers talk to native frameworks and finally the common gets executed on the target device (mobile, desktop, TV, etc)
- The server returns an HTTP response
Session
- Each action in Appium happens under the context of a session
- We generally start a session with a Desired capabilities object to specify the exact type of connection we want and what behaviours are we most interested in.
Desired Capabilities
- Think of this as a Hashmap with the key being a unique capability/behaviour that you want the driver to expose and values with the configurations.
- For example, you may want to set up the device in landscape or portrait mode for a test case, you can then use either of the below configurations
- For example, you may want to set up the device in landscape or portrait mode for a test case, you can then use either of the below configurations
{
  "orientation": "LANDSCAPE|PORTRAIT"
}- You can find the complete reference on Appium docs and I’ll highly recommend you get versed with them. In fact, there was an interesting talk called All Desired Capabilities by Jonah Stiennon in Appium Conf 2019 on this exact topic. You could watch it here.
Appium Inspector
- A desktop app that supports identifying selector strategies and aids in writing automated tests. Download it from Appium GitHub releases here.
Setup Appium
Now that we understand the high-level components at play, let’s install some of these to set up our environment regardless of the platform that we choose to automate.
To set up the Appium server and other utilities, we’ll need to install npm, node. These could be easily installed with a tool like homebrew (mac), Linux brew (Linux), or chocolatey (windows)
We’ll assume using a Mac/Linux or WSL (Windows Subsystem for Linux) environment for this series but you’ll be able to find equivalent steps for the Windows platform by googling.
Step 1: Install Homebrew
We’ll need it to install npm and node.
To install on macOS:
/bin/bash -c "$(curl -fsSL https://raw.githubusercontent.com/Homebrew/install/master/install.sh)"On Linux or WSL (Windows Subsystem for Linux), you may need to install Linux brew.
Step 2: Install node and npm
You can download and install node (10+) for your platform. Prefer choosing LTS (Long term support version) since that would be the stable version.
On macOS:
brew install nodeVerify running the below command returns desired version:
node -vAnd verify that npm is installed as well:
npm -vStep 3: Install Appium server
To install Appium server < 2.0
npm install -g appium- ? Do not use sudo to install Appium server
- -g indicates that this package would be installed globally
Verify Appium server is installed by typing appium command in your terminal and see all server logs.
➜  appium-fast-boilerplate git:(main) appium
[Appium] Welcome to Appium v1.17.0
[Appium] Appium REST http interface listener started on 0.0.0.0:4723
Appium 2.0 ?
Appium 1.2x.x would be the last version supported by Appium devs and an EOL (End of Life) plan is already published on the Appium Github repo. Read it here. Since Appium 2.0 is the future of the project, let’s see how to install the new server and some key commands.
To install Appium 2.0:
npm install -g appium@nextYou’ll get an output like:
/usr/local/bin/appium -> /usr/local/lib/node_modules/appium/build/lib/main.js

> appium@2.0.0-beta.16 postinstall /usr/local/lib/node_modules/appium
> node ./postinstall.js

Not auto-installing any drivers or plugins
+ appium@2.0.0-beta.16
added 113 packages from 587 contributors, removed 316 packages, updated 136 packages and moved 5 packages in 81.611s
With Appium 2.0, drivers are decoupled and not bundled into the main server. This makes sense since if your app is only on Android, you wouldn’t need iOS, desktop, and TV drivers anyways right?
We’ll install Android and iOS drivers for this project using the below commands:
appium driver install xcuitest
appium driver install uiautomator2
You can list all available drivers using the command:
appium driver listOr list only installed drivers using:
appium driver list --installedAfter running the appium command, you’ll see an output like this and as you can see our installed drivers:
[Appium] Welcome to Appium v2.0.0-beta.16
[Appium] Non-default server args:
[Appium]   tmpDir: /var/folders/5d/flg6q03n3j7769kffzly2x_r0000gp/T
[Appium] Attempting to load driver xcuitest...
[Appium] Attempting to load driver uiautomator2...
[Appium] Appium REST http interface listener started on 0.0.0.0:4723
[Appium] Available drivers:
[Appium]   - xcuitest@3.53.1 (automationName 'XCUITest')
[Appium]   - uiautomator2@1.67.0 (automationName 'UiAutomator2')
Step 4: Install Java and Set JAVA_HOME
You can install Java from the Oracle site or the OpenJDK version:
On macOS: If you choose to install OpenJDK, then execute the below command:
brew install openjdk@8sudo ln -sfn /usr/local/opt/openjdk@8/libexec/openjdk.jdk /Library/Java/JavaVirtualMachines/openjdk-8.jdkAdd JDK home path as JAVA_HOME variable. Since we would use the Java client binding for this series, this is a needed step.
export JAVA_HOME=/Library/Java/JavaVirtualMachines/openjdk-8.jdk/Home
export PATH=$JAVA_HOME/bin:$PATH
Step 5: Verify Dependencies are Installed with Appium Doctor
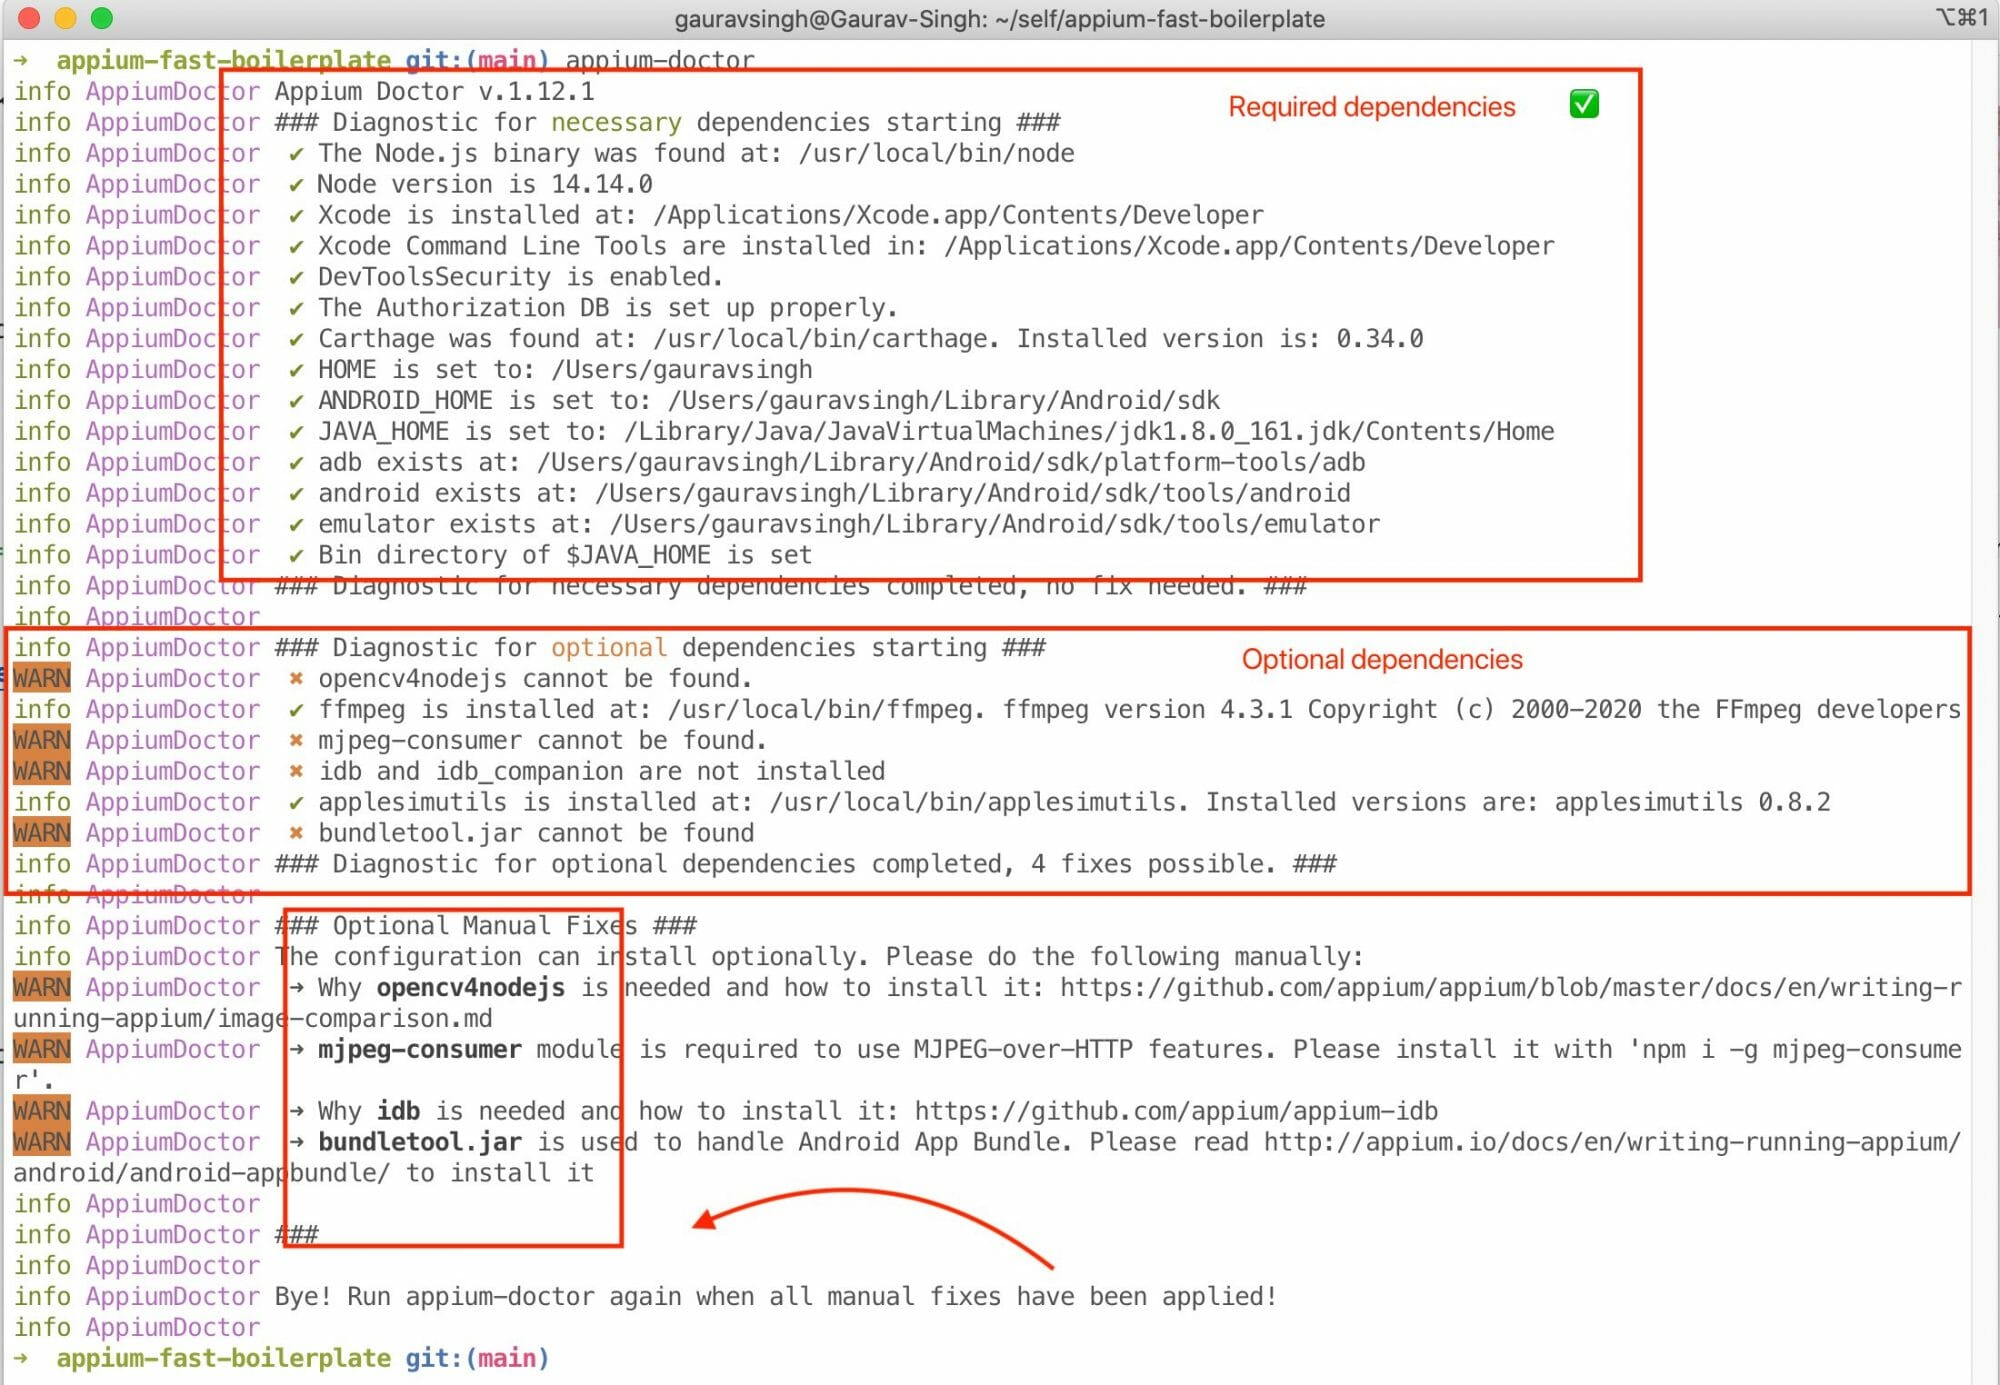
Appium doctor is a CLI that provides insights on what dependencies are missing as well as how to install them. It even provides very helpful suggestions or notes on how exactly a dependency might be useful.
Make sure all required dependencies are installed:
npm install -g appium-doctorRun below commands:
# For both android and iOS
appium-doctor
# For only android
appium-doctor --android
# For only iOS
appium-doctor --ios
If I run it at this point in time, it intelligently warns me about the required dependencies that are installed, optional dependencies that could be installed, and how to go about installing them.
Conclusion
So hopefully you are set up with Appium, have a conceptual understanding of the different components, and are now ready to dive into writing our first tests for Android and iOS. Stay tuned for the next part. In the meantime, you can read the below docs to get further context.
References
- You can read the complete intro from Appium docs
- Installing Appium 2.0 and the Driver and Plugins CLI on Appium Pro
- First Look at Appium 2.0 and New Drivers on headspin.io
Related Appium Articles
Looking for more? We’ve got other great content to help you dig in and get started with Appium. Here are a few places to help you get started with Appium today.
- Install Appium the Easy Way
- Appium vs Espresso vs XCUITest – Understanding how Appium Compares to Espresso & XCUITest
- A Guide to Appium – Our Top 10 Appium Tutorials in 2021