
Hallo vorken en lepels, Leo hier. Today we will discuss three ways to refactor massive SwiftUI Views.
I’ve done a couple of courses with the RayWenderlich platform now. All of them present you with the SwiftUI feature of breaking massive views into smaller ones. In the courses, I learned how to use the View protocol to break big SwiftUI views into smaller and easier-to-reason ones. For example, you can use those refactors to extract accordion views from your views.
I already knew that has other ways to break up big SwiftUI views but I never tried those, until this week, when I got some feedback in my last SwiftUI article that my views were too big. They were right! Although the focus of the article wasn’t to demonstrate good SwiftUI architecture, I got the message.
That inspired the article of this week since is a topic I didn’t know and it is part of my SwiftUI journey, I think that would be interesting to dive into how SwiftUI helps you to break views and make your development simple. We will build upon last week’s example.
Let’s code! But first…
Painting of The Day
The painting I chose today is a 19-century painting called The burning of a Turkish frigate by Konstantinos Volanakis.
This artwork depicts a strategic battle scheme used by Greek revolutionary fighters to attack their enemies which eventually lead to the liberation of Greece. The tactic of attaching a small boat laden with explosives to the side of a frigate was used by sailors such as Canaris, Papamanolis, and Barbatsis.
I chose this art because if your view is too big it can become easy to break with a small shipment of features. Got it?
The Problem – Three Ways to Refactor Massive SwiftUI Views
You have a SwiftUI view that is becoming really hard to understand what is going on.
Let’s start from the beginning with the project setup. Create a new SwiftUI project and copy/paste the code below:
struct ContentView: View {

    @State var name: String = ""
    @State var password: String = ""
    @State var showPassword: Bool = false

    var isSignInButtonDisabled: Bool {
        [name, password].contains(where: \.isEmpty)
    }

    var body: some View {
        VStack(alignment: .leading, spacing: 15) {
            Spacer()

            TextField("Name",
                      text: $name ,
                      prompt: Text("Login").foregroundColor(.blue)
            )
            .padding(10)
            .overlay {
                RoundedRectangle(cornerRadius: 10)
                    .stroke(.blue, lineWidth: 2)
            }
            .padding(.horizontal)

            HStack {
                Group {
                    if showPassword {
                        TextField("Password",
                                    text: $password,
                                    prompt: Text("Password").foregroundColor(.red))
                    } else {
                        SecureField("Password",
                                    text: $password,
                                    prompt: Text("Password").foregroundColor(.red))
                    }
                }
                .padding(10)
                .overlay {
                    RoundedRectangle(cornerRadius: 10)
                        .stroke(.red, lineWidth: 2)
                }

                Button {
                    showPassword.toggle()
                } label: {
                    Image(systemName: showPassword ? "eye.slash" : "eye")
                        .foregroundColor(.red)
                }

            }.padding(.horizontal)

            Spacer()

            Button {
                print("do login action")
            } label: {
                Text("Sign In")
                    .font(.title2)
                    .bold()
                    .foregroundColor(.white)
            }
            .frame(height: 50)
            .frame(maxWidth: .infinity)
            .background(
                isSignInButtonDisabled ?
                LinearGradient(colors: [.gray], startPoint: .topLeading, endPoint: .bottomTrailing) :
                    LinearGradient(colors: [.blue, .red], startPoint: .topLeading, endPoint: .bottomTrailing)
            )
            .cornerRadius(20)
            .disabled(isSignInButtonDisabled)
            .padding()

            //customDisableButton // Mark 1
            //customDisableButton2 // Mark 1
            //CustomButton3(isSignInButtonDisabled: isSignInButtonDisabled) // Mark 1
        }
    }
}
In the last three lines of the view, you can see what we will implement today. The process is simple so we will only do that to the Button struct and you can apply for any other view that you have.
The refactoring steps are simple:
- When a view body is too big, choose a view or piece of the UI structure that you want to refactor.
- Choosing the best approach to break the views, which can be using any of the mentioned in this article (or any other not mentioned too).
- Refactor!
Looks like a simple endeavor and it is, but I know that when you are in the flow of programming sometimes you forget to clean things along the way, so I would recommend already starting coding with these refactoring principles in mind.
You might be thinking now… When a view is too big? That is the one-million-dollar question.
A common sense in OOP is using the Single Responsibility Principle from SOLID to guide in how much stuff your class should do. In the end, it all comes down to what heuristic are you going to adopt. And don’t worry there’s no such thing as a “Perfect Heuristic”, adopt one and be consistent with it.
We could spend a lot of time talking about refactoring principles but I’ll let this to another article.
Let’s try out our first refactor technique.
Using var “some View” or AnyView in SwiftUI
Create an extension of ContentView and let’s add our first new button refactor:
extension ContentView {
    private var customDisableButton: some View { // this return type, is the same as the last function that you will use in the view, in this case padding
        Button {
            print("do login action")
        } label: {
            Text("Sign In")
                .font(.title2)
                .bold()
                .foregroundColor(.white)
        }
        .frame(height: 50)
        .frame(maxWidth: .infinity)
        .background(
            isSignInButtonDisabled ?
            LinearGradient(colors: [.gray], startPoint: .topLeading, endPoint: .bottomTrailing) :
                LinearGradient(colors: [.blue, .red], startPoint: .topLeading, endPoint: .bottomTrailing)
        )
        .cornerRadius(20)
        .disabled(isSignInButtonDisabled)
        .padding()
    }
}
Then go back to the ContentView Body and add:
var body: some View {
    // the rest of the view ...

    customDisableButton
}
Here we extracted the code to a var of type “some View“. But why is that type? That type has to match with the last type returned by any of the views or view modifiers that are used inside your new variable.
In our case, the last modifier is “.padding()” so this is the return type of the variable. But what would happen if inside the variable we would want to return two completely different types of views? For example, a variable with an if inside that if true returns a Text or if False a Button.
Check the example below:
private var customDisableButton: some View { // ERROR HERE
    if isSignInButtonDisabled {
        Text("The Signin is Disabled")
          .padding()
    } else {
        Button {
            print("do login action")
        } label: {
            Text("Sign In")
                .font(.title2)
                .bold()
                .foregroundColor(.white)
        }
        .frame(height: 50)
        .frame(maxWidth: .infinity)
        .background(
            isSignInButtonDisabled ?
            LinearGradient(colors: [.gray], startPoint: .topLeading, endPoint: .bottomTrailing) :
                LinearGradient(colors: [.blue, .red], startPoint: .topLeading, endPoint: .bottomTrailing)
        )
        .cornerRadius(20)
        .disabled(isSignInButtonDisabled)
        .padding()
    }
}
The error is saying:
Function declares an opaque return type, but has no return statements in its body from which to infer an underlying type
And then you can add the return keyword to both of the cases, now you get a new error:
Function declares an opaque return type ‘some View’, but the return statements in its body do not have matching underlying types
But now the returning type for both Text and Button is “some View”. To fix that we need to wrap them into AnyView objects, that erase their type and then satisfy the compiler:
private var customDisableButton: some View {
    if isSignInButtonDisabled {
        return AnyView(Text("The Signin is Disabled") // Erase the Text view type to AnyView
                .padding())
    } else {
        return AnyView(Button { // Erase the Button type to AnyView
            print("do login action")
        } label: {
            Text("Sign In")
                .font(.title2)
                .bold()
                .foregroundColor(.black)
        }
        .padding())
    }
}
Very simple, and now our ContentView body is more organized!
AnyView Problems
As Apple says in the docs: An AnyView allows changing the type of view used in a given view hierarchy. Whenever the type of view used with AnyView changes, the old hierarchy is destroyed and a new hierarchy is created for the new type.
This implies that the performance is affected by using AnyView to deal with your view structures.
When to use “some View” or AnyView?
I would go with this solution only if I could use “some view” and I wouldn’t use that view anywhere else throughout the app.
Keep in mind that for a small app the performance is not relevant and the difference shouldn’t be noticed, but as your app grows and the hierarchy becomes deeper and deeper you have to take extra care about recreating the whole hierarchy several times each time a property change in your data streams.
Refactor your view with @ViewBuilder in SwiftUI
To solve the AnyView problem, Swift has a new result builder Struct called @ViewBuilder. You can use it to annotate closures or variables to turn them into views parseable by any SwiftUI body.
Check the example below:
    @ViewBuilder
    private var customDisableButton2: some View {
        Button {
            print("do login action")
        } label: {
            Text("Sign In")
                .font(.title2)
                .bold()
                .foregroundColor(.white)
        }
        .frame(height: 50)
        .frame(maxWidth: .infinity)
        .background(
            isSignInButtonDisabled ?
            LinearGradient(colors: [.gray], startPoint: .topLeading, endPoint: .bottomTrailing) :
                LinearGradient(colors: [.blue, .red], startPoint: .topLeading, endPoint: .bottomTrailing)
        )
        .cornerRadius(20)
        .disabled(isSignInButtonDisabled)
        .padding()
    }
And you can use it in the body of the content view like this:
var body: some View {
    // the rest of the view ...

    customDisableButton2
}
You don’t need to use @ViewBuilder directly, you can use other structures that also take advantage of structures that use view builders internally, for example, Groups.
Using Group to refactor SwiftUI Views
Another way is using Group that implicitly uses @ViewBuilder inside it.
Let’s look at its definition:
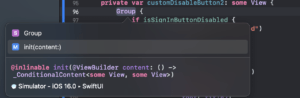
See? There’s a @ViewBuilder in the initializer.
Now let’s implement it!
private var customDisableButton2: some View {
    Group {
        if isSignInButtonDisabled {
            Text("The Signin is Disabled")
                .padding()
        }
        else {
            Button {
                print("do login action")
            } label: {
                Text("Sign In")
                    .font(.title2)
                    .bold()
                    .foregroundColor(.black)
            }
            .padding()
        }
    }
}
This way you don’t need to use @ViewBuilder directly and still have its advantages.
When to use @ViewBuilder in SwiftUI?
@ViewBuilder is a better solution than AnyView structure, but it also has its limitations. Although, it enables us to extract and refactor views you cannot reuse those views in other views.
This means that you do have a better code structure but it is not reusable. It is not a downside per se, because in some cases you maybe not need to reuse the view in other places at all, this way a view builder is more than enough to accomplish what you want.
Use View protocol Conformances to Create Subviews in SwiftUI
I think the first technique that people learn when learning SwiftUI is to create a new subview to organize and refactor the code. The steps to use this technique are:
- Create a new struct that conforms to View
- Copy the code that you want to refactor to the “var body: some View {…}”
- Add any binding or variable that you will need to the new view.
This is very simple as you can see in the code below:
struct CustomButton3: View { // Step 1
    let isSignInButtonDisabled: Bool // Step 3

    var body: some View { // Step 2
    if isSignInButtonDisabled {
        Text("The Signin is Disabled")
            .padding()
    } else {
            Button {
                print("do login action")
            } label: {
                Text("Sign In")
                    .font(.title2)
                    .bold()
                    .foregroundColor(.white)
            }
            .frame(height: 50)
            .frame(maxWidth: .infinity)
            .background(
                isSignInButtonDisabled ?
                LinearGradient(colors: [.gray], startPoint: .topLeading, endPoint: .bottomTrailing) :
                    LinearGradient(colors: [.blue, .red], startPoint: .topLeading, endPoint: .bottomTrailing)
            )
            .cornerRadius(20)
            .disabled(isSignInButtonDisabled)
            .padding()

        }
    }
}
Observe that in our case, differently from the cases where you just create a var in your View using @ViewBuilder or not, when you create a new subclass you need to add all variables that the code is using passing through the initializer of the new subclass. If the subclass has the power to modify the state of that data, you probably want to create a @Binding var in your subviews.
Now let’s check how Xcode can help us in this process of refactoring SwiftUI views.
Using Xcode “Extract Subview” shortcut
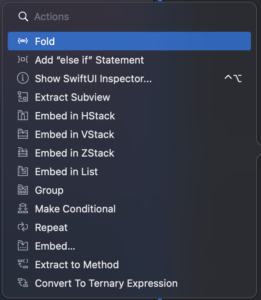
For SwiftUI developers Xcode has a lot of great shortcuts for development.
With Xcode 14 you just need to hold the command button and then click on any view or expression ( for example if, forEach), and you can automatically:
- Fold the current code brackets, so you can focus on what you are typing.
- If you are in an “if block” you can automatically add an “else if” condition to it.
- Show SwiftUI Inspector with “control+option” shortcut.
- Extract subview ( that is what we are going to use.
- Embed in HStack, VStack, ZStack, List, Group, and also custom embed code
- Create conditionals and ternary Expressions
- Create loops with ForEach
- Extract Method
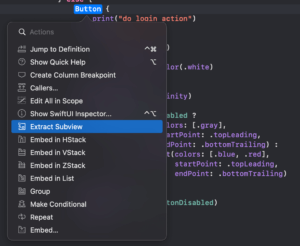
Let’s use the “Extract Subview” now.
- First, hold the “command button” and click on the structure that you want to extract. Then go to the “Extract Subview” option.
- Now rename the view to a proper name and check if everything is ok. In our case, Xcode is complaining about a variable that doesn’t exist in the new view, check the image below:
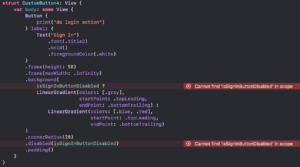
- Just add “let isSignInButtonDisabled: Bool” to it and pass in the body of the ContentView the new variable. And we are done!
It is nice when Xcode helps us with those boring things, right?
When to use View protocol conformance in SwiftUI?
If you want to reuse the extracted subview throughout your code, you should create a new struct conforming to View. I would recommend putting all your custom views into separate files to not overwhelm yourself with one big file called “CustomViews.swift” with three thousand lines of custom views. Be conscious of when to break your views into smaller views, don’t let your views get too big.
Wrap up
When to use a local variable/function @ViewBuilder or AnyView:
- When you want to increase the readability locally in your code.
- Don’t intend to use it anywhere else in the code the newly refactored code.
When to create a new struct conforming to View protocol:
- When you want to increase the readability of your code for several parts of the app.
- Creating independent components that can work anywhere in the code with the same input.
- You want to reuse the extracted view in more than 1 place in the code.
…And that’s it for today!
Summary – Three Ways to Refactor Massive SwiftUI Views
Today we studied various ways to refactor your massive SwiftUI views. We checked how to do with just variables, using the “some View” type or AnyView type depending on your needs.
The @ViewBuilder function builder is really handy when you don’t want to deal with the performance drop of the AnyView type erasing object, we also studied that solution in this tutorial.
And finally, we used Xcode to automatically extract e refactor view for us, doing the boring part of creating the structures and the boilerplate code.
Fellow developers, that’s all. I hope you liked reading this article as much as I enjoyed writing it. If you want to support this blog you can Buy Me a Coffee or just leave a comment saying hello. You can also sponsor posts! You can reach me on LinkedIn, or Twitter or send me an e-mail through the contact page.
Thanks for the reading and… That’s all folks. Image Credit: Wikiart