
Table of contents
The Checkly community recently came together to talk Playwright in our public Slack! My fellow Playwright ambassador John Hill and I invited everyone to ask questions and share tips about Microsoft’s stellar end-to-end testing tool.
And there were plenty of them! Let’s have a look at my favorite questions (and learnings) coming from the community! Are you ready for a mixed bag of Playwright tricks? Let’s go!
How should you handle parallelism in your end-to-end tests?
In general, it’s best practice to parallelize as many tests as possible to avoid seeing your test duration going through the roof. No one likes to wait thirty minutes for a green deployment light and a test suite that takes forever (or flakiness) is the main reason your test efforts fail.
But as usual in software development, things are complicated and every complex project comes with its own challenges when it comes to testing.
A tricky case is test cases that involve resource updates. If all your tests run in parallel it’s easy to discover race conditions where one test creates or deletes a resource while another one is testing it, too! This problem is tricky to solve and there is no ideal solution but our CTO Tim Nolet shared a possible approach:
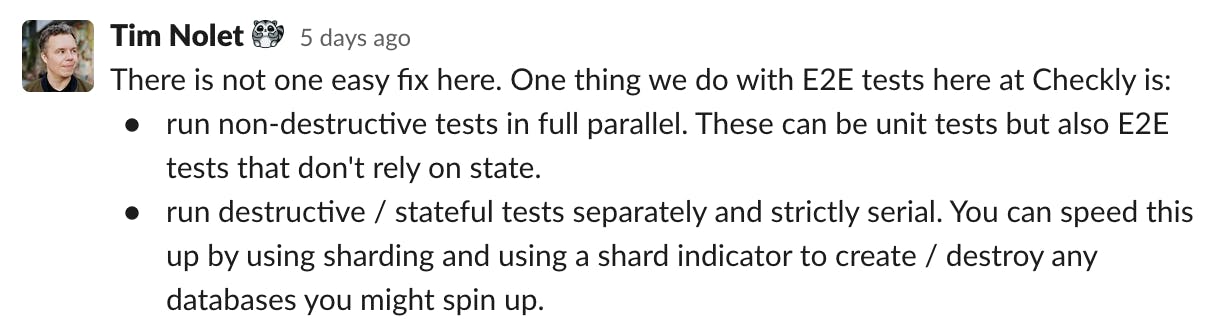
For non-destructive tests that are not relying on a state in your database, Tim recommends going all in with parallel testing. Your test cases could range from checking that a modal pops up after a button click or previews that are rendered when someone interacts with a text field. All these tests can run independently and in parallel.
With stateful tests, it’s a different story, though. If resource creation and updates are at play, it’s sometimes unavoidable to run tests sequentially to avoid one test messing with another one.
But how do you separate and run these different tests in your Playwright project?
To implement Tim’s recommendation in your project, you have to familiarize yourself with how Playwright handles parallelism.
In general, Playwright runs different test files in parallel, and all tests in a file are run sequentially. But watch out, the fullyParallelfullyParallel global config changes this behavior and runs every test case in parallel regardless of where it’s defined.
The default behavior lets you run tests that are in a single file sequential. For example, if you want to create, update and delete resources after another, having tests in a single file guarantees execution order.
That’s a good start, but unfortunately, it doesn’t guarantee that other spec files aren’t interfering with a similar resource and this again could lead to false positives. Luckily Playwright is highly configurable and you can disable parallelism via the CLI or Playwright config by defining the number of workers running your tests.
npx playwright test --workers=1
The global workersworkers configuration enables you to run tests with different parallelization settings. Independent and stateless tests can be run fully parallel whereas sequential state-dependent tests can run in a sequence.
To split tests, leverage custom annotations or file path conventions to run Playwright in full parallelized or sequential mode. The example package.jsonpackage.json below leverages different directories to separate parallel from sequential test cases.
{
  "name": "parallel",
  "version": "1.0.0",
  "description": "",
  "main": "index.js",
  "scripts": {
    "test:parallel": "npx playwright test tests/parallel/",
    "test:sequence": "npx playwright test tests/sequence/ --workers=1"
  },
  "keywords": [],
  "author": "",
  "license": "ISC",
  "devDependencies": {
    "@playwright/test": "^1.29.2"
  }
}
With this setup, you can run npm run test:parallelnpm run test:parallel and npm run:sequencenpm run:sequence without running into test conflicts. By separating the stateless and stateful tests, you’ll be able to reduce test collisions and run independent tests as quickly as possible.
But end-to-end tests that interact with the same resources are only one cause for flakiness. There are plenty of others!
What are common reasons for flaky tests and how can you avoid them?
There are many reasons for flaky tests. Giovanni Rago, our Head of Customer Solutions, shared his top flakiness offenders.

As Gio states, suboptimal waiting is a common problem in UI and end-to-end testing.
To test your application it has to have reached a particular state, JavaScript probably needs to be loaded or potential API calls had to resolve. There are multiple ways to go about testing your UIs.
But before going into explicit waiting scenarios, make sure to check Playwright’s auto-waiting mechanisms and web-first assertions. With all the built-in auto-waiting mechanisms you rarely need to worry about explicit waiting. For example, if you want to test a UI flow that includes a component that only becomes visible eventually, Playwright actions such as click wait for elements to become visible.
These features enable you to test highly asynchronous UIs with code that looks synchronous.
// Playwright retries to click this button until it works or times out
await page.getByRole('button').click();
But as Gio says, sometimes these built-in waiting mechanisms aren’t enough and you have to wait for an explicit event to happen or a UI state to be reached. John Hill takes things to another level and recommends watching specific network requests to make functionality deterministic.
If you click a button, that triggers an API call, you can wait for the API call to resolve and test if the UI reacted accordingly.
As John states:
If your browser has a HTTP API Backend, the #1 way to add determinism to your tests is to wait on the specific network requests to resolve.
99% of the flake I’ve experienced when testing a flaky frontend app comes from a flaky and unreliable backend.
The frontend tests are just the bearer of bad news.
If you want to check an example of this approach, here’s the code John and the team at Open MCT run to test UIs request-dependent at Nasa.
How can you emulate custom keyboard interactions in Playwright?
If you’re working on a SaaS product and aim for stellar UX, you might implement keyboard shortcuts and interactions. These could be challenging to test, but luckily, Playwright also supports a way to control a virtual keyboard.
Playwright’s keyboard functionality enables you to interact with input elements and pages like a real user.
await page.keyboard.press("Meta+KeyA")
await page.keyboard.type('This is a line of text\n');
This functionality is great for shortcuts but also valuable for highly custom and complex components. One example is a JS-based code editor like Monaco.
Millions of developers use Monaco because it’s built into VS Code (and app.checklyhq.com 😉). But how does it work under the hood and how would you test a custom editor if it’s embedded in your application?
Open the Monaco Playground to look at Microsoft’s open-source editor component. When you inspect the editor, you’ll see that to offer syntax highlighting, there are divs and spans all over the editor component. But how could you edit and test these and interact with the editor?
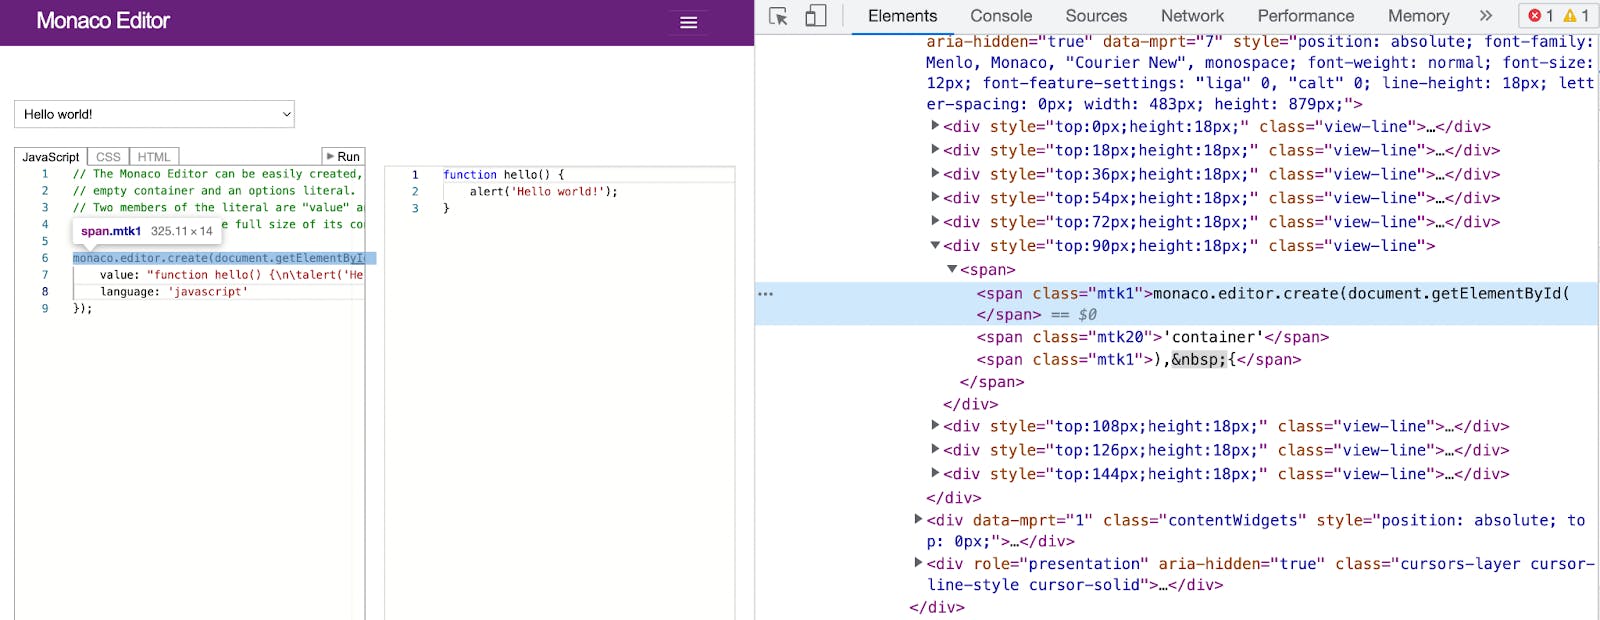
Monaco and other code editor components usually include a hidden or transparent textarea to catch keyboard events and make things more accessible. The textarea keystrokes are captured, canvas elements render code suggestions, and spans/divs display highlighted code. There’s a lot of magic involved and it’s pretty challenging to test.
Luckily, Playwright’s virtual keyboard helps out here and as the Playwright core team member Max Schmitt shared, page.keyboardpage.keyboard is at your service to interact with Monaco.
await page.goto('https://microsoft.github.io/monaco-editor/playground.html');
const monacoEditor = page.locator(".monaco-editor").nth(0);
await monacoEditor.click();
await page.keyboard.press("Meta+KeyA");
await page.keyboard.type('This is a line of text\n');
await page.screenshot({ path: example.png });
This functionality allows testing and simulating keyboard interactions going beyond filling an input with a string value. Press specific key combinations, jump to the beginning of a line, or hit the “delete” key three times… It’s up to you to mimic your users’ keyboard behavior!
- Related Reading: How we added custom languages, code completion and highlighting to the Monaco editor.
Real users are an unpredictable bunch, though. How can you guarantee that your application isn’t breaking when you “attack” it with your end-to-end tests?
How can you catch JavaScript errors in long end-to-end testing flows?
It’s always good to monitor if your application throws JavaScript exceptions when users interact with it. Luckily, reacting to JavaScript errors is straightforward in Playwright by leveraging emitted page events such as pageerrorpageerror. React and count exceptions with a few lines of code.
// Log all uncaught errors to the terminal
page.on('pageerror', exception => {
  console.log(`Uncaught exception: "${exception}"`);
});
- Related video: if you want to learn how these work, have a look at one of our Playwright tips on YouTube.
John Hill again puts things to the next level and shared how they implement JavaScript error tracking with Playwright fixtures. His approach allows you to collect all JS errors until the end of your test and only fail it then.
exports.test = base.test.extend({
   failOnConsoleError: [true, { option: true }],
   /**
    * Extends the base page class to enable console log error detection.
    * @see {@link https://github.com/microsoft/playwright/discussions/11690 Github Discussion}
    */
   page: async ({ page, failOnConsoleError }, use) => {
       // Capture any console errors during test execution
       const messages = [];
       page.on('console', (msg) => messages.push(msg));
       await use(page);

       // Assert against console errors during teardown
       if (failOnConsoleError) {
           messages.forEach(
               msg => expect.soft(msg.type(), `Console error detected: ${_consoleMessageToString(msg)}`).not.toEqual('error')
           );
       }
   }
});
The example leverages fixtures and soft assertions and if you’re curious, have a look at John’s provided example code.
Conclusion
These were my favorite Playwright learnings from our Community AMA session and I continue to be amazed at how far end-to-end testing has come. If you want to keep learning about Playwright, check out our Checkly YouTube channel where I share all these nitty-gritty tricks as I discover them. And if you have any questions, don’t hesitate to drop into Slack, I’m happy to help!
And lastly, you might know that testing is only the beginning of shipping stellar products. If you want to start monitoring your apps and be confident that your site works at all times, this is what we do at Checkly. Sign up and run Playwright tests at any time from around the world. It’s free and pretty cool, trust me! 😉