A flaky test is a test that produces different results in different runs. It may pass a few times and fail others for no apparent reason. As you can imagine, there are obviously some reasons behind that behavior. The problem is more prominent on UI and E2E tools like Playwright.
Playwright flaky tests are one of the greatest enemies of CI systems because they lead to seemingly random pipeline failures. Here is why it is so important to avoid them!
In this guide, you will understand what a flaky test is and what are the main causes behind it. Then, you will explore some best practices to avoid writing flaky tests in Playwright.
Let’s dive in!
What Is a Flaky Test in Playwright?
A faulty test is a test that produces different results for the same commit SHA. Another rule for identifying such a test is “if it passes on the branch but fails once merged, it may be a flaky test.” In the context of Playwright, a test is labeled as “flaky” when it fails the first time but passes when retried.
The impact of Playwright flaky tests is particularly significant in a CI pipeline because of their inconsistent nature, resulting in unpredictable failures for the same commit across various attempts. To ensure a successful deployment, the pipeline needs to be configured to run multiple times upon failure. This leads to slowdowns and confusion, as each deploy appears to be subject to seemingly random failures.
Reasons Why a Test May Be Flaky
These are some of the most important reasons why a test can end up being flaky:
- Race conditions: Concurrent operations that trigger dynamic page change can easily lead to unexpected behavior.
- Slowdowns: If the application under test runs on a machine that experiences slowdowns, the timeouts used in the test may cause the test to fail intermittently.
- Bugs in tests: Specific choices in the test scripts, such as non-robust node locators, can be the cause of test instability.
These factors can individually or collectively contribute to test flakiness. Let’s now see how to protect against them with some best practices!
Strategies to Avoid Writing Flaky Tests in Playwright
Before getting started, keep in mind that you can find some Playwright sample tests to play with in the Playwright repository on GitHub. Clone the repository, install Playwright, and start the tests with:
git clone https://github.com/microsoft/playwright.git
cd playwright/examples/todomvc/
npm install && npx playwright install
npx playwright test
Now, explore the best strategies supported by the official documentation to avoid flaky tests in Playwright.
Running and Debugging Tests Before Committing Them
The simplest and most intuitive way to avoid Playwright flaky tests is to try to prevent them. The idea is to thoroughly inspect all tests locally before committing them. This way, you can ensure that they are robust and work as intended in different scenarios.
Since a flaky test may or may not fail by definition, you should run each test more than once and on a machine with similar resources as the production server. Changing the environment on local testing would produce results that are not comparable with those of the CI/CD pipeline.
After setting up the environment and configuring Playwright correctly, you can run all tests locally with:
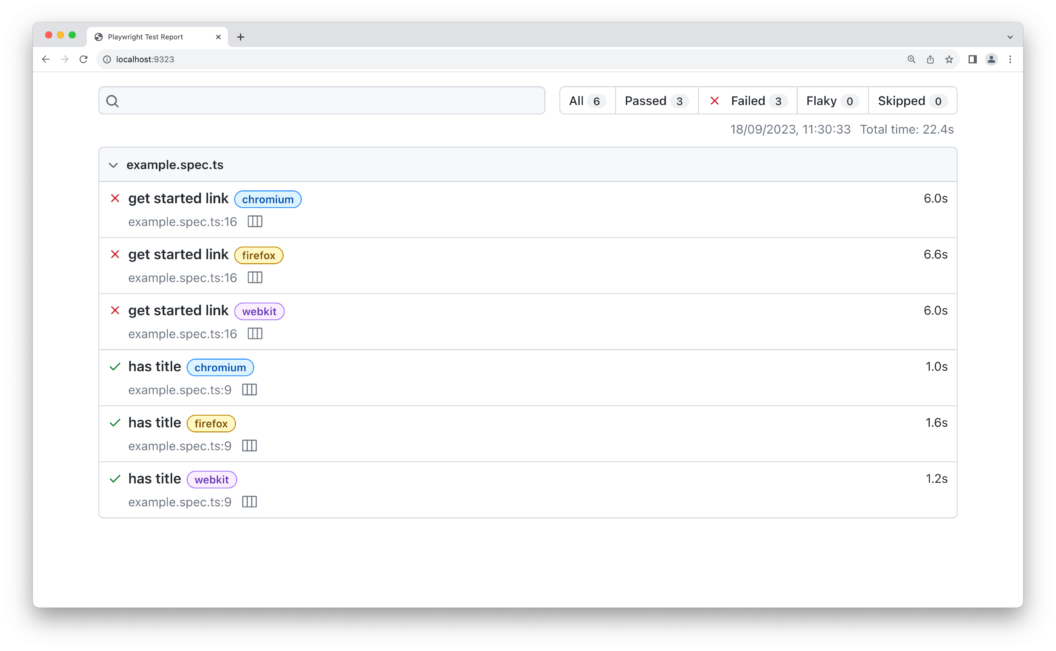
npx playwright testOnce the tests have been run, the Plawright HTML report will be opened automatically if some of the tests have failed. Otherwise, you can access it manually with the following command:
npx playwright show-reportThe produced HTML file will show a complete report of the tests performed. In detail, it allows you to filter out results by flaky tests:
Do not forget that a test is marked as “faulty” when it fails the first time but passes on another attempt. In other words, if you want to detect flaky tests locally, you need to configure Playwright to automatically retry tests on failure.
After identifying a flaky test, you can debug it using one of the many debugging tools offered by Playwright. For example, suppose the detected flaky test is defined in the test() function starting at line 15 in landing-page.spec.ts. This is the command you have to launch to debug the test with the built-in Playwright Debugger:
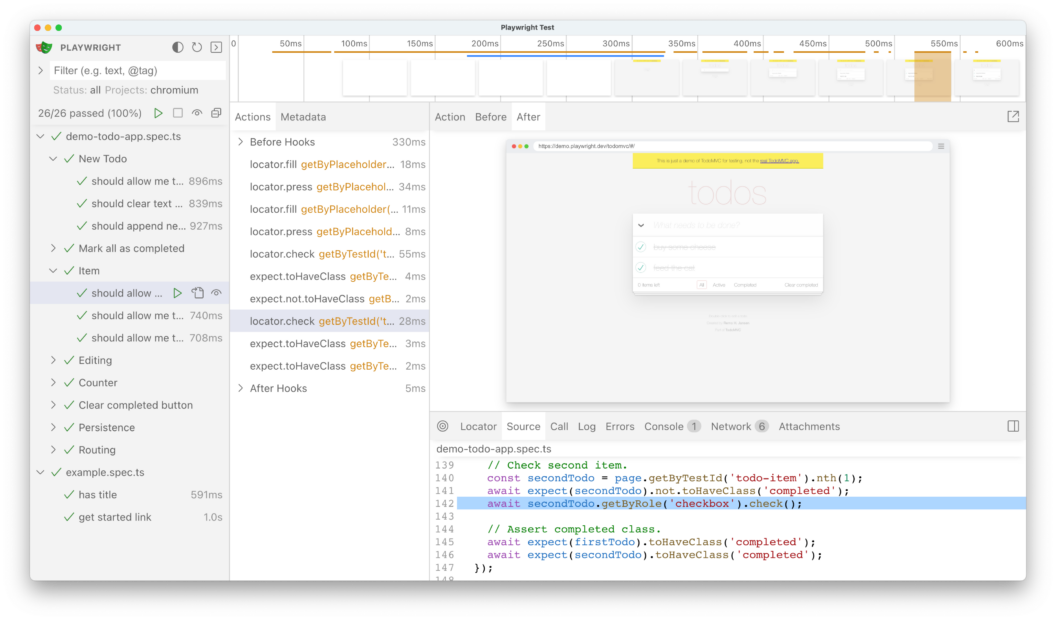
npx playwright test landing-page.spec.ts:15 --debugUsing the UI Mode is also recommended for debugging tests. This is because it provides a time-travel experience that enables you to visually inspect and walk through all the operations performed by a test:
Use Locators, Not Selectors
One of the key aspects of writing robust E2E tests is to write effective selection strategies for HTML nodes. While you may be familiar with XPath and CSS selectors, these are not the best solutions when it comes to testing. The problem is that the DOM of a modern page using JavaScript is dynamic and such static selectors can lead to test flakiness.
Here is why Playwright recommends using locators that are close to how the user perceives the page. Instead of writing CSS selectors, you should target custom IDs or use role locators. Locators represent a way to find elements on the page at any moment, and they are at the core of Playwright’s auto-waiting and retry-ability.
The recommended built-in locator functions you should use to select DOM nodes on a page are:
page.getByRole(): To locate elements by explicit and implicit accessibility attributes.page.getByText(): To locate nodes by text content.page.getByLabel(): To locate a form control by associated label’s text.page.getByPlaceholder(): To locate an input by placeholder.page.getByAltText(): To locate an element, usually an image, by itsalttext alternative.page.getByTitle(): To locate an element by itstitleattribute.page.getByTestId(): To locate an element based on itsdata-testidattribute.
Now, consider this CSS selector:
.btn-primary.submit
This is easy to read and understand, but it is surely not as robust and expressive as:
page.getByRole("button", { "name": "Submit" });While the class attribute of an HTML element in the DOM can change dynamically, its text and role on the page are unlikely to change as easily.
If you absolutely must use CSS or XPath, try to write selectors that are as consistent and generic as possible. XPath and CSS selectors can easily become tied to the implementation, which is bad because they lead to test failures when the page structure changes. As a rule of thumb, remember that long CSS or XPath selectors are not good and lead to tests that are flaky and difficult to maintain.
Never Rely on Hard Waits
In testing, hard waits refer to adding fixed time delays to the logic of a test. The idea is to stop the test execution for a given amount of time to wait for specific actions to complete in the meantime. While this is certainly a straightforward approach to waiting, it is one of the main reasons that results in flaky tests.
For instance, take a look at the Playwright test below:
const { test, expect } = require('@playwright/test');

test('"Load More" button loads new products', async ({ page }) => {
  // navigate to the page to test
  await page.goto('https://localhost:3000/products');

  // select the "Load More" button
  const loadMoreButton = await page.getByRole('button', { name: 'Load More' });

  // click the "Load More" button
  await loadMoreButton.click();

  // pause the test execution for 10 seconds waiting
  // for new products to be loaded on the page
  await page.waitForTimeout(10000);

  // count the number of product elements on the page
  const productNodes = await page.locator('.product').count();

  // verify that there are 20 product elements on the page
  expect(productNodes).toBe(20);
});
This clicks the “Load More” button, waits 10 seconds for new products to be retrieved and rendered on the page, and verifies that the page contains these new elements.
The main problem with this solution is that you never know what is the right fixed amount to wait for. Different environments, machines, or network conditions can cause variations in the time the application takes to complete the desired action.
The specified time may be sufficient and the test will pass. Other times, it will not be enough and the test will fail. That is exactly the definition of a flaky test in Playwright. Plus, hard waits slow down tests. The reason is that they can result in unnecessarily long wait times, especially when the action to wait for is completed before the set time.
No wonder, the Playwright documentation on waitForTimeout() states:
“Never wait for timeout in production. Tests that wait for time are inherently flaky. Use Locator actions and web assertions that wait automatically.”
When using a locator, Playwright performs a series of actionability checks on the selected node. Specifically, it automatically waits until all relevant checks are passed and only then performs the requested action on the node. Similarly, when using a web-first assertion, the automation framework automatically waits for a predefined time until the expected condition is met. If these conditions are not met in the expected default time, the test fails with a TimeoutError.
Note that you can usually configure default timeouts with a custom timeout option on both locator and assertion functions.
To fix the flaky test presented above, replace waitForTimeout() with the toHaveCount() web assertion as follows:
const { test, expect } = require('@playwright/test');

test('"Load More" button loads new products', async ({ page }) => {
  // navigate to the page to test
  await page.goto('https://localhost:3000/products');

  // select the "Load More" button
  const loadMoreButton = await page.getByRole('button', { name: 'Load More' });

  // click the "Load More" button
  await loadMoreButton.click();

  // verify that there are 20 product elements on the page,
  // waiting up to 10 seconds for them to be loaded
  expect(await page.locator('.product')).toHaveCount(20, {
    timeout: 10000
  });
});
This time, the test will automatically wait up to 10 seconds for the desired elements to be on the page. If product nodes are present on the page after 1 second, the test will be successful immediately without having to waste time of a fixed wait.
Configure Automatic Retrie
Plawright supports test retries, a way to automatically re-run a test when it fails. When this feature is enabled, failing tests will be retried multiple times until they pass or the maximum number of attempts is reached.
By default, Playwright does not perform retries. To change that behavior and instruct it to retry failing tests, set the retriesoption in playwright.config.ts:
import { defineConfig } from '@playwright/test';

export default defineConfig({
  // give failing tests 3 retry attempts
  retries: 3,
});
Equivalently, you can achieve the same result by launching your tests with the retries flag as follows:
npx playwright test --retries=3As mentioned before, Playwright will categorize tests in the reports as below:
- “passed”: Tests that passed on the first run.
- “flaky”: Tests that failed on the first run but passed when retried.
- “failed”: Tests that failed on the first run and failed all other retries.
While the retry function does not directly help you avoid flaky tests, it does help to detect them. It also allows the CI pipeline to continue even if a flaky test fails on the first run but succeeds on the retries.
Set the Right Timeouts
When using web-first locators and assertions, Playwright automatically waits for certain conditions to become true in a given timeout. Playwright timeouts are designed to cover most scenarios but may be too short for certain conditions and lead to flakiness in your tests.
The timeouts you should keep in mind are:
- Test timeout: Maximum time that any single test can take before raising a
TimeoutError. Default value:30000(30 seconds). - Expect timeout: Maximum time each assertion can take. Default value:
5000(5 seconds).
As seen previously, most locator action functions support a timeout option. By default, that option is usually set to 0, which means that there is no timeout. This is not a problem because of the test timeout, which prevents a test from running forever. As a result, you should never increase the test timeout option too much or set it to 0.
Bad timeout values are one of the main causes of Playwright flaky tests. A temporary slowdown on the local machine or the backend services your application relies on and your tests will fail.
To configure these timeouts globally, set the following options in playwright.config.ts:
import { defineConfig } from '@playwright/test';

export default defineConfig({
  // test timeout set to 2 minutes
  timeout: 2 * 60 * 1000,
  expect: {
    // expect timeout set to 10 seconds
    timeout: 10 * 1000
  }
});
To change the test timeout on a single test, call the test.SetTimeout() function:
import { test, expect } from '@playwright/test';

test('very slow test', async ({ page }) => {
  // set the test timeout to 5 minutes
  test.setTimeout(5 * 60 * 1000);

  // ...
});
Otherwise, you can mark a specific test as “slow” with test.slow():
import { test, expect } from '@playwright/test';

test('slow test', async ({ page }) => {
  // mark the test as "slow"
  test.slow();

  // ...
});
When a test is marked as “slow,” it will be given three times the default timeout time.
Use locator.all() Carefully
When a locator matches a list of elements on the page, locator.all() returns an array of locators. In detail, each locator in the array points to its respective element on the page. This is how you can use the function:
// click all "li" element on the page
for (const li of await page.getByRole('listitem').all()) {
  await li.click();
}
As pointed out in the official documentation, locator.all() can lead to flaky tests if not used correctly. That is because the all() method does not automatically wait for elements to match the locator. Instead, it immediately returns an array of locators for the nodes that are currently present on the page.
In other words, when locator.all() is called while the page is changing dynamically, the function may produce unpredictable results. To prevent that, you should call locator.all() only when the lists of elements you want to locate have been fully loaded and rendered.
Prefer Locators over ElementHandles
In Playwright, ElementHandles represent in-page DOM elements and can be created with the page.$() method. While they used to be helpful for selecting and interacting with elements on a page, their use is currently discouraged.
As mentioned in the official documentation, the methods exposed by an ElementHandle do not wait for the element to pass actionability checks. Therefore, they can lead to flaky tests. As a more robust replacement, you should use Locator helper methods and web-first assertions instead.
The difference between a Locator and an ElementHandle is that the ElementHandle object points directly to a particular element on the DOM, while the Locator captures the logic of how to retrieve the element.
When you call an action method on an ElementHandle, this is executed immediately. If the element is not interactable or is not on the page, the test will fail. On the contrary, action methods on a Locator element are executed only after all required actionability checks have been passed.
For example, before executing locator.click(), Playwright will ensure that:
locatorresolves to an exactly one element- Element is visible
- Element is stable
- Element can receive events
- Element is enabled
Learn more in the documentation.
Inspect the Traces and Videos to Detect Why the Test Failed
By default, Playwright is configured to record of all operations performed by a test on the first retry after a failure. This information is called “traces” and can be analyzed in the Playwright Trace Viewer.
Trace Viewier is a GUI tool to explore the recorded traces of a test, giving you the ability to go back and forward through each action of your test and visually see what was happening during it. Traces are a great way to debug failed Playwright tests, and this recording feature should always be enabled on CI.
To turn trace recording on, make sure your playwright.config.ts file contains:
import { defineConfig } from '@playwright/test';

export default defineConfig({
  retries: 1, // must be greater than or equal to 1
  use: {
    trace: 'on-first-retry', // enable tracing
  },
});
The available options for trace are:
'on-first-retry': Record a trace only when retrying a test for the first time. This is the default option.'on-all-retries': Record traces for all test retries.'retain-on-failure': Generate a traces file for each test, but delete it when the same test ends successfully.'on': Record a trace for each test. This option is not recommended because of its performance implications.'off': Do not record traces.
With the default 'on-first-retry' setting, Playwright creates a trace.zip file on the first retry of each failed test. You can then inspect those traces locally in the Trace Viewier or at trace.playwright.dev.
You can also open traces using the Playwright CLI with the following command:
npx playwright show-trace <path_to_trace_zip>Note that <path_to_trace_zip> can be either a path to a local file or a URL.
Keep in mind that Playwright also supports recording screenshots and videos about test failures. You can enable them with these options in playwright.config.ts:
import { defineConfig } from '@playwright/test';

export default defineConfig({
  use: {
    // capture screenshot after each test failure
    screenshot: 'only-on-failure',

    // record video only when retrying a test for the first time
    video: 'on-first-retry'
  },
});
The options for screenshot include 'off', 'on', and 'only-on-failure'. Instead, the options for video are 'off', 'on', 'retain-on-failure', and 'on-first-retry'.
Trace files, screenshots, and videos will be stored in the test output directory, which is usually test-results.
How to Deal With a Flaky Test in Playwright
The strategies presented above are helpful in reducing flaky tests, but you cannot really eliminate them altogether. So what to do when you discover a flaky test? A good approach involves following these three steps:
- Investigate the root cause: Use the tools offered by Playwright to study the test run and try to understand why it produced inconsistent results.
- Develop a fix: Update the test logic to address the problem. Then, run the test locally several times and under the same conditions that lead to the flaky results to make sure it works all the time.
- Deploy the updated test: Verify that the test now produces the expected results in the CI/CD pipeline.
For more guidance, read our guide on how to fix flaky tests.
Conclusion
In this article, you learned what a flaky test is and what implications it has in a CI/CD process. In particular, you saw some Playwright best practices that specifically target the root cause of flakiness. Thanks to them, you can now write robust tests that produces the same results consistently. Although eliminating flaky tests forever is not possible, you should now be able to reduce them as much as possible. Keep your CI pipeline safe from unpredictable failures!
