


In Part 1 and Part 2 of this series, we looked at how we could take a serverless application and group it into a set of testable CDK constructs. In this part, I look into how we can refine the approach to make it as simple as possible to write and run tests in this way.
Quick recap
We started with our event-driven application architecture, where files added to an S3 bucket cause a ripple of events. The challenge being how to test that the system is working as expected.
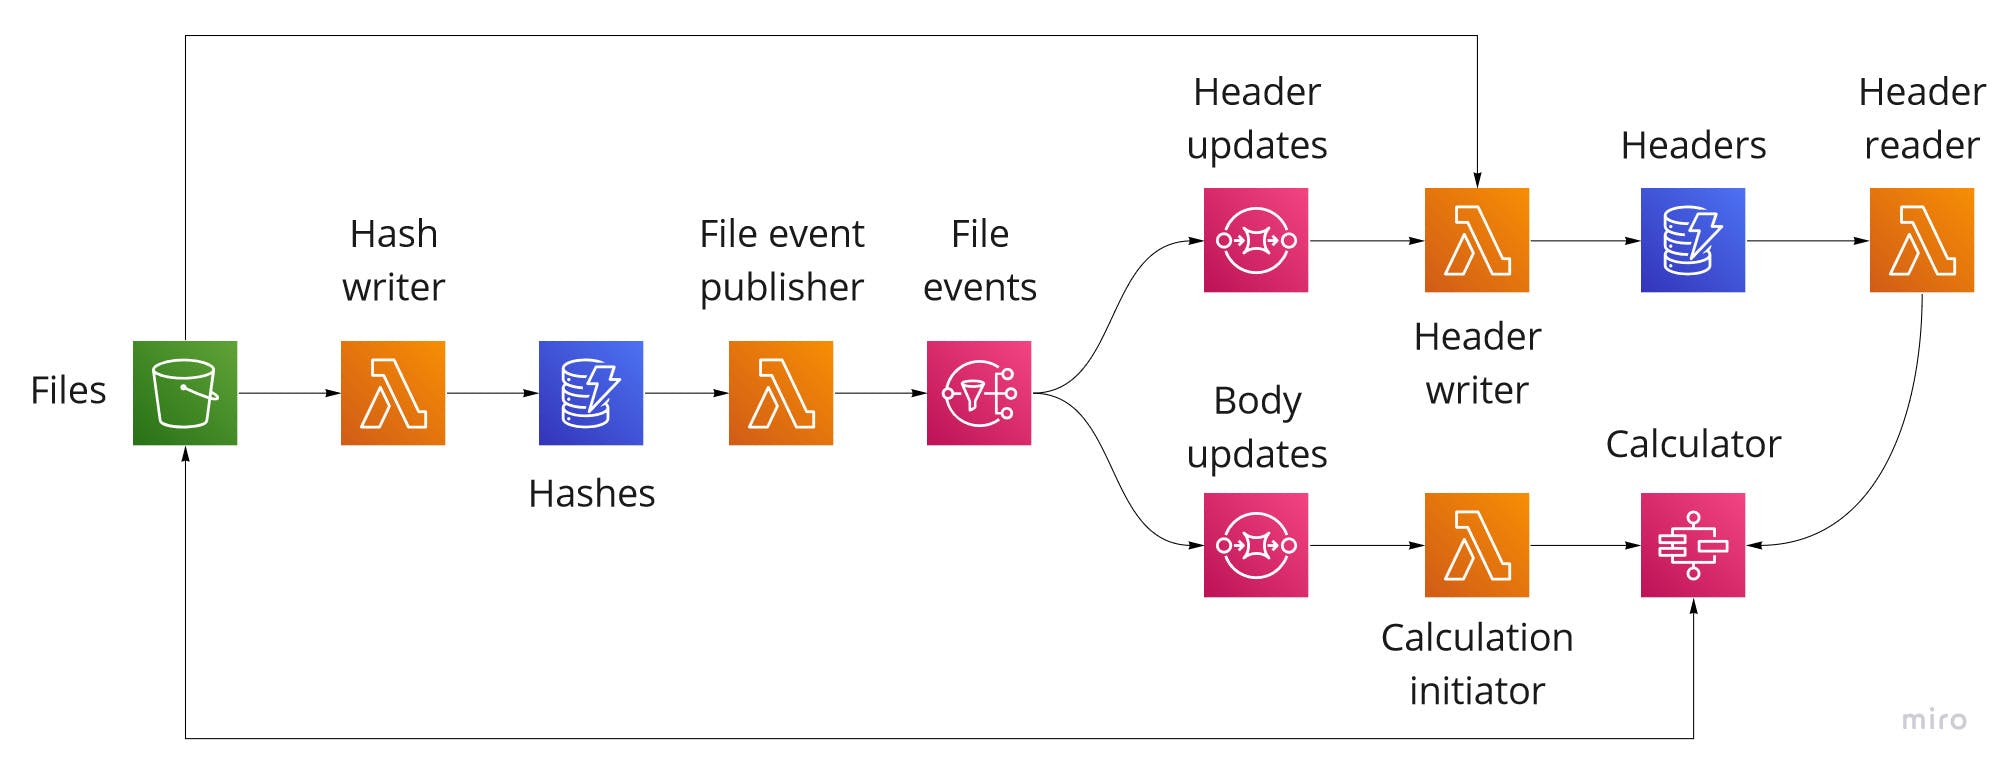
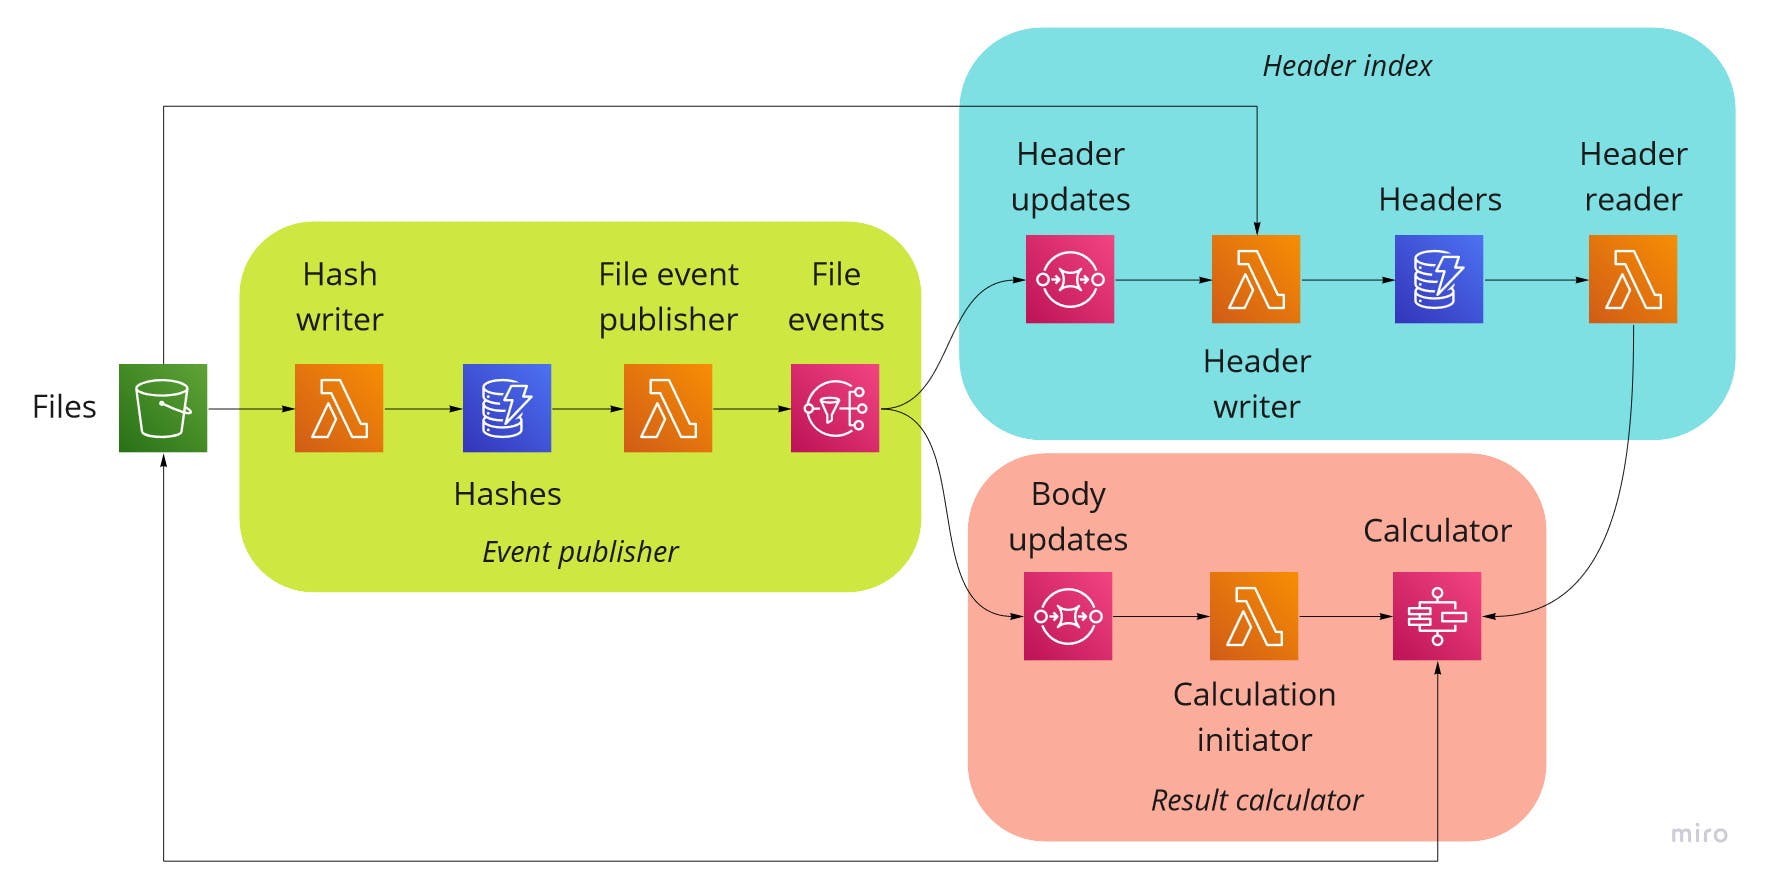
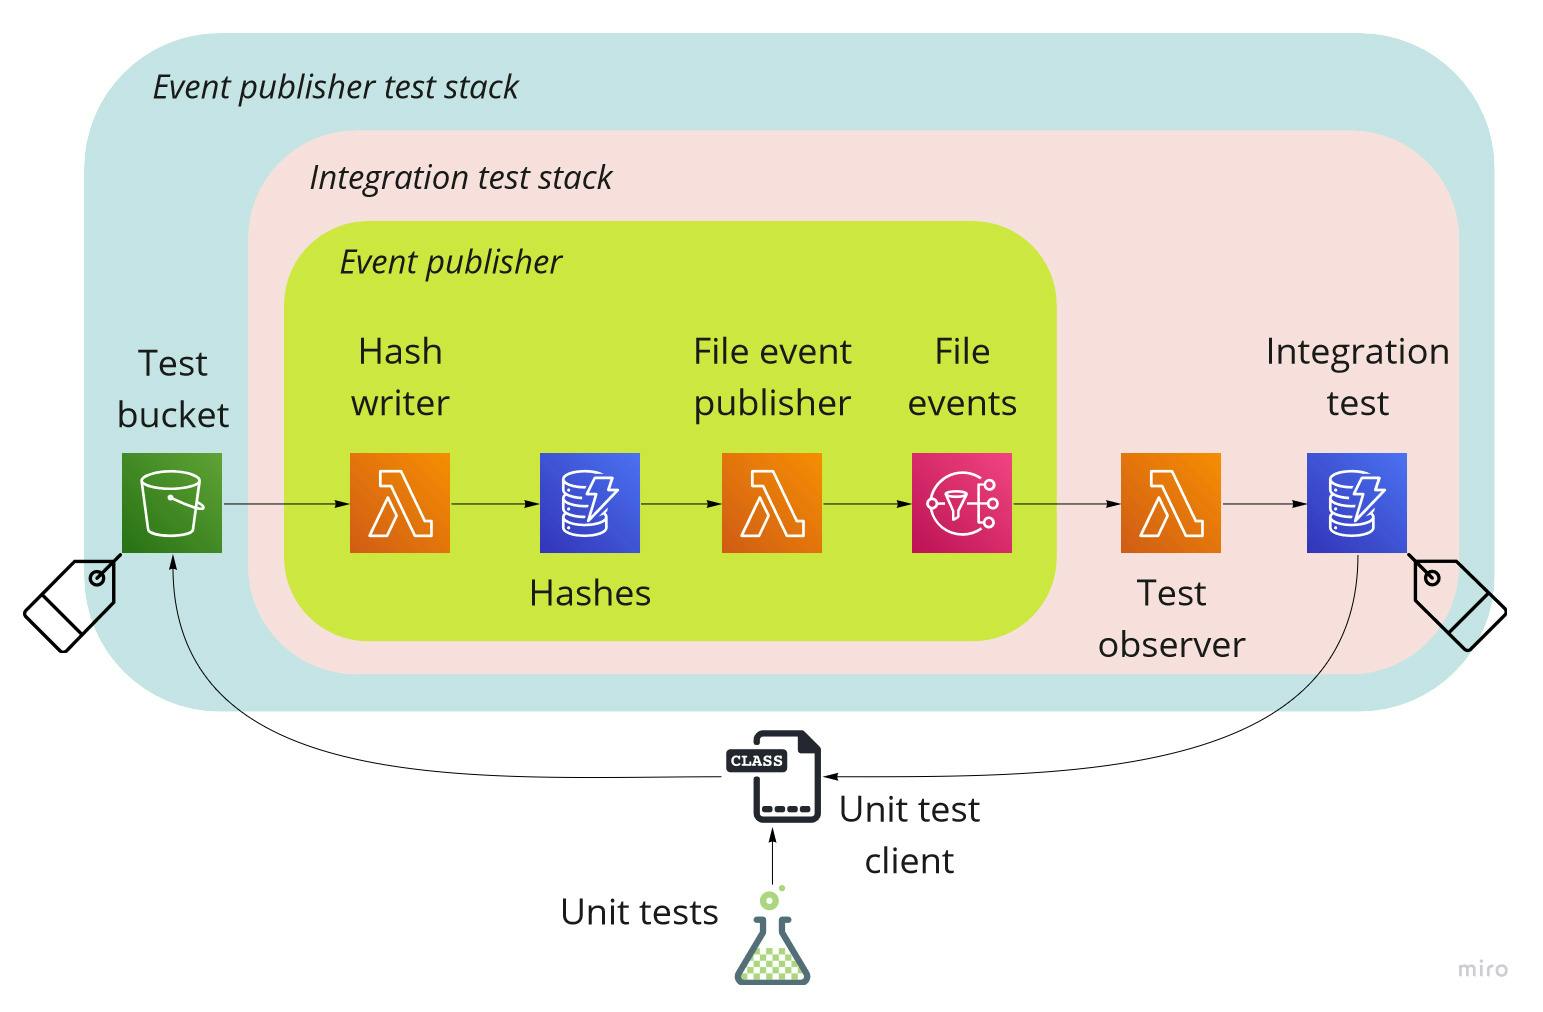
We then grouped the application into a set of CDK constructs, as shown by the shaded boxes below. The idea being that these can be deployed and tested in isolation and then combined to produce the whole application.
We took the Event publisher construct first and got to a point where we could repeatedly run a unit test to drive the processing and then observe the results.
Observations from the first two parts
- Calling the AWS CLI is clunky.
- The approach relied on invoking the AWS CLI via the
child_processpackage. Looking at the code for AWS Testing Library, I could see that it is possible to call the AWS services directly using the AWS SDK and use the credentials loaded from from the Shared Credentials File as described here.
- The approach relied on invoking the AWS CLI via the
- This approach to testing will require similar scaffolding infrastructure for each construct being tested.
- For example, a function to act as an observer of events and a table to record the observable outputs from the test.
- The unit tests need to know the names of the deployed resources.
- The approach relied on the deployment outputting the resource names for use in the tests, either by hardcoding or by passing them in by some other mechanism. As we are following the best practise and not specifying resource names, this adds a extra step each time they change as result of a deployment.
Moving forward
With these observations in mind, enter the Integration test stack and the Unit test client.
The Integration test stack is an abstract CDK Stack class that provides the following functionality:
- Deployment of common test resource scaffolding, such as an observer function and a test output table.
- A method to tag the deployed resources so that they can be discovered without needing to know the resource names or ARNs.
The Unit test client is a class that works in conjunction with the Integration test stack and provides the following:
- A set of methods to locate and interact with test resources using the AWS SDK. For example, upload an object to an S3 bucket.
- A method that encapsulates the polling of the test outputs, to make writing unit tests simple and clear.
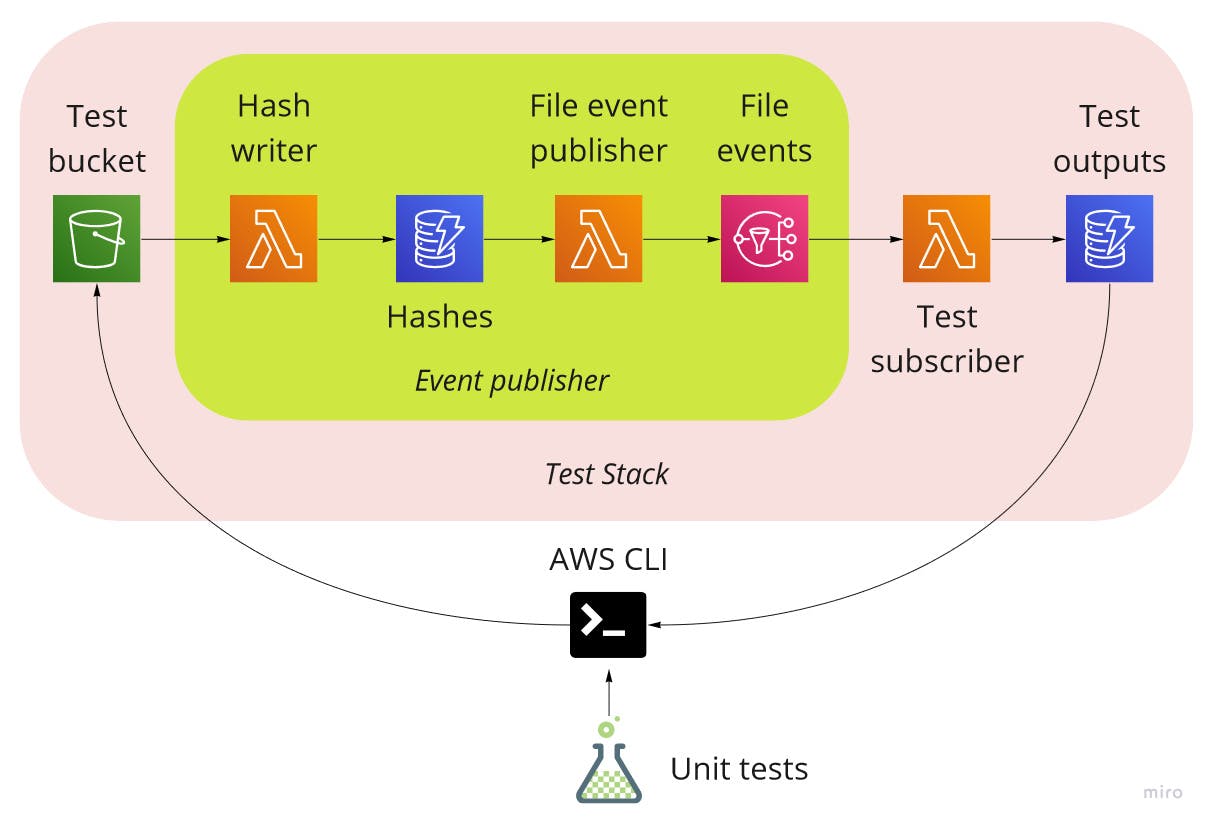
Using these two classes our test architecture becomes the following, with a generic Test observer function and a generic Integration test table being provided by the Integration test stack and our unit tests using the Unit test client.
Creating the test stack
Now let's look at some code. To take advantage of the base functionality, our new test stack needs to extend IntegrationTestStack. For the moment, we will concentrate on how to use this class, but if you are interested in the inner workings of IntegrationTestStack, then you can find the code for it and everything else in the GitHub repo.
export default class FileEventPublisherTestStack extends IntegrationTestStack {
  static readonly ResourceTagKey = 'FileEventPublisherTestStackResource';

  static readonly TestBucketId = 'TestBucket';

  constructor(scope: cdk.Construct, id: string) {
    super(scope, id, {
      testResourceTagKey: FileEventPublisherTestStack.ResourceTagKey,
      deployIntegrationTestTable: true,
      deployTestObserverFunction: true,
    });
We first declare a couple of constants that we will need later for the Unit test client to work its magic, then we turn our attention to the meat of a CDK Stack, the constructor.
Here we supply three properties to super:
testResourceTagKey: This value is used as the key to tag any resources that our tests need to interact with.deployIntegrationTestTable: Thisbooleanproperty specifies whether or not we want a table to be created to hold the observable outputs of the tests.deployTestObserverFunction: Thisbooleanproperty specifies whether or not we want a function to be created that writes all observed events received to the output table.
Next we need a test bucket to upload test file to.
const testBucket = new s3.Bucket(this, FileEventPublisherTestStack.TestBucketId, {
  removalPolicy: cdk.RemovalPolicy.DESTROY,
  autoDeleteObjects: true,
});

this.addTestResourceTag(testBucket, FileEventPublisherTestStack.TestBucketId);
Here we specify a test bucket that will be cleaned up automatically (the CDK construct creates a function to do this). We also have a call to addTestResourceTag, which tags it for later discovery and interaction.
Onto the system under test.
const sut = new FileEventPublisher(this, 'SUT', {
  fileBucket: testBucket,
  deploymentTarget: 'TEST',
});
Here we specify an instance of our construct FileEventPublisher. We wire the fileBucket property up to the test bucket we created above. We also set the deploymentTarget to TEST. Setting this value changes the removal policy for the underlying resources to one more suitable for a test environment. We do this as we want to avoid having test resources hanging around causing confusion and potentially costing money.
Finally, we add something to observe the results of our tests.
sut.fileEventTopic.addSubscription(
  new subscriptions.LambdaSubscription(this.testObserverFunction)
);
Earlier, we specified true for the deployTestObserverFunction property. This will cause the IntegrationTestStack to create a simple function that writes all events received to the test output table. In this case, we want to observe SNS events, so we wire it up to the topic of the system under test.
Now we have our test stack ready to go. We can use cdk synth to verify it, and then use cdk deploy to deploy it. Once done, it's time to turn our focus to the unit tests.
Creating the unit test
For the unit test we will be using the Mocha testing framework and the Chai assertion library. The approach doesn't use anything specific to these, so it should be still viable if other frameworks and libraries are used.
The first thing we need to do is create and initialise an instance of UnitTestClient.
describe('FileEventPublisher Tests', () => {
  const testClient = new UnitTestClient({
    testResourceTagKey: FileEventPublisherTestStack.ResourceTagKey,
  });

  before(async () => {
    await testClient.initialiseClientAsync();
  });

  it('New file upload', async () => {
    // Our test goes here
  });
});
The constructor requires a value for testResourceTagKey. This is quite literally the key for the UnitTestClient to locate resources by their tag. When initialiseClientAsync is called, UnitTestClient uses the getResources method from the ResourceGroupsTaggingAPI SDK to locate all resources that have a tag with a key of testResourceTagKey. This method returns an array of resource ARNs and their tags, an example of which is shown below.
[
  {
    "ResourceARN": "arn:aws:dynamodb:eu-west-2:728023361653:table/FileEventPublisherTestStack-IntegrationTestTableD3B8E277-OSEUU2XIBRK",
    "Tags": [
      {
        "Key": "FileEventPublisherTestStackResource",
        "Value": "IntegrationTestTable"
      }
    ]
  }
]
One thing to note is that all the SDK calls require the AWS region. The way the code is currently set up, this value is specified via a .env file containing a entry of the following format.
AWS_REGION=eu-west-2
Before we can start on the usual parts of a unit test, we first need to make a call to initialiseTestAsync passing in a test identifier. Behind the scenes, this value is used to record outputs from the tes. The call to initialiseTestAsync uses the identifier to clear down all previously recorded data against it.
await testClient.initialiseTestAsync('New file upload');
Arrange
The Arrange step is next. In this case, we create the object to be uploaded and the S3 key to upload it to.
const configurationFile = newConfigurationFile();
const configurationFileS3Key = configurationFile.header.name;
Act
The Act step is more interesting.
await testClient.uploadObjectToBucketAsync(
  FileEventPublisherTestStack.TestBucketId,
  configurationFileS3Key,
  configurationFile
);
Here we use the uploadObjectToBucketAsync method on the UnitTestClient instance to upload our test object. We pass in the statically-known value FileEventPublisherTestStack.TestBucketId that was used to tag the resource. Underneath, the UnitTestClient uses this to resolve it to the deployed bucket name before making the AWS SDK call to do the upload. This approach keeps our unit test clean and decouples it from the details of a specific deployment.
Await
Next, we move to the additional step in an event-driven serverless test, the Await step.
const { outputs, timedOut } = await testClient.pollOutputsAsync<SNSEvent>({
  until: async (o) => getFileEvents(o).length === 2,
  intervalSeconds: 2,
  timeoutSeconds: 12,
});
There is quite a bit going on with this single line. It tells the UnitTestClient to poll the Integration test table every 2 seconds until the until function supplied returns true or if 12 seconds have elapsed. The return value from pollOutputsAsync is deconstructed into outputs, an array of the test outputs, and timedOut, a boolean indicating whether or not the polling timed out before the until function returned true.
What is happening is that the implementation of pollOutputsAsync is locating the Integration test table by its tag. It then queries the table for all outputs associated with the test identifier and periodically calls the until function with the outputs found so far. In this case, the Test observer function is hooked up to an SNS topic, so it is writing SNSEvent instances to the table.
In our test, we are looking for two events that will be fired in close succession. Now, SNS can batch up events into a single SNSEvent instance that contains multiple records. Our events could well be batched together, so what we need to do is create a utility function to extract and return the underlying FileEvent instances.
function getFileEvents(outputs: SNSEvent[]): FileEvent[] {
  return outputs
    .map((o) => o.Records.map((r) => JSON.parse(r.Sns.Message)))
    .reduce((allEvents, events) => allEvents.concat(events), []);
}
Assert
Now we are into standard unit test territory with the Assert step. We check if the polling timed out and then, if not, that if our action resulted in the expected events.
expect(timedOut).to.equal(false);

const fileEvents = getFileEvents(outputs);

expect(fileEvents.length).to.equal(2);

expect(
  fileEvents.some(
    (e) =>
      e.s3Key === configurationFileS3Key &&
      e.eventType === FileEventType.Created &&
      e.sectionType === FileSectionType.Header
  )
);

expect(
  fileEvents.some(
    (e) =>
      e.s3Key === configurationFileS3Key &&
      e.eventType === FileEventType.Created &&
      e.sectionType === FileSectionType.Body
  )
);
We now have a unit test that fully exercises the construct. In the GitHub repo, you can see how I created other tests for the construct. For example, testing the scenarios where an existing file was updated or partially updated. This was straightforward to do and gives me a high level of confidence in the system. In addition, anyone can clone the repo, set their region in the .env file, deploy the test stack and they are ready to run the tests.
Testing the approach
To further test the approach, I then looked at the Header index construct. This construct is driven by SNS events, reads files from an S3 bucket, stores the headers in a table, and makes them queryable via function. The resulting test architecture looked as follows.
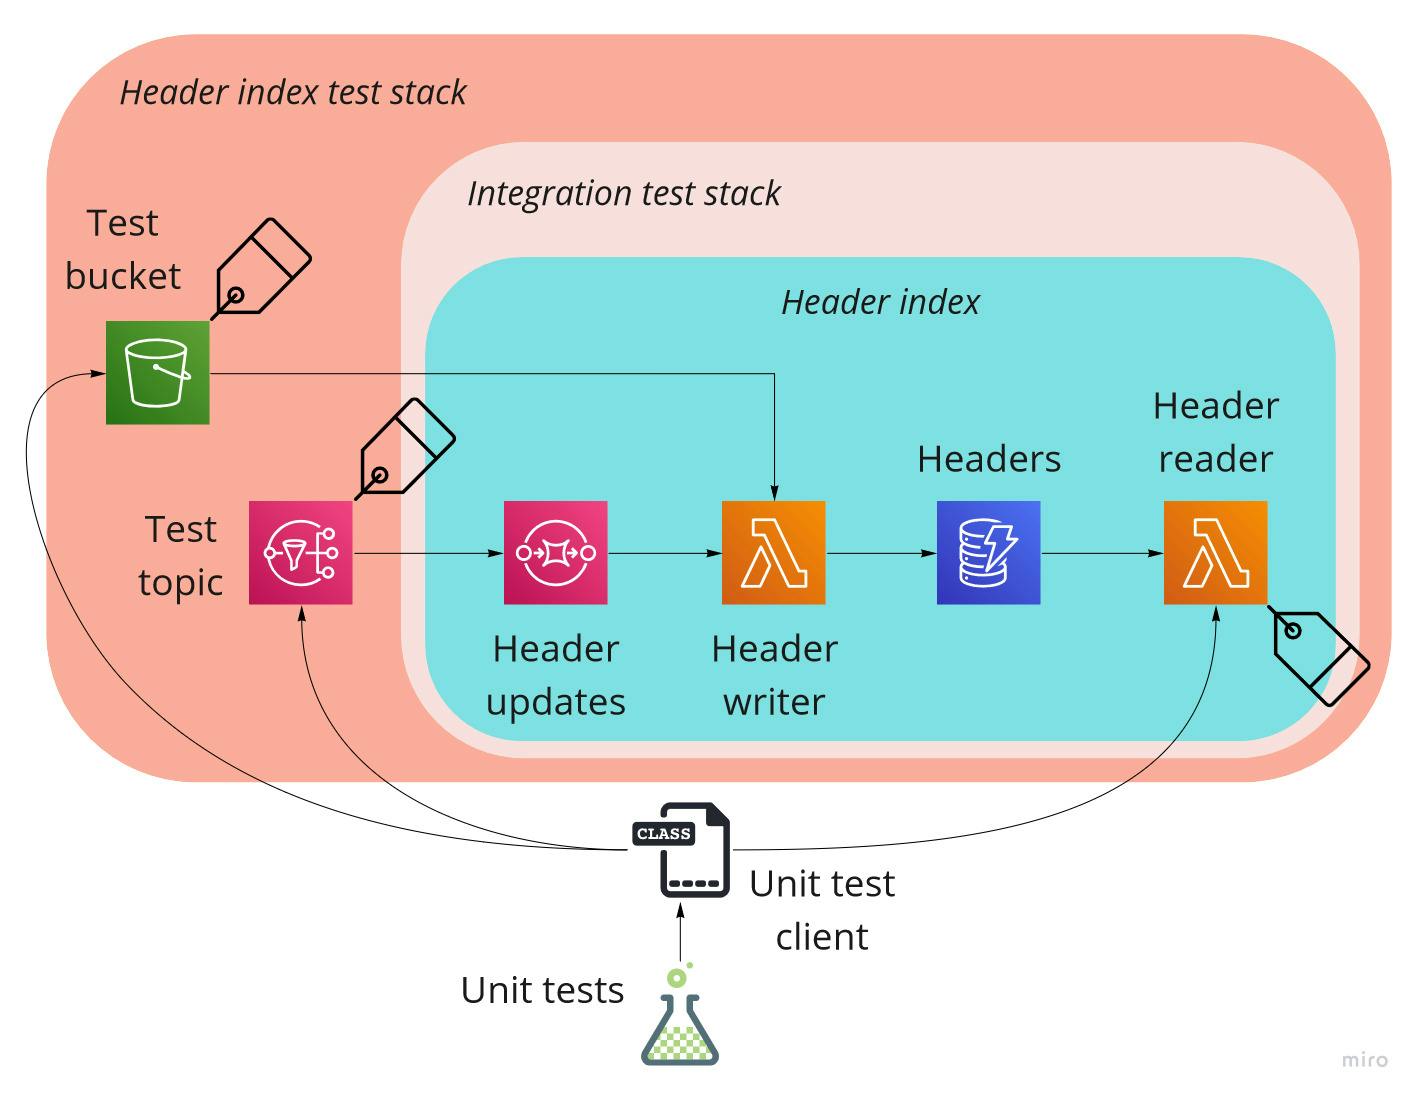
In this case, the Integration test stack does not need to create an observer or a table for the outputs. However, it still has a role in tagging the resources that our unit tests need to interact with. With these tags in place, the UnitTestClient instance can be used to publish messages to a topic using the publishMessageToTopicAsync method.
await testClient.publishMessageToTopicAsync(
  FileHeaderIndexTestStack.TestFileEventTopicId,
  fileEvent,
  fileEvent.messageAttributes
);
And also to invoke a function using the invokeFunctionAsync method.
await testClient.invokeFunctionAsync<FileTypeCriteria, FileHeaderIndex[]>(
  FileHeaderIndexer.ReaderFunctionId,
  { fileType: file.header.fileType }
)
Overall, I felt the approach worked very well. I was able to deploy iteratively and test each part in turn. For example, starting with a simple function implementation that logs the event. Deployments were not as quick as I would like, but I felt they were not so long as to invalidate the approach. For complicated business logic, I would recommend local unit tests anyway.
You can find the resulting test stack and unit test in the GitHub repo. I have to say, that the level of confidence I had once the tests were passing was very pleasing. The generic components are also shaping up well to be published as an npm package.
For the next part, I will look into how the approach might be applied to unit testing Step Functions.