


Written by Souvik Biswas
It always looks cool to control any electrical equipment with a mobile device remotely without even going near it.
Today, we will demonstrate how you can give any normal AC power plug, socket or switch a touch of magic using IoT. This will enable us to control any electrical equipment in our house using a mobile device, with the help of an app (of course, built with Flutter) having Bluetooth capability.
This article will cover a lot of things:
- Integrating Bluetooth in a Flutter app (for communicating with the IoT device)
- Connecting various modules to Arduino (Bluetooth module and a 5V relay)
- Setting up Arduino (to send and receive signals)
Let’s get started by integrating Bluetooth in a Flutter app.
Integrating Bluetooth
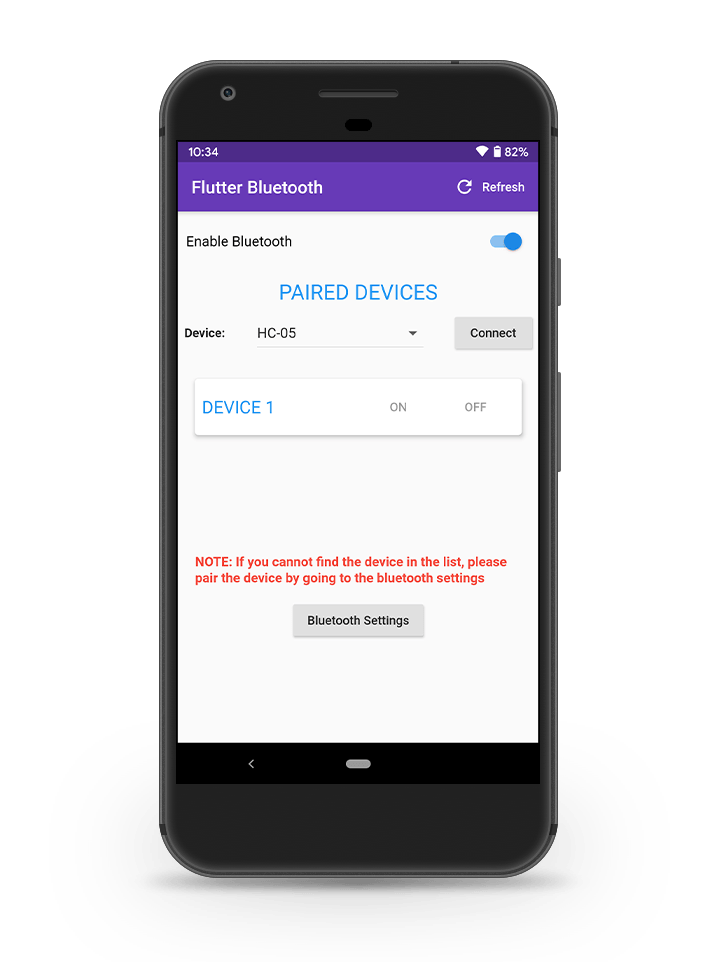
The final app UI will look like this:
For this project, we will be using a plugin called flutter_bluetooth_serial. There is another awesome plugin for integrating Bluetooth in a Flutter app, flutter_blue.
I am using flutter_bluetooth_serial plugin in this project because it has a lot more features and gives much greater control over the Bluetooth connection while communicating with other devices.
The downside of this plugin is that it only has support for Android as of now. Any iOS developer who wants to contribute to this project can add iOS support to it (there is also an issue open on the plugin’s GitHub repo for this).
Defining the basic structure
Create a new Flutter app and add the following to the main.dart file after removing all of the Flutter Demo Counter app code:
import 'package:flutter/material.dart';

void main() => runApp(MyApp());

class MyApp extends StatelessWidget {
  @override
  Widget build(BuildContext context) {
    return MaterialApp(
      title: 'Flutter Demo',
      theme: ThemeData(
        primarySwatch: Colors.blue,
      ),
      home: BluetoothApp(),
    );
  }
}

class BluetoothApp extends StatefulWidget {
  @override
  _BluetoothAppState createState() => _BluetoothAppState();
}

class _BluetoothAppState extends State<BluetoothApp> {
  @override
  Widget build(BuildContext context) {
    return MaterialApp(
      home: Scaffold(),
    );
  }
}
This is the basic structure for starting our project. We have to use a StatefulWidget for the BluetoothApp class because we will need to mutate the state multiple times during the lifecycle of the app.
Enabling Bluetooth and retrieving devices
Now that we have the basic structure of the app, we can focus on enabling the Bluetooth connection of the user’s device and retrieve the paired devices.
-
Initialize some of the variables which will be required (we will be adding more class member variables as needed later while building the app):
// main.dart class _BluetoothAppState extends State<BluetoothApp> { // Initializing the Bluetooth connection state to be unknown BluetoothState _bluetoothState = BluetoothState.UNKNOWN; // Get the instance of the Bluetooth FlutterBluetoothSerial _bluetooth = FlutterBluetoothSerial.instance; // Track the Bluetooth connection with the remote device BluetoothConnection connection; // To track whether the device is still connected to Bluetooth bool get isConnected => connection != null && connection.isConnected; // ... } -
Inside
initState(), we first have to get the current Bluetooth state. If the state indicates that Bluetooth is not turned on, request that the user give Bluetooth permissions for enabling Bluetooth on their device.// main.dart // Inside _BluetoothAppState class // This member variable will be used for tracking // the Bluetooth device connection state int _deviceState; @override void initState() { super.initState(); // Get current state FlutterBluetoothSerial.instance.state.then((state) { setState(() { _bluetoothState = state; }); }); _deviceState = 0; // neutral // If the Bluetooth of the device is not enabled, // then request permission to turn on Bluetooth // as the app starts up enableBluetooth(); // Listen for further state changes FlutterBluetoothSerial.instance .onStateChanged() .listen((BluetoothState state) { setState(() { _bluetoothState = state; // For retrieving the paired devices list getPairedDevices(); }); }); } -
Now, we have to define the two functions:
enableBluetooth()for getting Bluetooth permissions from the user.getPairedDevices()for retrieving the paired devices list.
The function implementation for enabling Bluetooth:
// main.dart
// Inside _BluetoothAppState class

Future<void> enableBluetooth() async {
  // Retrieving the current Bluetooth state
  _bluetoothState = await FlutterBluetoothSerial.instance.state;

  // If the Bluetooth is off, then turn it on first
  // and then retrieve the devices that are paired.
  if (_bluetoothState == BluetoothState.STATE_OFF) {
    await FlutterBluetoothSerial.instance.requestEnable();
    await getPairedDevices();
    return true;
  } else {
    await getPairedDevices();
  }
  return false;
}
The function implementation for retrieving the Bluetooth devices list:
// main.dart // Inside _BluetoothAppState class // Define a new class member variable // for storing the devices list List<BluetoothDevice> _devicesList = []; Future<void> getPairedDevices() async { List<BluetoothDevice> devices = []; // To get the list of paired devices try { devices = await _bluetooth.getBondedDevices(); } on PlatformException { print("Error"); } // It is an error to call [setState] unless [mounted] is true. if (!mounted) { return; } // Store the [devices] list in the [_devicesList] for accessing // the list outside this class setState(() { _devicesList = devices; }); } -
In order to avoid any memory leaks, we will be defining the
dispose()method to make sure that the connection is closed and resources are freed.// Define a member variable to track // when the disconnection is in progress bool isDisconnecting = false; @override void dispose() { if (isConnected) { isDisconnecting = true; connection.dispose(); connection = null; } super.dispose(); }
UI for enabling Bluetooth
So, we have all the methods required for establishing a proper Bluetooth connection with a device, and now we have to map them to some UI widgets.
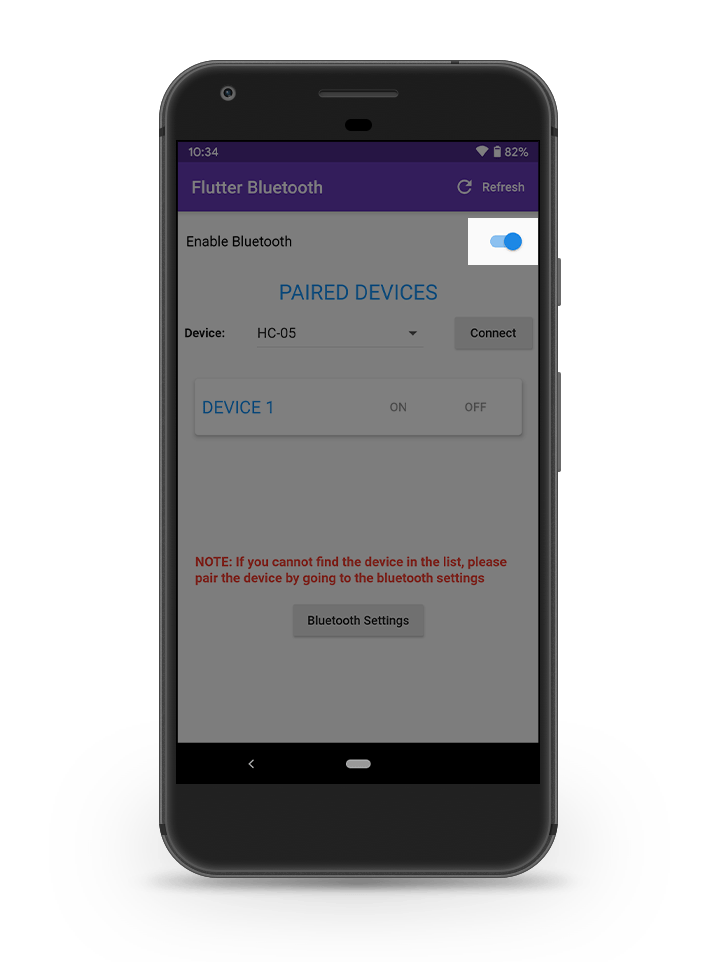
First of all, we will be adding a Switch widget which can toggle between only two modes (on/off).
The code for this component is available below:
// main.dart
// Inside _BluetoothAppState class

// Define this member variable for storing
// the current device connectivity status
bool _connected = false;

// Inside build method
Switch(
  value: _bluetoothState.isEnabled,
  onChanged: (bool value) {
    future() async {
      if (value) {
        // Enable Bluetooth
        await FlutterBluetoothSerial.instance
            .requestEnable();
      } else {
        // Disable Bluetooth
        await FlutterBluetoothSerial.instance
            .requestDisable();
      }

      // In order to update the devices list
      await getPairedDevices();
      _isButtonUnavailable = false;

      // Disconnect from any device before
      // turning off Bluetooth
      if (_connected) {
        _disconnect();
      }
    }

    future().then((_) {
      setState(() {});
    });
  },
)
Here, the Switch will toggle between on/off depending on whether the Bluetooth connection is enabled/disabled. Irrespective of whether Bluetooth is enabled or disabled by the toggle, the getPairedDevices() method is called in order to refresh the device list (i.e., if Bluetooth is enabled then the device list will be updated, and if it is disabled then the list content will be made empty).
UI for paired devices list
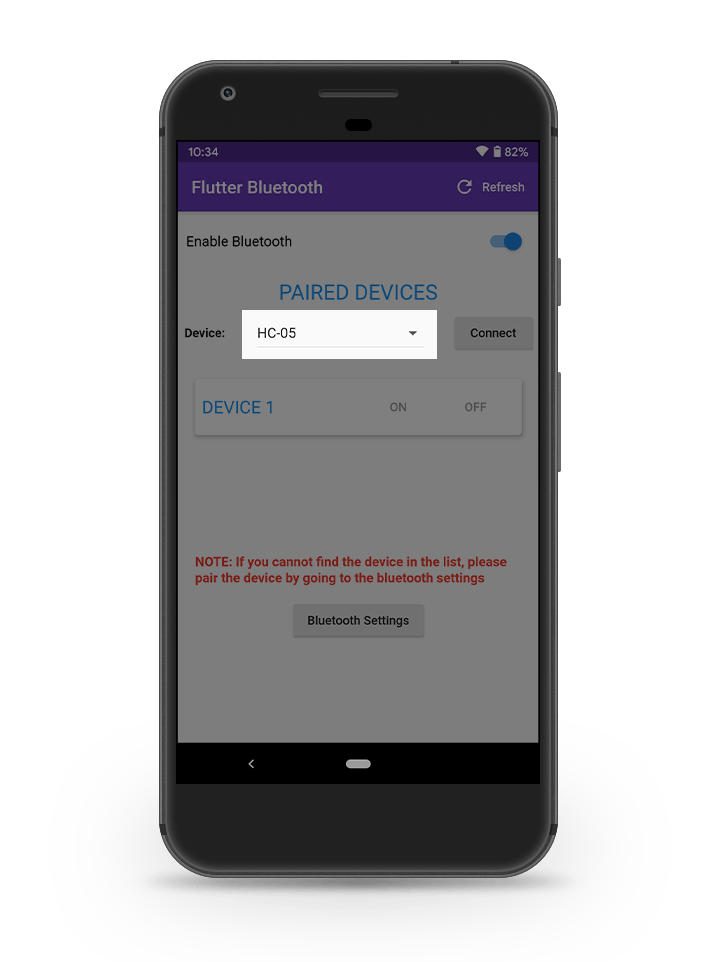
We will be using a DropdownButton widget for displaying the list of paired devices.
The code for it is:
// main.dart
// Inside _BluetoothAppState class

// Define this member variable for storing
// each device from the dropdown items
BluetoothDevice _device;

DropdownButton(
  items: _getDeviceItems(),
  onChanged: (value) =>
      setState(() => _device = value),
  value: _devicesList.isNotEmpty ? _device : null,
),
Define the method _getDeviceItems() for storing the device names in a list. When there are no devices to store in the list, a text value, ‘NONE’, is stored as the only item.
// main.dart
// Inside _BluetoothAppState class

List<DropdownMenuItem<BluetoothDevice>> _getDeviceItems() {
  List<DropdownMenuItem<BluetoothDevice>> items = [];
  if (_devicesList.isEmpty) {
    items.add(DropdownMenuItem(
      child: Text('NONE'),
    ));
  } else {
    _devicesList.forEach((device) {
      items.add(DropdownMenuItem(
        child: Text(device.name),
        value: device,
      ));
    });
  }
  return items;
}
Connecting to a device via Bluetooth
Now we have come to the main part of the process: connecting to the Bluetooth device.
-
Check if a device is selected from the list.
// main.dart // Inside _BluetoothAppState class void _connect() async { if (_device == null) { show('No device selected'); } else { // If a device is selected from the // dropdown, then use it here } } -
If a device is selected, then try to establish the connection.
// Define the following inside else block
// of the previous

// Making sure the device is not connected
if (!isConnected) {
  // Trying to connect to the device using
  // its address
  await BluetoothConnection.toAddress(_device.address)
      .then((_connection) {
    print('Connected to the device');
    connection = _connection;

    // Updating the device connectivity
    // status to [true]
    setState(() {
      _connected = true;
    });

    // This is for tracking when the disconnecting process
    // is in progress which uses the [isDisconnecting] variable
    // defined before.
    // Whenever we make a disconnection call, this [onDone]
    // method is fired.
    connection.input.listen(null).onDone(() {
      if (isDisconnecting) {
        print('Disconnecting locally!');
      } else {
        print('Disconnected remotely!');
      }
      if (this.mounted) {
        setState(() {});
      }
    });
  }).catchError((error) {
    print('Cannot connect, exception occurred');
    print(error);
  });
  show('Device connected');
}
The listener is set to the connection to track it. This will be helpful while we try to disconnect from the device. The
onDone()method will be triggered when thedispose(),finish()orclose()method is called from the connection, all of which cause the connection to disconnect.
Disconnecting from the device
To disconnect from the Bluetooth device, we have to call the close() method on the connection variable.
// main.dart
// Inside _BluetoothAppState class

void _disconnect() async {
  // Closing the Bluetooth connection
  await connection.close();
  show('Device disconnected');

  // Update the [_connected] variable
  if (!connection.isConnected) {
    setState(() {
      _connected = false;
    });
  }
}
UI for the connect/disconnect button
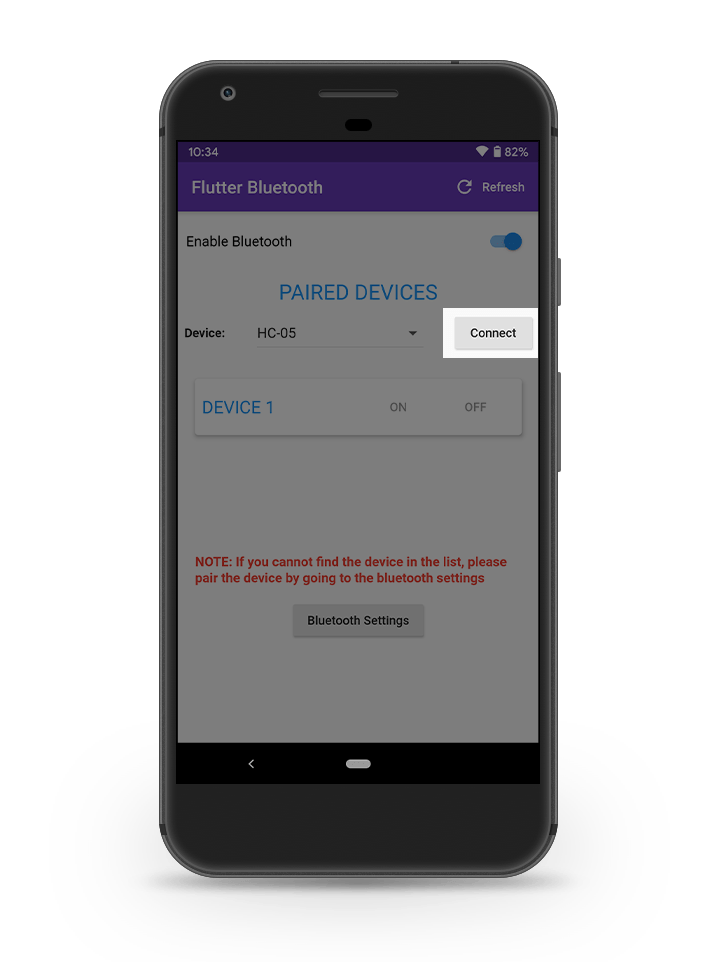
The UI for the connect/disconnect button is very simple. The code for it is available below:
// main.dart
// Inside _BluetoothAppState class

RaisedButton(
  onPressed: _isButtonUnavailable
      ? null
      : _connected ? _disconnect : _connect,
  child:
      Text(_connected ? 'Disconnect' : 'Connect'),
)
Send messages to the Bluetooth device
In this app, we will only be adding on/off functionality, so that a user can turn on or turn off their Bluetooth device from the app.
For turning on the device, we will be sending “1” as the message, and for turning off the device, we will be sending “0” as the message.
The code for this functionality is available below:
// main.dart
// Inside _BluetoothAppState class

// Method to send message
// for turning the Bluetooth device on
void _sendOnMessageToBluetooth() async {
  connection.output.add(utf8.encode("1" + "\r\n"));
  await connection.output.allSent;
  show('Device Turned On');
  setState(() {
    _deviceState = 1; // device on
  });
}

// Method to send message
// for turning the Bluetooth device off
void _sendOffMessageToBluetooth() async {
  connection.output.add(utf8.encode("0" + "\r\n"));
  await connection.output.allSent;
  show('Device Turned Off');
  setState(() {
    _deviceState = -1; // device off
  });
}
UI for sending messages via Bluetooth
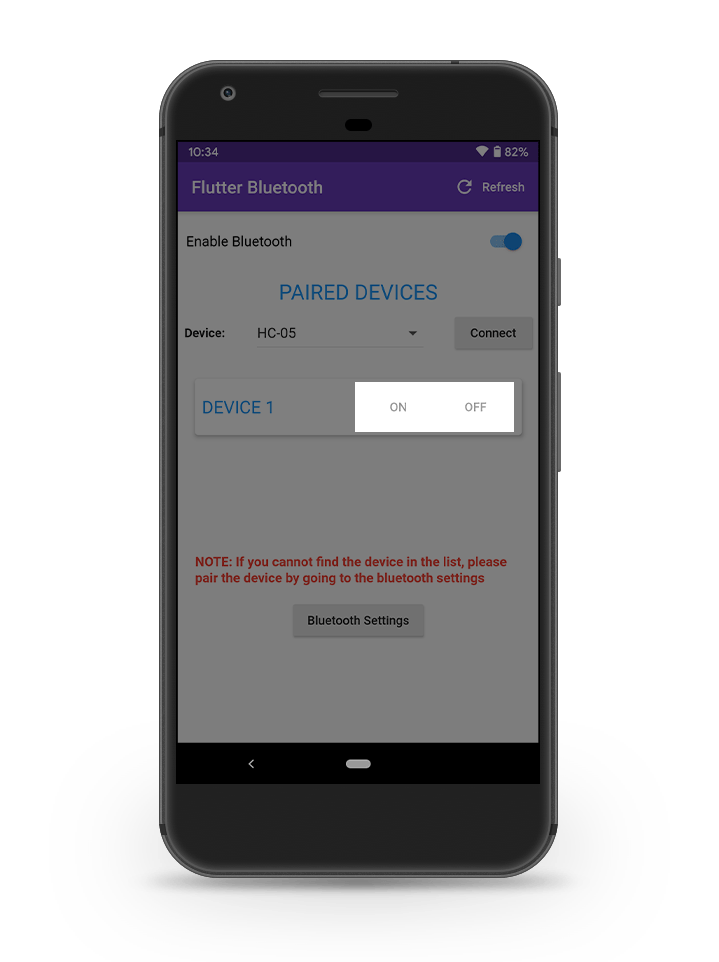
We will be using two buttons, one for sending an ON instruction to the device and the other one for sending an OFF instruction to the device.
The code for the UI is available below:
// main.dart
// Inside build method of
// _BluetoothAppState class

// ON button
FlatButton(
  onPressed: _connected
      ? _sendOnMessageToBluetooth
      : null,
  child: Text("ON"),
),
// OFF button
FlatButton(
  onPressed: _connected
      ? _sendOffMessageToBluetooth
      : null,
  child: Text("OFF"),
)
With this, all the main functionalities of our Bluetooth app are complete. There can be some UI improvements that can be made in the finished version of the app.
The whole Bluetooth app project is available on GitHub here.
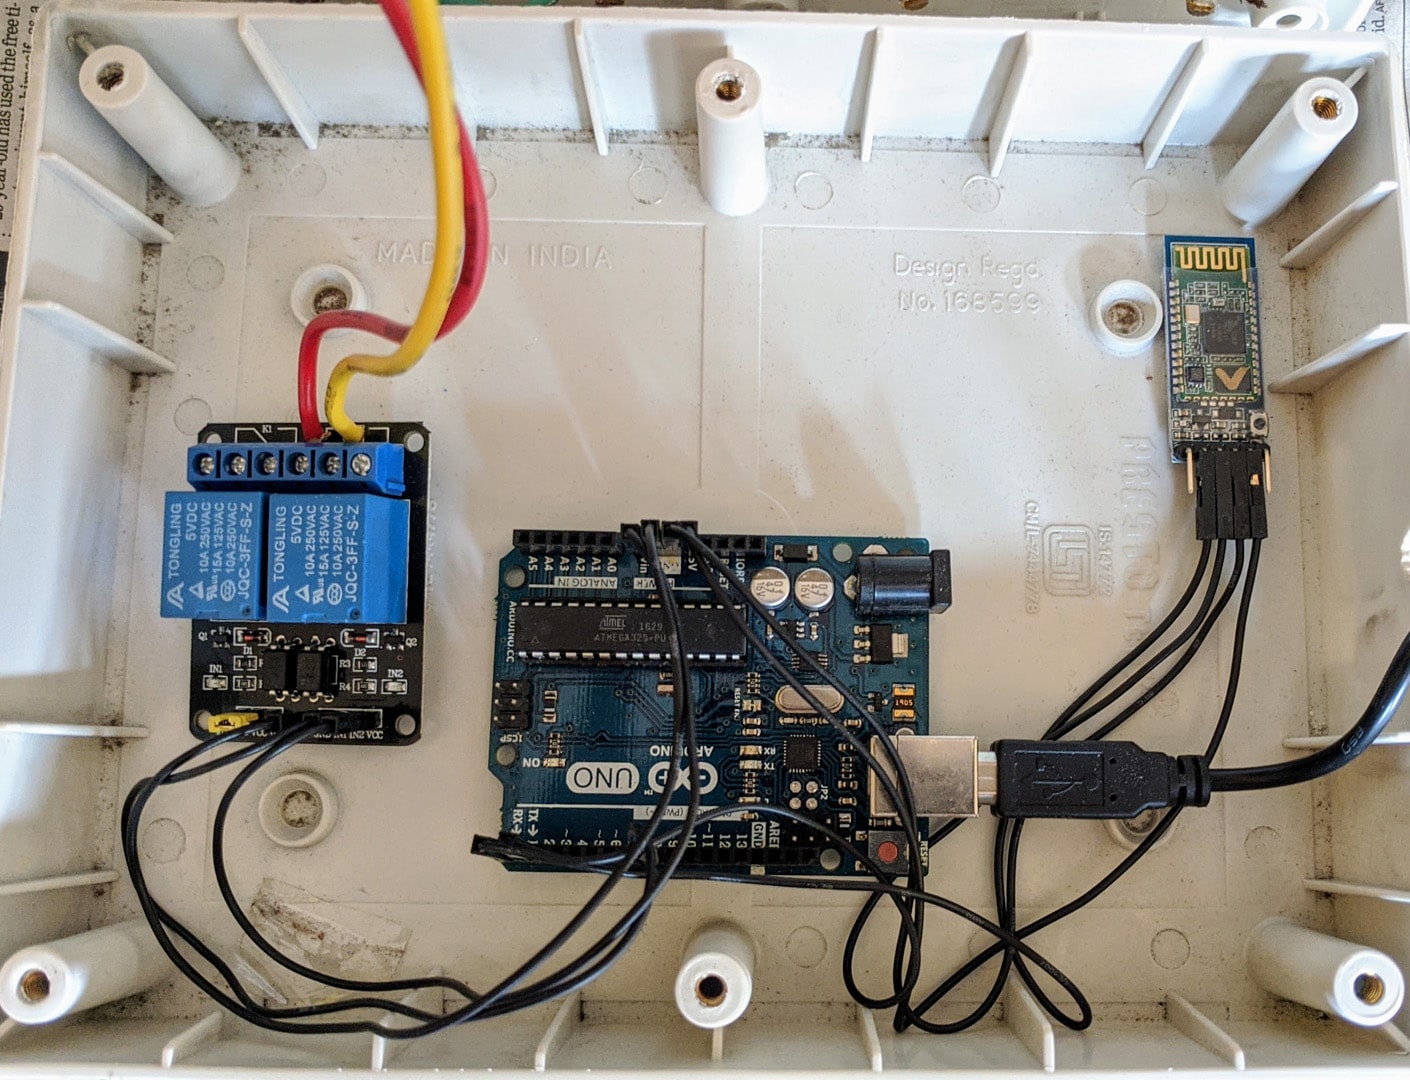
Connecting various modules to Arduino
The hardware components required for creating the controlling device are:
- Arduino UNO REV3
- 5V relay module (can have any number of channels, but you will be able to connect more devices with more channels)
- HC-05 Bluetooth Transceiver Module
- Jumper wires
- Some electrical wires
- Switch (together with an enclosure)
The module pin configurations and circuit diagram are given below:
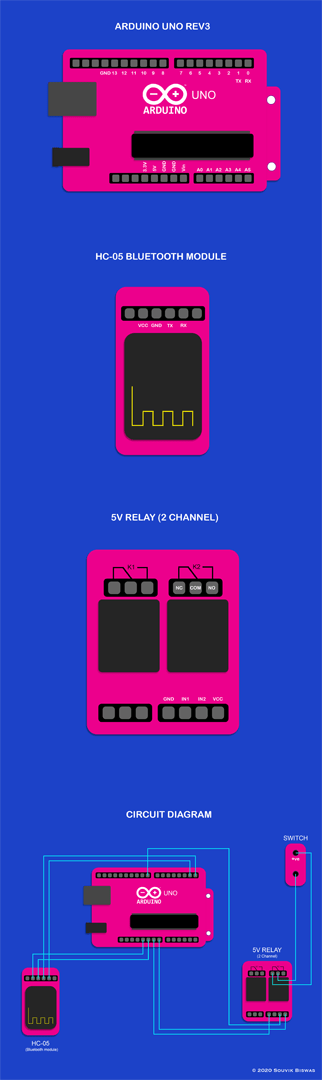
NOTE: The connection between the relay and the switch is done in such a way that the relay will only function when the switch is kept in off mode (as the NC or Normally Closed terminal of the relay is connected to the positive terminal of the switch).
When the switch is in on mode manually, it will get power directly from the main supply line.
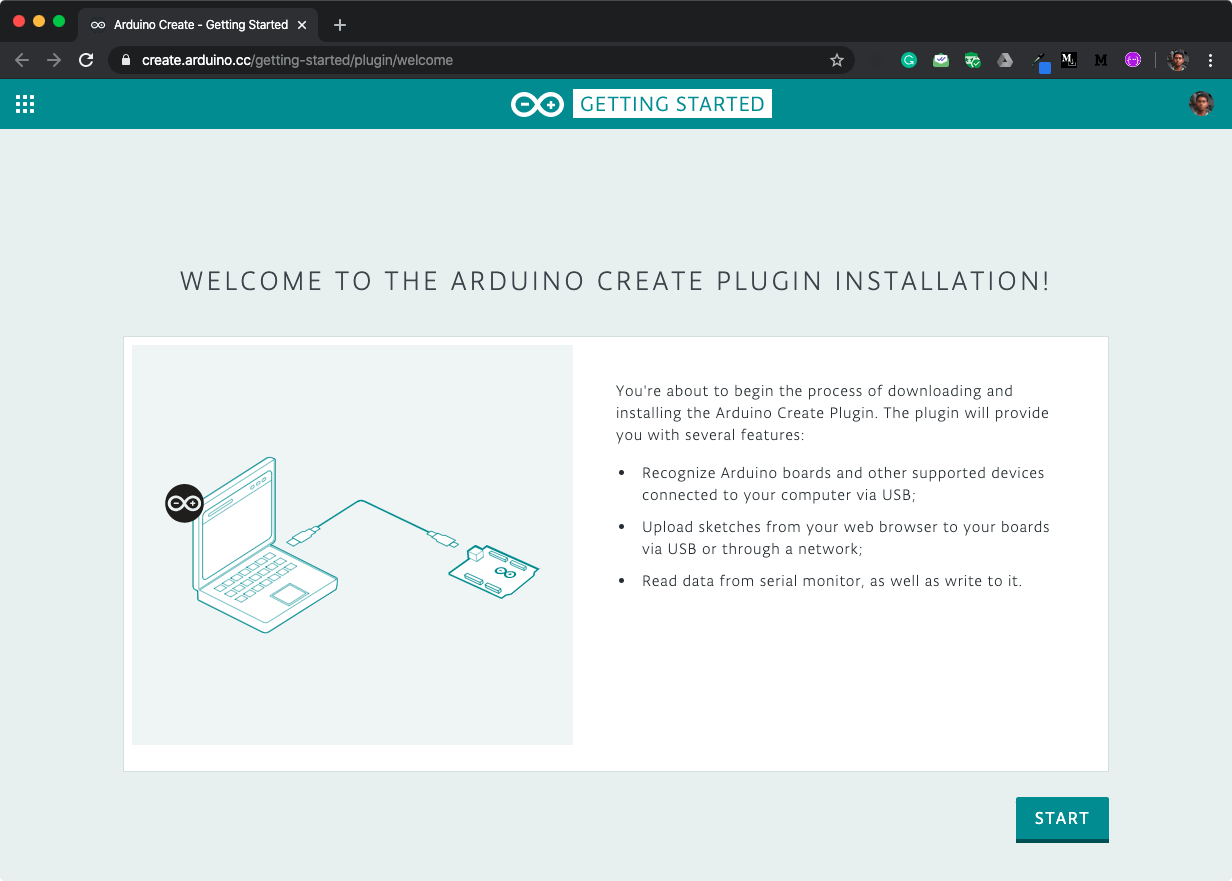
Setting up Arduino
You can use Arduino Web Editor for uploading the code to your Arduino Uno device. But before writing and uploading the code, you will need to install a plugin on your system, which is used for detecting and connecting to the Arduino device from the Web Editor.
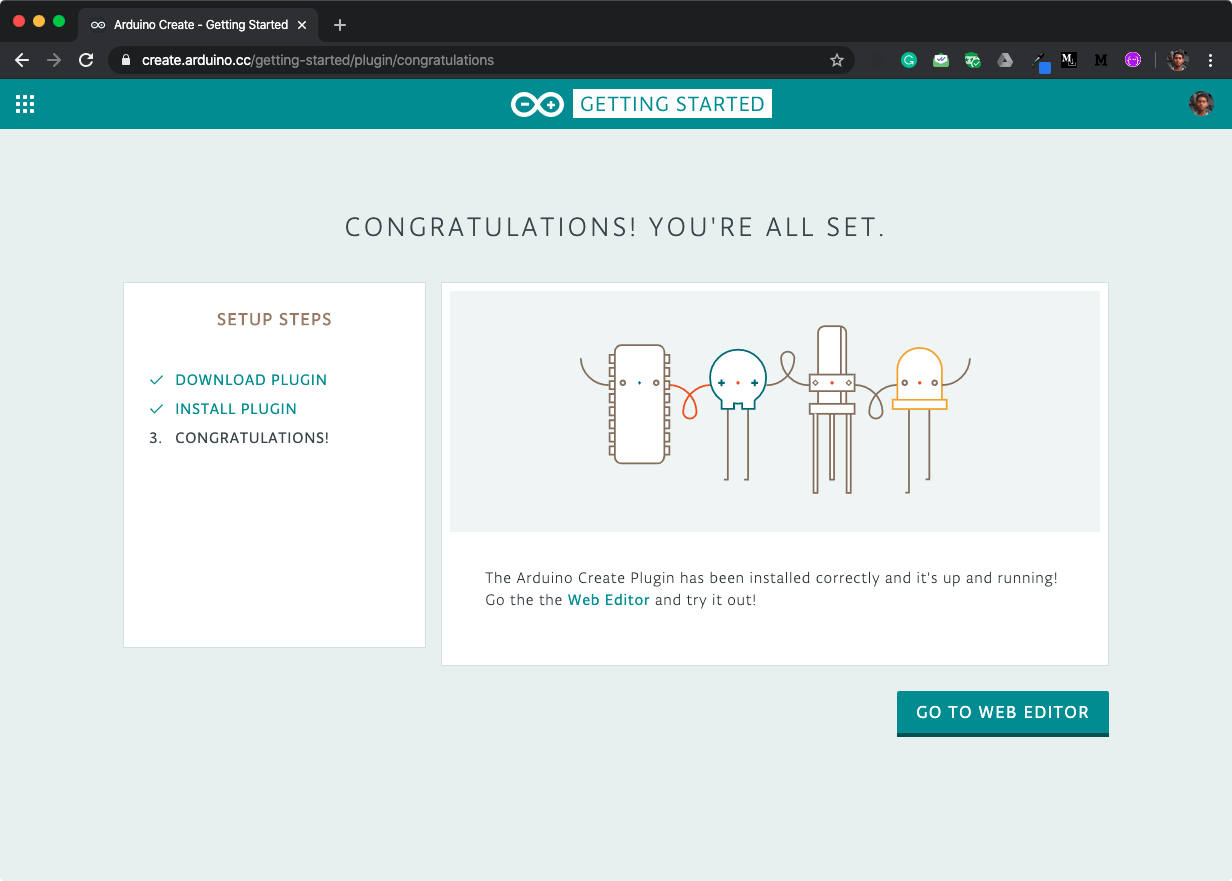
Just follow the steps here in order to download and set up the Arduino Create Plugin.
After the setup is complete, click on GO TO WEB EDITOR to start writing code for the Arduino device.
You can Sign In using an account on the Arduino Create webpage in order to safely store your projects in the cloud so that you can access them anywhere and anytime you want.
Click on NEW SKETCH to create a new project.
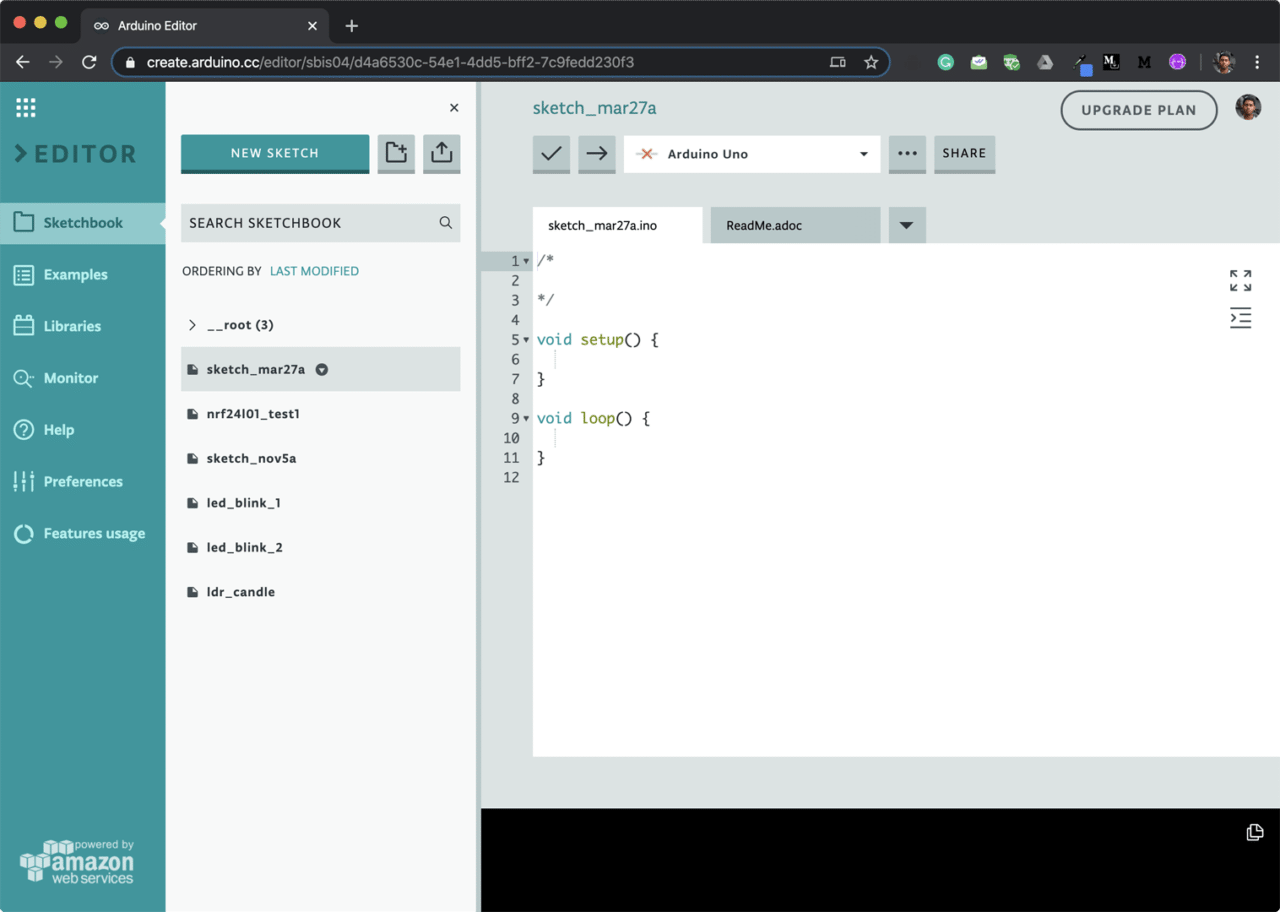
Now, you can write your program here.
Basically, what we have to do is take the input through Bluetooth from the app and turn on/off the relay connected to the switch.
The code is available below:
// Power_outlet.ino

// Variable for storing incoming value
char Incoming_value = 0;

void setup()
{
  // Sets the data rate in bits per second (baud)
  // for serial data transmission
  Serial.begin(9600);

  // Sets digital pin 8 as output pin
  pinMode(8, OUTPUT);

  // Initializes the pin 8 to LOW (i.e., OFF)
  digitalWrite(8, LOW);
}

void loop()
{
  if (Serial.available() > 0)
  {
    // Read the incoming data and store it in the variable
    Incoming_value = Serial.read();

    // Print value of Incoming_value in Serial monitor
    Serial.print(Incoming_value);
    Serial.print("\n");

    // Checking whether value of the variable
    // is equal to 0
    if (Incoming_value == '0')
      digitalWrite(8, LOW); // If value is 0, turn OFF the device

    // Checking whether value of the variable
    // is equal to 1
    else if (Incoming_value == '1')
      digitalWrite(8, HIGH); // If value is 1, turn ON the device
  }

  // Adding a delay before running the loop again
  delay(1);

}
Here, the Arduino signal pin is 8, which is connected to IN2 of the relay.
Connect the Arduino to your system.
You can check whether there are any syntactical mistakes in the code by clicking on the check mark beside the connected device name.
REMEMBER TO DO THIS STEP: Before uploading the code to Arduino, disconnect the wire connected to the RX pin on the Arduino board only (the top, rightmost wire in the diagram).
Click on the Upload button.
After you get the SUCCESSFUL upload message on the console, reconnect the RX pin wire.
Hoorah! You have finally completed this long project.
Now, you can test whether the Bluetooth functionality of the app is working correctly and controlling the relay.
The GitHub repo of this app is available here.

Souvik Biswas is a passionate Mobile App Developer (Android and Flutter). He has worked on a number of mobile apps throughout his journey. Loves open source contribution on GitHub. He is currently pursuing a B.Tech degree in Computer Science and Engineering from Indian Institute of Information Technology Kalyani. He also writes Flutter articles on Medium - Flutter Community.

