Watch Now This tutorial has a related video course created by the Real Python team. Watch it together with the written tutorial to deepen your understanding: Building a Django User Management System
If you finished the first part of this series, then you may already have a lot of ideas for your own Django applications. At some point, you might decide to extend them with user accounts. In this step-by-step tutorial, you’ll learn how to work with Django user management and add it to your program.
By the end of this tutorial, you’ll be able to:
- Create an application where users can register, log in, and reset and change passwords on their own
- Edit the default Django templates responsible for user management
- Send password reset emails to actual email addresses
- Authenticate using an external service
Let’s get started!
Free Bonus: Click here to get access to a free Django Learning Resources Guide (PDF) that shows you tips and tricks as well as common pitfalls to avoid when building Python + Django web applications.
Set Up a Django Project
This tutorial uses Django 3.0 and Python 3.6. It focuses on user management, so you won’t use any advanced or responsive styling. It also doesn’t deal with groups and permissions, only with creating and managing user accounts.
It’s a good idea to use a virtual environment when working with Python projects. That way, you can always be sure that the python command points to the right version of Python and that the modules required by your project have correct versions. To read more about it, check out Python Virtual Environments: A Primer.
To set up a virtual environment on Linux and macOS, run these commands:
$ python3 -m venv venv
$ source venv/bin/activate
(venv) $ python -m pip install --upgrade pip
(venv) $ python -m pip install django
To activate a virtual environment on Windows, run this command:
C:\> venv\Scripts\activate
Now that the environment is ready, you can create a new project and an application to store all your user management code:
(venv) $ django-admin startproject awesome_website
(venv) $ cd awesome_website
(venv) $ python manage.py startapp users
In this example, your application is called users. Keep in mind that you need to install it by adding it to INSTALLED_APPS:
# awesome_website/settings.py

INSTALLED_APPS = [
    "users",
    "django.contrib.admin",
    "django.contrib.auth",
    "django.contrib.contenttypes",
    "django.contrib.sessions",
    "django.contrib.messages",
    "django.contrib.staticfiles",
]
Next, apply the migrations and run the server:
(venv) $ python manage.py migrate
(venv) $ python manage.py runserver
This will create all user-related models in the database and start your application at http://localhost:8000/.
Note: In this tutorial, you’ll be using Django’s built-in user model. In practice, you would more likely create a custom user model, extending the functionality offered by Django. You can read more about customizing the default user model in Django’s documentation.
There’s one more thing you should do for this setup. By default, Django enforces strong passwords to make user accounts less prone to attacks. But you’re going to change passwords very often during the course of this tutorial, and figuring out a strong password each time would be very inconvenient.
You can solve this issue by disabling password validators in settings. Just comment them out, leaving an empty list:
# awesome_website/settings.py

AUTH_PASSWORD_VALIDATORS = [
    # {
    #     "NAME": "django.contrib.auth.password_validation.UserAttributeSimilarityValidator",
    # },
    # {
    #     "NAME": "django.contrib.auth.password_validation.MinimumLengthValidator",
    # },
    # {
    #     "NAME": "django.contrib.auth.password_validation.CommonPasswordValidator",
    # },
    # {
    #     "NAME": "django.contrib.auth.password_validation.NumericPasswordValidator",
    # },
]
Now Django will allow you to set passwords like password or even pass, making your work with the user management system much easier. Just remember to enable the validators in your actual application!
For this tutorial, it would also be useful to have access to the admin panel so you can track newly created users and their passwords. Go ahead and create an admin user:
(venv) $ python manage.py createsuperuser
Username (leave blank to use 'pawel'): admin
Email address: admin@example.com
Password:
Password (again):
Superuser created successfully.
With the password validators disabled, you can use any password you like.
Create a Dashboard View
Most user management systems have some sort of main page, usually known as a dashboard. You’ll create a dashboard in this section, but because it won’t be the only page in your application, you’ll also create a base template to keep the looks of the website consistent.
You won’t use any of Django’s advanced template features, but if you need a refresher on the template syntax, then you might want to check out Django’s template documentation.
Note: All templates used in this tutorial should be placed in the users/templates directory. If the tutorial mentions a template file users/dashboard.html, then the actual file path is users/templates/users/dashboard.html. For base.html, the actual path is users/templates/base.html, and so on.
The users/templates directory doesn’t exist by default, so you’ll have to create it first. The structure of your project will look like this:
awesome_website/
│
├── awesome_website/
│   ├── __init__.py
│   ├── asgi.py
│   ├── settings.py
│   ├── urls.py
│   └── wsgi.py
│
├── users/
│   │
│   ├── migrations/
│   │   └── __init__.py
│   │
│   ├── templates/
│   │   │
│   │   ├── registration/  ← Templates used by Django user management
│   │   │
│   │   ├── users/  ← Other templates of your application
│   │   │
│   │   └── base.html  ← The base template of your application
│   │
│   ├── __init__.py
│   ├── admin.py
│   ├── apps.py
│   ├── models.py
│   ├── tests.py
│   └── views.py
│
├── db.sqlite3
└── manage.py
Create a base template called base.html with the following content:
<!--users/templates/base.html-->

<h1>Welcome to Awesome Website</h1>

{% block content %}
{% endblock %}
The base template doesn’t do much. It shows the message Welcome to Awesome Website and defines a block called content. The block is empty for now, and other templates are going to use it to include their own content.
Now you can create a template for the dashboard. It should be called users/dashboard.html and should look like this:
<!--users/templates/users/dashboard.html-->

{% extends 'base.html' %}

{% block content %}
Hello, {{ user.username|default:'Guest' }}!
{% endblock %}
This doesn’t add a lot to the base template yet. It just shows the welcome message with the current user’s username. If the user isn’t logged in, then Django will still set the user variable using an AnonymousUser object. An anonymous user always has an empty username, so the dashboard will show Hello, Guest!
For your template to work, you need to create a view that renders it and a URL that uses the view:
# users/views.py

from django.shortcuts import render

def dashboard(request):
    return render(request, "users/dashboard.html")
Now create a users/urls.py file and add a path for the dashboard view:
# users/urls.py

from django.conf.urls import url
from users.views import dashboard

urlpatterns = [
    url(r"^dashboard/", dashboard, name="dashboard"),
]
Don’t forget to add your application’s URLs to your project’s URLs:
# awesome_website/urls.py

from django.conf.urls import include, url
from django.contrib import admin

urlpatterns = [
    url(r"^", include("users.urls")),
    url(r"^admin/", admin.site.urls),
]
You can now test the dashboard view. Open http://localhost:8000/dashboard/ in your browser. You should see a screen similar to this one:

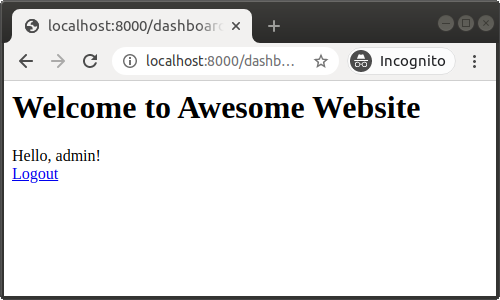
Now open the admin panel at http://localhost:8000/admin/ and log in as the admin user. Your dashboard should now look a bit different:

As you can see, your new template correctly displays the name of the currently logged-in user.
Work With Django User Management
A complete website needs a bit more than just a dashboard. Luckily, Django has a lot of user management–related resources that’ll take care of almost everything, including login, logout, password change, and password reset. Templates aren’t part of those resources, though. You have to create them on your own.
Start by adding the URLs provided by the Django authentication system into your application:
# users/urls.py

from django.conf.urls import include, url
from users.views import dashboard

urlpatterns = [
    url(r"^accounts/", include("django.contrib.auth.urls")),
    url(r"^dashboard/", dashboard, name="dashboard"),
]
That will give you access to all of the following URLs:
-
accounts/login/is used to log a user into your application. Refer to it by the name"login". -
accounts/logout/is used to log a user out of your application. Refer to it by the name"logout". -
accounts/password_change/is used to change a password. Refer to it by the name"password_change". -
accounts/password_change/done/is used to show a confirmation that a password was changed. Refer to it by the name"password_change_done". -
accounts/password_reset/is used to request an email with a password reset link. Refer to it by the name"password_reset". -
accounts/password_reset/done/is used to show a confirmation that a password reset email was sent. Refer to it by the name"password_reset_done". -
accounts/reset/<uidb64>/<token>/is used to set a new password using a password reset link. Refer to it by the name"password_reset_confirm". -
accounts/reset/done/is used to show a confirmation that a password was reset. Refer to it by the name"password_reset_complete".
This might seem a bit overwhelming, but don’t worry. In the next sections, you’ll learn what each of these URLs does and how to add them to your application.
Create a Login Page
For the login page, Django will try to use a template called registration/login.html. Go ahead and create it:
<!--users/templates/registration/login.html-->

{% extends 'base.html' %}

{% block content %}
<h2>Login</h2>

<form method="post">
    {% csrf_token %}
    {{ form.as_p }}
    <input type="submit" value="Login">
</form>

<a href="{% url 'dashboard' %}">Back to dashboard</a>
{% endblock %}
This will display a Login heading, followed by a login form. Django uses a dictionary, also known as a context, to pass data to a template while rendering it. In this case, a variable called form will already be included in the context—all you need to do is display it. Using {{ form.as_p }} will render the form as a series of HTML paragraphs, making it look a bit nicer than just {{ form }}.
The {% csrf_token %} line inserts a cross-site request forgery (CSRF) token, which is required by every Django form. There’s also a button for submitting the form and, at the end of the template, a link that will take your users back to the dashboard.
You can further improve the looks of the form by adding a small CSS script to the base template:
<!--users/templates/base.html-->

<style>
    label, input {
        display: block;
    }
    span.helptext {
        display: none;
    }
</style>

<h1>Welcome to Awesome Website</h1>

{% block content %}
{% endblock %}
By adding the above code to the base template, you’ll improve the looks of all of your forms, not just the one in the dashboard.
You can now open http://localhost:8000/accounts/login/ in your browser, and you should see something like this:

Use the credentials of your admin user and press Login. Don’t be alarmed if you see an error screen:

According to the error message, Django can’t find a path for accounts/profile/, which is the default destination for your users after a successful login. Instead of creating a new view, it would make more sense to reuse the dashboard view here.
Luckily, Django makes it easy to change the default redirection. All you need to do is add one line at the end of the settings file:
# awesome_website/settings.py

LOGIN_REDIRECT_URL = "dashboard"
Try to log in again. This time you should be redirected to the dashboard without any errors.
Create a Logout Page
Now your users can log in, but they should also be able to log out. This process is more straightforward because there’s no form—they just need to click a link. After that, Django will redirect your users to accounts/logout and will try to use a template called registration/logged_out.html.
However, just like before, you can change the redirection. For example, it would make sense to redirect your users back to the dashboard. To do so, you need to add one line at the end of the settings file:
# awesome_website/settings.py

LOGOUT_REDIRECT_URL = "dashboard"
Now that both login and logout are working, it would be a good idea to add proper links to your dashboard:
<!--users/templates/users/dashboard.html-->

{% extends 'base.html' %}

{% block content %}
Hello, {{ user.username|default:'Guest' }}!

<div>
    {% if user.is_authenticated %}
        <a href="{% url 'logout' %}">Logout</a>
    {% else %}
        <a href="{% url 'login' %}">Login</a>
    {% endif %}
</div>
{% endblock %}
If a user is logged in, then user.is_authenticated will return True and the dashboard will show the Logout link. If a user is not logged in, then user variable will be set to AnonymousUser, and user.is_authenticated will return False. In that case, the Login link will be displayed.
The updated dashboard should look like this for nonauthenticated users:

If you log in, then you should see this screen:
Congratulations! You just completed the most important part of the user management system: logging users in and out of the application. But there are a couple more steps ahead of you.
Change Passwords
At some point, your users might want to change their passwords. Instead of making them ask the admin to do it for them, you can add a password change form to your application. Django needs two templates to make this work:
-
registration/password_change_form.htmlto display the password change form -
registration/password_change_done.htmlto show a confirmation that the password was successfully changed
Start with registration/password_change_form.html:
<!--users/templates/registration/password_change_form.html-->

{% extends 'base.html' %}

{% block content %}
<h2>Change password</h2>

<form method="post">
    {% csrf_token %}
    {{ form.as_p }}
    <input type="submit" value="Change">
</form>

<a href="{% url 'dashboard' %}">Back to dashboard</a>
{% endblock %}
This template looks almost the same as the login template you created earlier. But this time, Django will put a password change form here, not a login form, so the browser will display it differently.
The other template you need to create is registration/password_change_done.html:
<!--users/templates/registration/password_change_done.html-->

{% extends 'base.html' %}

{% block content %}
<h2>Password changed</h2>

<a href="{% url 'dashboard' %}">Back to dashboard</a>
{% endblock %}
This will reassure your users that the password change was successful and let them go back to the dashboard.
The dashboard would be a perfect place to include a link to your newly created password change form. You just have to make sure it’s shown to logged in users only:
<!--users/templates/users/dashboard.html-->

{% extends 'base.html' %}

{% block content %}
Hello, {{ user.username|default:'Guest' }}!

<div>
    {% if user.is_authenticated %}
        <a href="{% url 'logout' %}">Logout</a>
        <a href="{% url 'password_change' %}">Change password</a>
    {% else %}
        <a href="{% url 'login' %}">Login</a>
    {% endif %}
</div>
{% endblock %}
If you follow the link in your browser, then you should see the following form:
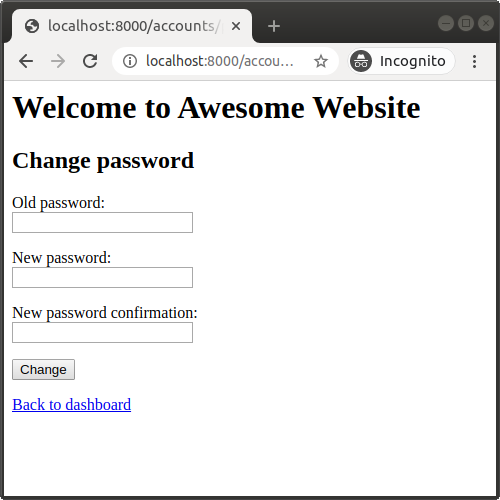
Go ahead and test it. Change the password, log out, and log in again. You can also try to access the password change page without logging in by accessing the URL http://localhost:8000/accounts/password_change/ directly in your browser. Django is clever enough to detect that you should log in first and will automatically redirect you to the login page.
Send Password Reset Links
Mistakes happen to the best of us, and every now and then someone might forget a password. Your Django user management system should handle that situation, too. This functionality is a bit more complicated because, in order to deliver password reset links, your application has to send emails.
Don’t worry—you don’t have to configure your own email server. For this tutorial, you just need a local test server to confirm that emails are sent. Open your terminal and run this command:
(venv) $ python -m smtpd -n -c DebuggingServer localhost:1025
This will start a simple SMTP server at http://localhost:1025. It won’t send any emails to actual email addresses. Instead, it’ll show the content of the messages in the command line.
All you need to do now is let Django know that you are going to use it. Add these two lines at the end of the settings file:
# awesome_website/settings.py

EMAIL_HOST = "localhost"
EMAIL_PORT = 1025
Django needs two templates for sending password reset links:
-
registration/password_reset_form.htmlto display the form used to request a password reset email -
registration/password_reset_done.htmlto show a confirmation that a password reset email was sent
They will be very similar to the password change templates you created earlier. Start with the form:
<!--users/templates/registration/password_reset_form.html-->

{% extends 'base.html' %}

{% block content %}
<h2>Send password reset link</h2>

<form method="post">
    {% csrf_token %}
    {{ form.as_p }}
    <input type="submit" value="Reset">
</form>

<a href="{% url 'dashboard' %}">Back to dashboard</a>
{% endblock %}
Now add a confirmation template:
<!--users/templates/registration/password_reset_done.html-->

{% extends 'base.html' %}

{% block content %}
<h2>Password reset done</h2>

<a href="{% url 'login' %}">Back to login</a>
{% endblock %}
It would also be a good idea to include a link to the password reset form on the login page:
<!--users/templates/registration/login.html-->

{% extends 'base.html' %}

{% block content %}
<h2>Login</h2>

<form method="post">
    {% csrf_token %}
    {{ form.as_p }}
    <input type="submit" value="Login">
</form>

<a href="{% url 'dashboard' %}">Back to dashboard</a>
<a href="{% url 'password_reset' %}">Reset password</a>
{% endblock %}
Your newly created password reset form should look like this:

Type in your admin’s email address (admin@example.com) and press Reset. You should see the following message in the terminal running the email server:
---------- MESSAGE FOLLOWS ----------
b'Content-Type: text/plain; charset="utf-8"'
b'MIME-Version: 1.0'
b'Content-Transfer-Encoding: 7bit'
b'Subject: Password reset on localhost:8000'
b'From: webmaster@localhost'
b'To: admin@example.com'
b'Date: Wed, 22 Apr 2020 20:32:39 -0000'
b'Message-ID: <20200422203239.28625.15187@pawel-laptop>'
b'X-Peer: 127.0.0.1'
b''
b''
b"You're receiving this email because you requested a password reset for your
user account at localhost:8000."
b''
b'Please go to the following page and choose a new password:'
b''
b'http://localhost:8000/accounts/reset/MQ/5fv-f18a25af38f3550a8ca5/'
b''
b"Your username, in case you've forgotten: admin"
b''
b'Thanks for using our site!'
b''
b'The localhost:8000 team'
b''
------------ END MESSAGE ------------
This is the content of an email that would be sent to your admin. It contains information about the application that sent it plus a password reset link.
Reset Passwords
Each password reset email sent by Django contains a link that can be used to reset the password. To handle that link correctly, Django needs two more templates:
-
registration/password_reset_confirm.htmlto display the actual password reset form -
registration/password_reset_complete.htmlto show a confirmation that a password was reset
These will look very similar to the password change templates. Start with the form:
<!--users/templates/registration/password_reset_confirm.html-->

{% extends 'base.html' %}

{% block content %}
<h2>Confirm password reset</h2>

<form method="post">
    {% csrf_token %}
    {{ form.as_p }}
    <input type="submit" value="Confirm">
</form>
{% endblock %}
Just like before, Django will automatically provide a form, but this time it’ll be a password reset form. You also need to add a confirmation template:
<!--users/templates/registration/password_reset_complete.html-->

{% extends 'base.html' %}

{% block content %}
<h2>Password reset complete</h2>

<a href="{% url 'login' %}">Back to login</a>
{% endblock %}
Now, if you follow the password reset link from one of the emails, then you should see a form like this in your browser:

You can now check if it works. Insert a new password into the form, click Confirm, log out, and log in using the new password.
Change Email Templates
You can change the default templates for Django emails just like any other user management–related templates:
registration/password_reset_email.htmldetermines the body of the emailregistration/password_reset_subject.txtdetermines the subject of the email
Django provides a lot of variables in the email template context that you can use to compose your own messages:
<!--users/templates/registration/password_reset_email.html-->

Someone asked for password reset for email {{ email }}.
Follow the link below:
{{ protocol}}://{{ domain }}{% url 'password_reset_confirm' uidb64=uid token=token %}
You can also change the subject to something shorter, like Reset password. If you implement these changes and send a password reset email again, then you should see this message:
---------- MESSAGE FOLLOWS ----------
b'Content-Type: text/plain; charset="utf-8"'
b'MIME-Version: 1.0'
b'Content-Transfer-Encoding: 7bit'
b'Subject: Reset password'
b'From: webmaster@localhost'
b'To: admin@example.com'
b'Date: Wed, 22 Apr 2020 20:36:36 -0000'
b'Message-ID: <20200422203636.28625.36970@pawel-laptop>'
b'X-Peer: 127.0.0.1'
b''
b'Someone asked for password reset for email admin@example.com.'
b'Follow the link below:'
b'http://localhost:8000/accounts/reset/MQ/5fv-f18a25af38f3550a8ca5/'
------------ END MESSAGE ------------
As you can see, both the subject and the content of the email have changed.
Register New Users
Your application can now handle all URLs related to Django user management. But one feature isn’t working yet.
You may have noticed that there’s no option to create a new user. Unfortunately, Django doesn’t provide user registration out of the box. You can, however, add it on your own.
Django offers a lot of forms that you can use in your projects. One of them is UserCreationForm. It contains all the necessary fields to create a new user. However, it doesn’t include an email field.
In many applications, this might not be a problem, but you’ve already implemented a password reset feature. Your users need to configure an email address or else they won’t be able to receive password reset emails.
To fix that, you need to add your own user creation form. Don’t worry—you can reuse almost the entire UserCreationForm. You just need to add the email field.
Create a new Python file called users/forms.py and add a custom form there:
# users/forms.py

from django.contrib.auth.forms import UserCreationForm

class CustomUserCreationForm(UserCreationForm):
    class Meta(UserCreationForm.Meta):
        fields = UserCreationForm.Meta.fields + ("email",)
As you can see, your CustomUserCreationForm extends Django’s UserCreationForm. The inner class Meta keeps additional information about the form and in this case extends UserCreationForm.Meta, so almost everything from Django’s form will be reused.
The key difference is the fields attribute, which determines the fields that’ll be included in the form. Your custom form will use all the fields from UserCreationForm and will add the email field.
Now that the form is ready, create a new view called register:
 1# users/views.py
 2
 3from django.contrib.auth import login
 4from django.shortcuts import redirect, render
 5from django.urls import reverse
 6from users.forms import CustomUserCreationForm
 7
 8def dashboard(request):
 9    return render(request, "users/dashboard.html")
10
11def register(request):
12    if request.method == "GET":
13        return render(
14            request, "users/register.html",
15            {"form": CustomUserCreationForm}
16        )
17    elif request.method == "POST":
18        form = CustomUserCreationForm(request.POST)
19        if form.is_valid():
20            user = form.save()
21            login(request, user)
22            return redirect(reverse("dashboard"))
Here’s a breakdown of the register() view:
-
Lines 12 to 16: If the view is displayed by a browser, then it will be accessed by a
GETmethod. In that case, a template calledusers/register.htmlwill be rendered. The last argument of.render()is a context, which in this case contains your custom user creation form. -
Lines 17 to 18: If the form is submitted, then the view will be accessed by a
POSTmethod. In that case, Django will attempt to create a user. A newCustomUserCreationFormis created using the values submitted to the form, which are contained in therequest.POSTobject. -
Lines 19 to 22: If the form is valid, then a new user is created on line 20 using
form.save(). Then the user is logged in on line 21 usinglogin(). Finally, line 22 redirects the user to the dashboard.
The template itself should look like this:
<!--users/templates/users/register.html-->

{% extends 'base.html' %}

{% block content %}
<h2>Register</h2>

<form method="post">
    {% csrf_token %}
    {{form}}
    <input type="submit" value="Register">
</form>

<a href="{% url 'login' %}">Back to login</a>
{% endblock %}
This is very similar to the previous templates. Just like before, it takes the form from the context and renders it. The only difference is that this time you had to add the form to the context on your own instead of letting Django do it.
Remember to add a URL for the registration view:
# users/urls.py

from django.conf.urls import include, url
from users.views import dashboard, register

urlpatterns = [
    url(r"^accounts/", include("django.contrib.auth.urls")),
    url(r"^dashboard/", dashboard, name="dashboard"),
    url(r"^register/", register, name="register"),
]
It’s also a good idea to add a link to the registration form on the login page:
<!--users/templates/registration/login.html-->

{% extends 'base.html' %}

{% block content %}
<h2>Login</h2>

<form method="post">
    {% csrf_token %}
    {{ form.as_p }}
    <input type="submit" value="Login">
</form>

<a href="{% url 'dashboard' %}">Back to dashboard</a>
<a href="{% url 'password_reset' %}">Reset password</a>
<a href="{% url 'register' %}">Register</a>
{% endblock %}
Your newly created form should look like this:

Please keep in mind that this is just an example of a registration form. In the real world, you would probably send emails with confirmation links after someone creates a user account, and you would also display proper error messages if someone tried to register an account that already exists.
Send Emails to the Outside World
At the moment, your application can send emails to the local SMTP server so you can read them in the command line. It would be far more useful to send emails to actual email addresses. One way to do this is by using Mailgun.
For this step, you’ll need a Mailgun account. The basic version is free and will let you send emails from a rather obscure domain, but it will work for the purpose of this tutorial.
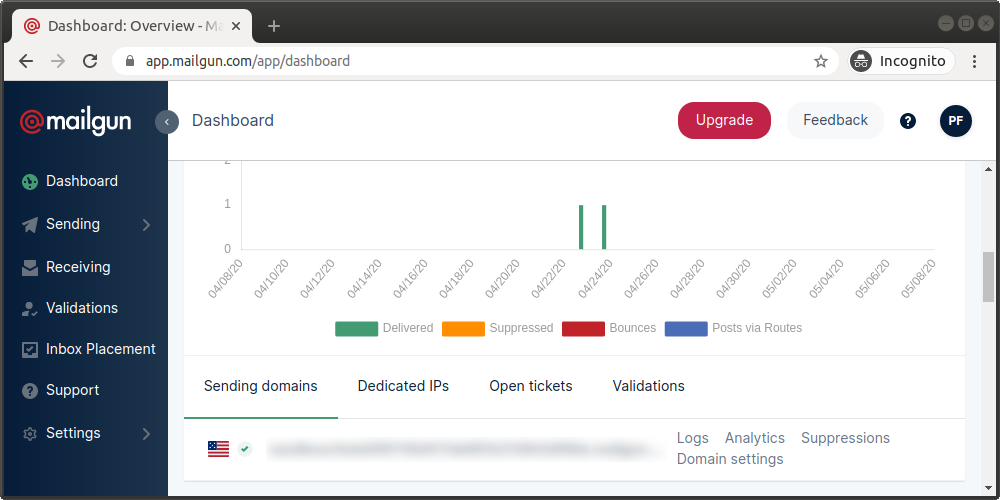
After you create your account, go to the Dashboard page and scroll down until you reach “Sending domains.” There you will find your sandbox domain:
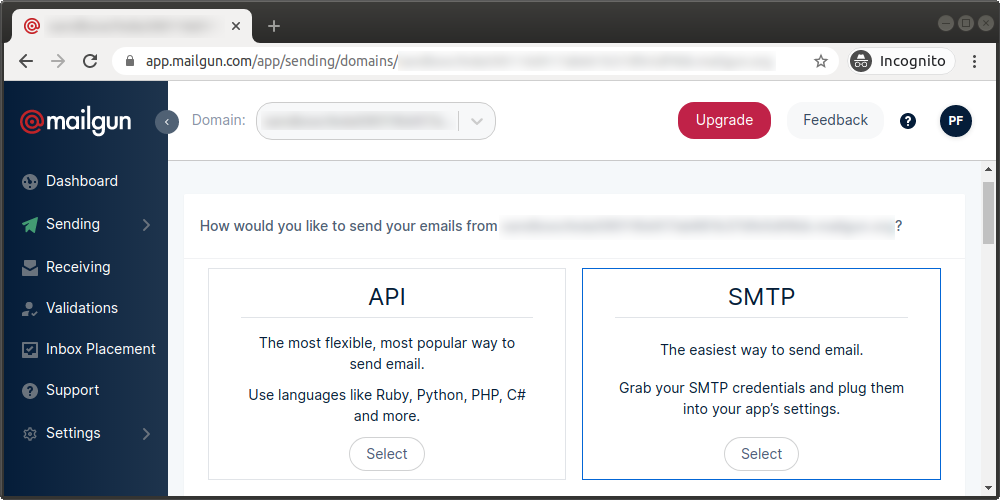
Click on the domain. You’ll be redirected to a page where you can select the way you want to send emails. Choose SMTP:
Scroll down until you reach the credentials for your account:

You should find the following values:
- SMTP hostname
- Port
- Username
- Default password
All you need to do is add these values to the settings file. Keep in mind that you should never include any credentials directly in your code. Instead, add them as environmental variables and read their values in Python.
On Linux and macOS, you can add an environmental variable in the terminal like this:
(venv) $ export EMAIL_HOST_USER=your_email_host_user
On Windows, you can run this command in Command Prompt:
C:\> set EMAIL_HOST_USER=your_email_host_user
Repeat the same process for EMAIL_HOST_PASSWORD, and remember to export the variables in the same terminal window where you run the Django server. After both variables are added, update the settings:
# awesome_website/settings.py

EMAIL_HOST = "smtp.mailgun.org"
EMAIL_PORT = 587
EMAIL_HOST_USER = os.environ.get("EMAIL_HOST_USER")
EMAIL_HOST_PASSWORD = os.environ.get("EMAIL_HOST_PASSWORD")
EMAIL_USE_TLS = True
The values of EMAIL_HOST and EMAIL_PORT should be the same for all sandbox domains, but you have to use your own username and password. There’s also one additional value called EMAIL_USE_TLS that you need to set to True.
To check if this works, you have to create a new user with your own email address. Go to http://localhost:8000/admin/ and log in as the admin user. Go to Users and click ADD USER. Select any username and password you like and click Save and continue editing. Then insert the same email address you used for your Mailbox account into the email address field and save the user.
After creating the user, navigate to http://localhost:8000/accounts/password_reset/. Enter your email address and press Send. The process of sending an email will take a bit longer than with the local server. After a few moments, the password reset email should arrive in your inbox. It may also be in your spam folder, so don’t forget to check there too.
The sandbox domain will only work with the email address that you used to create your Mailgun account. To send emails to other recipients, you’ll have to add a custom domain.
Log in With GitHub
Many modern websites offer an option to authenticate using social media accounts. One such example is Google login, but in this tutorial you’ll learn how to integrate with GitHub.
Luckily, there’s a very useful Python module that takes care of this task. It’s called social-auth-app-django. This tutorial shows just the basic configuration of the module, but you can learn more about it from its documentation, especially the part dedicated to Django configuration.
Set Up Social Authentication
Start by installing the module:
(venv) $ python -m pip install social-auth-app-django
Like any other Django application, you have to add it to INSTALLED_APPS. Notice that, in this case, the name of the Django application is different from the name of the Python module:
# awesome_website/settings.py

INSTALLED_APPS = [
    "users",
    "social_django",
    "django.contrib.admin",
    "django.contrib.auth",
    "django.contrib.contenttypes",
    "django.contrib.sessions",
    "django.contrib.messages",
    "django.contrib.staticfiles",
]
Next, add two context processors to awesome_website/settings.py:
# awesome_website/settings.py

TEMPLATES = [
    {
        "BACKEND": "django.template.backends.django.DjangoTemplates",
        "DIRS": [],
        "APP_DIRS": True,
        "OPTIONS": {
            "context_processors": [
                "django.template.context_processors.debug",
                "django.template.context_processors.request",
                "django.contrib.auth.context_processors.auth",
                "django.contrib.messages.context_processors.messages",
                "social_django.context_processors.backends",
                "social_django.context_processors.login_redirect",
            ],
        },
    },
]
After you do that, apply the migrations:
(venv) $ python manage.py migrate
You also need to include the social authentication URLs in your application, just like you did with the ones provided by Django:
# users/urls.py

from django.conf.urls import include, url
from users.views import dashboard, register

urlpatterns = [
    url(r"^accounts/", include("django.contrib.auth.urls")),
    url(r"^dashboard/", dashboard, name="dashboard"),
    url(r"^oauth/", include("social_django.urls")),
    url(r"^register/", register, name="register"),
]
All of that was a general configuration for Django. To use social authentication specifically with GitHub, you have to add a dedicated authentication backend.
By default, Django settings don’t specify authentication backends, and the default backend used by Django is django.contrib.auth.backends.ModelBackend. So to use social authentication, you have to create a new value in settings:
# awesome_website/settings.py

AUTHENTICATION_BACKENDS = [
    "django.contrib.auth.backends.ModelBackend",
    "social_core.backends.github.GithubOAuth2",
]
The first backend on the list is the default one used by Django. If you don’t include it here, then Django won’t be able to log in standard users. The second backend is used for GitHub logins.
The last thing to do is to add a link to the GitHub login on your login page:
<!--users/templates/registration/login.html-->

{% extends 'base.html' %}

{% block content %}
<h2>Login</h2>

<form method="post">
    {% csrf_token %}
    {{ form.as_p }}
    <input type="submit" value="Login">
</form>

<a href="{% url 'dashboard' %}">Back to dashboard</a>
<a href="{% url 'social:begin' 'github' %}">Login with GitHub</a>
<a href="{% url 'password_reset' %}">Reset password</a>
<a href="{% url 'register' %}">Register</a>
{% endblock %}
You might notice that the new URL uses the namespace social. Namespaces are Django’s way of organizing URLs in more complex projects.
Using a unique namespace ensures that there will be no conflicts between your application’s URLs and the URLS of other applications. The social authentication application uses the namespace social, so every URL you want to use has to start with social:.
Create a GitHub Application
To use GitHub authentication with Django user management, you first have to create an application. Log in to your GitHub account, go to GitHub’s page for registering a new OAuth application, and fill in the form:

The most important part is the Authorization callback URL. It has to point back to your application.
After you register the application, you’ll be redirected to a page with credentials:

Add the values of Client ID and Client Secret to settings the same way you added Mailgun email credentials:
# awesome_website/settings.py

SOCIAL_AUTH_GITHUB_KEY = os.environ.get("SOCIAL_AUTH_GITHUB_KEY")
SOCIAL_AUTH_GITHUB_SECRET = os.environ.get("SOCIAL_AUTH_GITHUB_SECRET")
You can now check if this works. Go to your application’s login page and select the option to log in with GitHub. Assuming you’ve logged out after creating the application in the previous step, you should be redirected to GitHub’s login page:

In the next step you’ll be asked to authorize the GitHub application:

If you confirm, then you’ll be redirected back to your application. You can now find a new user in the admin panel :

The newly created user has the same username as your GitHub handle and doesn’t have a password.
Select Authentication Backend
There’s one problem with the example above: by enabling GitHub login, you accidentally broke the normal user creation process.
That happened because Django previously had only one authentication backend to choose from, and now it has two. Django doesn’t know which one to use when creating new users, so you’ll have to help it decide. To do that, replace the line user = form.save() in your registration view:
# users/views.py

from django.contrib.auth import login
from django.shortcuts import redirect, render
from django.urls import reverse
from users.forms import CustomUserCreationForm

def dashboard(request):
    return render(request, "users/dashboard.html")

def register(request):
    if request.method == "GET":
        return render(
            request, "users/register.html", {"form": CustomUserCreationForm}
        )
    elif request.method == "POST":
        form = CustomUserCreationForm(request.POST)
        if form.is_valid():
            user = form.save(commit=False)
            user.backend = "django.contrib.auth.backends.ModelBackend"
            user.save()
            login(request, user)
            return redirect(reverse("dashboard"))
A user is created from the form like before, but this time it’s not immediately saved thanks to commit=False. In the next line, a backend is associated with the user, and only then is the user saved to the database. This way, you can use both normal user creation and social media authentication in the same Django user management system.
Conclusion
Django is a versatile framework, and it does its best to help you with every possible task, including user management. It provides a lot of ready-to-use resources, but sometimes you need to extend them just a bit.
In this tutorial, you’ve learned how to:
- Extend your Django application with a full set of user management features
- Adjust the default Django templates to better suit your needs
- Use Mailgun to send password reset emails
- Add an option to log in with GitHub
This should provide you with a good starting point for your own amazing ideas. If you think that something’s missing, or if you have any questions, then please don’t hesitate to let me know!
Watch Now This tutorial has a related video course created by the Real Python team. Watch it together with the written tutorial to deepen your understanding: Building a Django User Management System