

In this tutorial, we'll walk through how to build a React component that uses the Google Maps API.
Integrating React with external libraries like Google or Facebook APIs can be confusing and challenging. In this discussion, we'll look at how to integrate the Google Maps API with React. In this post we'll deal with lazily-loading the library through building complex nested components.
This post is not only about how to use Google Maps, but how to use 3rd party libraries in React generally and how to build up rich interactive components.

Table of Contents
- Loading a Google-based Component
- Adding props to the Map Component
- Adding state to the Map Component
- Using the Browser's Current Location
- Dragging the Map Around with addListener
- Adding Markers to the Map
- Creating the MarkerComponent
- Adding a Marker Info Window
- Conclusion
In this post, we'll look at how we to connect the Google API and build a Google Maps Component.
Before we can integrate with Google Maps, we'll need to sign up at Google to get an API key.
You're more than welcome to use our apiKey, but please use it lightly so Google doesn't cut off our api access so it works for everyone.
Our
apiKeyis:
Loading a Google-based Component
In order to use Google within our components, we'll need to handle two technical boundaries:
- Loading the Google API
- Handling access to the Google API within our components.
Our goal here is to create an independent component that can handle these two tasks for us. Let's build a GoogleApiComponent to handle taking care of this for us (alternatively, we've wrapped this into an npm module ( google-maps-react). Feel free to grab this npm module and head to the next section).
With our key in hand, we'll need to load up the Google API on our page. We can handle this in multiple ways, including directly including the <script> tag on our page through asynchronously loading the script using JavaScript. We try to keep our dependencies limited to the scripts we directly need on a page as well as define our dependencies in JavaScript, so we'll take the latter method of loading our window.google object using a React component.
First, grab the ScriptCache.js script from this gist.
There are 3 scripts included in the gist. The scripts:
ScriptCache.js- The backbone of this method which asynchronously loads JavaScript<script>tags on a page. It will only load a single<script>tag on a page per-script tag declaration. If it's already loaded on a page, it calls the callback from theonLoadevent immediately.
Sample usage:
this.scriptCache = cache({
  google: 'https://api.google.com/some/script.js'
});
GoogleApi.jsis a script tag compiler. Essentially, this utility module builds a Google Script tag link allowing us to describe the pieces of the Google API we want to load in using a JS object and letting it build the endpoint string.
Sample usage:
GoogleApi({
  apiKey: apiKey,
  libraries: ['places']
});
GoogleApiComponent.js- The React wrapper which is responsible for loading a component and passing through thewindow.googleobject after it's loaded on the page.
Sample usage:
const Container = React.createClass({
  render: function() {
    return <div>Google</div>;
  }
})
export default GoogleApiComponent({
  apiKey: __GAPI_KEY__
})(Container)
With our helpful scripts in-hand, we can load our Google Api in a Map component directly in our React component. Let's do this together in building our Map:
The Map Container Component
Before we jump into building our Map component, let's build our container component to demonstrate usage as well as be responsible for loading the Google Api:
export class Container extends React.Component {
  render() {
    if (!this.props.loaded) {
      return <div>Loading...</div>
    }
    return (
      <div>Map will go here</div>
    )
  }
}

export default GoogleApiComponent({
  apiKey: __GAPI_KEY__
})(Container)
The bulk of the work with the code is wrapped away in the GoogleApiComponent component. It's responsible for passing through a loaded prop that is set to true after the Google API has been loaded. Once it's loaded, the prop will be flipped to true and our default render function will render the <div>.
We'll place our Map component inside this Container component using JSX. Since we're using the GoogleApiComponent Higher-Order Component, we'll get a reference to a google object and (in our case) a Google map. We can replace the currently rendered <div> element with a reference to our Map component:
export class Container extends React.Component {
  render() {
    return (
      <div>
        <Map google={this.props.google} />
      </div>
    )
  }
}
// ...
Before we move on, our map object won't show without a set height and width on the containing object. Let's set one to be the entire page:
export class Container extends React.Component {
  render() {
    const style = {
      width: '100vw',
      height: '100vh'
    }
    return (
      <div style={style}>
        <Map google={this.props.google}
          />
      </div>
    )
  }
}
// ...
The Map Component
With the stage set for our Container component, let's start our Map component. Our Map component is essentially a simple wrapper around the default Google Maps api. The tricky part about using the asynchronous library is being able to depend upon it's API being available.
Let's build the basic Map component:
export class Map extends React.Component {
  render() {
    return (
      <div ref='map'>
        Loading map...
      </div>
    )
  }
}
When our GoogleApiComponent loads on the page, it will create a google map component and pass it into our Map component as a prop. As we're wrapping our main component inside the Google api component wrapper, we can check for either a new prop or the mounting of the component (we'll need to handle both) to see if/when we get a link to the window.google library as it's been loaded on the page.
Let's update our Map component to include the case when the map is first loaded. When the Map component is first loaded, we cannot depend upon the google api being available, so we'll need to check if it's loaded. If our component is rendered without it, the google prop will be undefined and when it's loaded, it will be defined.
export class Map extends React.Component {
  componentDidUpdate(prevProps, prevState) {
    if (prevProps.google !== this.props.google) {
      this.loadMap();
    }
  }

  loadMap() {
    // ...
  }

  render() {
    // ...
  }
}
After a React component has updated, the componentDidUpdate() method will be run. Since our component is based upon Google's api, which is outside of the React component workflow, we can use the componentDidUpdate() method as a way to be confident our component has changed and let the map update along with the rest of the component.
In our Map component, let's handle the case when the Map is available when the component mounts. This would happen on the page whenever the map has already been loaded previously in our app. For instance, the user navigated to a page with a Map component already available.
export class Map extends React.Component {
  componentDidMount() {
    this.loadMap();
  }

  loadMap() {
    // ...
  }

  render() {
    // ...
  }
}
We'll need to define the loadMap() function to actually get any of our map on the page. In here, we'll run the usual gapi functions to create a map. First, let's make sure the google api is available. If it is, we'll be using the map key on the object, so let's extract it here:
export class Map extends React.Component {
  loadMap() {
    if (this.props && this.props.google) {
      // google is available
      const {google} = this.props;
      const maps = google.maps;
    }
    // ...
  }
}
The loadMap() function is only called after the component has been rendered (i.e. there is a DOM component on the page), so we'll need to grab a reference to the DOM component where we want the map to be placed. In our render method, we have a <div> component with a ref='map'. We can grab a reference to this component using the ReactDOM library:
export class Map extends React.Component {
  loadMap() {
    if (this.props && this.props.google) {
      // google is available
      const {google} = this.props;
      const maps = google.maps;

      const mapRef = this.refs.map;
      const node = ReactDOM.findDOMNode(mapRef);
    }
    // ...
  }
}
The node variable above is a reference to the actual DOM element on the page, not the virtual DOM, so we can set the google map to work with it directly as though we're using plain JavaScript.
To instantiate a Google map object on our page, we'll use the map API (documentation is here) as usual.
export class Map extends React.Component {
  loadMap() {
    if (this.props && this.props.google) {
      // google is available
      const {google} = this.props;
      const maps = google.maps;

      const mapRef = this.refs.map;
      const node = ReactDOM.findDOMNode(mapRef);

      let zoom = 14;
      let lat = 37.774929;
      let lng = -122.419416;
      const center = new maps.LatLng(lat, lng);
      const mapConfig = Object.assign({}, {
        center: center,
        zoom: zoom
      })
      this.map = new maps.Map(node, mapConfig);
    }
    // ...
  }
}
The maps.Map() constructor accepts a DOM node and a configuration object to create a map. To instantiate a map we need at least two config options:
- center - the combination of latitude and longitude to display (in a
map.LatLng()object) - zoom - the level of zoom to display, i.e. how close to the center we should display.
Above, we statically assigned the zoom and center (we'll move these to be dynamic shortly).

Once we reload the page, we'll see that we now should have a map loaded in our page.
Adding props to the Map Component
In order to make our center dynamic, we can pass it through as props (in fact, regardless of how we'll be creating the center of the map, we'll pass the attributes through props). Being good react developers, let's define our propTypes
Defining
propTypeson a component is always good practice to both document our components and make them more easily sharable. For more information on documentingpropTypes, the React documentation is a convincing place to read more.
export class Map extends React.Component {
  // ...
}
Map.propTypes = {
  google: React.PropTypes.object,
  zoom: React.PropTypes.number,
  initialCenter: React.PropTypes.object
}
Since we'll require the zoom and center to be present, we can define some default properties to be set in case they aren't passed. Additionally, we can set them to be required using the .isRequired argument on the PropType we're setting. As we'll make these lat and lng dynamic using the browser's navigator object to find the current location, we won't use the .isRequired object. Let's set some defaults on the Map:
export class Map extends React.Component {
  // ...
}
Map.propTypes = {
  google: React.PropTypes.object,
  zoom: React.PropTypes.number,
  initialCenter: React.PropTypes.object
}
Map.defaultProps = {
  zoom: 13,
  // San Francisco, by default
  initialCenter: {
    lat: 37.774929,
    lng: -122.419416
  }
}
Awesome. Now we can convert our loadMap() function to use these variables from the this.props object instead of hardcoding them. Let's go ahead an update the method:
export class Map extends React.Component {
  loadMap() {
    if (this.props && this.props.google) {
      // google is available
      const {google} = this.props;
      const maps = google.maps;

      const mapRef = this.refs.map;
      const node = ReactDOM.findDOMNode(mapRef);

      let {initialCenter, zoom} = this.props;
      const {lat, lng} = initialCenter;
      const center = new maps.LatLng(lat, lng);
      const mapConfig = Object.assign({}, {
        center: center,
        zoom: zoom
      })
      this.map = new maps.Map(node, mapConfig);
    }
    // ...
  }
}
Adding state to the Map Component
Since we'll be moving the map around and we'll want the map to retain state, we can move this to be held in local state of the map. Moving the location to state will also have the side-effect of making working with the navigator object simple.
Let's go ahead and make the map stateful:
export class Map extends React.Component {
  constructor(props) {
    super(props);

    const {lat, lng} = this.props.initialCenter;
    this.state = {
      currentLocation: {
        lat: lat,
        lng: lng
      }
    }
  }
  // ...
}
We can update the loadMap() function to pull from the state, rather than from props:
export class Map extends React.Component {
  loadMap() {
    if (this.props && this.props.google) {
      // ...
      const {lat, lng} = this.state.currentLocation;
    }
    // ...
  }
}
Using the Browser's Current Location
Wouldn't it be more exciting if we could use the browser's technology to determine the current location of the viewer instead of hardcoding the lat and lng props?
Awesome. We'll be using the navigator from the native browser implementation. We'll need to be sure that the browser our user is using supports the navigator property, so keeping that idea in mind, we can call on the Navigator object to get us the current location of the user and update the state of our component to use this position object.
Additionally, let's only set the map to use the current location if we set a boolean prop to true. It would be weird to use a <Map /> component with a center set to the current location when we want to show a specific address.
First, let's set the prop:
export class Map extends React.Component {
  // ...
}
Map.propTypes = {
  google: React.PropTypes.object,
  zoom: React.PropTypes.number,
  initialCenter: React.PropTypes.object,
  centerAroundCurrentLocation: React.PropTypes.bool
}
Map.defaultProps = {
  zoom: 13,
  // San Francisco, by default
  initialCenter: {
    lat: 37.774929,
    lng: -122.419416
  },
  centerAroundCurrentLocation: false
}
Now, when the component itself mounts we can set up a callback to run to fetch the current position. In our componentDidMount() function, let's add a callback to run and fetch the current position:
export class Map extends React.Component {
  // ...
  componentDidMount() {
    if (this.props.centerAroundCurrentLocation) {
        if (navigator && navigator.geolocation) {
            navigator.geolocation.getCurrentPosition((pos) => {
                const coords = pos.coords;
                this.setState({
                    currentLocation: {
                        lat: coords.latitude,
                        lng: coords.longitude
                    }
                })
            })
        }
    }
    this.loadMap();
  }
// ...
Now when the map is mounted, the center will be updated... except, there's one problem: the map won't be repositioned to the new location. The state will be updated, but the center won't change. Let's fix this by checking for an update to the currentLocation in the state after the component itself is updated.
We already have a componentDidUpdate() method defined, so let's use this spot to recenter the map if the location changes.
export class Map extends React.Component {
  componentDidUpdate(prevProps, prevState) {
    if (prevProps.google !== this.props.google) {
      this.loadMap();
    }
    if (prevState.currentLocation !== this.state.currentLocation) {
      this.recenterMap();
    }
  }

  recenterMap() {
    // ...
  }
  // ...
}
The recenterMap() function will now only be called when the currentLocation in the component's state is updated. Recentering the map is a straightforward process, we'll use the .panTo() method on the google.maps.Map instance to change the center of the map:
export class Map extends React.Component {
  recenterMap() {
    const map = this.map;
    const curr = this.state.currentLocation;

    const google = this.props.google;
    const maps = google.maps;

    if (map) {
        let center = new maps.LatLng(curr.lat, curr.lng)
        map.panTo(center)
    }
  }
  // ...
}
Dragging the Map Around with addListener
Since we have our Map component set, the we can interact with it in a lot of ways. The google map api is rich with opportunities for handling events that happen within the map (just check out the extensive documentation). We can set up callbacks to call when these events occur within the map instance itself.
For instance, when the google map has been moved or dragged around, we can fire a callback. For instance, let's set up a callback to run when the map itself has been dragged around.
To add event handlers, we need the map to be listening for events. We can add listeners pretty easily with the Google API using the addListener() function on our Map.
After we create our map, in the loadMap() function, we can add our event listeners. Let's handle the dragend event that will be fired when the user is done moving the map to a new location.
export class Map extends React.Component {
  loadMap() {
    if (this.props && this.props.google) {
      // ...
      this.map = new maps.Map(node, mapConfig);

      this.map.addListener('dragend', (evt) => {
        this.props.onMove(this.map);
      })
    }
    // ...
  }
}
Map.propTypes = {
  // ...
  onMove: React.PropTypes.func
}
Map.defaultProps = {
  onMove: function() {} // default prop
}
When our user is done moving around the map, the dragend event will be fired and we'll call our onMove() function we passed in with the props.
One issue with the way we're handling callbacks now is that the dragend event is fired a LOT of times. We don't necessarily need it to be called every single time it's dragged around, but at least once at the end. We can create a limit to the amount of times we'll call the onMove() prop method by setting up a simple timeout that we can clear when the event is fired again.
export class Map extends React.Component {
  loadMap() {
    if (this.props && this.props.google) {
      // ...
      this.map = new maps.Map(node, mapConfig);

      let centerChangedTimeout;
      this.map.addListener('dragend', (evt) => {
        if (centerChangedTimeout) {
          clearTimeout(centerChangedTimeout);
          centerChangedTimeout = null;
        }
        centerChangedTimeout = setTimeout(() => {
          this.props.onMove(this.map);
        }, 0);
      })
    }
    // ...
  }
}
Handling More Events
Although we are only handling the dragend event above, we can handle other events as well in a similar fashion, but this can get really cumbersome, really fast. We can be a little bit more clever and more programatic about building our interactivity into our component.
Let's say we want to handle two events, the dragend event and the click event. Rather than copy+pasting our code from above for every single event, let's build this up programmatically.
First, let's create a list of the events we want to handle:
const evtNames = ['click', 'dragend'];
With our evtNames list, let's replace our addListener() funcitonality from above with a loop for each of the evtNames:
export class Map extends React.Component {
  loadMap() {
    if (this.props && this.props.google) {
      // ...
      this.map = new maps.Map(node, mapConfig);

      evtNames.forEach(e => {
        this.map.addListener(e, this.handleEvent(e));
      });
    }
    // ...
  }

  handleEvent(evtName) {

  }
}
As the addListener() function expects us to return an event handler function, we'll need to return a function back, so we can start our handleEvent() function like:
export class Map extends React.Component {
  handleEvent(evtName) {
    let timeout;
    return (e) => {
      // ...
    }
  }
}
We'll basically copy+paste our timeout functionality into our new handleEvent() function.
export class Map extends React.Component {
  handleEvent(evtName) {
    let timeout;
    const handlerName = evtName;

    return (e) => {
      if (timeout) {
        clearTimeout(timeout);
        timeout = null;
      }
      timeout = setTimeout(() => {
        if (this.props[handlerName]) {
          this.props[handlerName](this.props, this.map, e);
        }
      }, 0);
    }
  }
}
Now, any time we pass a prop with the event name, like click it will get called whenever we click on the map itself. This isn't very React-like, or JS-like for that matter. Since it's a callback, a better naming scheme would be onClick and onDragend.
Since we're going meta in the first place, let's make our propName be a camelized word starting with on and ending with the capitalized event name.
A simple camelize() helper function might look something similar to:
const camelize = function(str) {
  return str.split(' ').map(function(word){
    return word.charAt(0).toUpperCase() + word.slice(1);
  }).join('');
}
camelize('i love you'); // ILoveYou
camelize('say hello'); // SayHello
With our camelize() helper function, we can replace the handlerName from our handleEvent function:
export class Map extends React.Component {
  handleEvent(evtName) {
    let timeout;
    const handlerName = `on${camelize(evtName)}`;

    return (e) => {
      if (timeout) {
        clearTimeout(timeout);
        timeout = null;
      }
      timeout = setTimeout(() => {
        if (this.props[handlerName]) {
          this.props[handlerName](this.props, this.map, e);
        }
      }, 0);
    }
  }
}
Lastly, because we are good React-citizens, let's add these properties to our propTypes:
evtNames.forEach(e => Map.propTypes[camelize(e)] = T.func)
Handling Custom Events on Map
We can also fire our own custom events along with the google map instance. Allowing us to listen for our own custom events is an incredibly useful feature that gives us the ability to react to custom functionality using the same event handling mechanism we just set up.
An example of this is giving the our <Map /> callback to trigger a ready event.
Let's add the 'ready' string to our evtNames so we handle the onReady prop (if passed in):
const evtNames = ['ready', 'click', 'dragend'];
To trigger an event, like the ready event we can use the google.maps.event object's trigger() function.
For handling the case after the map is ready (at the end of our loadMap() function), we can call the trigger() function on the map instance with the event name.
export class Map extends React.Component {
  loadMap() {
    if (this.props && this.props.google) {
      // ...
      this.map = new maps.Map(node, mapConfig);

      evtNames.forEach(e => {
        this.map.addListener(e, this.handleEvent(e));
      });

      maps.event.trigger(this.map, 'ready');
    }
    // ...
  }
}
Since we've already set the rest of the event handlers up, this will just work.
Adding Markers to the Map
What good is a Google Map without markers indicating location spots on the map, eh? Let's add a method for our users to place a marker on our map. We could set up our Map component to accept a list of places and be responsible for setting up the markers itself, or we can build the Map component in the React Way and build custom components to manipulate the calendar as children.
Let's build a MarkerComponent using the React Way. As we previously did, let's build the usage first and then build the implementation.
The React Way is to write our Marker components as children of the Map component.
export class Container extends React.Component {
  render() {
    const style = {
      width: '100vw',
      height: '100vh'
    }
    const pos = {lat: 37.759703, lng: -122.428093}
    return (
      <div style={style}>
        <Map google={this.props.google}>
          <Marker />
          <Marker position={pos} />
        </Map>
      </div>
    )
  }
}
// ...
We'll build our <Marker /> component as a child of the Map component so that they are independent of the Map itself, but still can be interdependent upon the Map component being available.
When we place a <Marker /> inside the <Map /> component, we'll want to pass through some custom props that the Map contains, including the map instance object to it's children.
React gives us a convenient method for handling updating the props of children objects of a component. First, let's update our Map.render() method to include rendering children:
export class Map extends React.Component {
  renderChildren() {
    // ...
  }

  render() {
    return (
      <div ref='map'>
        Loading map...
        {this.renderChildren()}
      </div>
    )
  }
}
Now, when our <Map /> component is rendered, it will not only place the Map on the page, but it will also call the lifecycle methods for it's children. Of course, we actually haven't placed any children in the map yet.
The renderChildren() method will be responsible for actually calling the methods on the children, so in here is where we'll create clones/copies of the children to display in the map.
To add props to a child inside a component, we'll use the React.cloneElement() method. This method accepts an element and creates a copy, giving us the opportunity to append props and/or children to the child. We'll use the cloneElement() to append the map instance, as well as the google prop. Additionally, let's add the map center as well, so we can set the mapCenter as the default position of a marker.
Since we want the usage of children inside the Map component to be optional (so we can support using the Map without needing children), let's return null if there are no children passed to the Map instance:
export class Map extends React.Component {
  renderChildren() {
    const {children} = this.props;

    if (!children) return;
  }
  // ...
}
Now, if we use the Map without children, the renderChildren() method won't blow up the rest of the component. Moving on, we'll want to clone each of the children passed through. In other words, we'll want to map through each of the children and run the React.cloneElement() function on each.
React gives us the React.Children.map() to run over each of the children passed by a component and run a function on... sounds suspiciously like what we need to do, ey?
Let's update our renderChildren() method to handle the cloning of our children:
export class Map extends React.Component {
  renderChildren() {
    const {children} = this.props;

    if (!children) return;

    return React.Children.map(children, c => {
      return React.cloneElement(c, {
        map: this.map,
        google: this.props.google,
        mapCenter: this.state.currentLocation
      });
    })
  }
  // ...
}
Now, each of the Map component's children will not only receive their original props they were passed, they will also receive the map instance, the google api instance, and the mapCenter from the <Map /> component. Let's use this and build our MarkerComponent:
Creating the MarkerComponent
The google api for markers requires that we have at least a position defined on it and it looks like:
let marker = new google.maps.Marker({
  position: somePosition,
  map: map
})
The Marker component is similar to the Map component in that it's a wrapper around the google api, so we'll take the same strategy where we will update the raw JS object after the component itself has been updated (via props or state).
Although we'll write a component that hands the constructed virtual DOM back to React, we won't need to interact with the DOM element, so we can return null from our render method (to prevent it from flowing into the view).
export class Marker extends React.Component {
  render() {
    return null;
  }
}
While we are at it, let's also define our propTypes for our Marker component. We'll need to define a position at minimum.
export class Marker extends React.Component {
  render() {
    return null;
  }
}

Marker.propTypes = {
  position: React.PropTypes.object,
  map: React.PropTypes.object
}
With our propTypes set, let's get started wrapping our new component with the google.maps.Marker() object. As we did with our previous Map component, we'll interact with the component after it's props have been updated.
export class Marker extends React.Component {
  componentDidUpdate(prevProps) {
    // component updated
  }
  renderMarker() {
    // ...
  }
  // ...
}
Our marker will need to be updated only when the position or the map props have changed. Let's update our componentDidUpdate() function to run it's function only upon these changes:
export class Marker extends React.Component {
  componentDidUpdate(prevProps) {
    if ((this.props.map !== prevProps.map) ||
      (this.props.position !== prevProps.position)) {
        // The relevant props have changed
    }
  }
  renderMarker() {
    // ...
  }
  // ...
}
When we pass a position property, we'll want to grab that position and create a new LatLng() object for it's elements. If no position is passed, we'll use the mapCenter. In code, this looks like:
export class Marker extends React.Component {
  componentDidUpdate(prevProps) {
    if ((this.props.map !== prevProps.map) ||
      (this.props.position !== prevProps.position)) {
        this.renderMarker();
    }
  }
  renderMarker() {
    let {
      map, google, position, mapCenter
    } = this.props;

    let pos = position || mapCenter;
    position = new google.maps.LatLng(pos.lat, pos.lng);
  }
  // ...
}
With our position object, we can create a new google.maps.Marker() object using these preferences:
export class Marker extends React.Component {
    renderMarker() {
      let {
        map, google, position, mapCenter
      } = this.props;

      let pos = position || mapCenter;
      position = new google.maps.LatLng(pos.lat, pos.lng);

      const pref = {
        map: map,
        position: position
      };
      this.marker = new google.maps.Marker(pref);
  }
  // ...
}
After reloading our page, we'll see we have a few markers on the map.

Markers aren't too interesting without interactivity. Let's add some to our markers.
We can handle adding interactivity to our <Marker /> component in the exact same way as we did with our <Map /> component.
Let's keep track of the names of the events we want to track with our Marker:
const evtNames = ['click', 'mouseover'];
Back when we create the Marker instance, we can add functionality to handle the event:
export class Marker extends React.Component {
  renderMarker() {
     // ...
     this.marker = new google.maps.Marker(pref);

      evtNames.forEach(e => {
        this.marker.addListener(e, this.handleEvent(e));
      })
  }

  handleEvent(evtName) {
    // ...
  }
}
Our handleEvent() function will look nearly the same as the function in the <Map /> component:
export class Marker extends React.Component {
  handleEvent(evtName) {
    return (e) => {
      const evtName = `on${camelize(evt)}`
      if (this.props[evtName]) {
        this.props[evtName](this.props, this.marker, e);
      }
    }
  }
}
Removing Markers
When we're done with the markers, it's useful to remove them from the map. Since React is taking care of the state tree, we can just ask the google API to remove the marker for us using the setMap(null) function on the <Marker /> instance.
Adding a componentWillUnmount() function to the <Marker /> component will handle this task for us:
export class Marker extends React.Component {
  componentWillUnmount() {
    if (this.marker) {
      this.marker.setMap(null);
    }
  }
}
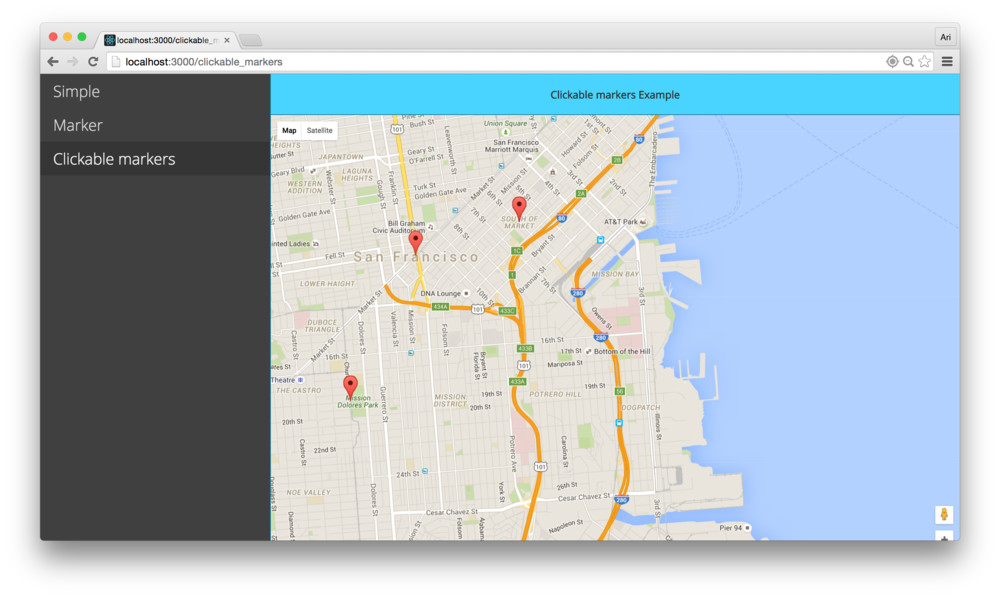
Adding a Marker Info Window
From here, we can use the marker as a point of reference for our user to click on to get more information about each of the markers.
In the Google API, the window that pops up over each of the markers is called an InfoWindow. To create an InfoWindow, we must pass in a string of html to show. Since the InfoWindow itself isn't a React component, we'll need to handle the conversion from a React component to html.
First, let's look at the usage of a ne InfoWindow component. In our Container.render() function, let's add a reference to the new component we'll create. The InfoWindow Google instance will require a marker to determine where to place the element, we'll need to pass one in. We'll also programmatically handle showing/hiding the InfoWindow component so we can operate with it in the React Way.
We'll also make the
Containerstateful to hold on to the latest clicked marker/info
export class Container extends React.Component {
  getInitialState: function() {
    return {
      showingInfoWindow: false,
      activeMarker: {},
      selectedPlace: {}
    }
  },

  render() {
    const style = {
      width: '100vw',
      height: '100vh'
    }
    const pos = {lat: 37.759703, lng: -122.428093}
    return (
      <div style={style}>
        <Map google={this.props.google}>
          <Marker
            onClick={this.onMarkerClick}
            name={'Dolores park'}
            position={pos} />

          <InfoWindow
            marker={this.state.activeMarker}
            visible={this.state.showingInfoWindow}>
              <div>
                <h1>{this.state.selectedPlace.name}</h1>
              </div>
          </InfoWindow>
        </Map>
      </div>
    )
  }
}
// ...
When we click on the <Marker /> component, we'll call the onMarkerClick() function. Let's go ahead and handle this event:
export class Container extends React.Component {
  onMarkerClick: function(props, marker, e) {
    this.setState({
      selectedPlace: props,
      activeMarker: marker,
      showingInfoWindow: true
    });
  },
}
We'll handle updating the state of the component when we click on the <Marker /> above
Making an InfoWindow Component
Let's start our our InfoWindow component as usual. It will be similar to the Marker component in that we're not going to use the virtual dom component it creates.
class InfoWindow extends React.Component {
  render() {
    return null;
  }
}
Just like our <Marker /> component, our <InfoWindow /> component will mirror the state of the Google map instance by updating itself along with the updates of of the map. Thus, we'll update this component using the componentDidUpdate() lifecycle function.
class InfoWindow extends React.Component {
  componentDidUpdate(prevProps) {
    // ...
  }
  renderInfoWindow() {
  }
}
We have three separate state cases to check for updates when updating the InfoWindow component:
- We need to check to see if we have a map instance available (as we did with the
<Marker />component) - If the content of the InfoWindow has been updated so we can update it live.
- We need to check to see if the state of the visibility of the InfoWindow has changed.
Let's handle each one at a time.
1. Map instance has become available
The first case is the opportunity for us to create the google.maps.InfoWindow() instance. We'll use the google api to create the instance when a map instance is available. Here is where we can set the this.infowindow instance on the component:
class InfoWindow extends React.Component {
  componentDidUpdate(prevProps, prevState) {
    if (this.props.map !== prevProps.map) {
      this.renderInfoWindow();
    }
  }
  renderInfoWindow() {
    let {map, google, mapCenter} = this.props;

    const iw = this.infowindow = new google.maps.InfoWindow({
      content: ''
    });
  }
}
We're keeping a reference to the
this.infowindowwith aconst iwin thecomponentDidUpdate()function. We'll come back to using this instance shortly.
2. The content of the InfoWindow has been updated
Finally, if the content of the InfoWindow has been updated and the visibility has not been updated, then we can update the content of the infowindow.
class InfoWindow extends React.Component {
  componentDidUpdate(prevProps, prevState) {
    if (this.props.map !== prevProps.map) {
      // ...
    }

    if (this.props.children !== prevProps.children) {
      this.updateContent();
    }
  }

  updateContent() {}
}
The updateContent() method from above is a simple wrapper around the google InfoWindow instance to call setContent():
class InfoWindow extends React.Component {
  updateContent() {
    const content = this.renderChildren();
    this.infowindow
      .setContent(content);
  }

  renderChildren() {}
}
The infowindow requires us to set content for us to show in the browser. Previously, we set the content to an empty string. When we want to show the window, the empty string isn't going to be very interesting. We'll use the children of the <InfoWindow /> component to define what the instance should show.
As we previously discussed, we'll need to translate the React component into an HTML string that the InfoWindow instance knows how to handle. We can use the ReactDOMServer from react-dom to update the content.
We can get a hold of the ReactDOMServer from the react-dom package:
import ReactDOMServer from 'react-dom/server'
We can use this package to translate the children of the <InfoWindow /> component in our renderChildren() function:
class InfoWindow extends React.Component {
  renderChildren() {
    const {children} = this.props;
    return ReactDOMServer.renderToString(children);
  }
}
3. The visibility of the InfoWindow has changed
If the visible prop has changed, we'll want to show or hide the InfoWindow component. Since this requires a programatic update, we'll need to check the value of the prop and open the window if it's visible or close it if it's not available.
As we're checking against the previous props, we know that the infoWindow is closed if the visible prop is true and visa versa.
class InfoWindow extends React.Component {
  componentDidUpdate(prevProps, prevState) {
    if (this.props.map !== prevProps.map) {
      // ...
    }

    if (this.props.visible !== prevProps.visible) {
      this.props.visible ?
        this.openWindow() :
        this.closeWindow();
    }
  }
}
In addition, if our user clicks on a new marker and the visibility has not changed, the InfoWindow won't be updated. We can check the value of the marker along with the visibility flag in the same spot:
class InfoWindow extends React.Component {
  componentDidUpdate(prevProps) {
    if (this.props.map !== prevProps.map) {
      // ...
    }

    if ((this.props.visible !== prevProps.visible) ||
        (this.props.marker !== prevProps.marker)) {
      this.props.visible ?
        this.openWindow() :
        this.closeWindow();
    }
  }

  openWindow() {}
  closeWindow() {}
}
The openWindow() and closeWindow() functions are simple wrappers around the google InfoWindow instance that we can use to call open() or close() on it:
class InfoWindow extends React.Component {
  openWindow() {
    this.infowindow
      .open(this.props.map, this.props.marker);
  }
  closeWindow() {
    this.infowindow.close();
  }
}
If we head back to our browser, refresh, and click on a marker, we'll see that the infoWindow is now showing

InfoWindow callbacks
Lastly, the state of the InfoWindow this.state.showingInfoWindow will never be reset to false unless we know when the instance is closed (it will also always be open after the first time we open it). We'll need a way for the <InfoWindow /> component to communicate back with it's parent that the InfoWindow has been closed (either through clicking the x at the top of the window OR by clicking on the <Map />).
If we click on the map, our <Map /> instance already knows how to handle clicking callbacks. Let's update the <Container /> component to reset the state of the this.state.showingInfoWindow:
export class Container extends React.Component {
  onMapClick() {
    if (this.state.showingInfoWindow) {
      this.setState({
        showingInfoWindow: false,
        activeMarker: null
      });
    }
  },

  render() {
    const style = {
      width: '100vw',
      height: '100vh'
    }
    return (
      <div style={style}>
        <Map google={this.props.google}
             onClick={this.onMapClick}>
           {/* ... */}
        </Map>
      </div>
    )
  }
}
// ...
Now, if we click on the <Map /> instance, the state of the Container will update the showingInfoWindow and our <InfoWindow /> instance visibility will be reflected accordingly.
Finally, we'll need to add a callback to the infoWindow to be called when the infowindow is opened as well as when it's closed (although for now, we'll only use the callback when it's closed). To add the callback, we'll need to hook into the state of the infowindow instance.
When we create the infowindow instance in our component, we can attach a few listeners to the instance to handle the case when each of the events are run:
class InfoWindow extends React.Component {
  componentDidUpdate(prevProps, prevState) {
    if (this.props.map !== prevProps.map) {
      this.renderInfoWindow();
    }
  }

  renderInfoWindow() {
    let {map, google, mapCenter} = this.props;

    const iw = this.infowindow = new google.maps.InfoWindow({
      content: ''
    });

    google.maps.event
      .addListener(iw, 'closeclick', this.onClose.bind(this))
    google.maps.event
      .addListener(iw, 'domready', this.onOpen.bind(this));
  }

  onOpen() {
    if (this.props.onOpen) this.props.onOpen();
  }

  onClose() {
    if (this.props.onClose) this.props.onClose();
  }
}
Our <InfoWindow /> component can now handle callback actions when it's open or closed. Let's apply this callback in our <Container /> component to reset the
export class Container extends React.Component {
  onInfoWindowClose: function() {
    this.setState({
      showingInfoWindow: false,
      activeMarker: null
    })
  },

  render() {
    const style = {
      width: '100vw',
      height: '100vh'
    }
    return (
      <div style={style}>
        <Map google={this.props.google}
             onClick={this.onMapClick}>
           {/* ... */}
          <InfoWindow
            marker={this.state.activeMarker}
            visible={this.state.showingInfoWindow}
            onClose={this.onInfoWindowClose}>
              <div>
                <h1>{this.state.selectedPlace.name}</h1>
              </div>
          </InfoWindow>
        </Map>
      </div>
    )
  }
}
// ...
Conclusion
As we built our Google Map component, we've walked through a lot of complex interactions from parent to children components, interacting with an outside library, keeping the state of a native JS library in line with a component, and much more.
The entire module is available at npm google-maps-react. Feel free to check it out, pull the source, contribute back.
If you're stuck, have further questions, feel free to reach out to us by:
- Commenting on this post at the end of the article
- Emailing us at [email protected]
- Tweet at us at @fullstackreact
- Filling an issue on the Github repo
Learn React the right way
The up-to-date, in-depth, complete guide to React and friends.
Download the first chapter