Well, not like Carbon. Don’t be so dramatic!
More like Core Foundation. It’s still there behind the scenes, but programmers use high-level Objective-C and Swift wrappers from Foundation. If something is missing, you can call an underlying C API. The relation between SwiftUI and AppKit is similar, for now1.
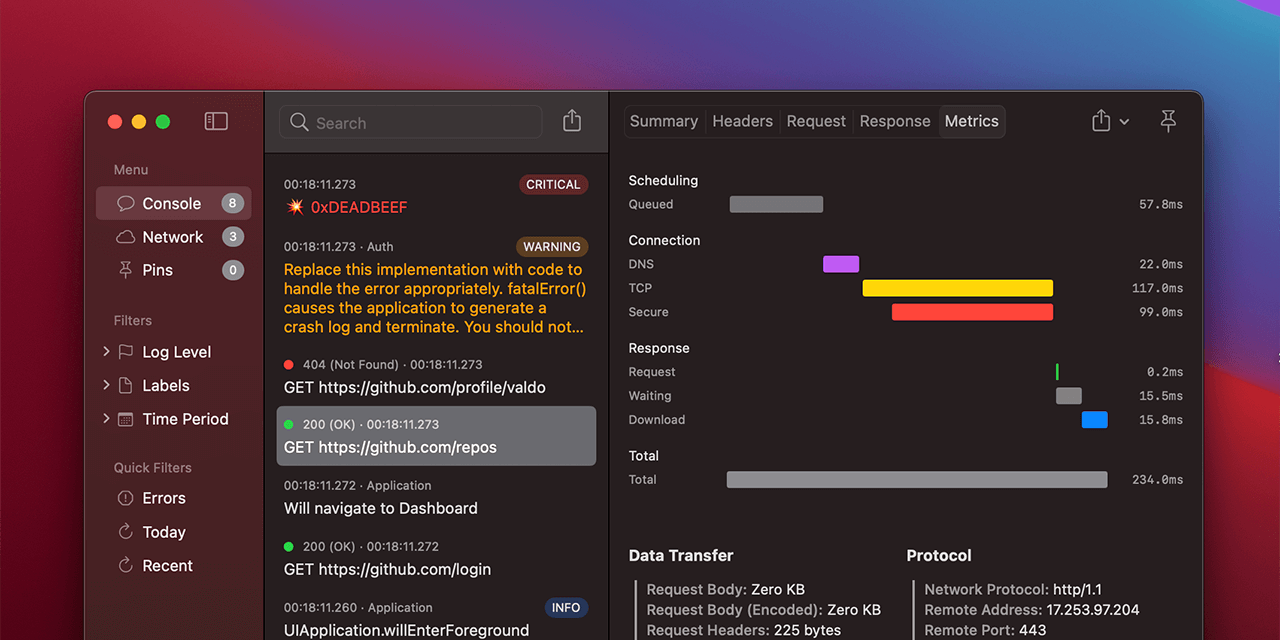
This is a native macOS app written entirely in SwiftUI, from @main to bottom. Not a prototype, not a toy. A full-featured app. The intention is to deliver the best macOS experience possible.
The two main reasons this app is possible are SwiftUI and Big Sur. I have extensive experience with iOS, so I started with it. When the time came to adopt it for macOS, I was anxious. I had no idea what to expect from SwiftUI on a Mac. But thanks to the new SwiftUI APIs and the Big Sur design changes, everything just made sense!
Total Lines: 7124
iOS: 593 (8%)
macOS: 513 (7%)
Shared: 6018 (85%)2
App Size: 2.5 MB
Want to learn how to build macOS apps or see some videos with rad UI interactions?
This post is for you.
Navigation #
The first step was to get the navigation right. I knew I wanted to use triple-column navigation3. SwiftUI makes this setup ease.
struct ContentView: View {
    var body: some View {
        NavigationView {
            SidebarView()
            Text("No Sidebar Selection") // You won't see this in practice (default selection)
            Text("No Message Selection") // You will see this
        }
    }
}
The key is the type system. What you used to configure in code, e.g. by passing a number of columns to UISplitViewController, you now configure using generic parameters. In my case, the type of the view is NavigationView<TupleView<(Sidebar, Text, Text)>>.
Use navigation links as usual. To make the first tab active by default, pass isActive in the NavigationLink initializer with a value of true.
struct SidebarView: View {
    @State private var isDefaultItemActive = true

    var body: some View {
        List {
            NavigationLink(destination: ConsoleView(), isActive: $isDefaultItemActive) {
                Label("Console", systemImage: "message")
            }
            // ...
        }.listStyle(SidebarListStyle()) // Gives you this sweet sidebar look
    }
}
By default, the toolbar displays a title in the main panel. To disable it, I used UnifiedWindowToolbarStyle(showsTitle: false).
To learn more about triple-column navigation, see Triple Trouble.
Don’t use the List
selectionAPI for navigation. It only exists to support single or multiple item selection of items in edit mode.
Sidebar #
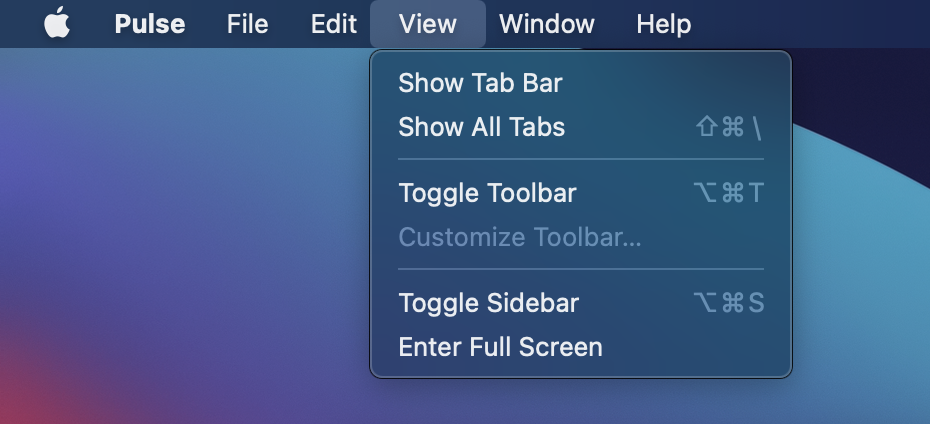
The “Toggle Sidebar” button does not appear by default. To add it, use .toolbar modifier.
SidebarView(model: model)
    .toolbar {
        Button(action: toggleSidebar) {
            Image(systemName: "sidebar.left")
                .help("Toggle Sidebar")
            }
        }
    }
}
Unfortunately, there doesn’t seem to be a way to hide the sidebar programmatically using NavigationView. I had to use NSApp APIs. One of the few AppKit usages in the app.
private func toggleSidebar() {
    NSApp.keyWindow?.firstResponder?
        .tryToPerform(#selector(NSSplitViewController.toggleSidebar(_:)), with: nil)
}
The relationship between SwiftUI and AppKit are not documented and not guaranteed to be supported. This workaround is useful for now, but might stop working in the future.
To add a “Toggle Sidebar” shortcut, use SidebarCommands.
If you have a group of items, put them in
ToolbarItemGroup. This will ensure proper positioning and spacing.
Customize the positioning on buttons with
ToolbarItemPlacement. The positioning that you can see on the video is the default option, no customization is needed.
Outline Groups #
To create a collapsing section, use DisclosureGroup. You can even nest sections. To open a section programmatically, use isExpanded binding.
DisclosureGroup(content: {
    Toggle("Current Session", isOn: $model.isCurrentSession)
    // ...
}, label: {
    Label("Log Level", systemImage: "flag")
})
To learn more about outlines, see WWDC 2020: Stacks, Grids, and Outlines in SwiftUI
Windows #
With the new WindowGroup API introduces in Big Sur, SwiftUI takes care of certain platform behaviors. For example, users can open more than one window from the group simultaneously. When the user double-clicks on a list item in the main panel, it opens the details in a separate window. This happens automatically.
It also comes with a standard set of shortcuts: Command-Tilde to switch between open windows, Command+W to close, Command+M to minimize, etc.
You can also open a new window group using Command+N. In my case, the app remembers the database you selected. This way you can have multiple views on the same set of logs with different filters. Very useful when investigating complex issues!
@main
struct PulseApp: App {
    @StateObject var model = AppViewModel()

    var body: some Scene {
        WindowGroup {
            contents
        }
        .windowToolbarStyle(UnifiedWindowToolbarStyle(showsTitle: false))
        .commands {
            // Adds `Command+Option+S` shortcut to toggle the sidebar
            SidebarCommands()
            // ...
        }
    }

    @ViewBuilder
    private var contents: some View {
        if let store = model.selectedStore {
            MainView(messageStore: store)
        } else {
            WelcomeView()
        }
    }
}
The way WindowGroup works is clever: it’s just struct copying. Every window created from the group maintains independent state. For example, for each new window created from the group the system allocates new storage for any State or StateObject variables instantiated by the scene’s view hierarchy.
To learn more about data flow in SwiftUI, see SwiftUI Data Flow.
List Search #
Search is probably the most complex UI feature I built. It felt like I was pushing it.
The search field, the search toolbar, and how the searches are performed is not particularly interesting – same as in AppKit. What is, is how do you scroll to the next item and activate the navigation link each time the user hits the Return (↩) key?
For programmatic scrolling, I used ScrollViewReader.
struct ConsoleContentView: View {
    @ObservedObject private(set) var model: ConsoleViewModel

    var body: some View {
        VStack(spacing: 0) {
            if !model.isSearchBarHidden {
                searchToolbar
            }
            ScrollViewReader { proxy in
                ConsoleMessageListView(model: model)
                    .onReceive(model.$selectedObjectId) { objectId in
                        guard let objectId = objectId else { return }
                        proxy.scrollTo(objectId)
                    }

            }
            filterToolbar
        }
    }
}
When the user hits Return (↩), ConsoleViewModel updates the published selectedObjectId property value observed by the view.
Every declarative framework is imperative if you try hard enough.
Now, what about activating the navigation links? We already know how to do that using isActive. But what do you do in a dynamic list? The solution I came up with is to create an array of bindings and grow it every time the number of items increases.
final class ConsoleViewModel: ObservableObject {
    @Published private(set) var messages: [MessageEntity]
    @Published var isLinkActive: [Bool]

    private func refresh() {
        // ....
        messages = /* new array */
        if isLinkActive.count < messages.count {
            isLinkActive += Array(repeating: false, count: messages.count - isLinkActive.count)
        }
    }

    private func scrollToMatch(_ match: Match) {
        selectedObjectId = match.objectID
        isLinkActive[match.index] = true
    }
}
struct ConsoleMessageListView: View {
    var body: some View {
        List(messages, rowContent: makeListItem)
    }

    private func makeListItem(message: MessageEntity) -> some View {
        NavigationLink(destination: DetailsView(message),
                       isActive: $model.isLinkActive[row.index]) {
            ConsoleMessageView(message)
        }
    }
}
By the way, this is not the only way to navigate a list with a keyboard. By default, on macOS, List can also be navigated with “Up” and “Down” arrows!
Listis not great. The performance with a large number of items (10000+) is unacceptable. The reason is the diff-based mechanism used for computing animations that you can’t disable. If you are considering displaying a large number of items in aList, it most likely won’t work for you.
Text View #
A similar search is also available on a details screen. This is the only place (except for NSSearchField) where I had to use AppKit components directly. SwiftUI doesn’t yet have a wrapper for NSTextView (except for TextEditor, but it doesn’t support attributed strings that I needed for syntax highlighting). So I had to create one.
Now here is the question. Does it mean that SwiftUI is somewhat incomplete? Maybe. After all, text view is a common component. But SwiftUI is built on top of AppKit, it is not going anywhere. Just because I had to wrap two components doesn’t mean that SwiftUI was in the way. Quite the opposite! The AppKit integration works great.
Deep Links #
Despite the rumors of SwiftUI’s lack of programmatic navigation, it exists.
One of the cool Pulse features is the ability to pin important messages. Imagine you are investigating a bug report, you found some related messages, but you are not sure. You can pin them and get back to them later in the “Pins” tab.
You can also pin a selected item using
Command+Pshortcut.
But this isn’t enough, is it? What you want to do is the ability to open pinned messages in the list. Pulse allows you to just that.
To implement it, PinsViewModel sends a message to MainViewModel: “hey, open a message with this ID”. MainViewModel activates the console navigation link and asks ConsoleViewModel to scroll to the given link. The console uses the same implementation from search. Simple.
Context Menus #
To add a context menu to the view, use .contextMenu modifier. It’s relatively easy to use and there are plenty of code samples online, including the official documentation.
The context menus look different on different platforms. On iOS, you invoke a context menu using a long-press. On macOS, it’s a right-click. You can add context menu to pretty much any views.
Menu is a related component. Unlike .contextMenu, a menu has a label (can be a button) to be displayed on the screen. To invoke a menu, you press the button. On macOS the menu also automatically adds an arrow to the control.
Menus can have pickers, this is how you create hierarchy.
Menu(content: {
    Picker(searchOptions.isCaseSensitive ? "Case Sensitive" : "Case Insensitive",
           selection: $searchOptions.isCaseSensitive) {
        Text("Case Sensitive").tag(true)
        Text("Case Insensitive").tag(false)
    }
    // ...
}
The menu from the video can be improved even further. When there are only a couple of items, there is no need for a hierarchal menu. To flatten the hierarchy, use InlinePickerStyle.
Share #
Unlike iOS, there are multiple ways to implement sharing on macOS. A common approach is to fetch the list of sharing services available for the current item and put them in a context menu. My initial implementation looked like this:
Menu {
    ForEach(NSSharingService.sharingServices(forItems: preview), id: \.title) { service in
        Button(action: { service.perform(withItems: self.items()) }) {
            Image(nsImage: service.image)
            Text(service.title)
        }
    }
}
Now, here is a problem, the first time you call NSSharingService.sharingServices it is slow. And when you create a menu, its content is evaluated eagerly. When I added the menu to the details screen, the first time I open it, it would be unacceptably slow.
My first attempt to fix it was to load services asynchronously when the menu appears while showing a placeholder “Loading…” button. This didn’t work. The menu just wouldn’t reload when the request is done.
What I ended up doing – and I’m not sure I’m happy about – is pre-fetching the list of services when the app starts and just hoping that the user doesn’t open the share menu before that.
Lightning Round #
If that wasn’t enough, here is a dozen more tips.
- Use
.helpto configure the view’s accessibility hint and its tooltip (“help tag”) - Use
.keyboardShortcutto add shortcuts for common actions that are not in the app menu. For example,.keyboardShortcut("f", modifiers: [.shift, .option]). - Use
.keyboardShortcut(.defaultAction)on a button to make it a default button (will use accent color) and register it for Return (↩) keyboard shortcut. Use.cancelActionfor Escape. - To change your app’s accent color, add a new color to your assets catalog and set it as a “Global Accent Color Name” in the build settings. On Big Sur, the system uses your app’s accent color by default, but the user can change the accent color to one of the predefined colors. Make sure your app looks great with all of them.
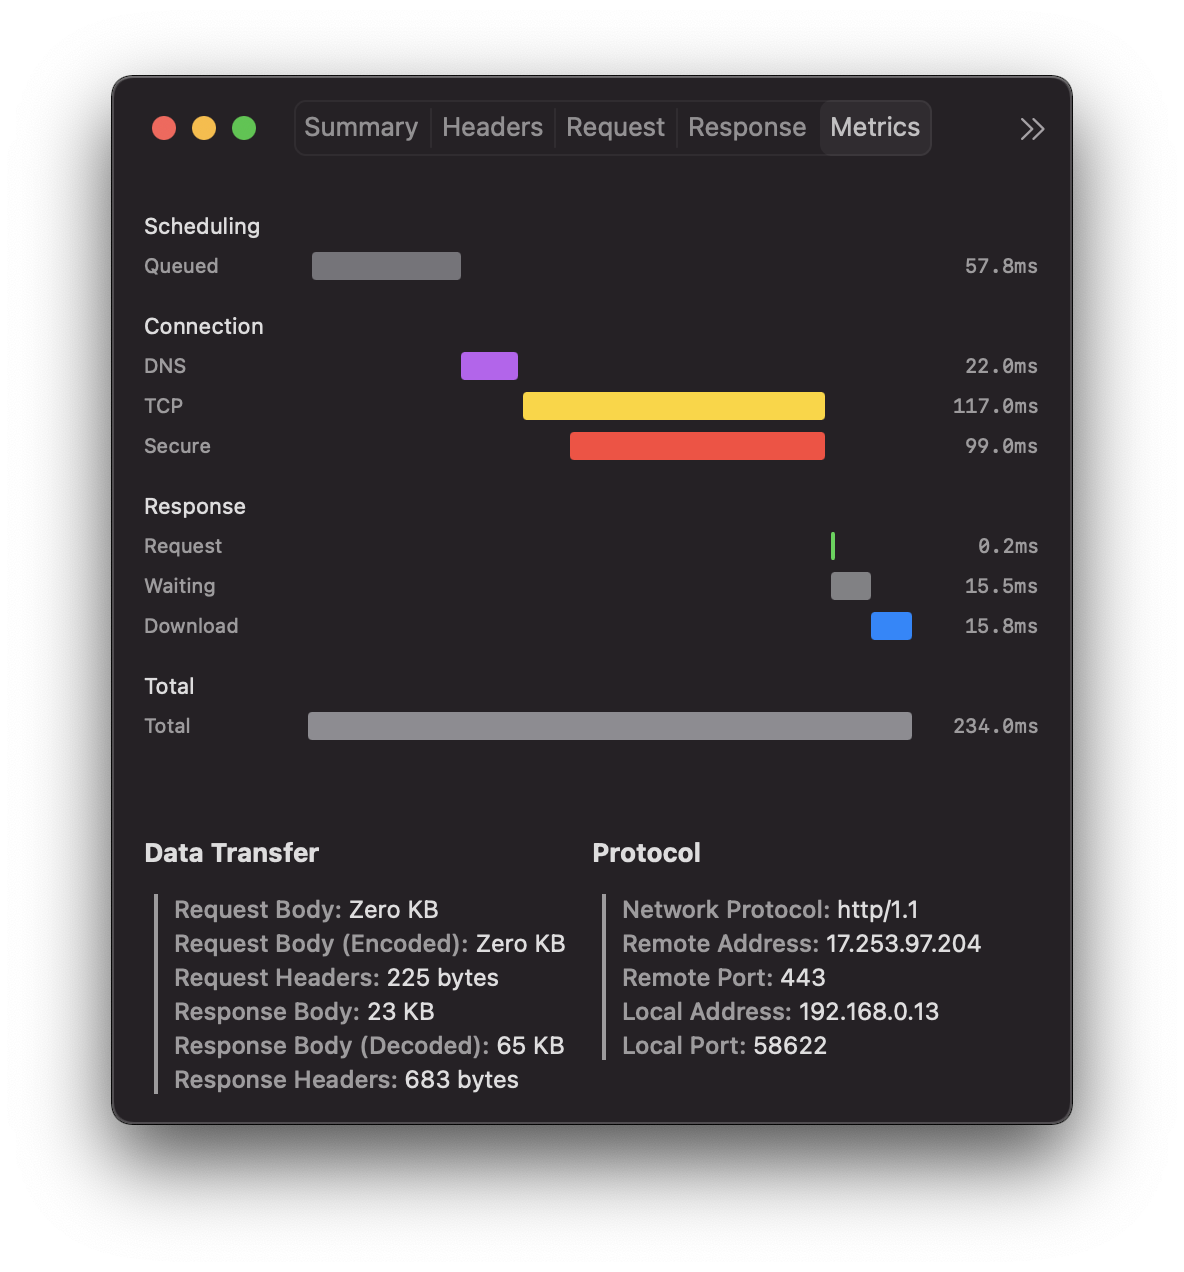
- Use
GeometryReaderfor layouts where SwiftUI layout system doesn’t cut it. I used it for metrics chart. - When adding commands, use CommandGroupPlacement to place items in one of the standard locations. For example, for “Open” command, use
.newItem. - SwiftUI has several built-in command groups, e.g.
SidebarCommands,ToolbarCommands,TextEditingCommands,TextFormattingCommands. - SwiftUI layout system and data flow are the same on macOS and iOS, see the linked posts to learn more. Gotta learn these first.
- Use
Settingsto add a settings screen, don’t add it anywhere in the app itself - Instead of
navigationBarTitle, usenavigationTitle. macOS also supports subtitles. - Use
Alertto show alerts, same API as iOS - Prioritize watching WWDC and reading official documentation, there is now a lot of outdated information about SwiftUI online
Conclusion #
SwiftUI isn’t perfect. I had to compromise in a few places. But I don’t have a lot of bugs to report4. Maybe I’m just getting better at avoiding things that don’t quite work as expected. There are some limitations. But the AppKit integration is always there for me.
One of the criticisms I hear a lot is: “I started using SwiftUI and it took me T amount of time to build X, it would’ve taken me a fraction of time to do that in AppKit”. I voiced this criticism. SwiftUI is complex and is not magic. It is almost nothing like AppKit which I think is a good thing. But it means that you need to learn a lot before you can use it efficiently, even if you are already familiar with the core principles behind it.
There are still a lot of things that can’t be done using only SwiftUI. I can sacrifice certain features for my app, but I can’t sacrifice performance. So far, List was the main impediment (as long as you have a decent number of items to display). If you want to learn more about List limitations, see the next post.
Is SwiftUI a game-changer for macOS? It’s economics. It might seem like web technologies are dominating the desktop. On the one hand, there is M1 which is finally powerful and energy-efficient enough to run Slack, rejoice! On the other hand, the calculation is changing thanks to SwiftUI. AppKit is arguably one of the main impediments for developing apps for a Mac. But SwiftUI opens this market for millions of iOS engineers. The path to delivering great native experience on Apple platforms is becoming clearer than ever5. I heard you can even put Swift on a server, but was not able to reach Tim Cook for comment6.
-
Many parts of SwiftUI don’t use AppKit. The relationship between SwiftUI and AppKit are not documented and not guaranteed to be supported. AppKit might be completely removed in the future, but we don’t know that. ↩
-
I’m positive that I can increase the amount of the shared code to at least 90%. It wasn’t a priority, my main focus was on the delivery. ↩
-
The iPhone app was developed first and it uses the simplest
TabViewandNavigationViewconfiguration possible. I then jumped straight into developing a macOS app skipping iPad. The reason I did it this way is that iPhone and Mac are simply higher priorities for me. The iPad app currently looks very similar to iPhone (it hasTabView), but it uses double-column navigation provided byNavigationViewby default. ↩ -
I see many Catalyst defects reported on Twitter which can sometimes be confused with SwiftUI defects. I’m a bit surprised this configuration (SwiftUI Catalyst) is even supported. But of course, UIKit apps that chose to support Catalyst need a path forward to adopt SwiftUI, so it has to be there. For new apps, if you are writing SwiftUI, there should be no reason to use Catalyst, you should compile for macOS natively. ↩
-
Let’s not talk about Catalyst, shall we? ↩
-
I love Swift on a server. If you haven’t checked it out, go see Vapor. It’s a vast ecosystem that keeps expanding. With coroutines in Swift 6, this is going to be insanely great. ↩
