


 Download code from GitHub
Chapter 1: Your First Unit Tests
When the iPhone platform was first introduced, applications were small and focused only on one feature. It was easy to make money with an app that only did one thing (for example, a flashlight app that only showed a white screen). The code of these early apps only had a few hundred lines and could easily be tested by tapping the screen for a few minutes.
Since then, the App Store and the available apps have changed a lot. There are still small apps with a clear focus in the App Store, but it's much harder to make money from them. A common app has many features but still needs to be easy to use. There are companies with several developers working on one app full-time. These apps sometimes have a feature set that is normally found in desktop applications. It is very difficult and time-consuming to test all the features in such apps manually for every update.
One reason for this is that manual testing needs to be done through a user interface (UI), and it takes time to load the app to be tested. In addition to this, human beings are very slow compared to the capabilities of computers for tasks such as testing and verifying computer programs. Most of the time, a computer (or a smartphone) waits for the user's next input. If we could let a computer insert values, testing could be drastically accelerated. In fact, a computer can run several hundred tests within a few seconds. This is exactly what unit tests are all about.
A unit test is a piece of code that executes some other code and checks whether the result is what the developer expected. The word "unit" means that the test executes a small unit of code. Usually, that is one function of a class or some similar type of structure. How big the unit actually is depends on the feature to be tested and on the person who is writing the test.
Writing unit tests seems hard at first because for most developers, it's a new concept. This chapter is aimed at helping you get started with writing your first simple unit tests.
These are the main topics we will cover in the chapter:
- Building your first automatic unit test
- Assert functions in the
XCTestframework - Understanding the difference from other kinds of tests
Building your first automatic unit test
If you have done some iOS development (or application development in general) already, the following example might seem familiar to you.
You are planning to build an app. You start collecting features, drawing some sketches, or your project manager hands the requirements to you. At some point, you start coding. You set up the project and start implementing the required features of the app.
Let's say the app has an input form, and the values the user puts in have to be validated before the data can be sent to the server. The validation checks, for example, whether the email address and the phone number have a valid format. After implementing the form, you want to check whether everything works. But before you can test it manually, you need to write code that presents the form on the screen. Then, you build and run your app in the iOS simulator. The form is somewhere deep in the view hierarchy, so you navigate to the view and put the values into the form. It doesn't work—something is wrong with the phone number validation code. You go back to the code and try to fix the problem. Sometimes, this also means starting the debugger and stepping through the code to find the bug.
Eventually, the validation works for the test data you put in. Normally, you would need to test for all possible values to make sure that the validation not only works for your name and your data, but also for all valid data. But there is this long list of requirements on your desk, and you are already running late. The navigation to the form takes three taps in the simulator and putting in all the different values just takes too long. You are a coder, after all.
If only a robot could perform this testing for you.
What are unit tests?
Automatic unit tests act like this robot for you. They execute code, but without having to navigate to the screen with the feature to test. Instead of running the app over and over again, you write tests with different input data and let the computer test your code in the blink of an eye. Let's see how this works in a simple example.
Implementing a unit test example
In this example, we write a simple function that counts the number of vowels in a string. Proceed as follows:
- Open Xcode and go to File | New | Project.
- Navigate to iOS | Application | App and click on Next.
- Put in the name
FirstDemo, selectStoryboardfor the Interface field andSwiftfor the Language field, and check Include Tests. - Uncheck Use Core Data and click on Next. The following screenshot shows the options in Xcode:
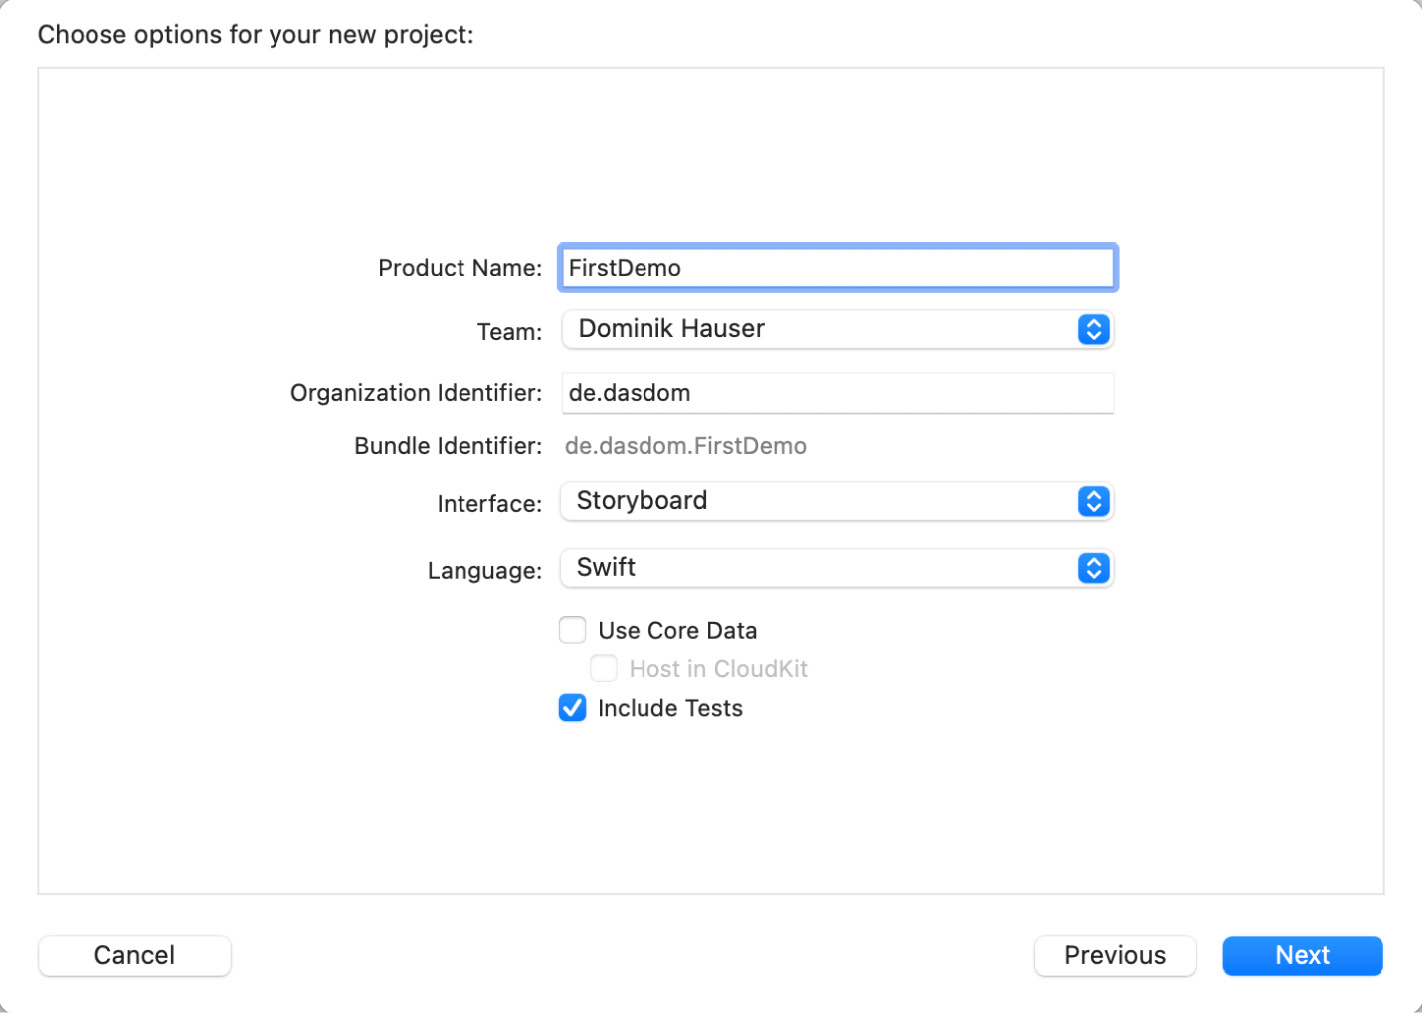
Figure 1.1 – Setting up your new project
Xcode sets up a project ready for development, in addition to two test targets for your unit and your UI tests.
- Open the
FirstDemoTestsfolder in the project navigator. Within the folder, there is one file:FirstDemoTests.swift. - Select
FirstDemoTests.swiftto open it in the editor.
What you see here is a test case. A test case is a class comprising several tests. In the beginning, it's a good practice to have one test case for each class in the main target.
Let's go through this file step by step, as follows:
The file starts with the import of the test framework and the main target, as illustrated here:
import XCTest
@testable import FirstDemo
Every test case needs to import the XCTest framework. It defines the XCTestCase class and the test assertions that you will see later in this chapter.
The second line imports the FirstDemo module. All the code you write for the demo app will be in this module. By default, classes, structs, enums, and their methods are defined with internal access control. This means that they can be accessed only from within the module. But the test code lives outside of the module. To be able to write tests for your code, you need to import the module with the @testable keyword. This keyword makes the internal elements of the module accessible in the test case.
Next, we'll take a look at the class declaration, as follows:
class FirstDemoTests: XCTestCase {
Nothing special here. This defines the FirstDemoTests class as a subclass of XCTestCase.
The first two methods in the class are shown in the following code snippet:
override func setUpWithError() throws {
  // Put setup code here. This method ...
}
override func tearDownWithError() throws {
  // Put teardown code here. This method ...
}
The setUpWithError() method is called before the invocation of each test method in the class. Here, you can insert the code that should run before each test. You will see an example of this later in this chapter.
The opposite of setUpWithError() is tearDownWithError(). This method is called after the invocation of each test method in the class. If you need to clean up after your tests, put the necessary code in this method.
The next two methods are template tests provided by the template authors at Apple:
func testExample() throws {
  // This is an example of a functional test case.
  // Use XCTAssert and related functions to ...
}
func testPerformanceExample() throws {
  // This is an example of a performance test case.
  self.measure {
    // Put the code you want to measure the time of here.
  }
}
The first method is a normal unit test. You will use this kind of test a lot in the course of this book.
The second method is a performance test. It is used to test methods or functions that perform time-critical computations. The code you put into the measure closure is called 10 times, and the average duration is measured. Performance tests can be useful when implementing or improving complex algorithms and to make sure that their performance does not decline. We will not use performance tests in this book.
All the test methods that you write have to have the test prefix; otherwise, the test runner can't find and run them. This behavior allows easy disabling of tests—just remove the test prefix of the method name. Later, you will take a look at other possibilities to disable some tests without renaming or removing them.
Now, let's implement our first test. Let's assume that you have a method that counts the vowels of a string. A possible implementation looks like this:
func numberOfVowels(in string: String) -> Int {
  let vowels: [Character] = ["a", "e", "i", "o", "u",
                             "A", "E", "I", "O", "U"]
  var numberOfVowels = 0
  for character in string {
    if vowels.contains(character) {
      numberOfVowels += 1
    }
  }
  return numberOfVowels
}
I guess this code makes you feel uncomfortable. Please keep calm. Don't throw this book into the corner—we will make this code more "swifty" soon. Add this method to the ViewController class in ViewController.swift.
This method does the following things:
- First, an array of characters is defined containing all the vowels in the English alphabet.
- Next, we define a variable to store the number of vowels. The counting is done by looping over the characters of the string. If the current character is contained in the
vowelsarray,numberOfVowelsis increased by one. - Finally,
numberOfVowelsis returned.
Open FirstDemoTests.swift and delete the methods with the test prefix. Then, add the following method:
func test_numberOfVowels_whenGivenDominik_shouldReturn3() {
  let viewController = ViewController()
  let result = viewController.numberOfVowels(in: "Dominik")
  XCTAssertEqual(result, 3,
    "Expected 3 vowels in 'Dominik' but got \(result)")
}
This test creates an instance of ViewController and assigns it to the viewController constant. It calls the function that we want to test and assigns the result to a constant. Finally, the code in the test method calls the XCTAssertEqual(_:, _:) function to check whether the result is what we expected. If the two first parameters in XCTAssertEqual are equal, the test passes; otherwise, it fails.
To run the tests, select a simulator of your choice and go to Product | Test, or use the ⌘U shortcut. Xcode compiles the project and runs the test. You will see something similar to this:
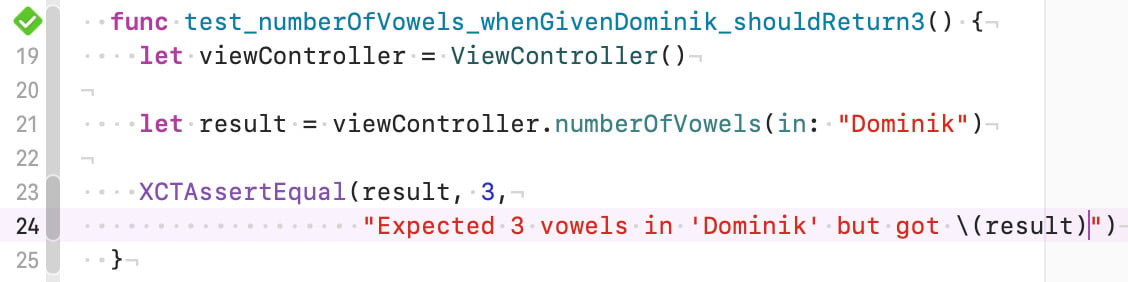
Figure 1.2 – Xcode shows a green diamond with a checkmark when a test passes
The green diamond with a checkmark on the left-hand side of the editor indicates that the test passed. So, that's it—your first unit test. Step back for a moment and celebrate. This could be the beginning of a new development paradigm for you.
Now that we have a fast test that proves that the numberOfVowels(in:) method does what we intended, we are going to improve the implementation. The method looks like it has been translated from Objective-C. But this is Swift. We can do better. Open ViewController.swift, and replace the numberOfVowels(in:) method with this more "swifty" implementation:
func numberOfVowels(in string: String) -> Int {
  let vowels: [Character] = ["a", "e", "i", "o", "u",
                             "A", "E", "I", "O", "U"]
  return string.reduce(0) {
    $0 + (vowels.contains($1) ? 1 : 0)
  }
}
Here, we make use of the reduce function, which is defined on the array type. The reduce function combines all the elements of a sequence into one value using the provided closure. $0 and $1 are anonymous shorthand arguments representing the current value of the combination and the next item in the sequence. Run the tests again (⌘U) to make sure that this implementation works the same as the one earlier.
Disabling slow UI tests
You might have realized that Xcode also runs the UI test in the FirstDemoUITests target. UI tests are painfully slow. We don't want to run those tests every time we type the ⌘U shortcut. To disable the UI tests, proceed as follows:
- Open the scheme selection and click on Edit Scheme…, as shown in the following screenshot:
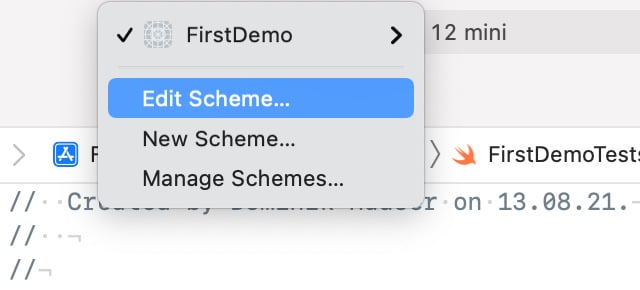
Figure 1.3 – Selecting the target selector to open the scheme editor
- Xcode opens the scheme editor. Select the Test option and uncheck the
FirstDemoUITeststarget, as shown in the following screenshot:
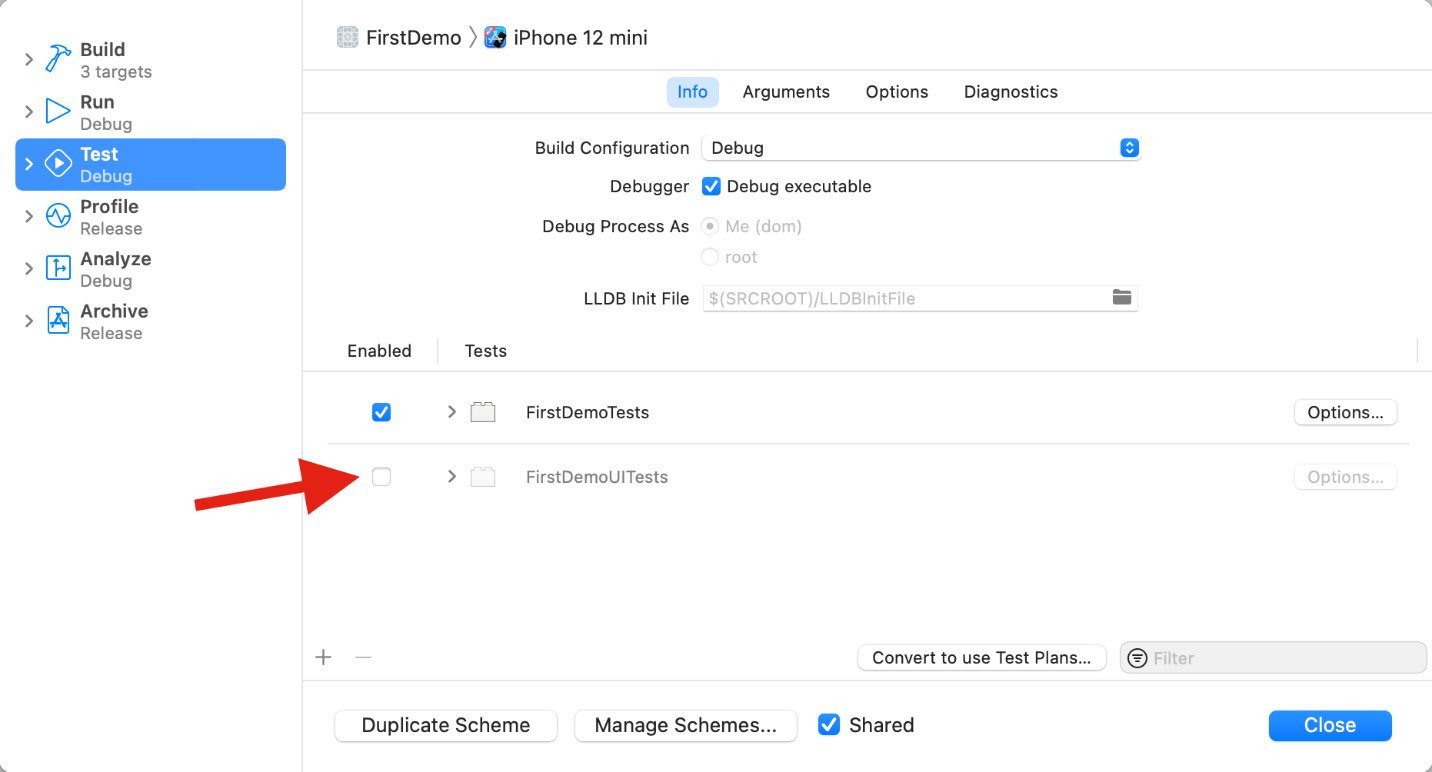
Figure 1.4 – Deselecting the UI test target
This disables the UI tests for this scheme, and running tests becomes fast. Check yourself and run the tests using the ⌘U shortcut.
Before we move on, let's recap what we have seen so far. First, you learned that you could easily write code that tests your code. Secondly, you saw that a test helped improve the code because now, you don't have to worry about breaking the feature when changing the implementation.
To check whether the result of the method is as we expected, we used XCTAssertEqual(_:, _:). This is one of many XCTAssert functions that are defined in the XCTest framework. The next section shows the most important ones.
Assert functions in the XCTest framework
Each test needs to assert some expected behavior. The use of XCTAssert functions tells Xcode what is expected.
A test method without an XCTAssert function that doesn't throw an error will always pass.
The most important assert functions are listed here:
XCTAssertTrue(_:_:file:line:): This asserts that an expression is true.XCTAssert(_:_:file:line:): This assertion is the same asXCTAssertTrue(_:_:file:line:).XCTAssertFalse(_:_:file:line:): This asserts that an expression is false.XCTAssertEqual(_:_:_:file:line:): This asserts that two expressions are equal.XCTAssertEqual(_:_:accuracy:_:file:line:): This asserts that two expressions are the same, taking into account the accuracy defined in theaccuracyparameter.XCTAssertNotEqual(_:_:_:file:line:): This asserts that two expressions are not equal.XCTAssertNotEqual(_:_:accuracy:_:file:line:): This asserts that two expressions are not the same, taking into account the accuracy defined in theaccuracyparameter.XCTAssertNil(_:_:file:line:): This asserts that an expression is nil.XCTAssertNotNil(_:_:file:line:): This asserts that an expression is not nil.XCTFail(_:file:line:): This always fails.
To take a look at a full list of the available XCTAssert functions, press Ctrl and click on the XCTAssertEqual word in the test that you have just written. Then, select Jump to Definition in the pop-up menu, as shown in the following screenshot:

Figure 1.5 – Jump to Definition of a selected function
Note that most XCTAssert functions can be replaced with XCTAssert(_:_:file:line). For example, the following assert functions are asserting the same thing:
// This assertion asserts the same as...
XCTAssertEqual(2, 1+1, "2 should be the same as 1+1")
// ...this assertion
XCTAssertTrue(2 == 1+1, "2 should be the same as 1+1")
But you should use more precise assertions whenever possible, as the log output of the more precise assertion methods tells you exactly what happened in case of a failure. For example, look at the log output of the following two assertions:
XCTAssertEqual(1, 2)
// Log output:
// XCTAssertEqual failed: ("1") is not equal to ("2")
XCTAssert(1 == 2)
// Log output:
// XCTAssertTrue failed
In the first case, you don't need to look at the test to understand what happened. The log tells you exactly what went wrong.
Custom assert functions
But sometimes, even the more precise assert function is not precise enough. In this case, you can write your own assert functions. As an example, let's assume we have a test that asserts that two dictionaries have the same content. If we used XCTAssertEqual to test that, the log output would look like this:
func test_dictsAreQual() {
  let dict1 = ["id": "2", "name": "foo"]
  let dict2 = ["id": "2", "name": "fo"]
  XCTAssertEqual(dict1, dict2)
  // Log output:
  // XCTAssertEqual failed: ("["name": "foo", "id":
    "2"]")...
  // ...is not equal to ("["name": "fo", "id": "2"]")
}
For the short dictionaries in this example, finding the difference is quite easy. But what if the dictionary has 20 entries or even more? When we add the following assert function to the test target, we get better log outputs:
func DDHAssertEqual<A: Equatable, B: Equatable>
  (_ first: [A:B],
   _ second: [A:B]) {
  if first == second {
    return
  }
  for key in first.keys {
    if first[key] != second[key] {
      let value1 = String(describing: first[key]!)
      let value2 = String(describing: second[key]!)
      let keyValue1 = "\"\(key)\": \(value1)"
      let keyValue2 = "\"\(key)\": \(value2)"
      let message = "\(keyValue1) is not equal to
        \(keyValue2)"
      XCTFail(message)
      return
    }
  }
}
This method compares the values for each key and fails if one of the values differs. Additionally, this assert function should check whether the dictionaries have the same keys. This functionality is left as an exercise for the reader. Here, we focus this example on how to write a custom assert function. By keeping the example short, the main point is easier to understand.
When we run this test with the preceding dictionaries, we see the following output in Xcode:

Figure 1.6 – Xcode showing the failure at two different places
As you can see in the preceding screenshot, Xcode shows the test failure in the assert function. In the test method, it only shows a redirect to the failure. Fortunately, there is an easy fix for that. All we have to do is to pass file and line parameters to the custom assert function and use these in the XCTFail call, like this:
 func DDHAssertEqual<A: Equatable, B: Equatable>(
  _ first: [A:B],
  _ second: [A:B],
  file: StaticString = #filePath,        // << new
  line: UInt = #line) {                  // << new
    if first == second {
      return
    }
    for key in first.keys {
      if first[key] != second[key] {
        let value1 = String(describing: first[key]!)
        let value2 = String(describing: second[key]!)
        let keyValue1 = "\"\(key)\": \(value1)"
        let keyValue2 = "\"\(key)\": \(value2)"
        let message = "\(keyValue1) is not equal to
          \(keyValue2)"
        XCTFail(message, file: file, line: line)  // << new
        return
      }
    }
  }
Note that our assert function now has two new parameters: file and line, with the default values #filePath and #line, respectively. When the function is called in a test method, these default parameters make sure that the file path and the line of the call site are passed into that assert function. These parameters are then forwarded into the XCTAssert functions (XCTFail in our case, but this works with all XCT... functions). As a result, the failure is now shown in the line in which the DDHAssertEqual function is called, and we didn't have to change the call of the assert function. The following screenshot illustrates this:

Figure 1.7 – Improved failure reporting
This example shows how easy it is to write your own assert functions that behave like the ones that come with Xcode. Custom assert functions can improve the readability of the test code, but keep in mind that this is also code you have to maintain.
Understanding the difference from other kinds of tests
Unit tests are just one piece of a good test suite. In my opinion, they are the most important tests because when carried out correctly, they are fast, focused, and easy to understand. But to increase your confidence in your code, you should additionally add integration, UI/snapshot, and manual tests. What are those?
Integration tests
In integration tests, the feature that is being tested is not isolated from the rest of the code. With these kinds of tests, the developer tries to figure out if the different units (that are thoroughly tested with unit tests) interact with each other as required. As a result, integration tests execute real database queries and fetch data from live servers, which makes them significantly slower than unit tests. They are not run as often as unit tests and failures are more difficult to understand as the error has to be tracked down in all involved code units.
UI tests
As the name suggests, UI tests run on the UI of an app. A computer program (the test runner) executes the app as a user would do. Usually, this means that in such a test assertion, we also have to use information accessible on screen. This means a UI test can only test whether a feature works as required when the result is visible on screen. In addition, these tests are usually quite slow as the test runner often has to wait until animations and screen updates are finished.
Snapshot tests
Snapshot tests compare the UI with previously taken snapshots. If a defined percentage of pixels differs from the snapshot image, the test fails. This makes them a perfect fit for situations where the UI of one app screen is already finished and you want to make sure that it won't change for given test data.
Manual tests
The final kind of test in the development of an app is a manual test. Even if you have hundreds of unit and integration tests, real people using your app will most probably find a bug. To minimize the number of bugs your users can find, you need testers in your team or to ask some users for feedback on the beta version of your app. The more diverse the group of beta testers is, the more bugs they will find before your app ships.
In this book, we will only cover unit tests because test-driven development (TDD) only works reasonably well with fast reliable feedback.
Summary
In this chapter, we discussed what unit tests are and saw some easy unit tests in action. We learned about the different assert functions available in XCTest, the testing framework provided by Apple. By writing our own assert function, we learned to improve the log output and what needs to be done to make it behave like built-in functions. This chapter concluded with other kinds of tests and how they differ from unit tests.
In the next chapter, we will learn what TDD is, and what its advantages and disadvantages are.
Exercises
- Write an assert function that only fails when the keys in two dictionaries differ. This assert function should also fail if a key is missing in one of the dictionaries.
- Improve
DDHAssertEqual<A: Equatable, B: Equatable>(_:_:file:line:)such that it also checks the keys of the dictionaries.

