I recently started exploring Great Expectations for performing data validation in one of my projects. It is an open-source Python library to test data pipelines and helps in validating data. The tool is being actively developed and is feature rich. At Qxf2, we feel that this tool has a lot of potential to help testers that need to grapple with data quality. So we are writing a series of posts about how to use this tool to implement tests for data quality. In this post, I will show how to get started with Great Expectations and implement a simple test for performing data validation with a real-world scenario. In the subsequent posts, I will walk through implementing more challenging test cases.
Why this post?
There are plenty of examples of using Great Expectations on the Internet. But they do not cover realistic test cases. As a tester, when I started to use the tool in a practical setting, I realized that the examples were not sufficient for the kind of tests that QA engineers dream up. The tutorials were written by people trying to get good at using Great Expectations. And not really from the perspective of someone testing the quality of data being collected. There were many data checks that I wanted to perform which were not available out of the box. So I thought I would fill the hole and write a series of posts to help testers implement useful tests with Great Expectations for data validation.
PS: I am providing all the data files used in these posts. You can try out the examples in this series of posts for yourself.
What I am trying to test
At Qxf2, we keep track of how our open-sourced GitHub repositories perform. We have a lambda that runs every day and collects some stats about each of our repositories using the GitHub API. We use this data within some of our internal applications. My task was to make sure that the quality of the data being stored in this table (well, many more tables actually) was good and consistent. The table name is github_stats. Here is a snapshot of the table with some data:
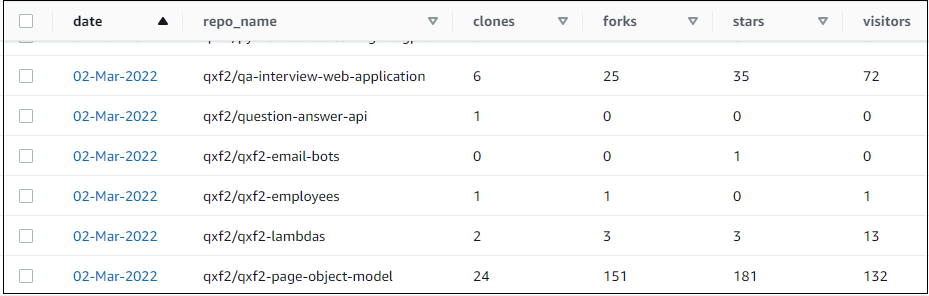
The data from github_stats table is available as a csv file here.
We will learn to write data quality checks with Great Expectations using this simple example. On the surface this might seem like a trivial example. But it is surprisingly rich in challenges and resembles real world problems well. One, we are collecting data from a 3rd party source that sometimes fails. Two, the underlying metadata (e.g.: the number of repositories) can vary. Three, there is no easy range for some of the metrics being collected. So exact checks are hard to implement. If you work with data collections teams, you will likely face similar challenges. Even if this example seems simple, we believe it will help you learn Great Expectations to a reasonable degree of competence.
How we are thinking about the tests
Before we jump into Great Expectations, I want to show the data quality checks that I eventually want to perform. If you are a data engineer, this step will be useful for you. I notice that many teams use Great Expectations but end up implementing only the simplest of checks. In this section, I am adding a few notes about how a tester thinks about what could go wrong with the data collection process and what minimal set of tests are needed to ensure high quality data is collected.
In this section, we will do the following:
-
1. Understand the data used in the use case
2. Look at the tests we can write for the data
1. Understand the data used in the use case
Let us examine the table structure again:
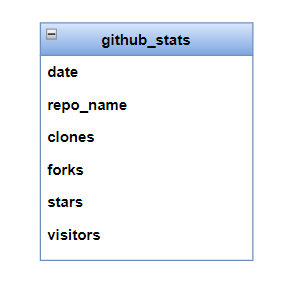
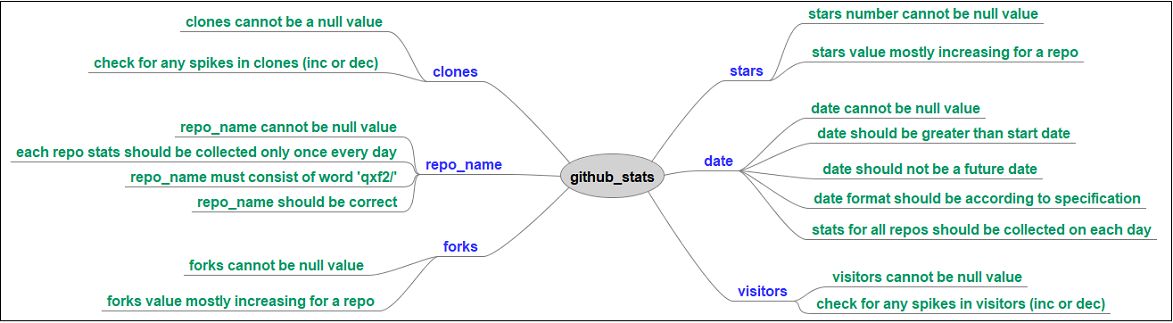
There are six columns – a date, a string and four positive integers. Forks and stars are cumulative data over the lifetime of a repository. Visitors and clones are unique data for each day on which it is collected. As you can already begin to feel, this example is richer in possibilities than it appears on the surface. Before proceeding to the test cases that I have listed, try and come up with some on your own. In projects that we come across, engineers seem to know how to use Great Expectations but this sort of “tester like thinking” is deficient! So what ends up happening is that the tests implemented using Great Expectations end up being less effective than they can be.
2. Look at the tests we can write for the data
I came up with the following test cases for each of the columns in the table:
These are not exhaustive, but good enough to begin with. In fact, I have tried to limit the test cases to whatever can serve as illustrative examples for this series of blog posts.
I have skipped over tests that cover intuitive relationships between columns. For example, as a human, you find it intuitive that the number of visitors should not be less than number of clones in a given period since everyone that cloned a repository (probably?) visited the repository. Now, there is the off chance that people just know the clone URL and type it on their terminal, but as a human, you would want to think about this relationship and verify if your hypothesis is true or not.
In a future post, I will show an example of using data in another table as a source of truth for the range of values in a certain column. But to restrict this blog post to a reasonable length, I have skipped many test cases that rely on a source of truth.
I have also skipped over focusing on metadata (data about data) too much. But thinking about metadata is another goldmine for coming up with good test cases.
If you work with data quality and are not coming with at least as many test cases as I have, then, improving this sort of thinking is the first thing you should be working on! No amount of proficiency with Great Expectations will help if the underlying ideas you want to express using the tool are not well formed.
Implement your first data validation test using Great Expectations
Now that we have a few test cases thought out, I will use the Great Expectations tool to implement one test case and run against the data on my local machine. By finishing this section, you would have gotten setup with Great Expectations and verified that you can run a simple test. This will set us up nicely for the remaining blog posts in this series.
We will go through the following sections:
-
1. Install
2. Setup
3. Connect to Data
4. Implement a test
This post will feel like a long read because many steps below are one-time actions you perform when you get started and the fact that I have tried to introduce some Great Expectations concepts. But in reality, you can zoom through these sections on your computer. I have taken the effort to capture a couple of videos (albeit with no audio) that perform all the steps. The two videos combined are less than 5 minutes long.
1. Install
To begin with, we need the following before we are able to install Great Expectations:
-
* A working Python install
* pip package installer for Python
* Create and active a virtual environment
* Basic familiarity in using a Jupyter notebook
Then, use the following command to install Great Expectations:
pip install great_expectations
![]()
![]()
This also installs the Great Expectations command line interface. The CLI provides commands for performing operations on our Great Expectations deployment. We will use the CLI to execute all the commands used in this blog post. Most of these commands will start the execution in the terminal and then open Jupyter Notebook which has boilerplate code to help us complete the task.
We can confirm that the installation went through fine using:
great_expectations --version
![]()
![]()
2. Setup
To start with, create a folder for your project. On your command prompt, change to this directory. Run all the commands given in this blog post from this newly created folder unless otherwise specified. Inside your project directory, create a folder called ‘data’ and place the github_stats.csv file inside it.
Next, we setup our project configuration for which we create something that Great Expectations calls a ‘Data Context’. It provides methods for all supporting components that Great Expectation consists of. If you do not understand what ‘Data Context’ means, that is ok. Basically, it is easy to setup and you will slowly get familiar with it over the next several posts.
Run the following command to initialize Great Expectations deployment. It will create a folder called great_expectations and build the directory structure and the necessary configuration files inside it.
great_expectations init
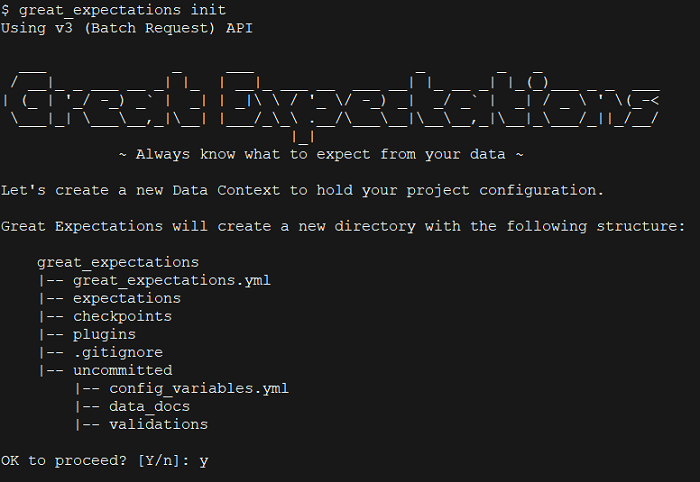
Let us examine the folder structure shown above:
-
* great_expectations.yml: This file holds the main configuration of our deployment
* expectations: This directory consists of all the assertions for our data
* uncommitted: This folder holds the content that is not checked into version control like credentials, validation results, data docs etc.
More on these later.
3. Connect to Data
To access and interact with our data, we create what Great Expectations calls a “Datasource”. This process involves picking some options on the command line and then making simple edits in a resulting Jupyter Notebook to customize and test your Datasource configuration. For folks that prefer video, I have included a (no sound) video of what I did at the end of this section.
Datasource utilizes two components to connect to data – One is the Execution Engine which provides resources to obtain batch of data which can be used to perform validation on. Another is the Data Connector which enables access to external source data systems.
We want to keep this first post easy to play along with. So in our case we will use a CSV file. The file is on our local machine and so we need Data Connector to access data on a filesystem. And since it is tabular data, makes sense to use Pandas as the Execution Engine. Depending on what kind of data you want to check and where it resides, your choices may vary. But the commands and thinking remain very similar to what is described here.
We will perform the process of creation of datasource in two steps:
-
3.1) Using the CLI
3.2) Using the Jupyter Notebook
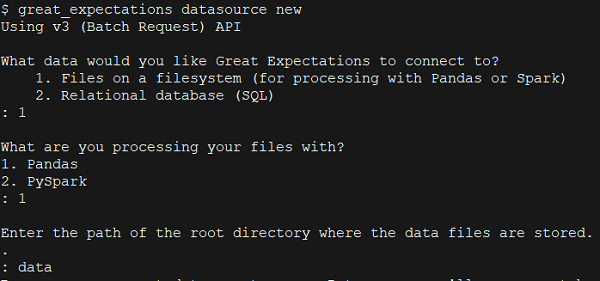
3.1) Using the CLI
Run the following command from the project directory:
great_expectations datasource new
This provides a series of prompts:
-
* First, choose the option 1 to connect to Files on filesystem
* Next, choose Pandas
* Provide name of directory where the data file is located. As noted earlier, we placed the file in a directory called ‘data’
3.2) Using the Jupyter Notebook
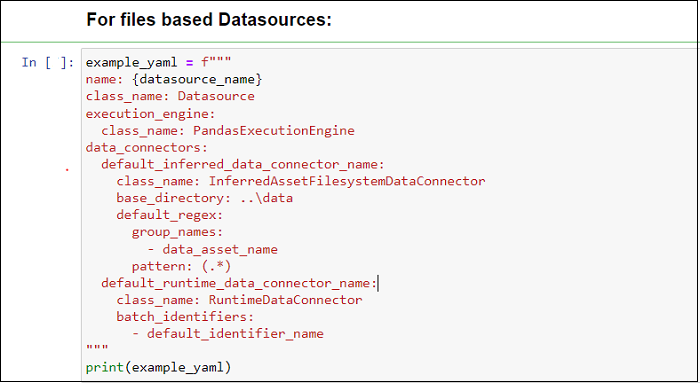
After we provide the name of directory, a Jupyter notebook opens up which has boilerplate code for completing the datasource creation. We will be making modifications to some cells and running each section to finish the process. Execute all cells in the notebook in order. I have provided screenshots of the code snippets (from the Jupyter notebook) to explain the various components of Great Expectations. But basically, we just need to run the cells, except for Step b) where we edit the cell to provide a name for our datasource.
i) The code in the first cell initializes a DataContext:

ii) Next, we need to name our datasource. Edit the cell to provide a name.

iii) We need a simple file based dataconnector to connect to our github_stats data. Let us use InferredAssetDataConnector, provided by Great Expectations which adds a data asset for each file in the directory we specify.
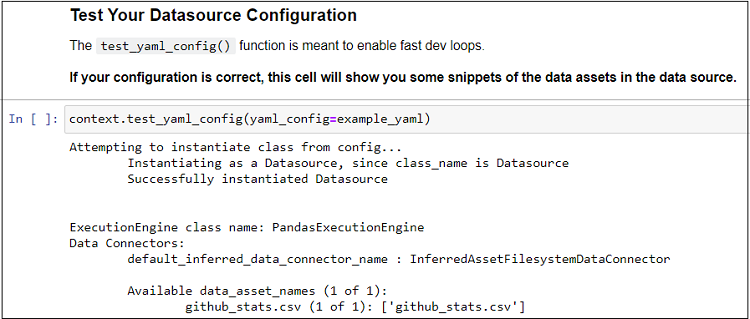
iv) Now that we have defined our datasource, we can test it using test_yaml_config() function. This will run a check to verify if a component works as expected. Here, it will confirm that the data connection works and list the DataAssets available (github_stats.csv in our case).
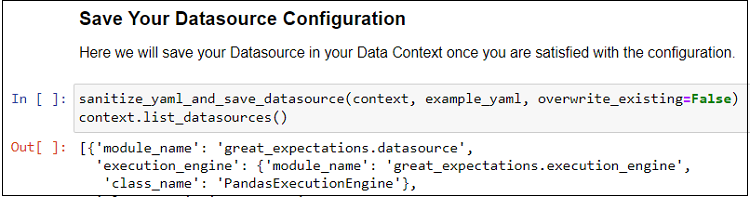
v) Finally, we save our configuration in the Data Context (great_expectations.yml file)
Here is a short video demo which shows how to create a datasource using the Great Expectations CLI:
4. Implement a test
Now that we have connected and configured a Datasource, we are ready to write tests. We will write and execute one test to make sure that the date is stored in the right format. Let us check if the values in the date column satisfies the format “%d-%m-%Y”. Where, %d is for day, %m is short form for month and %Y is full form of year. For folks that prefer video, I have included a (no sound) 3-minute video of what I did at the end of this section.
Note: This section looks long because writing your first test takes some preparation. But in reality, we will be making just one or two edits to the boilerplate code that Great Expectations generates.
The steps look something like this:
-
4.1. Prepare a test suite
4.2. Find a suitable built-in expectation
4.3. Create an expectation
4.4. Run the test
4.1) Prepare a test suite
Tests in Great expectations exist within an “Expectation Suite”. Great Expectations has this concept of an Expectation suite that is a collection of tests.
If you already have an expectation suite, you can go ahead and modify it. But in our case, since this is our first test, we will first create an Expectation Suite. To do that, you will start with a CLI command and then execute code in a Jupyter notebook. Hopefully you are beginning to see a pattern develop here. Great Expectations seems to let you run a command on the CLI to perform an action and then lets you customize and execute different parts of that action in a Jupyter notebook. Here, there are two steps again:
-
4.1.1) Using the CLI
4.1.2) Using the Jupyter Notebook
4.1.1) Using the CLI
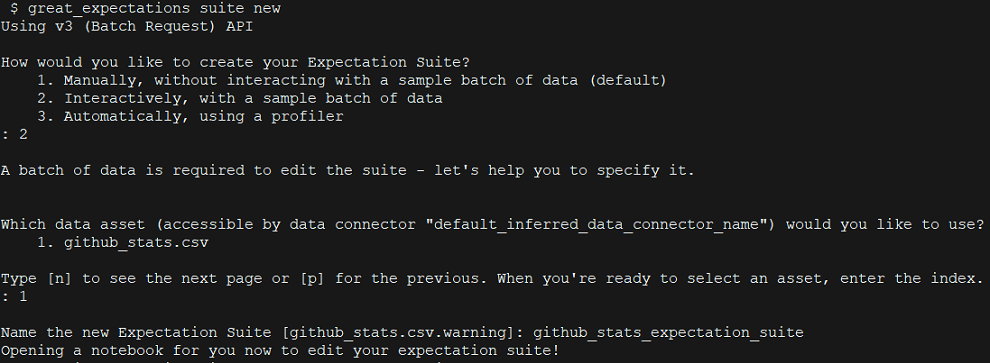
On the Great Expectations CLI console, run the following command to create a new expectation suite:
great_expectations suite new
This provides a series of prompts:
-
* We will pick the option to create Expectation Suite Interactively
* Next, choose the data asset, which is github_stats.csv (the only one we have right now, but there could be more)
* Provide a name for the Expectation Suite. I gave github_stats_expectation_suite
4.1.2) Using the Jupyter Notebook
Like earlier, we are redirected to a Jupyter notebook which provides the boilerplate code for completing creation of Expectation Suite. It is completely ok for you (as a beginner) to not know what the code in the different sections do. Just execute them. I have provided screenshots of how the output looks if you execute each section. You can use these images to compare the results on your machine.
We need a couple of resources to create an Expectation Suite. The below screenshot shows snippets of code from the first cell of our Jupyter notebook:
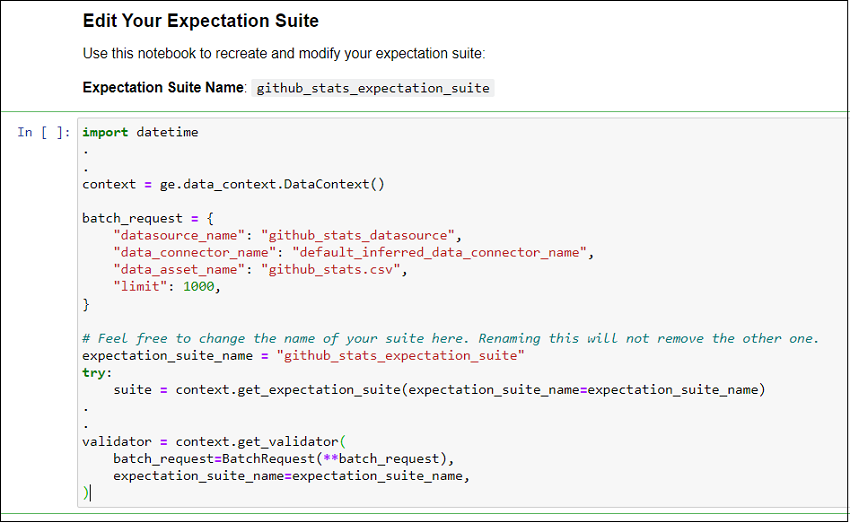
It does the following:
-
* Loads our Data Context
* Defines a BatchRequest which lets us chunk our data for analysis. In our case, we will simply accept the defaults. But a smarter batch (which requires code outside the scope of this example) would be to batch data by date.
* Set our Expectation Suite name
* Instantiates a Validator. Validators help in running the Expectation Suite against the specific chunk of data. We provide our Expectation Suite and Batch Request defined in earlier steps to our Validator.
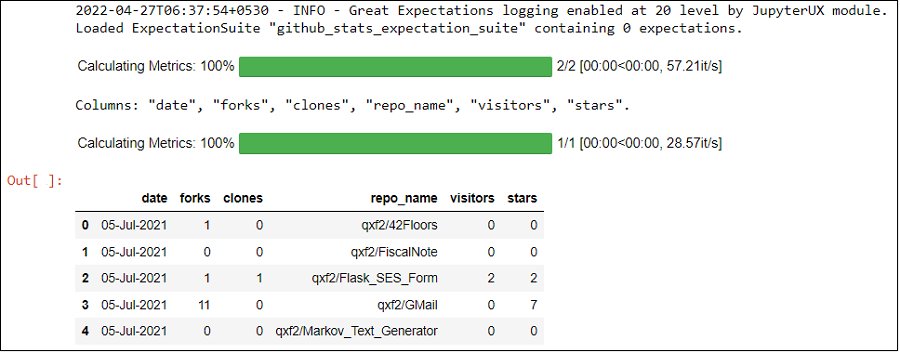
After we run the cell, we see that it prints the first 5 rows of our CSV confirming that an Expectation Suite is created and the Validator was able to load the data.
4.2) Find a suitable built-in expectation
For performing validations on our data we create “Expectations” which are assertions, defined in simple declarative language. As an example , consider that we want to check if a column does not accept null values. We can use expect_column_values_to_not_be_null. This is a built-in expectation provided by Great Expectations. There are several other expectations that are available online. Explore them here.
We can define custom expectations too and we will cover that in a future blog post. An expectation suite would consist of all the expectations that we create.
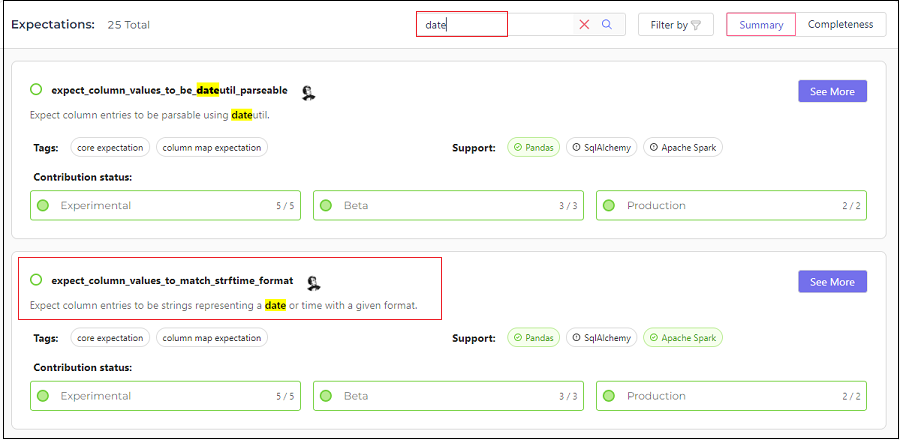
As noted earlier, we will write a test to validate the date format. Heading over to the Expectations Gallery, let is try to find a built-in Expectation which would serve our purpose.
Doing a quick search with the word ‘date’ lists out a couple of Expectations related to it. We will go with ‘expect_column_values_to_match_strftime_format‘ which verifies that the given column satisfies the date format we specify.
4.3) Create an Expectation
In the above step, we had picked a built-in Expectation for our test case. Let us now use it in our Jupyter notebook. Under the Column Expectations section, add a new cell (press b). We can add expectations by using the Validator object we defined earlier:
validator.expect_column_values_to_match_strftime_format(column="date",strftime_format="%d-%b-%Y")
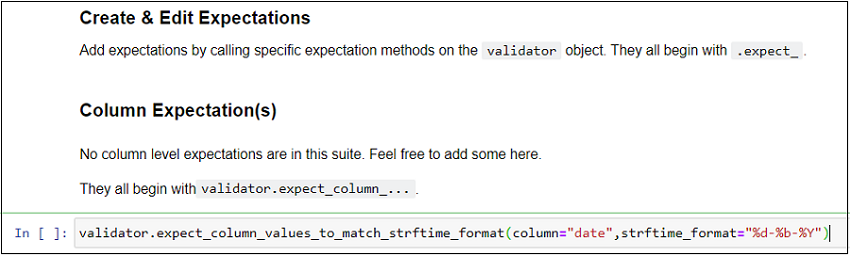
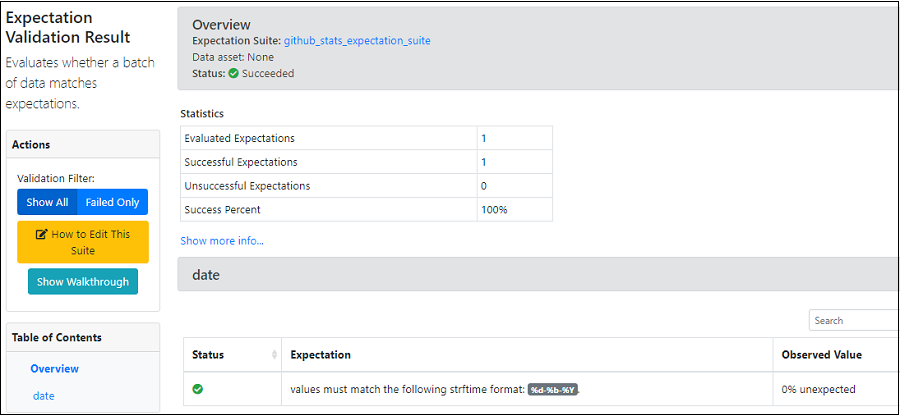
Run the cell (Shift + Enter) to execute the Expectation on the data (github_stats.csv).
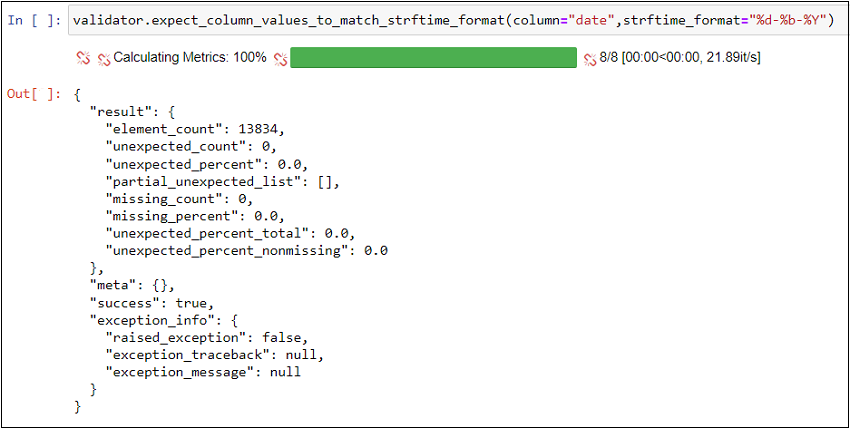
As displayed in the screenshot, we can see that all the rows satisfied the format check condition.
4.4) Run the test
At this point, we have our Expectation Suite ready with one Expectation (we will add many more in further blog posts). Let us save it and run the entire suite against our data using what Great Expectation calls a ‘Checkpoint’. It basically handles all the existing configuration we have for Expectation Suites, Data Connectors, Batch Requests in order to perform data validation. This is useful to run checks on production data. For instance, as new data keeps getting added to the github_stats table, we can schedule a job which will run a checkpoint on it. Don’t worry if all this doesn’t make sense immediately, we will touch upon and explore in more detail in further blog posts.
Back in our Jupyter notebook, let us look at the last section:
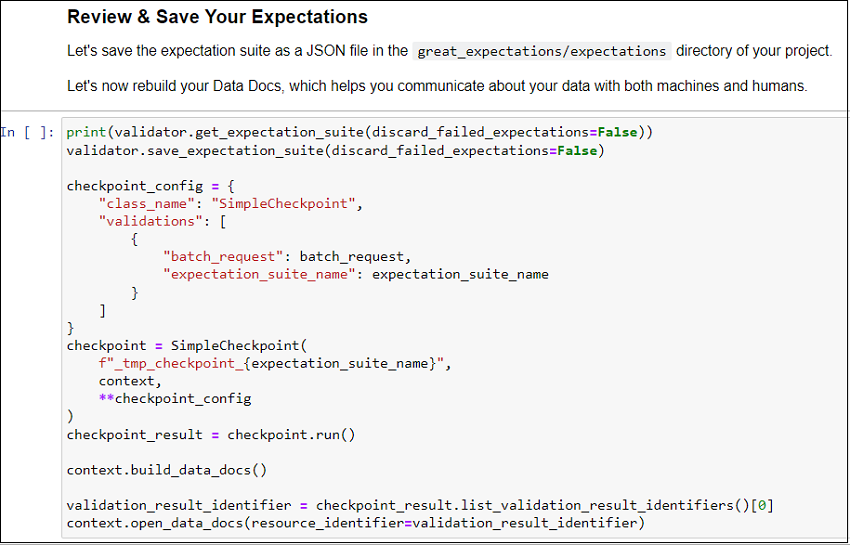
Here, SimpleCheckpoint class (one of the checkpoint classes provided by Great Expectations) is used. It is good enough in our case which has simple configuration.
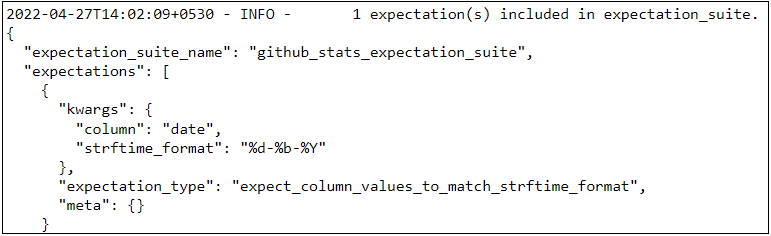
Run the cell and observe that the expectation we defined in our Expectation Suite is listed:
When we run the above cell, it also opens Data Docs which is documentation generated by Great Expectations. Running a checkpoint produces Validation Results. We can view our Expectation Suites and Validation results in Data docs. With the help of Data docs, we can make sure that our documentation is always up-date (in sync with our latest test runs).
Here is a short video demo which shows how to create an Expectation Suite, add an Exception, run it against data and see the data docs:
Next steps
We are now familiar with the basic steps on how use Great Expectations for performing data validations. There are several options to explore – create custom expectations, run checkpoints with a job, configure third party services(like Amazon S3) to store Expectation Suite, host data docs etc. I will attempt to touch a couple of them in my next blog posts. Thanks for reading and keep an eye out for the next one!
References
1. Official documentation – https://docs.greatexpectations.io/docs/
2. Expectations gallery – https://greatexpectations.io/expectations/
I have been in the IT industry from 9 years. I worked as a curriculum validation engineer at Oracle for the past 5 years validating various courses on products developed by them. Before Oracle, I worked at TCS as a Manual tester. I like testing – its diverse, challenging, and satisfying in the sense that we can help improve the quality of software and provide better user experience. I also wanted to try my hand at writing and got an opportunity at Qxf2 as a Content Writer before transitioning to a full time QA Engineer role. I love doing DIY crafts, reading books and spending time with my daughter.


This is great and in detail. I was looking for a way to validate large dataset and I will try this method. Thanks so much
Excellent pedagogical article.
Great job on your blog post! It was evident that you conducted thorough research and provided valuable insights. I found it to be engaging and informative. To learn more about this subject, click here.
What if you want the specific records that have unexpected values? How can you get the Primary Keys or a record identifier?
Hi Joe,
Thank you for going through my blogs. One of the features of Great Expectations is the result_format parameter, which controls the level of detail and information returned by each Expectation. It can be either a string or a dictionary, and it can be specified at the Expectation level or at the Checkpoint level. If you want to get the specific records that have unexpected values, you can use the result_format parameter to customize the output of your Expectation. More details are in this link – https://docs.greatexpectations.io/docs/reference/expectations/result_format/
For example, if you want to get the primary keys of the records that have unexpected values in column A, you can write something like this:
validation_result = my_validator.expect_column_values_to_be_in_set(
column=”A”,
value_set=[“A”, “B”],
result_format={
“result_format”: “COMPLETE”,
“unexpected_index_column_names”: [“pk_column”],
“return_unexpected_index_query”: True,
},
)
This will return a validation result that contains a query or a set of indices that can be used to retrieve the records with unexpected values in column A, along with their primary keys in pk_column.
Hope this helps!
Hi Joe,
How can we compare two different tables if they are same at the data level?