Almost 8 (!) years ago, I wrote an article called “Colourful rating system with CSS3“. It was a simple demo using jQuery and the jQuery Color Plugin to animate from one color to another to create a rating system. Now, I wanted to take that same concept but apply it on an app build with Xamarin.Forms. Today, let’s check out how to create a colorful rating system with Xamarin.Forms and Custom Animations.
Because Color animations aren’t available by default, we’ll need to use Custom Animations to achieve the effect. The animated profile cards were the first steps into Xamarin.Forms animation, but now we’ll take it another step forward. The source code can be found on Github in case you directly want to dive into the code. Otherwise, read on! Since we’re using Xamarin.Forms, these animations work perfectly on iOS and Android.
The setup

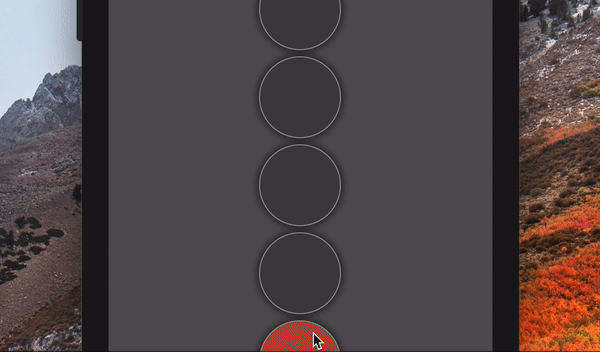
Since a phone is usually held in a portrait-orientation, I wanted the rating selection to be in that orientation as well. I used the same colors as my HTML version. The dynamic text will be placed in a label and the user will have to submit the selection by pressing a button. We’ll be using a Dictionary to keep track of the Ratings with their corresponding text and color.
Dictionary<int, Rating> _ratings = new Dictionary<int, Rating>();

private void SetRatings()
{
    _ratings.Add(1, new Rating() {
        Color = Color.FromHex("bd2c33"), Text = "This is just a piece of crap..." });
    _ratings.Add(2, new Rating()
        { Color = Color.FromHex("e49420"), Text = "Nothing too new or interesting" });
    // More Ratings
}
Keeping this in mind, let’s start building the UI!
The User Interface
I wanted the Rate Selections to be round and since the BoxView doesn’t support Rounded Corners by default, I went ahead and used the Frame to achieve the effect. These are placed inside a dynamically created Grid.
private Grid DrawRateGrid()
{
    var grid = new Grid();
    foreach (var rating in _ratings) {
        var rateSelection = DrawRateSelection(grid, rating.Key);
        var rateTapGestureRecognizer = CreateRateTapGestureRecognizer();
        rateSelection.GestureRecognizers.Add(rateTapGestureRecognizer);

        _rateSelections.Add(rateSelection);
        grid.Children.Add(rateSelection, 0, 5 - rating.Key); // Count backwards for stacking from the bottom
    }
    return grid;
}

private Frame DrawRateSelection(Grid grid, int ratingId)
{
    grid.RowDefinitions.Add(new RowDefinition { Height = new GridLength(PlatformRateSize()) });
    var frame = new Frame {
        HeightRequest = PlatformRateSize(),
        WidthRequest = PlatformRateSize(),
        CornerRadius = PlatformRateSize() / 2,
        OutlineColor = Color.FromRgb(136, 136, 136),
        BackgroundColor = _emptyColor,
        AutomationId = $"{ratingId}"
    };
    return frame;
}
There are a couple of things that I want to point out before we move on:
-
CornerRadius: We take 50% of theWidth&Heightfor theRadiusto create full circles.AutomationId: We’ll be (ab)using this property to store the Id of the rating so we’ll be able to use it later in the events.OutlineColor: Xamarin.Forms currently has issues on displaying theOutlineColorfor Android, but it’ll be fixed in the future.
Now that we have our UI, let’s move on and add the interaction!
Interaction
Since Frame doesn’t have any Tap events by default, we’ll add this by using a TapGestureRecognizer. Once it’s tapped, it’ll start coloring the frames for the rating.
private TapGestureRecognizer CreateRateTapGestureRecognizer()
{
    var tgr = new TapGestureRecognizer();
    tgr.Tapped += async (s, e) => {
        var tappedFrame = (Frame)s;
        _selectedRating = int.Parse(tappedFrame.AutomationId); // Retrieve the ratingId

        // Act when the Rating is tapped
        await ColorFramesAsync(_ratings[_selectedRating].Color);
    };
    return tgr;
}

private async Task ColorFramesAsync(Color color)
{
    var colorAnimations = new List<Task<bool>>();
    for (int i = 0; i < _rateSelections.Count; i++) {
        if (i < _selectedRating)
            colorAnimations.Add(_rateSelections[i].ColorTo(color));
        else
            colorAnimations.Add(_rateSelections[i].ColorTo(_emptyColor));
    }
    await Task.WhenAll(colorAnimations);
}
As you can see, we’re retrieving the selected rating by getting the AutomationId. Take note this could be handled differently as well, but in this example this is good enough. The ColorFramesAsync-method is executed after the tap and determines which Rate Selection should get which color. This is combined in a list to be animated at the same time from one color to another. But how can this be achieved?
Color animation
To animate the colors, we’ll need to use Custom Animations. David Britch wrote about this earlier and my ColorTo animation is based on his code as well. I created a Class with an Extension Method on the Frame-class to animate the BackgroundColor.
public static class FrameExtensions
{
    public static Task<bool> ColorTo(this Frame frame, Color toColor, uint length = 250, Easing easing = null)
    {
        var tcs = new TaskCompletionSource<bool>();
        var startColor = frame.BackgroundColor;

        new Animation(AnimateColorCallback(frame, startColor, toColor), 0, 1, easing)
            .Commit(frame, "ColorTo", 16, length, finished: (f, a) => tcs.SetResult(a));

        return tcs.Task;
    }

    private static Action<double> AnimateColorCallback(Frame frame, Color startColor, Color toColor)
    {
        Func<double, Color> computeColor = progress => {
            var r = startColor.R + (toColor.R - startColor.R) * progress;
            var g = startColor.G + (toColor.G - startColor.G) * progress;
            var b = startColor.B + (toColor.B - startColor.B) * progress;
            var a = startColor.A + (toColor.A - startColor.A) * progress;
            return Color.FromRgba(r, g, b, a);
        };

        var weakView = new WeakReference<Frame>(frame);
        Frame frameRef;
        if (!weakView.TryGetTarget(out frameRef)) {
            throw new ArgumentException("Can't target Frame");
        }

        Action<double> setColor = f => {
            frameRef.BackgroundColor = computeColor(f);
        };
        return setColor;
    }
}
The AnimateColorCallback calculates the new BackgroundColor based on the progress by setting the RGBA values. You can easily use this code for any color you need to animate in Xamarin.Forms.
Conclusion & Download
There you have it, a neat and colorful rating system built with Xamarin.Forms and used custom animations to transition the colors. I’m pretty happy with the conversion of the HTML version, what do you think? Dive in the code on Github, send me a PR with improvements and let me know your thoughts in the comments!