Can you believe this is the seventh post in the Adding Authentication Using Azure AD B2C Into Your Mobile Apps?
With lucky number 7, it seems like a perfect time to do a review of where we came from... and a preview of where we're going with this whole thing.
The journey so far...
- Part 1 - The Introduction - here I explained what Azure AD B2C is, why you may want to consider it, and a high level overview of how it works.
- Part 2 - Creating an Azure AD B2C Tenant - this is the one where I go over how to create a Tenant within the Azure portal. I found the Tenant creation a bit tricky, so I wrote an article on it and did a quick video too!
- Part 3 - Invoking and Consuming Web APIs with Xamarin - we need to invoke something that's protected with Azure AD B2C - so I took a little detour with this post to go over how to call Web APIs with a Xamarin.Forms app.
- Part 4 - Azure AD B2C Application Fundamentals - The Parts of the Party - this post gets down to it and explains all of the constituent parts of an Azure AD B2C Application ... which models our Web API and mobile app within the Tenant.
- Part 5 - Adding Authentication and Authorization with Azure AD B2C - down and dirty ... actually taking what we learned from the previous parts and actually invoking policies, getting tokens, and calling Web APIs ... all with the help of Azure AD B2C.
- Part 6 - Social Authentication in Azure AD B2C - nobody likes remembering a yet another username and password combo, this article showed how to enable social authentication so people can sign-up and sign-in to our app using services like Twitter or Facebook.
We've come a long... thorough(!)... way! And we're going to move through several more areas before we're done!
By the end of the series of tutorials, you'll have a solid understanding of not only what Azure AD B2C is, but how to integrate it into your mobile app, whether it's Xamarin.Forms or not.
The upcoming route...
- Part 7 - Multi-Factor Authentication - this post!!
- Part 8 - Change the Look and Feel of the Pages Displayed in the WebViews
- Part 9 - Ability to Reset Passwords and Edit Profiles
- Part 10 - Adding Azure AD B2C Authentication and Authorization to Azure App Services
- Part 11 - Understanding Scopes and Using the Microsoft Graph for Super Duper Lock Down
- Part 12 - Putting Everything All Together
The good news is that this post and the next two are done purely in the Azure Portal, so there will be no code changes to either our Web API or Xamarin.Forms app. So these posts will mostly be follow along.
The very last post is going to be the most fun, it's where I'll give you a production ready sample app that is fully integrated with Azure AD B2C using all the techniques we talked about in the previous ten (10!!) posts.
OK - enough reflection - let's get going and start talking about today's topic - adding in Multi-Factor Authentication.
Adding Multi-Factor Authentication with Azure AD B2C
So... multi-factor authentication (MFA) is kinda important these days. Unfortunately people tend to reuse passwords across multiple services, and all we need is one to be breached, and then every single app is at risk.
But with multi-factor authentication enabled, after a successful login either with a password (a local account) or with a social account, the user must enter another code. That code is sent to a device that they should have on them. This way even if their password is stolen - unless their phone has also been stolen by the same password theif - our user's account is safe.
Sweet - seems like a no-brainer to make sure we set up. So let's take a look at how to do so.
Enabling MFA in the Azure Portal
Multi-factor authentication is enabled in the policies within an Azure AD B2C tenant. This means you can have MFA available selectively enforced on apps within your Tenant. Enabling it for one app doesn't mean you have to have it enabled for all apps.
In fact, you can even have certain portions of your app protected by MFA and other portions not.
Setting a policy up to enforce MFA is straight forward.
Go into the Tenant, select the type of policy you want to edit, then the actual policy.

From there, hit the Edit button, then select the Multifactor Authentication option, and select On in the blade that appears.

And you can enable (or disable) MFA at any point - whether you're first creating the policy or editing it 15 years later.
That's it. Seriously. Now when your app invokes that policy to have a user sign-up or sign-in, they'll have to go through a multi-factor authentication in addition to local or social authentication.
One thing though... there are several different types of policies.. Sign In or sign up, Profile editing, Password reset, Sign-Up, and Sign-In (the last two are not recommended to be used any longer in lieu of the first policy).
All of those policies can have MFA enabled on them except... Profile editing. It's coming, but something to be aware of for now (22-Dec-2017).
Let's run through what that looks like then from the user's perspective.
The MFA Experience
No code changes are necessary in either the Xamarin.Forms app nor the backing Web API in order to accomodate the MFA. These next steps and screenshots will show what MFA looks like in a mobile app once it is enabled.
Just make sure your client code (in our case, the Xamarin.Forms app) invokes the policy that has the MFA enabled on it. When using MSAL, that's specified in the
authorityparameter of thePublicClientApplication.AcquireTokenAsyncfunction.
The value of the
authorityparameter will behttps://login.microsoft.com/tfp/{TENANT-DOMAIN-NAME}/{POLICY-NAME}. And you can find the Tenant's domain name off of the Overview blade.

Check out the example on GitHub here for more info.
Here's the flow...
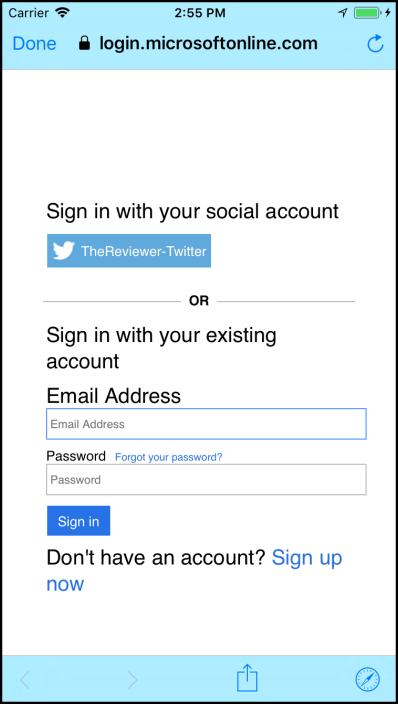
Here the user is going to sign up for an account. So when they click login on the app, and our code calls AcquireTokenAsync with a Sign-up or Sign-In policy, we'll get the following screen:

Of course since the user is signing up for a brand new account, using the local login, they'll tap on Sign up now and be presented with the screen below.

If the user wanted to sign up using Twitter, they would have just tapped the Twitter button. The screen is confusing. (We'll talk about how to customize it in a future post.)
First thing that needs to be done when signing up for a new local account is verification of the email address:
So by tapping the Send verification code in the screen above, an email gets sent, and the user is prompted to enter a code:

After that's done, the user gets to fill out the rest of the sign-up form.

Then when they hit Create the MFA will kick in (and some more confusing screens will be presented.)
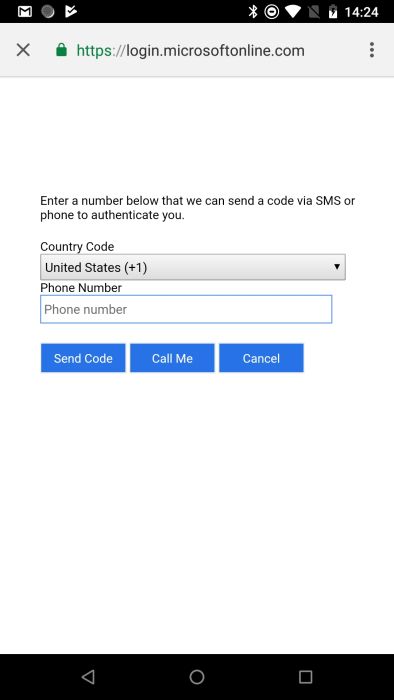
I wish this screen was a little more verbose. It's where the user is entering their phone number for MFA (and at this time Azure AD B2C only provides MFA via phone). But when I first saw it, I was a bit confused as to how it was different than email verification ... or why I even needed to enter it in the first place.
However, once they enter their phone number, a text will be sent to it, and the following will be displayed:

So ... what's missing from that page? An OK button perhaps? Seriously, I looked at that page for the longest time and wondered what the... was going on. Turns out you enter the number that was sent to you & the page automatically starts to verify it when 6 digits are entered.
Again confusing.
After that though - the account is created, the user authenticated & authorized to the appropriate scope (again, sent in to AcquireTokenAsync function) and the user can access the backing Web API.
Cool ... and if you take a look at the user info by clicking Users and Groups from the left side menu of the Tenant:

Then selecting the newly created user, Profile from the left hand side, and scroll all the way to the bottom, you'll see the phone number under Authentication Contact Info.

That's fun.
But here's another flow where things may be confusing to the end user.
Adding MFA to an Existing Policy with Social Authentication
You already have a Sign-up or sign-in policy in place. People have been using it. You decide to provide an extra layer of security by enabling MFA.
Here's what it's going to look like to the user who is signing in with a social account ... and that social account also has MFA enabled.
The user signs in as normal.
And they'll pick Twitter, because they already have an account created via social authentication.
The following screen pops up:

Assuming the Twitter token is no longer valid, they'll have to login to Twitter again.

Like everybody should, 2-Factor has been enabled on their Twitter account, so they'll go through that.
Now this screen is shown:

Wha??? The user is probably thinking, why would I have to redo my MFA? Again, a better onscreen explanation other than the default would go a long way here.
Finally, the text is sent to the entered phone number and away they go.

So this flow for MFA on social authentication for somebody who has 2-Factor setup on their existing account can be cumbersome & confusing. Granted the right conditions need to happen in order for the confusion to come into play... but keep it in mind.
I'm not saying skip MFA, I think it should be on, but we need to be prepared to help guide our users through it. And in the following posts I will show some possible ways to do so.
Summary
In this post we looked at how to enable MFA for our app. Actually, we really looked at enabling MFA for a particular policy in an Azure AD B2C Tenant, and then had our app invoke that policy. Then the flow for that policy dictated that MFA would be invoked.
We also saw some confusing situations that can arise from the user's perspective. In the next post one easy way to remedy that confusion, as well as customize other pages during the sign-up and in process to go along better with your app's look and feel.
Comments