If you are brand new to CanJS, we suggest reading its technology overview for background information on what CanJS does and how it works.
Dear JavaScript Community,
The humble DoneJS core team is proud to present CanJS 4.0. Like previous major releases, it represents a unique enrichment of CanJS's vision. Where 3.0 was about making your app more stable and less affected by rapid technology changes, 4.0 is about simplifying CanJS and enhancing your understanding of your application.
So turn on your terminal, clean off your keyboard, boot up your browser, alt-command-I (⌥ ⌘I ) your console, and get ready for some fun as we walk through the most important improvements in CanJS 4.0!
Here's a summary of those improvements:
- Community Driven Development - 4.0's features were directed by the community through our surveys.
- Debugging Tools - We've got powerful new debugging abilities:
- Understanding how stateful values affect each other - See what changes a stateful value or what a stateful value changes (including DOM nodes).
can.debug.logWhatChangesMe(viewModel, "fullName"); - Understanding why something happened - Trace the root and intermediate reasons why an event happens.
can.queues.logStack()
- Understanding how stateful values affect each other - See what changes a stateful value or what a stateful value changes (including DOM nodes).
- Simplified Development - CanJS is easier to use.
- Easier Setup - Use automounting components to bootstrap your application.
Component.extend({ tag: "hello-world", view: `{{message}} World!`, ViewModel: { message: {default: "Hello"} } }) + <hello-world> = START CODING! - Simplified Stache Templates - Many of stache's quirks have been eliminated or simplified. For example, you now pass functions as simple as:
<my-grid getList:from="Todo.getList"/> - Proxy and Class-based Observable Object and Arrays - Use ES classes to create custom observable Objects and Arrays that behave just like native Object and Arrays.
class Todo extends observe.Object { … }
class TodoList extends observe.Array { … }
- Easier Setup - Use automounting components to bootstrap your application.
- Better Code Inside and Out - Write more maintainable code against a rock-solid framework.
- Streaming Property Definitions - Encapsulate the behavior of a property within a streaming property definition.
DefineMap.extend({ name: "string", nameChangedCount: { value({resolve, listenTo}) { var count = resolve(0); listenTo("name", () => { resolve(++count); }); } } }); - Determinism and Performance with Queues - CanJS uses queues to make sure that event handlers are always called after all other values have been updated including the DOM:
It also uses queues to improve performance by avoiding unnecessary browser layout reflows.person.on("fullName", function(ev){ updatedElement.innerHTML //-> <h2>Justin Meyer</h2> });
- Streaming Property Definitions - Encapsulate the behavior of a property within a streaming property definition.
- Upgradability - If you've built an app in 3.0 and it's not warning, you should be able to upgrade without difficulty to 4.0.
This article concludes with ideas on what's next for CanJS and when to expect the next major release.
Feature: Community Driven Development
While the features that landed in previous major releases were forged from a chaotic mix of GitHub issues and our gut instinct, 4.0's features were directed by you, the users of CanJS through our surveys.

As maintainers, we are trying to avoid the innovator's dilemma. We are treating CanJS as a product, with 6 week product cycles, user testing, etc. This has shifted our focus to what matter most to users.
If something matters to you, sign up for our survey here!
Feature: Debugging Tools
NOTE: All of CanJS's debugging tools and tips can be found on the Debugging Guide.
Federated state mechanics, a.k.a. components having their own stateful values, are the best way of building an application. It allows developers to build stateful components that work on their own without having to worry about how they get assembled later.
But federated state has difficulties. How can you trace what a stateful value affects or is affected by? When something happens, how can you know the root and intermediate causes? These difficulties prompted the creation of libraries like ImmutableJS and patterns like Flux.
Instead of running away from these problems, CanJS 4.0 tries to solve them with improved tooling. Division was nearly impossible with roman numerals, but it's easy with decimal numbers that we use today. We believe improved tooling can expand our mental capabilities so much that the problems immutable data structures are trying to solve disappear, leaving the benefits of federated state to shine through.
CanJS 4.0 formalized how its observables work so the questions above can be answered.
Understanding how stateful values affect each other
In the following example, a Person observable constructor function is defined with a fullName property that derives from the first and last property:
var Person = DefineMap.extend({
  first: "string",
  last: "string",
  get fullName() {
    return this.first + " " + this.last;
  }
});
We can create a person instance and use can-debug to print out what values it derives from. The following:
var me = new Person({ first: "John", last: "Doe" });
can.debug.logWhatChangesMe(me, "fullName");
Logs what changes fullName:
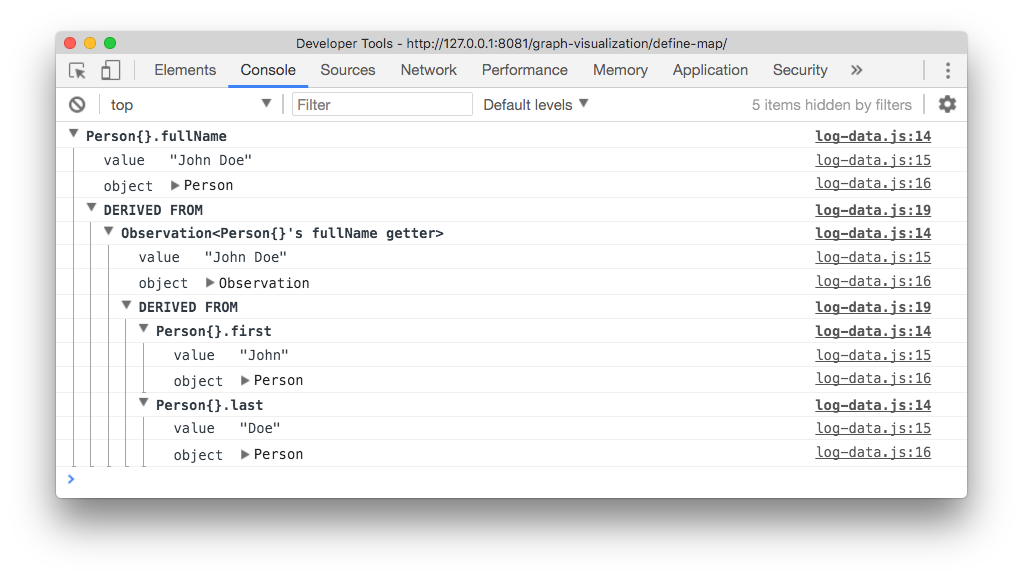
This is even more powerful when it can trace dependencies of elements updated by the page back to the elements that change their value. The following JS Bin creates an editor for the previous person's first and last name, and displays the fullName in the page:
We trace the h1.fullName element in the page, and see that it can be changed from fullName, which is in-turn derived from .first and .last, which is in-turn derived from <input> elements!
can.debug.logWhatChangesMe(document.querySelector("h1.fullName"));Logs:

You can even see this relationship in reverse. Given one of the input elements, you can see what values it affects, including seeing the fullName element.
This is just the start. Getting the dependency graph data was our goal for 4.0. But there's more we can do to make it better at representing the nature of your application (beyond console.log). For example, we've graphed the data:
can.debug.drawGraph(me, "fullName");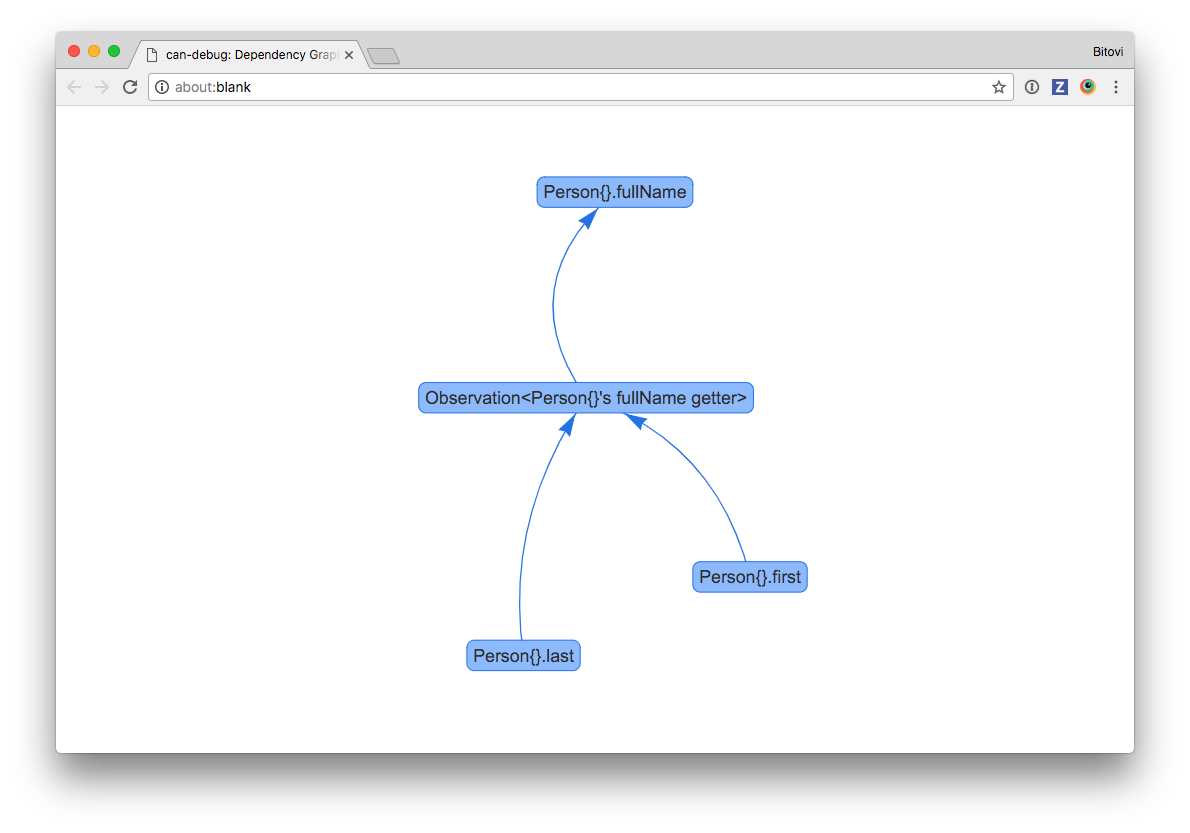
Understanding why something happened
In the Determinism with Queues section below, we talk about why CanJS uses queues to provide assurances about the state of an application at a particular point in time. The unfortunate side-effect of using queues is that it can be hard to understand why something happened looking at the developer tools call stack.
In CanJS 3.0, listening to a can-compute or can-observation change with a debugger like the following:
const person = new DefineMap({first: "Annie", last: "Sullivan"});

const fullName = new Observation(function fullName () {
  return person.first + " " + person.last;
});

fullName.on(function fullNameChanged (newVal) {
  debugger;
})

person.first = "Lincoln";
Would give a stack trace like this:

It's hard to know that setting first caused fullName to update, which caused the fullName event handler to run. In 4.0, you can run can.queues.logStack() and see:
DefineMap{}'s first changed to Lincoln from Annie
NOTIFY ran task: Observation<fullName>.onDependencyChange {...}
DERIVE ran task: Observation<fullName>.update
MUTATE ran task: fullNameChanged {...}
can.queues.logStack shows the important parts of what lead to your code being run. In this case:
- The
DefineMap's first property was set to Lincoln. - This notified the fullName observation one of its dependencies has changed.
- The fullName observation updated its value.
- The
fullNameChangedhandler was called because fullName changed.
In 4.0, we also named many important generated functions, making your browser's stack trace easier to understand as well:

For more ways of understanding and debugging your application, check out the debugger guide.
Feature: Simplified Development
CanJS has been around almost 10 years! In that time, a lot of complexity gets added. For this release, we removed many deprecated features and focused on the essential developer experience — creating components — reducing what is needed to be an effective CanJS developer. Let's see the most significant simplifications:
- Easier setup with component automounting and defaulted
viewandViewModeltypes - Simplified stache template syntax
- ES6 Proxy-based observables that behave just like Object and Array
Easier Setup with Components
CanJS 3.0's suggested setup has people:
- Create a stache view
- Define an application view model with DefineMap
- Create an instance of the application view model
- Render the view with the application view model
- Insert the resulting document fragment into page
A 3.0 hello-world looks like:
import stache from "can-stache";
import DefineMap from "can-define/map/map";

const view = stache(`<h1>{{greeting}} {{subject}}!</h1>`);
const ViewModel = DefineMap.extend({
  greeting: {value: "Hello"},
  subject: {value: "World"}
});
const viewModel = new ViewModel();

const frag = view(viewModel);
document.body.appendChild(frag);
In 4.0, components automatically mount themselves if a matching element is added to the page or is already in the page — just like native custom elements! This means the suggested setup for 4.0 is:
- Create a component with a view, view model and tag name.
- Include an element that matches the component's tag name in the page.
A pure JavaScript hello-world might look like:
import Component from "can-component";

Component.extend({
  tag: "hello-world",
  view: `<h1>{{greeting}} {{subject}}!</h1>`,
  ViewModel: {
    greeting: {default: "Hello"},
    subject: {default: "World"}
  }
});

document.body.appendChild( document.createElement("hello-world") )
But it is more likely you will have a page that includes the root component HTML (<hello-world>) like:
<!DOCTYPE html>
<html>
  <head>
  <title>My CanJS App</title>
  </head>
  <body>
    <hello-world></hello-world>
    <script src="path-to-your-build.js"></script>
  </body>
</html>
And a JavaScript file that defines your main component like:
import Component from "can-component";

Component.extend({
  tag: "hello-world",
  view: `<h1>{{greeting}} {{subject}}!</h1>`,
  ViewModel: {
    greeting: {default: "Hello"},
    subject: {default: "World"}
  }
});
While users still have to learn about stache views and DefineMap view models, they don't feel like separate moving parts that you have to coordinate. We've further refined this pattern by eliminating much of the need of the Component's events object and moving that logic into the ViewModel. We'll show this off later in Streaming Property Definitions.
Speaking of easier setup, we made can-route easier to set up too. You can point route.data directly at your top-level component and it will cross-bind to its view model:
import Component from "can-component";
import route from "can-route";
import "can-stache-route-helpers";

Component.extend({
  tag: "my-app",
  view: `You are on the {{page}} page.
         <a href="{{routeUrl(page='home')}}">Home</a>
         <a href="{{routeUrl(page='stranger')}}">Stranger</a>
         <a href="{{routeUrl(page='things')}}">Things</a>
         `,
  ViewModel: {
    page: "string"
  }
});

route.register("{page}",{page: "home"});
route.data = document.querySelector("my-app"); // connects URL to component
route.start();
Simplified Stache Templates
Stache template have been greatly simplified in this upgrade. If you are confused by code like:
<some-component @show:to="@*showCallback">or are unsure of the differences between:
{{helper value}} and {{helper(value)}}
you are not alone!
can-stache 3.0 had a lot of syntax you needed to be effective:
-
{{helper value}}- helper expressions -
{{helper(value)}}- call expressions @- Prevent calling a function~compute- Pass a compute instead of a value%special- Special values. Ex:%index,%element,%event,%viewModel,%arguments.*variable- A template variable.
Our goal for 4.0 was to reduce the amount you need to know about stache to be effective. Stache has been updated to:
Explicitly call functions
We started by doing away with the source of ambiguity in stache - functions called implicitly.
In 3.0, the following template:
<p>{{makeTodo.name}}</p>Rendered with:
makeTodo = function(){
  return {name: "todo instance"}
}
makeTodo.name = "makeTodo"
Results in: <p>todo instance</p>
Calling functions implicitly made passing functions between components difficult, you had to use the 3.0 @ symbol to prevent calling a function:
<some-component showCallback:from="@show">In 4.0, if you want to call a function, you must use call(), just like in JavaScript. This means that:
- <p>{{makeTodo.name}}</p> produces <p>makeTodo</p>, and
- <p>{{makeTodo().name}}</p> produces <p>todo instance</p>.
This greatly simplifies passing functions around and eliminates the need for @. For example, the following passes a show function to <some-component>'s showCallback:
<some-component showCallback:from="show">Reduce special syntax: *variable, *self, and %special, and ~compute
can-stache 3.0 had too much special syntax to remember. Instead of using *variable to represent template variables, and %special to house special variables, 4.0 has a reserved scope keyword (like arguments in JavaScript) that is used to provide these behaviors.
So to access the event in a on:event binding:
| 3.0 |
|
| 4.0 |
|
To access the index of the element being iterated over:
| 3.0 |
|
| 4.0 |
|
Variables are also housed within scope now:
| 3.0 |
|
| 4.0 |
|
We've removed the need for ~compute in most cases too. Most of the time, when calling a function, you want values passed. The following should pass the account's amount value to the toFixed function:
{{toFixed(account.amount)}}But some helpers, like converters and each should to be passed an observable. In 3.0, it looked like:
{{#each(~items) }}
<li>{{name}}</li>
{{/each}}
~items passed items as a compute to each. By passing a compute, #each is able to perform a diff of items as it changes, improving update performance.
In 4.0, you don't need to remember to do this. #each is registered as a live helper. It will get passed an observable automatically.
Removed scope walking
In can-stache 3.0, any variables you use within magic tags or bindings are looked up in scope chain. This lent itself to all sorts of subtle bugs. For example, if you render a stache template like:
{{#each children}}
  <li>
    {{name}} is {{age}} years old
  </li>
{{/each}}
With some data like:
{
  name: 'Justin',
  age: 33,
  children: [
    { name: 'Ramiya', age: 2 },
    { name: 'Joffrey' }
  ]
}
You will get an output that looks like
<li>Ramiya is 2 years old</li>
<li>Joffrey is 33 years old</li>
It might be obvious what is happening in this simple example, but when this happens in larger apps it is often difficult to identify.
In 4.0, there is no implicit scope walking. 4.0 will render:
<li>Ramiya is 2 years old</li>
<li>Joffrey is years old</li>
If you want the old scope walking you can use scope.find:
{{#each children}}
  <li>
    {{name}} is {{scope.find('age')}} years old
  </li>
{{/each}}
Or scope walk with ../ like:
{{#each children}}
  <li>
    {{name}} is {{../age}} years old
  </li>
{{/each}}
Or use scope.root which accesses the data passed to the template:
{{#each children}}
  <li>
    {{name}} is {{scope.root.age}} years old
  </li>
{{/each}}
Proxy and Class-based Observable Objects and Arrays
can-define has been a huge improvement from can-map. But it has one major limitation - it is unable to add and delete observable properties with normal JavaScript DOT and delete operators:
var me = new DefineMap()
me.first = "Justin" //-> does not emit "first" events
delete me.first     //-> does not emit "first" events
We've long seen proxies as a solution to this problem. Proxies are able to trap setting, getting, and deleting properties that were not previously defined. With Proxies available in modern browsers, we've created a proxy-based version of observables.
Use it like:
import observe from "can-observe";

var me = new observe.Object();
me.first = "Justin" //-> emits a first event
delete me.first     //-> deletes first and emits a first event
You can extend observe.Object and observe.Array into your own types with class declarations! The following creates a Person type whose fullName property is a computed getter:
import observe from "can-observe";

class Person extends observe.Object {
  get fullName() {
    return this.first + " " + this.last;
  }
}

const me = new Person({first: "Justin"});

me.on("fullName", function(ev, fullName){
  fullName //-> "Justin Meyer"
});

me.last = "Meyer"; //-> emits fullName event above

me.fullName //-> "Justin Meyer"
You can use can-observe for both model and view model types. Check out this TodoMVC example. While can-observe is still experimental, it represents another example of CanJS simplifying as new features get added to browsers.
Feature: Better Code Inside and Out
CanJS 4.0 has features that help you write better, more organized code, and CanJS itself is written better, resulting in fewer downstream bugs.
Streaming Property Definitions
This might be what I'm most excited about in CanJS 4.0. There seems to be a gap between object-oriented state mechanics like those found in Vuejs, CanJS, MobX and the reducer/streaming patterns in Angular with RXJS and Redux. can-define's improved value behavior aims to fill that gap. Use it to create code that is easier to understand and debug.
How a stateful value behaves should be clearly defined and located in one place. In CanJS 3.0, one often resorted to using setters or component's events object to implement property behaviors that were not definable with getters alone.
For example, consider a state / city selector where as the state changes, the city selection should be removed. In 3.0, this might have been implemented as follows:
Locator = DefineMap.extend({
  state: {
    type: "string",
    set: function(){
      this.city = null;
    }
  },
  city: "string"
});

var locator = new Locator({ state: "IL", city: "Chicago" });
locator.state = "CA";
locator.city //-> null;
The problem with the previous code is that it relies on side effects to manage the behavior of city. If someone wants to understand how city behaves, they might have to search the entire map's code.
The value behavior allows you to consolidate the behavior of a property to a single place. For example, the following implements Locator with value in 4.0:
var Locator = DefineMap.extend("Locator",{
  state: "string",
  city: {
    value: function(prop) {
      // When city is set, update `city` with the set value.
      prop.listenTo(prop.lastSet, prop.resolve);

      // When state is set, set `city` to null.
      prop.listenTo("state", function(){
        prop.resolve(null);
      });

      // Initialize the value to the `set` value.
      prop.resolve( prop.lastSet.get() );
    }
  }
});
While functional reactive programming (FRP) can take time to master at first, once you do, your code will be much easier to understand and debug. The value behavior supports the basics of FRP programming — the ability to listen to events and changes in other properties and resolve the property to a new value.
Determinism and Performance with Queues
CanJS 4.0 orders execution of observable and DOM updates within task queues. A task is simply the calling of a function, usually a callback function within an event binding.
There are two main reasons tasks are ordered:
- performance - It can be beneficial to order some tasks to happen at the same time. For example, those that change the DOM.
- determinism - Ordering tasks provides assurances about the state of an application at a particular point in time.
Performance
For performance, CanJS 4.0 now performs all DOM mutations together in the DOMUI queue. This helps avoid expensive browser layout reflows.
The following demo uses can-queues to update 1000 slider positions. Using queues to batch DOM updates performs over 150 times faster.
NOTE: This demo shows using queues directy. In everyday CanJS programming, you don't have to do this. All CanJS libraries that update the DOM have been updated to use queues.
Determinism
Let's explore the determinism use case a bit more with a small example that shows what a lack of determinism looks like. In the following example, a person observable is created, with two observations that derive values from person's values:
var person = observe({name: "Fran", age: 15});
var info = new Observation(() => {
  return person.name + " is " + person.age;
});

var canVote = new Observation(()=> {
  return person.age >= 18;
});
Now let's say we listened to when info and canVote changed and used the other value to print a message:
info.on(function (newInfo) {
  console.log("info: " + newInfo + ", canVote:" + canVote.get());
});

canVote.on(function (newCanVote) {
  console.log("canVote: " + newCanVote + ", info: " + info.get());
});
If person.age is set to 19, info and canVote are each updated and their event handlers dispatched. If the updates to info and canVote immediately dispatched their events, you would see something like:
person.age = 19;
// console.log("info: Fran is 19, canVote: false")
// console.log("canVote: true, info: Fran is 19")
Notice that canVote is false. This is because canVote has not been updated yet. CanJS avoids this problem by scheduling callbacks in queues. All "user" events like the ones above (registered with .on()) happen last in the mutateQueue. info and canVote update their values in the deriveQueue. info and canVote are notified of the age change in the notifyQueue queue. With queues, you will see:
person.age = 19;
// console.log("info: Fran is 19, canVote: true")
// console.log("canVote: true, info: Fran is 19")
In CanJS, all user event handlers are able to read other values and have those values reflect all prior state changes, including DOM changes (mutations).
Feature: Upgradability
If you built an application using CanJS 3.0, and got rid of all the warnings about using deprecated features, you should be able to upgrade without much difficulty to CanJS 4.0.
The CanJS 4.0 migration guide goes over how to upgrade. We've begun creating several code-mods that you can use to automatically change code to 4.0 compatible code.
What's Next?
With CanJS 4.0 out, we are going to turn our attention to:
- Improving can-set and can-connect
- Creating guides: forms, routing, testing
- can-element and can-observe
- Expanding our developer tools
- What the community votes for on the surveys
As for a 5.0, we have no immediate plans to create one. Similar to 4.0, an underlying bug or architectural change is the most likely reason to make breaking changes. In 3.0, there were numerous bugs around the old event batching system. 4.0's can-queues fixed these bugs but created breaking changes in dependent packages like can-define. So we took the opportunity to clean up as many problems areas as possible, like can-stache.
As we find new problem areas or things that require breaking changes, we will add them to the CanJS 5.0 issue.
Finally, a huge thanks to everyone who made CanJS 4.0 possible.
Thank you,
- CanJS developers around the world building some of the most high-profile, high-performance, and amazing pieces of software on the web.
- Contributors big and small to CanJS. Every bug report, feature request, and documentation fix makes CanJS better.
- Bitovi and its team for helping other companies build quality applications and investing its resources back into open-source development that benefits everyone.
Sincerely and with much love,
DoneJS Core Team
(the ever humble)