
While working through a coding tutorial in the excellent iOS 8 by Tutorials book by the Ray Wenderlich crew, I learned about the new Preview Assistant Editor in Xcode 6. This is a feature that you can enable in an assistant editor while editing a view file (e.g. a storyboard or XIB). It shows what that view looks like on the ever-growing plethora of screen sizes, vastly reducing the time spent testing out UI changes on device simulators. It can also be used to see how a view will look when using strings from different languages, such as infamously long German words.
Rechtsschutzversicherungsgesellschaften!
Having this very useful feature relegated to an assistant editor is a shame. An assistant editor must share a window with its primary editor. I would prefer to open the preview in a new window, which would live on my second monitor, enabling me to see many different previews at the same time without needing to scroll around the assistant editor. I am not aware of a way to do this, but I found the next best thing. Here’s what my setup looks like:

The lefthand screen has the main Xcode window, in which I edit a view. The righthand screen has a maximized window with a nearly fullscreen preview of the view I’m editing on the left. As you can see in the photo, I can fit a preview of all four iPhone sizes into the screen at the same time. When I edit the view on the left, the changes are immediately reflected in the previews on the right. It’s pretty sweet!
Here’s how you can set this up…
- In the Project Navigator pane, single-click a storyboard/XIB file to open it in the main Xcode window.
- Now double-click that same file to open it in a new window.
- Move the new window to another monitor and maximize it.
- Click on the new window to make sure it has input focus, then type Option+Command+Enter to open an assistant editor in that window.
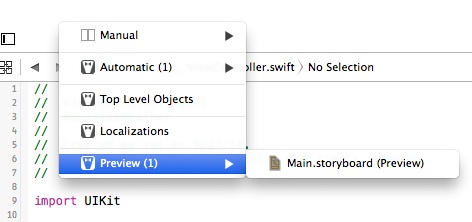
- In the assistant editor’s jump bar click on ‘Automatic‘ to open the drop-down menu (see the screenshot below if you don’t know what this means).
- Click on the ‘Preview‘ menu item to open the preview editor.
- Click and hold next to the assistant editor’s jump bar, then drag up or left (depending on which editor layout you prefer; vertical or horizontal), to maximize the preview’s screen real estate.
In case you didn’t understand the step involving the assistant editor’s jump bar, here’s a screenshot for reference:
Have fun!


Pingback: Dew Drop – September 29, 2014 (#1865) | Morning Dew
In step 4 you said to make sure the new window has input focus. Can you explain what that is and how to to it ?
That means you need to click on the window to ensure the keystrokes are sent to that window. Sorry, that’s the old Windows developer in me peeking out! 🙂
I reworded that step to make it more understandable. Thanks for your feedback.