


Introduction
JUnit 5 is the next generation of JUnit. The goal is to create an up-to-date foundation for developer-side testing on the JVM. This includes focusing on Java 8 and above, as well as enabling many different styles of testing.
In this article we will focus on one of the features of Junit 5, the extensions, throughout the article you will discover how to use the extensions to customize the behavior of tests.
Note: By reading this article, it is assumed that you are already familiar with Junit 5 and want to go one step further, if you are not familiar with Junit 5 or Junit at all, I advise you to take a look before diving into the article.
What is Junit 5 Extensions
Before Junit 5, to extend the behaviors of a test it was necessary to use the Runner or Rules which are based on the use of reflection, the problem with Reflection is that it breaks the encapsulation, Junit 5 has come to overcome this problem by introducing the concept of extension that you will discover very quickly and this made the code that used Junit 4 strongly coupled to the one making it difficult to evolve the code.
Extension with Junit 5
In contrast to the competing Runner, TestRule, and MethodRule extension points in JUnit 4, the JUnit 5 extension model consists of a single, coherent concept: the Extension API. Note, however, that Extension itself is just a marker interface.
Junit 5 Modularity
A modular approach was needed to the Junit Framework to evolve, The architecture had to allow Junit to interact with different programmatic clients that used different tools and IDEs. The logical separation of concerns required
- An API to write tests, mainly for use by developers
- A mechanism for discovering and running tests
- An API to allow easy integration with IDEs and tools to run tests from them.
And the extensions in Junit 5 are among the elements that have allowed the Junit Framework to have this modularity
Junit 5 extension model
Junit 4 provided extension through Runners and Rules, but Junit 5 has only one concept: the Extension API.
Extensions itself is just a marker interface (or tag or token interface), an interface with no fields or methods inside. It is used to mark the fact that the class implementing an interface of this category has some special behavior. Among the best-know Java marker interfaces are Serializable and Cloneable
JUnit 5 can extend the behavior of tests’ classes or methods, and these extensions can be reused by many tests. A JUnit 5 extension is connected to an occurrence of a particular event during the execution of a test. This kind of event is called an extension point. At the moment when such a point is reached in a test’s life cycle, the JUnit engine automatically calls the registered extension.
The available extension points are as follows:
- Conditional test execution — Controls whether a test should be run
- Life-cycle callback — Reacts to events in the life cycle of a test
- Parameter resolution — At runtime, resolves the parameter received by a test
- Exception handling — Defines the behavior of a test when it encounters certain types of exceptions
- Test instance post processing — Executed after an instance of a test is created
Note that the extensions are largely used inside frameworks and build tools. They can also be used for application programming, but not to the same extent. The creation and usage of extensions follow common principles; this chapter will present examples appropriate for regular application development.
Create your first Junit 5 Extension
We are going to illustrate all the possibilities of extensions that Junit 5 offers by a small and simple program that consists in saving elements in a database (in memory database)
1. Conditional test execution
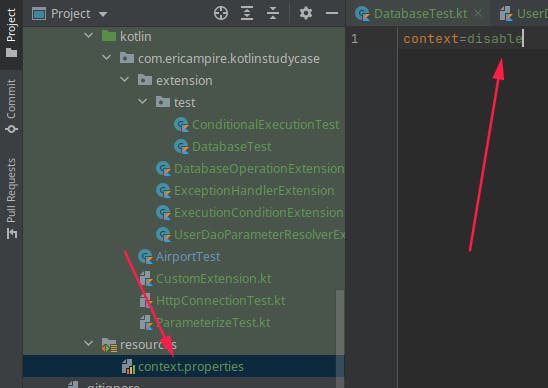
Sometimes we need the test to run only under certain conditions or context, to illustrate this we will create a context.properties file in which we will put information that represents a context, and according to this context we will set up an Extension that will disable or enable the execution of the test according to the context
To create a conditional execution extension, we just have to create a class that implements the ExecutionCondition interface and then implement the evaluateExecutionCondition method as shown in the following code snippet.
class ExecutionConditionExtension : ExecutionCondition {
    override fun evaluateExecutionCondition(context: ExtensionContext): ConditionEvaluationResult {
        val properties = Properties()
        try {
            properties.load(this::class.java.classLoader.getResourceAsStream("context.properties"))
            val executionContext = properties.getProperty("context")

            return if (executionContext.contentEquals("disable", true)) {
                ConditionEvaluationResult.disabled("Test is disable inside disable context")
            } else {
                ConditionEvaluationResult.enabled("Test enable on $executionContext context")
            }
        } catch (e: Exception) {
            throw RuntimeException(e)
        }
    }
}
As you can see, the following code reads the context property defined in the context.properties file and depending on the value of this property we return ConditionEvaluationResult.disabled("Message") to disable the execution of the test or ConditionEvaluationResult.enabled("Message") to enable the execution.
Well done, you have just created your first Junit 5 extension, to now define that a test can be executed according to the logic defined by this extension you just have to use the ExtendWith annotation by passing it the extension as shown in the following code, when the test will be launched, any test that uses this extension will be executed or disabled according to the context defined in the context.properties file
@ExtendWith(ExecutionConditionExtension::class)
class ConditionalExecutionTest {

    @Test
    fun testSomethingHere() {
        val expected = "some expectation"
        assertEquals(expected, "some expectation")
    }
}
2. Life-cycle callback
Let's say you want to test your database, as you already know, to run the query to the database, you need to establish the connection to the database, and then close the connection to the database right after running the tests,
This operation can be easily done with the BeforeAll or AfterAll annotation but it is to do this operation on several tests, it could become very quickly repetitive, to remedy this we will create an extension that will execute some operation for us according to the test life cycle, but this will set up the different around our database
For the sake of simplicity we will use JDBC and H2 as our database system, let's define components that will allow us to manage our database.
The Connection Manager
This class will allow us to manage the database version connection, i.e. establish the connection to the database server, and close the connection when we have no more requests to make.
object ConnectionManager {
    private lateinit var connection: Connection
    fun getConnection(): Connection {
        try {
            Class.forName("org.h2.Driver")
            connection = DriverManager.getConnection("jdbc:h2:mem:test;DB_CLOSE_DELAY=-1", "sa", "sa")
            return connection
        } catch (e: Exception) {
            throw RuntimeException(e)
        }
    }

    fun closeConnection() {
        if (this::connection.isInitialized) {
            try {
                connection.close()
            } catch (e: Exception) {
                throw RuntimeException(e)
            }
        }
    }
}
Table manager :
This class will allow us to manage the only table in the database, it has one method that creates the table if it doesn't exist and the other that deletes the table if it exists.
object TableManager {
    fun dropTable(connection: Connection) {
        val query = """DROP TABLE IF EXISTS USERS;"""
        executeStatement(connection, query)
    }

    fun createTable(connection: Connection) {
        val query = """CREATE TABLE IF NOT EXISTS USERS(ID VARCHAR(50), NAME VARCHAR(50));"""
        executeStatement(connection, query)
    }

    private fun executeStatement(connection: Connection, query: String) {
        try {
            val statement = connection.prepareStatement(query)
            statement.executeUpdate()
        } catch (e: Exception) {
            throw RuntimeException(e)
        }
    }
}
Data Access Object
To make requests, the UserDao class must implement this interface
interface Dao<T> {
    fun save(item: T)
    fun delete(item: T)
    fun findById(id: String): T?
}
User Data Access Object
This class implements the DAO defined before, this class will be used to make the request to our database, to work, this class needs the dependency to the Connection object that will allow us to execute SQL requests.
class UserDao(
    private val connection: Connection
) : Dao<User> {
    override fun save(item: User) {
        val query = "INSERT INTO USERS(ID, NAME) VALUES (?, ?)"
        try {
            connection.prepareStatement(query).apply {
                setString(1, item.id)
                setString(2, item.name)
                executeUpdate()
            }
        } catch (e: Exception) {
            throw RuntimeException(e)
        }
    }

    override fun findById(id: String): User? {
        val query = "SELECT * FROM USERS WHERE ID = ?"
        var user: User? = null
        try {
            val statement = connection.prepareStatement(query).apply {
                setString(1, id)
            }
            val result = statement.executeQuery()
            if(result.next()) {
                user = User(result.getString(1), result.getString(2))
            }
        } catch (e: Exception) {
            throw RuntimeException(e)
        }
        return user
    }

    override fun delete(item: User) {
        val query = "DELETE FROM USERS WHERE ID = ?"
        try {
            connection.prepareStatement(query).apply {
                setString(1, item.id)
                executeUpdate()
            }
        } catch (e: Exception) {
            throw RuntimeException(e)
        }
    }
}
Lifecycle extension
Now that all the elements allowing to interact with our database are available, it is now time to create an extension capable of doing certain actions according to the life cycle of our test.
Using this extension we won't have to configure the database every time we run a test related to the database, all we have to do is apply the extension to the corresponding test that will take care of the configuration and cleaning for us.
class DatabaseOperationExtension : BeforeAllCallback,
    AfterAllCallback, BeforeEachCallback, AfterEachCallback {

    private lateinit var savepoint: Savepoint
    private lateinit var connection: Connection

    override fun beforeAll(context: ExtensionContext?) {
        // Database init
        connection = ConnectionManager.getConnection()
        TableManager.dropTable(connection)
        TableManager.createTable(connection)
    }

    override fun afterAll(context: ExtensionContext?) {
        // Close connection
        ConnectionManager.closeConnection()
    }

    override fun beforeEach(context: ExtensionContext?) {
        connection.autoCommit = false
        savepoint = connection.setSavepoint("save-point")
    }

    override fun afterEach(context: ExtensionContext?) {
        connection.rollback(savepoint)
    }
}
As you have noticed so well, the class implements 4 interfaces BeforeAllCallback, AfterAllCallback, BeforeEachCallback, AfterEachCallback and each of its interfaces has a method which will be executed according to its name.
In the
beforeAllmethod which will be executed before all the tests, we establish the connection to the database and we create the table by deleting the one that existed before.In the
afterAllmethod which will be executed after all the tests, we close the connection to the database.In the
beforeEachmethod which will be executed before each test, we do an autoCommit then we save the state.In the
afterEachmethod which will be executed after each test, we do a rollback
As you would have probably understood, the previous methods correspond to the BeforeAll, AfterAll, BeforeEach, AfterEach annotations.
Applying the extension
Now that our extension is ready, we just have to use it as we did before.
Using this extension we won't have to configure the database every time we run a test related to the database, all we have to do is apply the extension to the corresponding test that will take care of the configuration and cleaning for us (closing the database connection etc...).
@ExtendWith(DatabaseOperationExtension::class)
class DatabaseTest(private val dao: UserDao) {

    @Test
    fun testDeleteUser() {
        val user = User(id = "5", name = "Jack Will")
        dao.save(user)
        dao.delete(user)
        assertNull(dao.findById("5"))
    }

    @Test
    fun testFindUser() {
        val user = User(id = "2", name = "Jack Will")
        dao.save(user)
        assertNotNull(dao.findById("2"))
    }

    @Test
    fun testSaveUser() {
        val user = User(id = "1", name = "Eric Ampire")
        dao.save(user)
        assertEquals("Eric Ampire", dao.findById("1")?.name)
    }
}
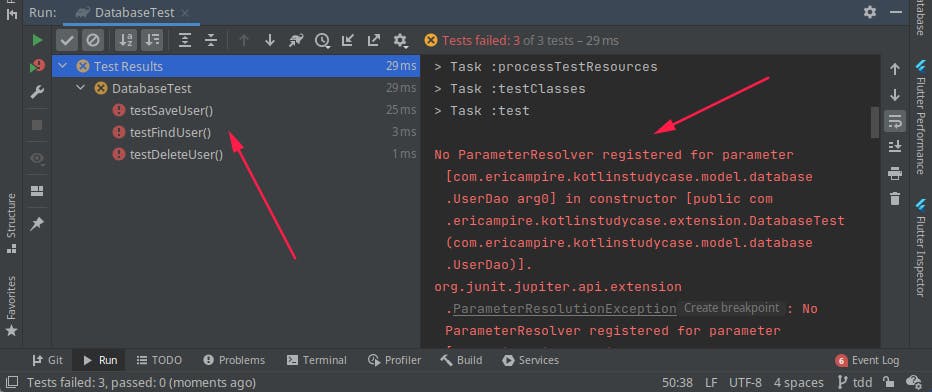
If you try to run the test you will notice that you will get a error which is due to the fact that the DatabaseTest class takes the UserDao as a parameter and Junit does not know where to look for it. We will fix that in the next section.
3. Parameter resolution
In the previous section, when we tried to run the test, we got an error due to the fact that the test class takes a parameter and Junit doesn't know how to create it, this error will allow us to introduce another kind of extension we can create with Junit 5
We are going to create an extension that will allow us to inject dependencies to our test class, to do this, let's create an extension named UserDaoParameterResolverExtensionthat implements the ParameterResolver interface provided by Junit 5.
class UserDaoParameterResolverExtension : ParameterResolver {
    override fun supportsParameter(
        parameterContext: ParameterContext,
        extensionContext: ExtensionContext
    ): Boolean {
        return parameterContext.parameter.type.equals(UserDao::class.java)
    }

    override fun resolveParameter(
        parameterContext: ParameterContext,
        extensionContext: ExtensionContext
    ): Any {
        return UserDao(ConnectionManager.getConnection())
    }
}
As you can see, the ParameterResolver has two methods, the first one allow us to define the type of the dependency that we want to create, and the second one allow us to the create the dependancy in our case it's a object of type UserDao
Now our extension is ready to use we have juste to use the ExtendWith annotation to applied this extension the a test, in order to applied several extension to the same class, you can use multiple ExtendWith extensions or you can use a single one with a array of extension
@ExtendWith(
    value = [
        DatabaseOperationExtension::class,
        UserDaoParameterResolverExtension::class,
    ]
)
class DatabaseTest(private val dao: UserDao) {
    //
}
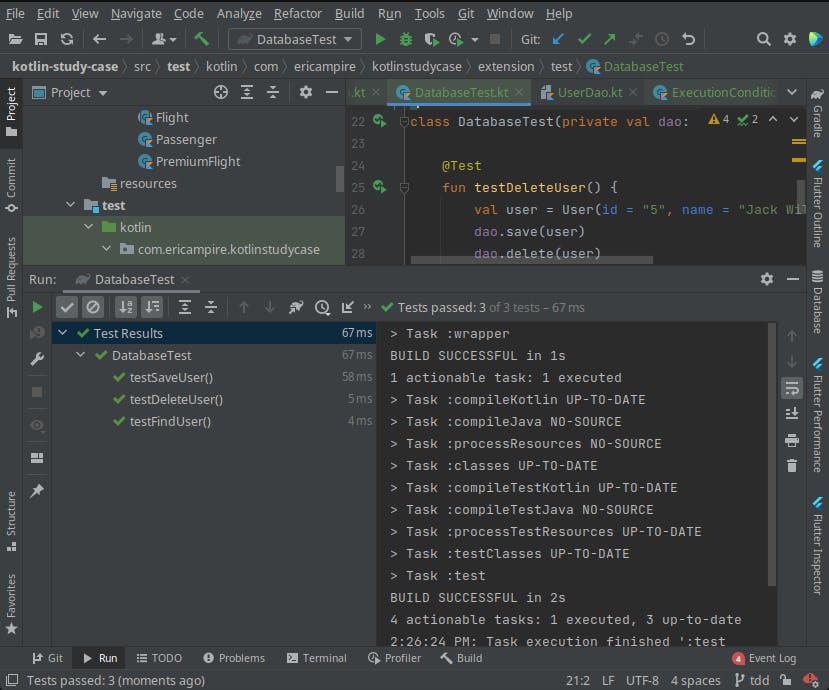
Now if you execute the test again everything works as expected.
4. Exception handling
Sometimes we need to have more explicit error messages when an exception is raised, in this section we will see how Junit 5 allows to catch an exception.
We are going to create an exception that will be raised instead of the SqlException when we try to add an element that has an id that already exists in the database.
class InsertOnceException(
    override val message: String,
    val user: User,
) : Exception(message)
As our exception is ready, we just have to use it in the save method of the UserDAO as shown in the following listing.
override fun save(item: User) {
        val query = "INSERT INTO USERS(ID, NAME) VALUES (?, ?)"
        val user = findById(item.id)
        if (user != null) {
            throw InsertOnceException("User with id : ${user.id} already exists !!", user)
        }
        // ...
    }
All we have to do is to create an extension able to catch this exception and to do the appropriate action , in our case, we will limit ourselves to display a log, and if the exception is not the exception that we have defined we have have just to rethrow the exception.
To do this, we will create an ExceptionHandlerExtension class which implements the TestExecutionExceptionHandler interface supplied with Junit 5, this interface forces us to implement the handleTestExecutionException method which has two parameters, the context and the exception which has just been triggered
class ExceptionHandlerExtension : TestExecutionExceptionHandler {
    private val logger = Logger.getLogger(this.javaClass.simpleName)

    override fun handleTestExecutionException(context: ExtensionContext?, throwable: Throwable) {
        if (throwable is InsertOnceException) {
            logger.severe("User exists : ${throwable.message}")
            return
        }
        throw throwable
    }
}
To use this extension we do as you have already learned before.
@ExtendWith(
    value = [
        DatabaseOperationExtension::class,
        UserDaoParameterResolverExtension::class,
        ExceptionHandlerExtension::class
    ]
)
class DatabaseTest(private val dao: UserDao) {
    //
}
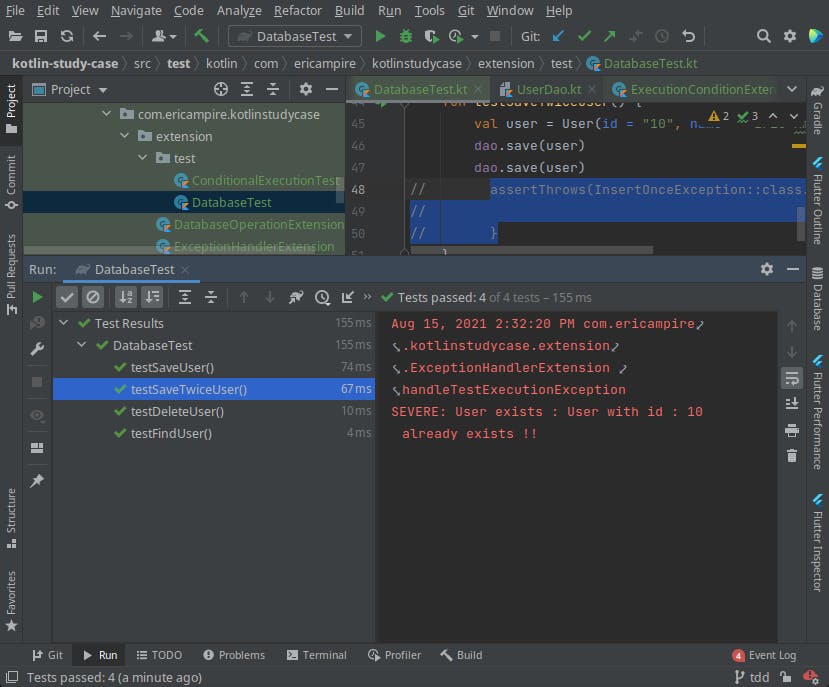
Now every time you try to add an element twice, you will see a message appear as shown in the following figure.
Conclusion
In this article, we have explored a very powerful feature brought to us by the Junit 5 framework, as you have quickly understood, Junit 5 allows us to extend the behavior of our tests in a very comfortable way while bringing us a modularity that we did not have before Junit 5, I hope this article will make you want to know more about Junit 5 to test your software with ease.