Background
I was recently made to work with Hackernews API using python (Django). There were several challenges faced by me during the project but I didn't give in. This post tends to document the application.
Latest update
Due to heroku's 10,000 data row limit for the free version of PostgreSQL database, and CloudMQ task's limit, you are likely to be faced with difficulties accessing some some items on the app's live version, if not all.
Changed the algorithm used in fetching the stories from the API. Instead of getting only the new (latest) stories, I now get the maximum or largest (latest) item ID, then walk backwards to fetch subsequent ones:
...

def get_max_item_id():
    max_item_id = requests.get(f"{BASE_API_URL}/maxitem.json")
    return max_item_id.json()

@shared_task
def store_latest_stories():
    max_item_id = get_max_item_id()
    for sid in reversed(range(max_item_id)):
        story_response = get_item(sid)
        ...
Also, the UI now allows only the item types available in the database for filtering. As soon as a new item type is fetched from the API, it will automatically be added to the filters.
Update
It is live on Heroku at newhackernews.herokuapp.com.
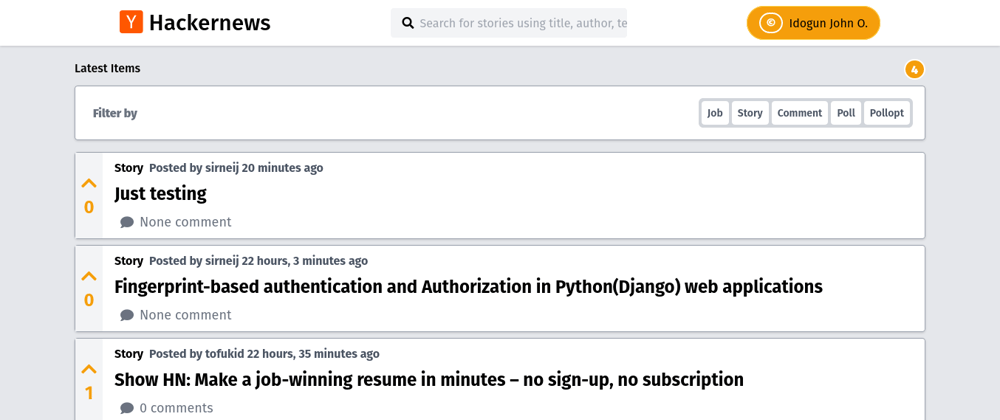
This application tends to make it easier to navigate Hackernews by utilizing its public API. It provides a better UX and interactivity courtesy its real-time searching and filtering capabilities, beautiful UI, and lazy-loading. Custom API was also incorporated for ease of accessibility, though POST requests require token-based authentication. Though it depends on hackernews API, all the available data are stored in a separate database and hosted on this platform thereby providing parallel storage and preventing a single source of failure. Hence more reliable. It looks like:


Data are being consumed every 5 minutes via a background task powered by Celery with redis as the broker. This presents performance gains as users do not need to wait for such actions' completions.
The application also provides an in-depth text searching with search term highlighting. Though it is not an enterprise grade full-text search functionality but it is close to that. PostgreSQL could have been used as database to facilitate full-text search but it was later dropped during development. It ended up being used in production.
Local setup
The application was built on a Linux machine (Pop!_OS 20.04 LTS) with Python 3.8.10, git, and Redis installed. Virtual environment was managed by pipenv though you can opt for other virtual environment tools (requirements.txt is included). Ensure your machine has all these tools to locally run this web application.
A typical setup to get the app up and running locally is stated below:
-
Get the program source files: You can clone it from GitHub via:
git clone https://github.com/Sirneij/Hackernews.git -
Change directory into the source code folder:
cd Hackernews -
Activate virtual environment (pipenv is used here but you can use virtualenv, venv, poetry, or conda):
pipenv shell -
Install the web application's dependencies (again, pipenv is used here but you are at liberty to use any other tool.
requirements.txtis included):
pipenv install -
Create migrations (migrations folder already populated. If you prefer to start afresh, delete all the files in the
migrationsfolder of each major app —accounts, andnews— except the__init__.pyfiles. Then, in your terminal, executepython manage.py makemigrations):
python manage.py migrate -
You can opt to create super user by executing:
python manage.py createsuperuserProvide the details requested by the prompts that follow.
-
Run the application. You will need a second terminal to start the Celery tasks. In one terminal, start the application:
python manage.py runserverYou can optionally provide a port as the default port is
8000. To provide a port, the command above becomes:
python manage.py runserver port_numberYou can now visit your browser and navigate to
http://localhost:8000/orhttp://localhost:port_number/as the case may be.In the second terminal, start the celery tasks by (ensure your virtual environment is activated):
celery -A hackernews worker -l info -B
About the Web application
The application was built using Django web framework, Tailwind CSS, SQLite database (PostgreSQL in production or on heroku) and Redis as a broker for celery. Lazy loading, real-time search and filtering were fascinated by jQuery ajax including infinite scroll capabilities. It has the following structure:
.
├── accounts
│   ├── admin.py
│   ├── apps.py
│   ├── __init__.py
│   ├── migrations
│   │   ├── 0001_initial.py
│   │   └── __init__.py
│   ├── models.py
│   ├── tests.py
│   └── views.py
├── api
│   ├── admin.py
│   ├── apps.py
│   ├── __init__.py
│   ├── migrations
│   │   └── __init__.py
│   ├── permissions.py
│   ├── serializers.py
│   ├── tests.py
│   ├── urls.py
│   └── views.py
├── celerybeat-schedule
├── db.sqlite3
├── detail.png
├── hackernews
│   ├── asgi.py
│   ├── celery.py
│   ├── __init__.py
│   ├── settings
│   │   ├── base.py
│   │   ├── development.py
│   │   ├── __init__.py
│   │   └── production.py
│   ├── urls.py
│   └── wsgi.py
├── home.png
├── manage.py
├── news
│   ├── admin.py
│   ├── apps.py
│   ├── __init__.py
│   ├── migrations
│   │   ├── 0001_initial.py
│   │   ├── 0002_alter_comment_story.py
│   │   └── __init__.py
│   ├── models.py
│   ├── tasks.py
│   ├── templatetags
│   │   ├── custom_tags.py
│   │   └── __init__.py
│   ├── tests.py
│   ├── urls.py
│   ├── utils.py
│   └── views.py
├── Pipfile
├── Pipfile.lock
├── Procfile
├── pyproject.toml
├── README.md
├── requirements.txt
├── runtime.txt
├── setup.cfg
├── static
│   ├── admin
│   │   ├── css
│   │   │   ├── autocomplete.css
│   │   │   ├── ...
│   │   ├── fonts
│   │   │   ├── LICENSE.txt
│   │   │   ├── ...
│   │   ├── img
│   │   │   ├── calendar-icons.svg
│   │   │   ├── ...
│   │   └── js
│   │       ├── actions.js
│   │       ├── ...
│   ├── css
│   │   ├── all.min.css
│   │   ├── style.css
│   │   └── tailwind.min.css
│   ├── images
│   │   └── useravatar.png
│   ├── js
│   │   ├── jquery.min.js
│   │   ├── mark.min.js
│   │   └── scripts.js
│   └── webfonts
│       ├── fa-brands-400.eot
│       ├── ...
└── templates
    ├── base.html
    ├── includes
    │   └── _header.html
    └── news
        ├── comments.html
        ├── commons
        │   └── _filters.html
        ├── detail.html
        ├── index.html
        └── stories.html

32 directories, 210 files
The major apps are news and accounts. While the former handles almost all the physical functionalities of the system, the latter only does user stuff. The api app exposes the data for consumption. It is documented using drf-yasg, a Swagger generation tool implemented without using the schema generation provided by Django Rest Framework. The api has a token-based authentication which requires that all POST requests must provide a token to be accepted, otherwise a not too interesting response:
{
    "detail": "Authentication credentials were not provided."
}
will be given. To get a token, you can use the following:
http POST http://127.0.0.1:8000/api/api-token-auth/ username=your_username password=your_password
Or in your terminal:
python manage.py drf_create_token user_name
If the user account is available, you should have a response like:
HTTP/1.1 200 OK
Allow: POST, OPTIONS
Content-Length: 52
Content-Type: application/json
Date: Fri, 24 Sep 2021 08:30:18 GMT
Referrer-Policy: same-origin
Server: WSGIServer/0.2 CPython/3.8.10
X-Content-Type-Options: nosniff
X-Frame-Options: DENY

{
    "token": "55868c9d71901f4bb09059eb0a669485511586f7"
}
or (for terminal):
Generated token 55868c9d71901f4bb09059eb0a669485511586f7 for user sirneij
You can then use the token for requests such as:
http POST http://localhost:8000/api/latest-stories/ 'Authorization: Token 55868c9d71901f4bb09059eb0a669485511586f7' title="Just testing" story_type="story" text="Just some text" dead=false story_url="http://localhost:8000/api/latest-stories/"
which should give you something like:
HTTP/1.1 201 Created
Allow: GET, POST, HEAD, OPTIONS
Content-Length: 399
Content-Type: application/json
Date: Fri, 24 Sep 2021 08:44:03 GMT
Location: http://localhost:8000/api/latest-stories/dd6fdcdd-da6f-45c8-a3bb-e883b5a16419/
Referrer-Policy: same-origin
Server: WSGIServer/0.2 CPython/3.8.10
Vary: Accept
X-Content-Type-Options: nosniff
X-Frame-Options: DENY

{
    "author": "sirneij",
    "created_by": "sirneij",
    "dead": false,
    "descendants": null,
    "id": "dd6fdcdd-da6f-45c8-a3bb-e883b5a16419",
    "score": 0,
    "slug": "just-testing",
    "story_type": "story",
    "story_url": "http://localhost:8000/api/latest-stories/",
    "text": "Just some text",
    "time": "2021-09-24T08:44:03.688895Z",
    "title": "Just testing",
    "url": "http://localhost:8000/api/latest-stories/dd6fdcdd-da6f-45c8-a3bb-e883b5a16419/"
}
If you need to make this request in a python application using the requests library, you can do something like:
import requests

url = 'http://localhost:8000/api/latest-stories/'
payload = {

    "title": "Title of the story",
    "story_type": "story",
    "text": "some text",
    "dead": true,
    "story_url": "http://example.com"

}
headers = {'Authorization': 'Token 55868c9d71901f4bb09059eb0a669485511586f7'}
r = requests.post(url, headers=headers, data=payload)
You can achieve same with JavaScript's fetch, or axios.
That is pretty much it!!!
Suggestions to make it better are welcome.
You can connect with or follow me on LinkedIn, and contact me for a job, something worthwhile or buying a coffee ☕


Top comments (4)
Nice project man
Thanks boss! I really appreciate...
Project not found on github
Sorry about that, it has been made private.