Playwright with Allure Reporter published on AWS S3 Bucket - full parallelization

What is the journey we are going to embark on to today?
- We will setup a Playwright framework with focusing on settings about full parallelization
- Install Allure-playwright as reporter and configure to preserve history and trends using AWS S3 buckets
- Configure AWS User to perform CLI commands in our github workflow
- Configure AWS S3 Bucket to be used for hosting our Allure reports
- Write a github actions workflow to run our tests, keep history and deploy to AWS
- Create an unique URL that will point to our report for easy access
OK. Let's do this !
Start with Playwright
npm init playwright@latestMove then to specific dependency for allure reporter, including the cli that will help us perform actions like generating a report.
npm install allure-playwright allure-commandlineInstall Java
https://www.java.com/en/download/help/download_options.html
Remember to restart in order to have JAVA_HOME in path . Otherwise you will get the following error: ERROR: JAVA_HOME is not set and no 'java' command could be found in your PATH.
Why do we need JAVA ?
Well once you run your tests, allure will generate a report and that report needs to be viewed on a http server. For local use we are going to need JAVA to spin up this server, for AWS we are going to setup the S3 bucket to have static website hosting enabled. So the answer is, just for local use.
I am not going to go thru all the details about how to install and configure Playwright. But if you want to learn or even enhance your knowledge about Playwright Renata Andrade can help you with these videos. And I will also not going to go thru how to use Allure. If you want to get more in depth knowledge about Playwright and Allure you can check out Kostiantyn Teltov well written article about Allure reports . But this is not our scope here. What we are doing here, is focus on details about parallelization and CI.
Now lets configure AWS
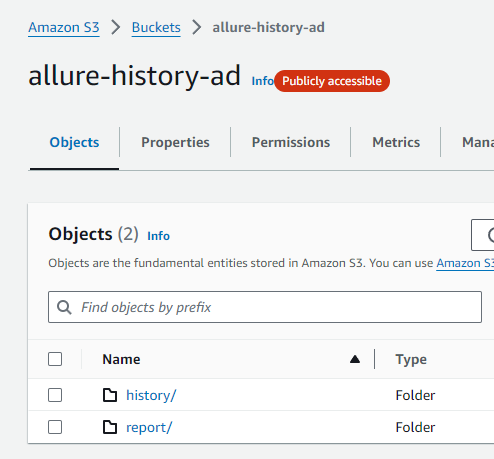
Create an S3 Bucket
Here are the details about the S3 Bucket
- General Purpose
- Bucket name - anything you want
- ACLs disabled
- I have block all public access disabled but here you can do as you see fit. Most common example would be maybe to setup the access to be done only by people who are inside your company VPN
- Bucket Versioning Disable
Now open the bucket you created. Go to Properties. And on the lower side of the page you will find Static Website Hosting. Enable that. Put in index document the value index.html . Our allure report will also be exactly like this index.html. Save the changes
At the same bucket go to Permissions and for bucket policies enter this:
{
    "Version": "2012-10-17",
    "Statement": [
        {
            "Effect": "Allow",
            "Principal": "*",
            "Action": "s3:GetObject",
            "Resource": "arn:aws:s3:::allure-history-ad/*"
        }
    ]
}
Notice above written allure-history-ad , this is the name of the bucket I've created. Replace for your policy with exactly the name of your bucket. Keep the rest the same.
Create an AWS user to be used in CI with aws cli
Go to AWS IAM. Users -> Create User. Give it a name. Attach policies directly. Search in permissions policies for IAMFullAccess . Check the box. Next. Create user
Of course, you know better what kind of policies your user should have, I am certain your local cloud developer can easily help you out what is the suitable permission to allocate to this user. Just let him/her know that you want to copy from and to a S3 bucket.
Once the user is created, go to that user and access security credentials. Create Access key. Use case -> Command line interface (CLI) . Put any description tag value you want. Create access key. Once you are at this step, you will have access to Access Key and Secret Access Key. Copy these two somewhere cause we will later use them.
Let's tweak our Playwright config to have full parallelization
import { defineConfig, devices } from '@playwright/test';

export default defineConfig({
  testDir: './tests',
  /* Run tests in files in parallel */
  fullyParallel: true,
  workers: 2,
  /* Reporter to use. You can even have multiple reporters if you want */
  reporter: 'allure-playwright',

  projects: [
    {
      name: 'myProject',
      use: { ...devices['Desktop Chrome'] },
    }
  ],
});
If you want more details about full parallelization you can check out my article about this, but for now, just understand that you need fullyParallel true and I would recommend at least 2 workers.
Have some random tests ready to see if it works. To check out if our allure reporter is working correctly before we move to CI part, run some tests.
npx playwright testOnce tests are done, you will have a folder called allure-results with some json files. They are not yet in readable form.
npx allure generateThis will generate our allure report in a folder called allure-report. And in order to view this on our local machine we do:
npx allure serveThis will automatically open a page in your default browser and show you the report. All good? Does it work?
Lets move onto Continuous integration part
We will first have a setup and run tests job
In .github/workflows create a yaml file that contains the below code
name: Allure-Playwright
on:
  workflow_dispatch:

jobs:

  setup-and-run-tests:
    # setup and run the tests in parallel machines, with each machine uploading its own results to artifacts
    # artifacts are shared among jobs and machines
    runs-on: ubuntu-latest
    strategy:
      fail-fast: false
      matrix:
        # shard values will be used to run playwright with sharding feature
        shardIndex: [1, 2, 3]
        shardTotal: [3]

    steps:
    - uses: actions/checkout@v4

    - uses: actions/setup-node@v4
      with:
        node-version: 20

    - name: Install dependencies
      run: npm ci

    - name: Install Playwright browsers
      run: npx playwright install chromium

    - name: Run Playwright tests
      run: npx playwright test --shard=${{ matrix.shardIndex }}/${{ matrix.shardTotal }}

    # Once playwright finishes it will create a folder called 'allure-results'
    - name: Upload results to Artifacts
      if: always()
      uses: actions/upload-artifact@v4
      with:
        name: allure-results-${{ matrix.shardIndex }} # name of the file you want to have once its uploaded
        path: allure-results # path on the drive to where the reports are, from where to upload the files.
        retention-days: 10
Lets break it down. You have a job called setup-and-run-tests, this will do the basics of getting a machine ready, install playwright, its browsers, and once the results are created it will upload them to artifacts.
However if you look at strategy, you notice some details. fail-fast: false is one of them. Setting fail-fast to false prevents GitHub from canceling all in-progress jobs if any matrix job fails. Default: true
Shard index you can setup depending on your number of tests. So if you want 4 machines for example, you can do index to be [1, 2, 3, 4] and total [4]. Do as per your need.
Now during upload we want to have each machine (shard index) have its own artifact name, to avoid overwriting files.
Moving on to the next job from our CI. Generate Report job
In the same yaml file, add the below code:
  generate-report:
    # Merge reports after playwright tests, even if some shards have failed
    if: always()
    needs: [setup-and-run-tests]
    runs-on: ubuntu-latest

    steps:

    - uses: actions/checkout@v4
    - uses: actions/setup-node@v4
      with:
        node-version: 20
    - name: Install dependencies
      run: npm ci

    - name: AWS cli setup
      uses: aws-actions/configure-aws-credentials@v4
      with:
        aws-access-key-id: ${{ secrets.AWS_ACCESS_KEY_ID }}
        aws-secret-access-key: ${{ secrets.AWS_SECRET_ACCESS_KEY }}
        aws-region: eu-north-1

    # We want a unique identifier to be used when we create subdirectories on our cloud for reports
    - name: Set a timestamp
      id: timestampid
      # this will store current time with UTC in outputs.timestamp (eg of value: 20231028_233147Z)
      run: echo "timestamp=$(date --utc +%Y%m%d_%H%M%SZ)" >> "$GITHUB_OUTPUT"

    - name: Download allure results from GitHub Actions Artifacts
      uses: actions/download-artifact@v4
      with:
        pattern: allure-results* # pattern for multiple files previously stored as artifacts
        merge-multiple: true
        path: merged-allure-results # name of the folder where ALL results will be extracted

    # If you put the current history inside allure-results, Allure can generate a report that will merge history files
    - name: Download current history files from S3
      run: aws s3 cp s3://allure-history-ad/history/ ./merged-allure-results/history --recursive

    - name: Generate Allure report
      run: npx allure generate ./merged-allure-results

    # Copy the history to the same S3 bucket to overwrite the previous history files with updated history
    - name: Backup the history with the latest data
      run: aws s3 cp ./allure-report/history s3://allure-history-ad/history/  --recursive

    - name: Deploy html report to S3
      run: aws s3 cp ./allure-report s3://allure-history-ad/report/${{ steps.timestampid.outputs.timestamp }}/ --recursive

    - name: Write URL in summary
      run: echo "### Test results - http://allure-history-ad.s3-website.eu-north-1.amazonaws.com/report/${{ steps.timestampid.outputs.timestamp }}/index.html" >> $GITHUB_STEP_SUMMARY
Its a big one. Let me explain. First we have to use the needs key, because we want this job to run only after all the tests from the previous job has finished.
Then we use aws-actions/configure-aws-credentials@v4 to setup our aws cli credentials. Remember I asked you to save access key id and secret key. You put them here. But you don't just write them here, you store them as secrets in github first, before you call them here.
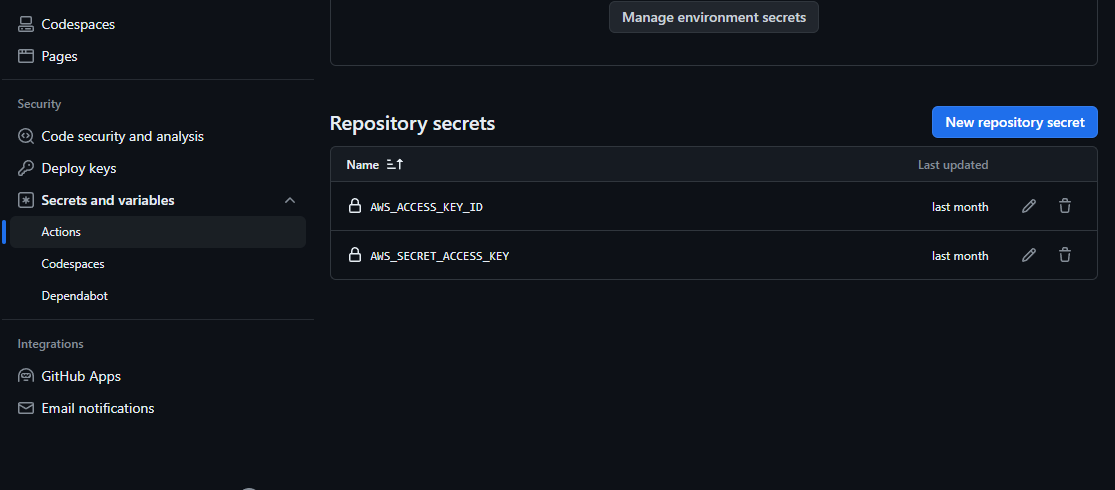
How do I store secrets in github ?
Go to your repository -> Settings -> Secrets and Variables -> Actions. Here create New repository secret. Fill at name: AWS_ACCESS_KEY_ID and set secret the Access Key from AWS. And do again a second time, fill name: AWS_SECRET_ACCESS_KEY and set secret the Secret Access Keyfrom AWS.
You should have something like this
Now , our yaml file, whenever will access the object called secrets it will have access to any key you have entered here, and it will return the value set, which is your secret. Example ${{ secrets.AWS_ACCESS_KEY_ID }}
Our workflow will then create a unique timestamp to be used later when we upload to AWS S3 bucket. Here is the part of the code that does this
    # We want a unique identifier to be used when we create subdirectories on our cloud for reports
    - name: Set a timestamp
      id: timestampid
      # this will store current time with UTC in outputs.timestamp (eg of value: 20231028_233147Z)
      run: echo "timestamp=$(date --utc +%Y%m%d_%H%M%SZ)" >> "$GITHUB_OUTPUT"
It will start downloading all the reports previously stored as artifacts. Notice the extra detail of pattern: allure-results*, the asterix at the end will instruct the download github actions to download all files related to allure results. Second important detail is merge-multiple: true, that will put all the files in the same folder.
    - name: Download allure results from GitHub Actions Artifacts
      uses: actions/download-artifact@v4
      with:
        pattern: allure-results* # pattern for multiple files previously stored as artifacts
        merge-multiple: true
        path: merged-allure-results # name of the folder where ALL results will be extracted
Pro tip: If you put allure-results files (all those unreadable json files, yes) from different runs, mix them all together in the same folder, and after that you do npx allure generate, this will generate one single report containing all the info about all the runs. This opens possibility for creative ways to mix various results from multiple suites or multiple projects and in the end have just one single report.Preserve and include history and trends for Allure Reporter
This is crucial. You must decide where in your S3 to keep history and trends, should be separate from your reports. The history and trends can be found in folder history and its always created after you do npx allure generate . Notice our workflow next step after download all artifacts, is that it wants to download history from AWS. This will do nothing for you, on the first run, but you will later understand that this will try to fetch the previously generated history and trends and mix it up with the actual results. This flow I just explained, is key in preserving our history and trends.
    # If you put the current history inside allure-results, Allure can generate a report that will merge history files
    - name: Download current history files from S3
      run: aws s3 cp s3://allure-history-ad/history/ ./merged-allure-results/history --recursive
OK. So, we now downloaded all json files results into one single folder called merged-allure-results , we have also downloaded our history from AWS, and put it in the same folder.
Now we ask allure to generate the report using run: npx allure generate ./merged-allure-results the folder with our "magical potions" inside.
Backup our history and trends for future runs
Since we have a generated report, we have to extract the history related files and back them up somewhere. As I previously said, decide on a separate place in your S3 bucket. Here is how I keep mine
    # Copy the history to the same S3 bucket to overwrite the previous history files with updated history
    - name: Backup the history with the latest data
      run: aws s3 cp ./allure-report/history s3://allure-history-ad/history/  --recursive
It is important to understand that a aws s3 cp copy command will by default overwrite any existing files on your bucket. In our situation its good, because we want the latest updated version of history.
Deploy to S3 Bucket and serve as static website
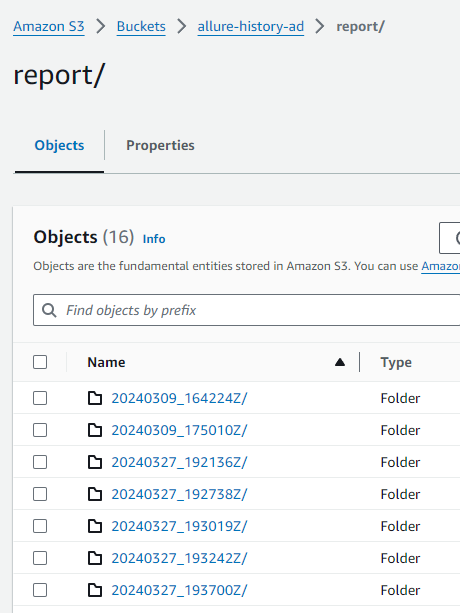
We are going to upload all the files onto S3 Bucket using run: aws s3 cp ./allure-report s3://allure-history-ad/report/${{ steps.timestampid.outputs.timestamp }}/ --recursive . Notice that we are using the time stamp id to differentiate our reports and avoid overwriting files. We can't use time stamp for the name of the file because we told S3 that our allure report will be rendered if we access index.html, so we put the unique id as a folder. Now all folders in S3 that will have a file called index.html will be transformed automatically as endpoints to a static website. And S3 will know to also render our screen shots, trace files and of course our history.
Folders will look something like this
Generate the URL where our reports can be easily accessed
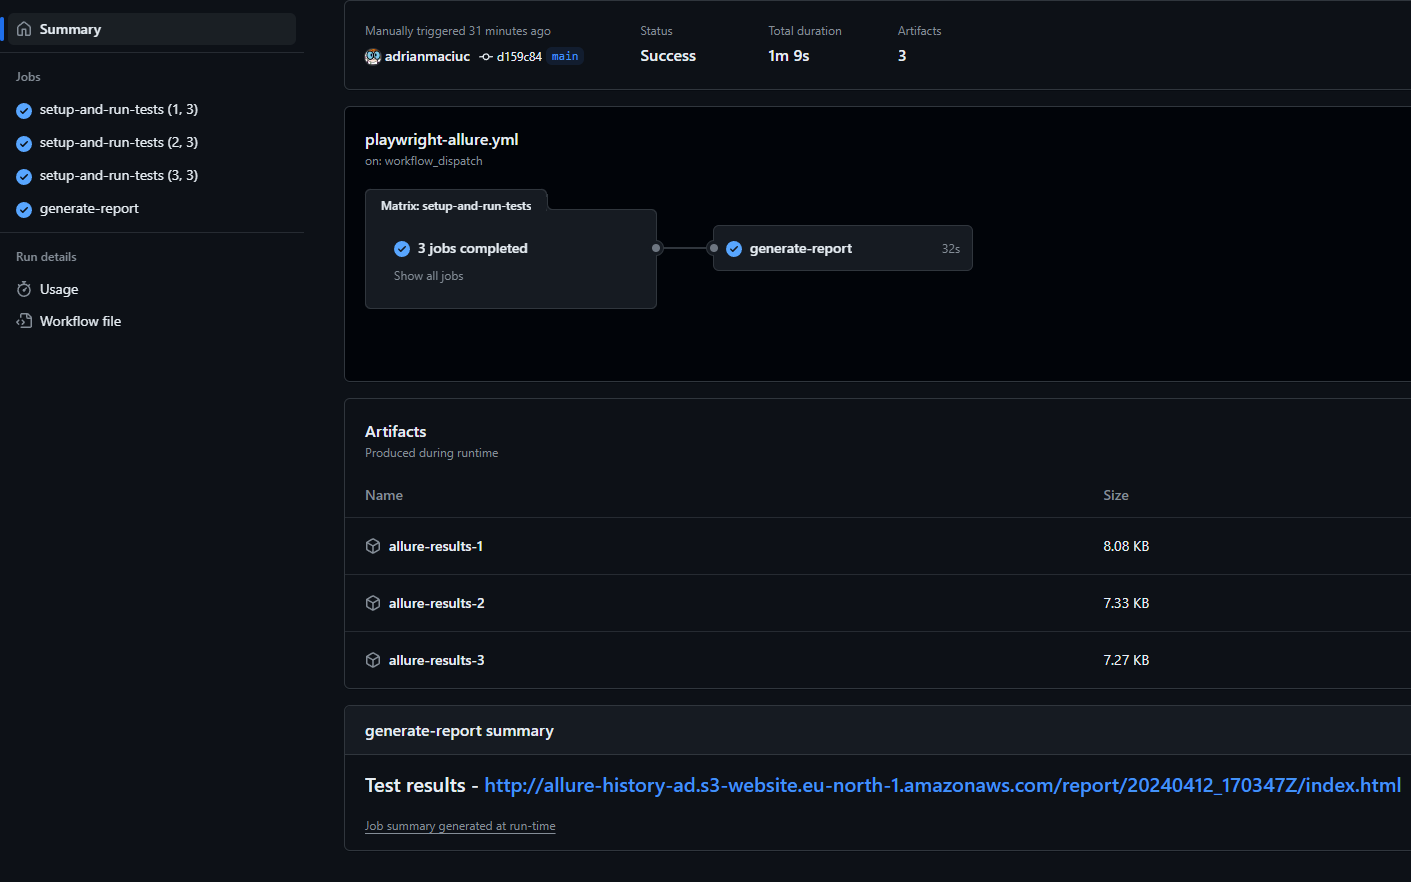
Our last lines in our workflow is a simple way to print out in Summary a link with the report
    - name: Write URL in summary
      run: echo "### Test results - http://allure-history-ad.s3-website.eu-north-1.amazonaws.com/report/${{ steps.timestampid.outputs.timestamp }}/index.html" >> $GITHUB_STEP_SUMMARY
The above line will print out in github and it will look like this
The info about how the URL is created you can see in your buckets properties
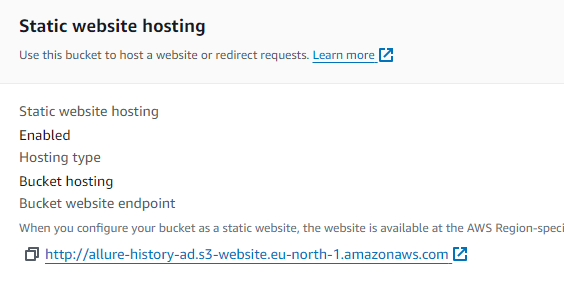
Now, just add to that, your folders, as endpoints, in my case I keep the reports in a folder called report then there is dynamically unique folder name (timestampid) and ends with index.html . And it will look like this http://allure-history-ad.s3-website.eu-north-1.amazonaws.com/report/20240412_170347Z/index.html
How do I delete old reports from S3 Bucket?
Of course you don't have unlimited storage in your S3 bucket and you want to delete old reports. In order to do that, go to your bucket, select Management -> Create lifecycle rule. Choose apply to all objects in the bucket. Acknowledge. Then based on your preferences you can move older files or just delete them. In my case I've chosen to permanently delete noncurrent versions of objects. Then I enter number of days, for example 30 (days).
And there you go, reports for automated tests, complete fully parallelized continuous integration workflow using github actions, AWS S3 Buckets, Allure and Playwright.
Here is the full yaml code for you
name: Allure-Playwright
on:
  workflow_dispatch:

jobs:

  setup-and-run-tests:
    # setup and run the tests in parallel machines, with each machine uploading its own results to artifacts
    # artifacts are shared among jobs and machines
    runs-on: ubuntu-latest
    strategy:
      fail-fast: false
      matrix:
        # shard values will be used to run playwright with sharding feature
        shardIndex: [1, 2, 3]
        shardTotal: [3]

    steps:
    - uses: actions/checkout@v4

    - uses: actions/setup-node@v4
      with:
        node-version: 20

    - name: Install dependencies
      run: npm ci

    - name: Install Playwright browsers
      run: npx playwright install chromium

    - name: Run Playwright tests
      run: npx playwright test --shard=${{ matrix.shardIndex }}/${{ matrix.shardTotal }}

    # Once playwright finishes it will create a folder called 'allure-results'
    - name: Upload results to Artifacts
      if: always()
      uses: actions/upload-artifact@v4
      with:
        name: allure-results-${{ matrix.shardIndex }} # name of the file you want to have once its uploaded
        path: allure-results # path on the drive to where the reports are, from where to upload the files.
        retention-days: 10

  generate-report:
    # Merge reports after playwright tests, even if some shards have failed
    if: always()
    needs: [setup-and-run-tests]
    runs-on: ubuntu-latest

    steps:

    - uses: actions/checkout@v4
    - uses: actions/setup-node@v4
      with:
        node-version: 20
    - name: Install dependencies
      run: npm ci

    - name: AWS cli setup
      uses: aws-actions/configure-aws-credentials@v4
      with:
        aws-access-key-id: ${{ secrets.AWS_ACCESS_KEY_ID }}
        aws-secret-access-key: ${{ secrets.AWS_SECRET_ACCESS_KEY }}
        aws-region: eu-north-1

    # We want a unique identifier to be used when we create subdirectories on our cloud for reports
    - name: Set a timestamp
      id: timestampid
      # this will store current time with UTC in outputs.timestamp (eg of value: 20231028_233147Z)
      run: echo "timestamp=$(date --utc +%Y%m%d_%H%M%SZ)" >> "$GITHUB_OUTPUT"

    - name: Download allure results from GitHub Actions Artifacts
      uses: actions/download-artifact@v4
      with:
        pattern: allure-results* # pattern for multiple files previously stored as artifacts
        merge-multiple: true
        path: merged-allure-results # name of the folder where ALL results will be extracted

    # If you put the current history inside allure-results, Allure can generate a report that will merge history files
    - name: Download current history files from S3
      run: aws s3 cp s3://allure-history-ad/history/ ./merged-allure-results/history --recursive

    - name: Generate Allure report
      run: npx allure generate ./merged-allure-results

    # Copy the history to the same S3 bucket to overwrite the previous history files with updated history
    - name: Backup the history with the latest data
      run: aws s3 cp ./allure-report/history s3://allure-history-ad/history/  --recursive

    - name: Deploy html report to S3
      run: aws s3 cp ./allure-report s3://allure-history-ad/report/${{ steps.timestampid.outputs.timestamp }}/ --recursive

    - name: Write URL in summary
      run: echo "### Test results - http://allure-history-ad.s3-website.eu-north-1.amazonaws.com/report/${{ steps.timestampid.outputs.timestamp }}/index.html" >> $GITHUB_STEP_SUMMARY
Hit the clap button if you found this useful. Or even buy me a coffee if you want to motivate me even more.


Comments ()