In this post I’ll be showing you how to use app actions in your .NET MAUI app. App actions are those shortcuts that pop up when you long press on your app’s icon. You can use them if you want to provide shortcuts for your user to easily navigate into a specific part of your app. App actions are accessible through the .NET MAUI Essentials, so you don’t need to bring in any extra packages.
Android setup
First we need to set up some things in our MainActivity class. In .NET MAUI, this class is located under Platforms -> Android.
Add the following intent filter to your class, right above the Activity attribute:
[IntentFilter(new[] { Platform.Intent.ActionAppAction }, Categories = new[] { Android.Content.Intent.CategoryDefault })]You also need to add this logic to handle the actions:
protected override void OnResume()
{
    base.OnResume();

    Platform.OnResume(this);
}

protected override void OnNewIntent(Android.Content.Intent intent)
{
    base.OnNewIntent(intent);

    Platform.OnNewIntent(intent);
}
Your MainActivity should look like this:
iOS setup
For iOS we also need to set some things up in our AppDelegate class. This is located under Platforms -> iOS.
Add the following logic under the CreateMauiApp-method:
public override void PerformActionForShortcutItem(UIApplication application, UIApplicationShortcutItem shortcutItem, UIOperationHandler completionHandler)
    => Platform.PerformActionForShortcutItem(application, shortcutItem, completionHandler);
Your AppDelegate should look like this:
Adding actions
You can add your app actions using the MauiAppBuilder. This is already used in your MauiProgram class and you can extend it by using the ConfigureEssentials-method. In the following example I have added three actions:
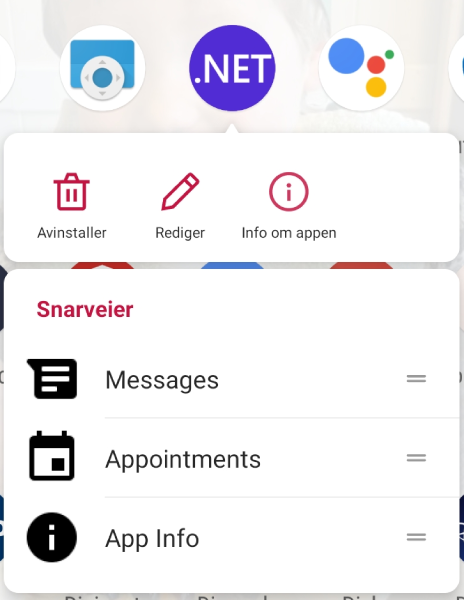
The first action has an id of id1, a display title of “Messages” and uses the image messages.png as icon. This image is retrieved from Resources -> Images in my project.
Here’s how it would look on Android:
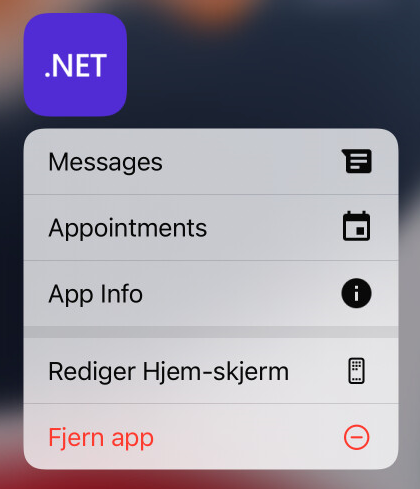
And here’s how it would look on iOS:
Handling actions
Now onto the actual handling of the actions. Here you could f.ex. navigate the user into a specific part of the app or maybe pre-fill some input for common actions. In this example we’ll be navigating to a modal page with the title of the action as a parameter.
First we need to register for the OnAppAction event. We’ll do this in the App.xaml.cs file. Right under InitializeComponent(), we’ll add this:
Microsoft.Maui.Essentials.AppActions.OnAppAction += AppActions_OnAppAction;The AppActions_OnAppAction will look like this:
private void AppActions_OnAppAction(object sender, AppActionEventArgs e)
    {
        // Don't handle events fired for old application instances
        // and cleanup the old instance's event handler
        if (Application.Current != this && Application.Current is App app)
        {
            Microsoft.Maui.Essentials.AppActions.OnAppAction -= app.AppActions_OnAppAction;
            return;
        }
        MainThread.BeginInvokeOnMainThread(async () =>
        {
            var navigation = Current.MainPage.Navigation;
            await navigation.PushModalAsync(new ModalPage(e.AppAction.Title));
        });
    }
We’ll get the title of the app action through e.AppAction.Title and we’ll pass that as a parameter to a content page we created called ModalPage. We use navigation to push the page modally. Here’s how the entire App.xaml.cs would look like:
If we wanted, we could have used e.AppAction.Id and toggled which area of the app we wanted to navigate to based on this.
And finally, here’s a video of the app actions in… action!
And there you have it! I have also provided this example on my GitHub, so feel free to check that out.
Thank you for this tutorial. It works without any problems and since I already hat that feature on my backlog, your timing was really perfect. 😀
Glad it could be of help!
One question though: Imagine you have a .NET MAUI Shell App that shows a list of items and if you tap on one, it navigates to another view showing the items’ details. Since the details are editable, the view is also used as an Add New Item view.
Now when you add an AppAction that lets the user navigate directly to the Add New Item view, it still has a back-button. However, it won’t work as expected now that you didn’t originally come from the main view.
What would be the best solution in this case?
I haven’t really used Shell so I’m not too sure what would be the best way to handle this. Maybe you could check the navigation stack before saving the item, maybe that could give you an indication of the entry point of the app? (from the App Action or normal route). Or maybe you could “manually” populate the navigation stack when entering from the App Action so that the back button knows where to go back to.
Nice post! But I’m getting a ‘The type or namespace name ‘ModalPage’ could not be found’ error. How do I navigate to a page in a Blazor app? (Normally I would inject a NavigationManager instance and use navManager.NavigateTo(«/page»);
Mr. Andreas, excellent tutorial. Is there anyway you can help me with the base.OnCreate(savedInstanceState) line in the OnCreate method of the MainActivity class for MAUI (for Android app).
protected override void OnCreate(Bundle savedInstanceState)
{
var url = Intent.GetStringExtra(Intent.ExtraText);
base.OnCreate(savedInstanceState);
}
It always errors out because savedInstanceState is always null. I am trying to do IntentFilter for a SEND action of text/plain. So when another app sends plain text, I would like to receive the text from the other app into my app. But while receiving the text, savedInstanceState is null and crashes every time.
public App()
{
InitializeComponent();
MainPage = new AppShell();
AppActions.SetAsync(
new AppAction(“NotePage”, “Add Note”, icon: “add_note”),
new AppAction(“AllNotesPage”, “List Of Notes”, icon: “notes_list”),
new AppAction(“AboutPage”, “App Information”, icon: “app_info”)
);
AppActions.OnAppAction += AppActions_OnAppAction;
}
private void AppActions_OnAppAction(object sender, AppActionEventArgs e)
{
// Don’t handle events fired for old application instances
// and cleanup the old instance’s event handler
if (Current != this && Current is App app)
{
AppActions.OnAppAction -= app.AppActions_OnAppAction;
return;
}
MainThread.BeginInvokeOnMainThread(async () =>
{
if(e.AppAction.Id == “NotePage”) await Current.MainPage.Navigation.PushModalAsync(new NotePage());
else if(e.AppAction.Id == “AllNotesPage”) await Current.MainPage.Navigation.PushModalAsync(new AllNotesPage());
else if(e.AppAction.Id == “AboutPage”) await Current.MainPage.Navigation.PushModalAsync(new AboutPage());
});
}
Buttons are not opening the page that I want what is the problem I dont understand
Maybe your project is using the Shell navigation? I’m not sure if my approach in this post would work with that. Maybe you could try navigation through Shell with the Shell.PushAsync or whatever the methods are. Do you get any stack trace or error telling you why it won’t open?
Thank you Andreas for short and sweet and accurate post. Just because you had a question on using the Shell navigation, here is my contribution:
In place of `PushModalAsync(…)`, I used `await Shell.Current.GoToAsync($”//Master?id={e.AppAction.Id}”);` and the application continued to work. BTW, even PushModalAsync() worked for me. So both StackNavigation and ShellNavigation can be done.