
13 Jan 2022
It feels like Swift is pretty ubiquitous across the Apple ecosystem now, but there’s a lot of Objective-C out there. The larger and older the app, the more likely that there’s still a bunch of Objective-C powering various bits behind the scenes.
At my last job I worked on a fairly large iOS and tvOS app for nearly 4 years, during which time we transitioned almost the whole app to Swift. At least the first year was spent learning how not to do a language transition, during the second and third we figured things out and really hit our stride, and by the fourth we had something resembling a formalised approach.
I’ve realised that there’s a bunch of teams out there still maintaining Objective-C projects, and struggling to make much headway on a Swift transition. So in this post I’m going to tell you what I learned along the way.
Ok, just how large was this app?
It’s all relative, but if you work on an app with 2 or 3 developers then it probably looks monstrous. If you work at Netflix then it probably looks pretty small!
It was large enough that a full rewrite from the ground up in Swift would take years and was out of the question.
The naive approach is to simply decide to write all new code in Swift. Surely, then, over time there will be more Swift code and less Objective-C.
This is probably most teams’ initial idea, and it was ours too. I can tell you that it didn’t move the needle very much.
It was difficult to gracefully integrate new Swift code into existing Objective-C classes and systems. A year down the line we still had a mostly Objective-C code base. Almost anything of any real importance was still in Objective-C, and all we’d really built was some surface level Swift on top of an Objective-C core.
Swift and Objective-C are interoperable, right?
Swift and Objective-C are interoperable in the same way that you can plug a VHS player into your 4K TV. It’s possible, but if that’s your plan then you really don’t need a 4K TV anyway.
Everything that’s great about Swift has to be sacrificed for Objective-C interoperability. Value types, generics, enums with associated values, optionals.
If you have a whole bunch of Objective-C and you write a tiny bit of Swift in the middle, then that Swift ends up being crappy Swift. Instead of using value types for your model objects, you end up with model classes that inherit from NSObject, all your enums use Int as a raw value, and everything is optional. (Urgh!)
We’ll call this code ‘Objective-C compromised Swift’.
It feels good that you’re writing Swift, but remember our goal is to go from A to B, where A is a fully Objective-C codebase, and B is a fully Swift one.
Once we remove all of our Objective-C code we’ll be at the end goal, right?
Nope, we’ll be at some awkward point between A and B. Yes, theoretically the project will be in Swift, but once the Objective-C is removed none of the compromises will make sense anymore. All of our model objects will be classes for no reason, and we’ll have to do a second refactoring pass to get to our fully Swift vision.

It took us a while to realise that this is what we were creating. We would end up sort of ‘halfway’ to the goal of having a Swift codebase. The Swift code would be horrible to work with, and the team would be suggesting yet another refactoring effort to rewrite things in a nicer way (management absolutely wouldn’t approve of this!).
The goal is that the Swift that we write needs to idiomatic Swift, following patterns that make sense in Swift. But how to we do that, if our new Swift lives alongside our existing Objective-C?
The key is to not tightly intermingle the two languages. What we need is separation between them. If system X is written in Objective-C and system Y is written in Swift, then only the api for system Y needs to be compatible with Objective-C. The innards of that system can use all the Swift goodness that we’re after.
This is great in theory, but we also don’t want to completely rewrite whole subsystems of our application in Swift in one go. We want a gradual approach that moves us to closer to having a full Swift codebase over time.
The approach that we developed was what we called ‘Swift islands’.
Our codebase would end up with three types of code.
An island looks like this:
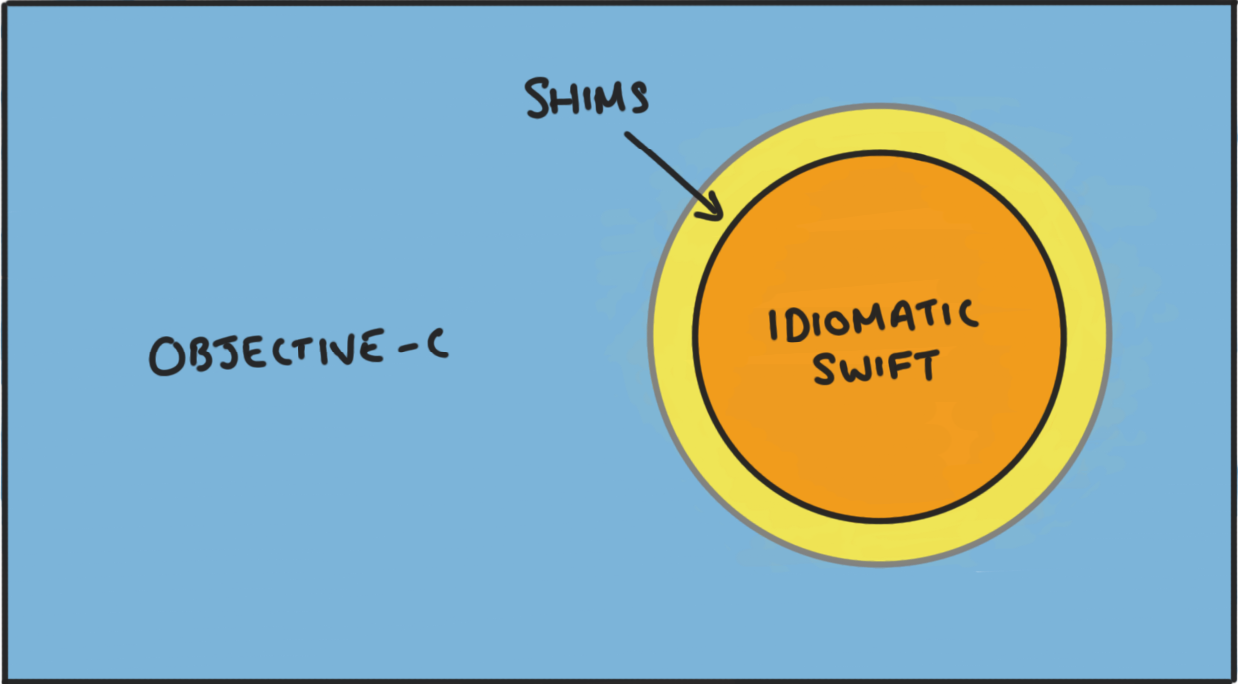
We can start anywhere that makes sense. The key is that we start with a small Swift ‘island’. It can be just be one Swift class. We write nice Swifty code that we can be proud of, and then we provide shims that our Objective-C code uses to interface with it.
When we come to write some new Swift code that lives in the same area, we interface with the Swift apis directly, not via the shims. Every time we rewrite some adjacent code in Swift, the island will expand a bit. This new code will provide more shims, but as we rewrite, the island expands and we can start removing the shims from inside of the island once there are no longer any Objective-C calls to them.
There’s no need to limit ourselves to a single island, either. As we start writing Swift in new areas of the app we create new little islands of Swift, and these will grow and merge together.
The feeling of deleting a shim is great. You’re left with idiomatic Swift that the team can be proud of and that you can maintain into the future.
Let’s look at some shimming strategies. There’s a variety of ways to write a shim, but these are the ones that I’ve got the most mileage from.
The important thing to remember is that shims are temporary. This means they can be a bit ugly. Remember, the thing that we’re optimising for is what the code will be like once the shim is removed, not the experience of using the shim.
The simplest way to add a shim is to write a extension on your class that provides an Objective-C compatible api.
@objc class NotificationScheduler: NSObject {
  enum NotificationTime {
    case now
    case scheduled(date: Date)
  }

  func sendNotification(time: NotificationTime, text: String) {
    ...
  }
}

/// Objective-C Shim
extension NotificationScheduler {
  @objc objc_sendNotificationNow(text: String) {
    sendNotification(.now, text: text)
  }

  @objc objc_sendNotificationAtDate(date: Date, text: String) {
    sendNotification(.scheduled(date: date), text: text)
  }
}
NotificationScheduler has the Swift api that we want, but the enum with associated values for NotificationTime prevents it from being callable from Objective-C. Instead, we provided an additional api for Objective-C using a shim extension.
The caveat with this approach is that we still had to make the class visible to Objective-C, so it required the @objc attribute and needed to inherit from NSObject. A small concession, but preferable to a fully Objective-C compatible api.
Also I like to prefix the shim methods with objc_. This makes the shims stand out, and prevents anyone accidentally calling them from Swift code. Remember, we’ll delete them, so it’s ok for them to be ugly.
Value types are pretty easy to deal with, we simply wrap them up, like this:
struct User {
  var name: String
  var email: String
}

@objc class User_ObjC: NSObject {
  let user: User
  init(user: User) {
    self.user = user
  }

  @objc var name: String {
    user.name
  }

  @objc var email: String {
    user.email
  }
}
We use User inside of our Swift island, and we wrap it in User_ObjC when it travels outside of the island through a shim, and unwrap User_ObjC to get back a User if it travels into our Swift island.
We can provide shims that facilitate all of this for us:
@objc class UserManager: NSObject {
  func getCurrentUser() -> User { ... }
  func updateUser(user: User) { ... }
}

extension UserManager {
  @objc func objc_getCurrentUser() {
    User_ObjC(user: getCurrentUser())
  }
  @objc func objc_updateUser(user: User_ObjC) {
    updateUser(user: user.user)
  }
}
Some Swift concepts are harder to convert to Objective-C than others. Take this model for a train status:
enum TrainStatus {
  case onTime
  case delayed(minutes: Int)
  case cancelled
}
We might have a table view in Objective-C that lists incoming trains and highlights them red if they’re either cancelled or more than 15 minutes late.
If you have many places where you use this type from Objective-C then you might write a fancy shim.
Or you can cheat:
@objc TrainStatus_ObjC: NSObject {
  var status: TrainStatus
  init(status: TrainStatus) {
    self.status = status
  }

  @objc isCancelledOrMoreThan15MinutesLate: Bool {
    switch status {
      case .onTime: return false
      case .delayed(let mins): return mins > 15
      case .cancelled: return true
    }
  }
}
You might balk at this. This isn’t very good design. We added a computed variable on this object that’s weirdly specific for this one use case, but remember, it’s for a shim! Shims are temporary, and we want them to be quick and easy to produce, and to leave no lasting negative effects on our application design once removed.
I’ve created a bunch of shims just like this and I have no regrets because I’ve since deleted them.
How much investment you make in the shim should be guided by how long you think it will last, and how many use cases you have for it. A long lasting shim should probably provide a reasonable api. A shim that only supports one call site can be pretty naive.
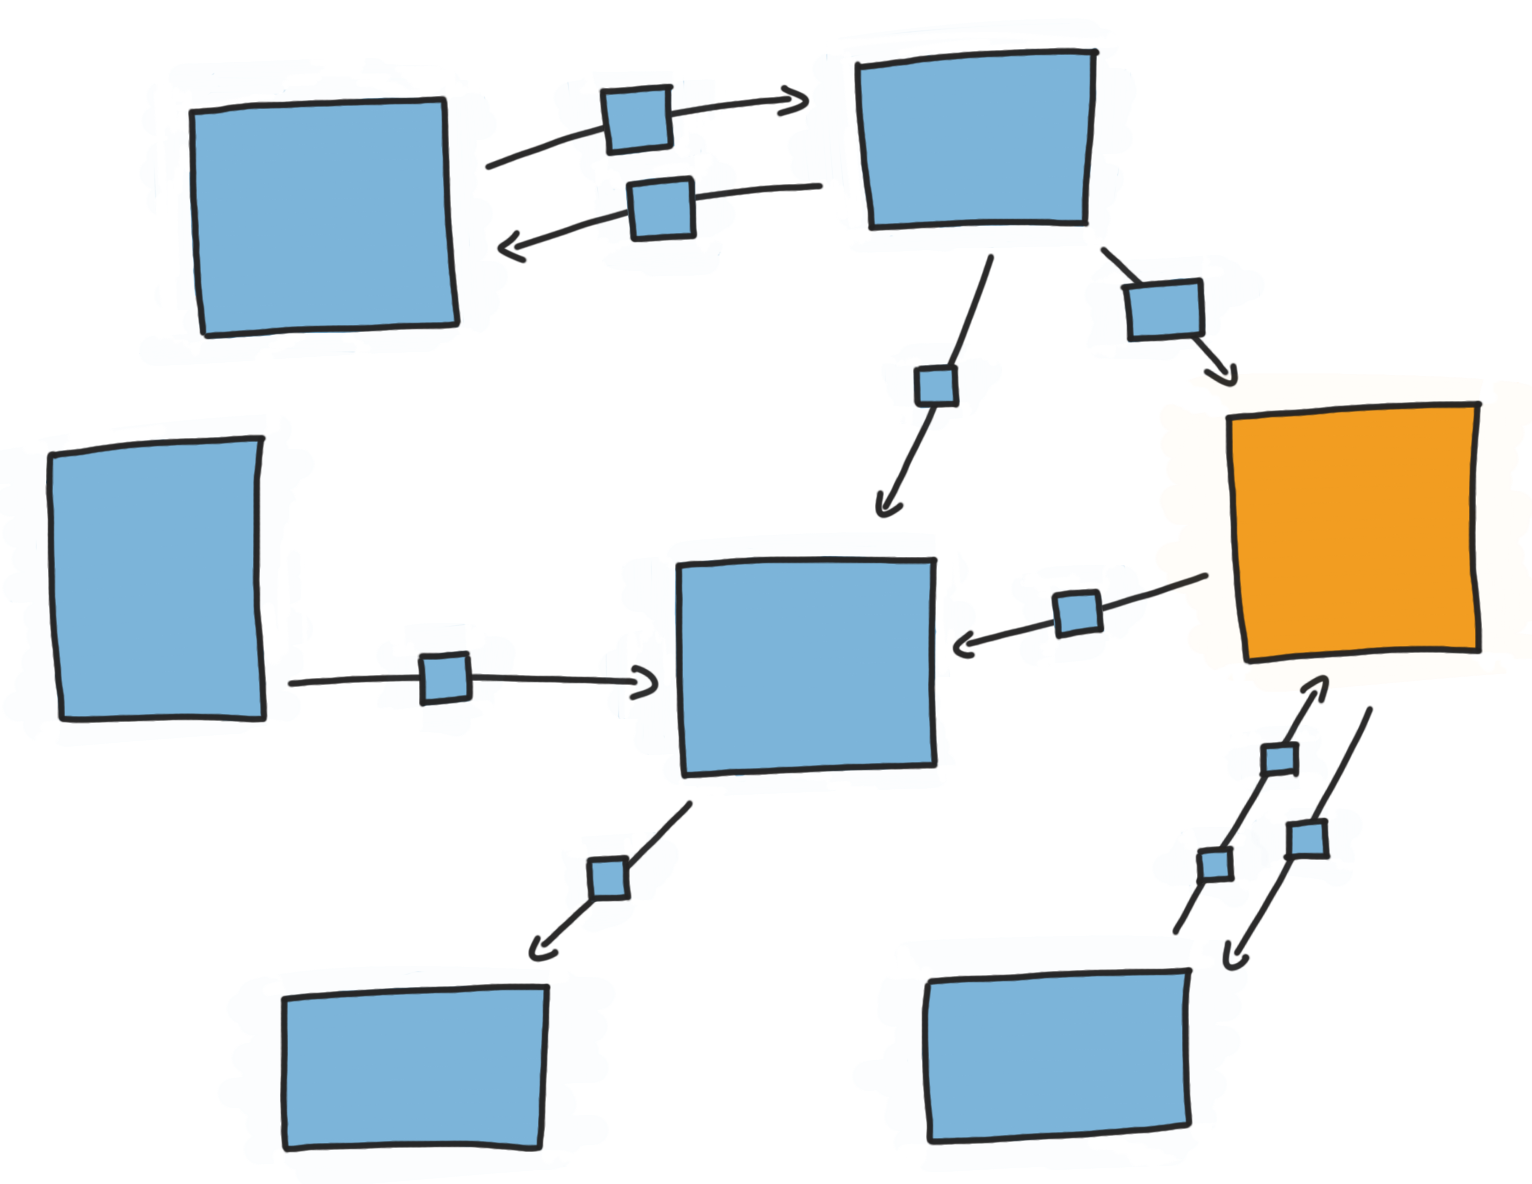
One thing that became evident to me over time was that when you have a collection of objects that work together, where most are Swift but some are Objective-C, you get a sort of ‘lowest common denominator’ effect, where even just a few Objective-C types pollute the design of the whole system. The reason is that these objects want to pass and receive Objective-C friendly types, and force everything around them into an Objective-C friendly style to work with them.
I’m going to call this part of the code the ‘messaging space’.
We can sort of visualise the objects in our application as little self contained boxes. We can then imagine connections between them, and imagine them sending little messages to each other. The space that the boxes sit in is the messaging space.
The messaging space also has a sort of language to it. A predominantly Objective-C messaging space might probably has messages flowing through it containing NSValues and NSNumbers, and model classes inheriting from NSObject.
Being a Swift class in this world is tough. Nothing feels like it really fits nicely with the design of Swift. For a new Swift object to participate here it also needs to pass and receive Objective-C objects.
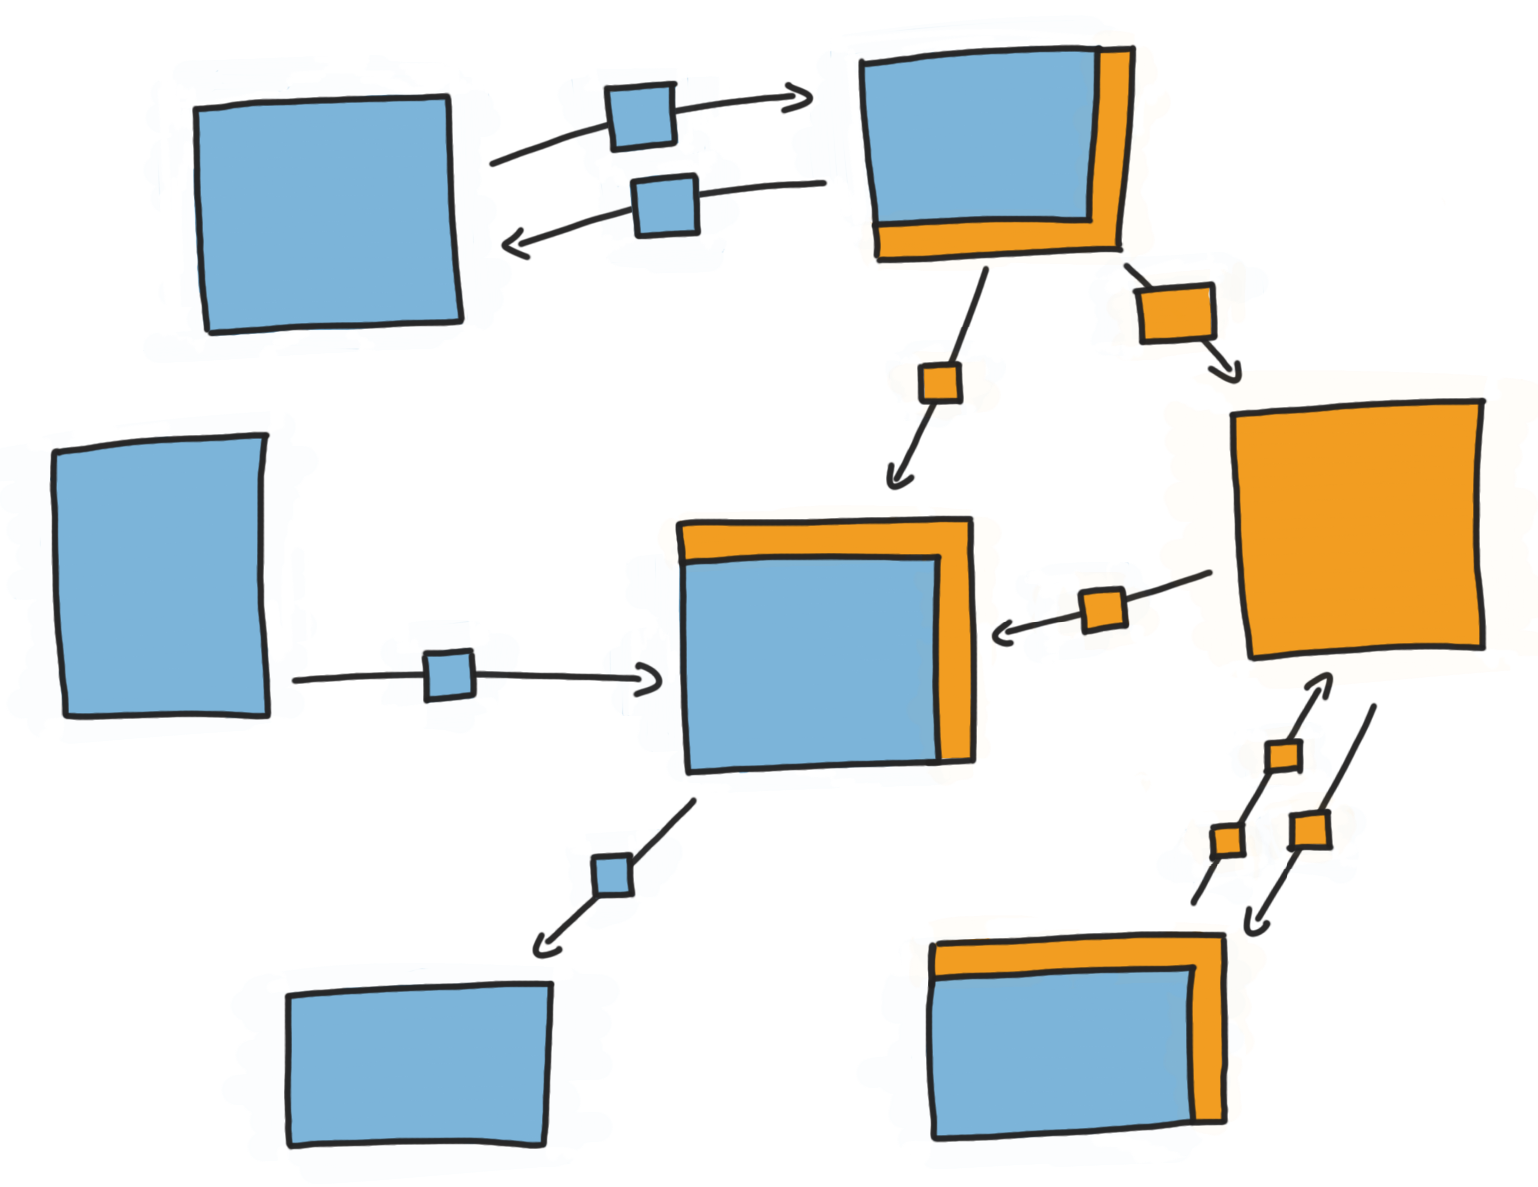
What we need to do is change the language of the messaging space to be Swift friendly, but without rewriting all of our Objective-C objects. We can do this by creating a Swift wrapper around our Objective-C classes and presenting a Swift friendly api.
Once these shims are in place our new Swift object is much happier, and probably contains much better Swift code.
For example, if we have a food order service declared in Objective-C, the api might import to Swift like this:
class FoodOrderService: NSObject {
  func order(food: Food, completion: (Receipt?, Error?) -> Void)
}
This wouldn’t be an unusual api in Objective-C, but this probably isn’t the design that we’d choose for Swift. The optional Receipt? and Error? completion isn’t very idiomatic, and we’d rather user a Result type.
Let’s wrap our FoodOrderService in a Swift wrapper, providing a nice Swift api. Here’s how I would go about it:
FoodOrderService to FoodOrderService_ObjC.FoodOrderService.FoodOrderService will internally hold an instance of FoodOrderService_ObjC, passing on any calls to the legacy service.FoodOrderService translate any calls into a Swift friendly API, and can provide translations for model objects such as Food and Receipt too, into value types.Here’s how it might look:
class FoodOrderService: NSObject {
  private let wrappedService = FoodOrderService_ObjC()

  func order(food: Food, completion: (Result<Receipt, Error>) -> Void) {
    wrappedService.order(food: Food_ObjC(food)) { receipt: Receipt_ObjC, error in
      if let error = error {
        completion(.failure(error))
      } else if let receipt = receipt {
        completion(.success(receipt.wrappedReciept))
      } else {
        completion(.failure(“Unexpected: Receipt and error are both nil”))
      }
    }
  }
}
With just a little bit of translation we’re able to provide a sensible Swift api.
Result<Receipt, Error> rather than (Receipt?, Error?).Receipt? and Error? are nil in the wrapper, so our call sites don’t have to deal with it.Food model with a struct and made a simple refactoring to the old system to reference Food_ObjC instead, and handle conversions in the wrapper.Receipt, unwrapping the value as it comes out of the old system.And if we need to still need to provide an Objective-C compatible interface for now, then we can write shims for this wrapper as we did for our ‘real’ Swift types.
It may seem like overkill to have an Objective-C shim for a Swift wrapper around an Objective-C type, but remember this is all a means to an end. If we’re making good progress on our language transition then we’re deleting shims as fast as we’re creating them.
Once the ‘messaging space’ for a cluster of objects is Swift friendly, then all of the interaction between them will be using ‘Swift’ apis. If some of the objects are just wrapped Objective-C types, the rest of the system is oblivious to this, and it will feel like a Swift codebase. You can choose any convenient time in the future to refactor the Objective-C insides of these objects, but these no pressure to do it any time soon.
Ok, so here’s my list of approaches:
Moving a codebase of any reasonable size from Objective-C to Swift is a harder challenge than it appears on the surface.
You still need to be prepared that it does require some level of dedicated effort. It’s possible to use the shimming approach for new code that gets written during the course for feature development and make some really good headway. At the end of the day though, no one’s going to rewrite the app delegate in Swift though unless it’s given some dedicated time.
With the shimming approach we were able to move our application from around 15% Swift to around 80% over a couple of years. Some of that required some dictated effort, but much was delivered during the course of feature development. All of the message passing between objects had transitioned to Swift, and the remaining 20% Objective-C was code that has living behind a shim that was working well.
The best part is that the Swift code that we’re left with no longer carries around the baggage of Objective-C interoperability. It’s pure, uncompromising Swift code, designed with a Swift mindset, which is the sort of codebase we all want to work in.

I'm Steve Barnegren, an iOS developer based in London. If you want to get in touch: