Contents
|
|
Contents
Recapping The First Part
In the first part, we learned the basics of the Python. We learned how if-elif-else and loops work in the system. We have basically learned how to do simple code on Python. In this part, we are going to start creating our blockchain. So, without any further ado, let’s get started!
Creating Our Python Blockchain: Introducing Lists
Alright, so enough with the basics. Now let’s create our blockchain!
We are going to do that by introducing lists. Lists are basically a group of data that could be of any type. They are defined like this:
List_name = [ element 1, element 2, element 3……element n]
The elements, as we have explained before, can be of any data type. It could be an integer, float, string, or even another list (which we are going to use later). Let’s see how this will work. We are going to use our terminal for this:
Some things to note from the code above.
Think of the individual elements of the list as blocks in the blockchain. It is not really that much of a stretch, obviously, we will make this more sophisticated later on. The list itself binds all this data together to give that “chain” element of the blockchain.
Now, another thing you will notice is the index number of each element. The first element has an index of 0. This is why, when we want to print the first element, we say “blockchain[0]”.
Modifying Elements of The List
A list that can’t be modified is useless. You need provisions to add and remove elements from the list. Now, we know that in a Bitcoin-like blockchain it is impossible to remove elements, however, we are still dealing with a list right now.
So, how are we going to do it?
We are going to use two list functions:
- append()
- pop()
The append function adds more elements to the list. So, bring back our old list:
blockchain = [1, 2, 5.6].
If we want to add “Blockgeeks” to it, we will simply say: blockchain.append(“Blockgeeks”)
Now when we print it, it shows:
[1, 2, 5.6, “Blockgeeks”]
Now let’s remove some data.
For that, we are going to use the pop() function, which will remove the last element from the list. So, if we do blockchain.pop[], now it will remove “Blockgeeks” and show:
[1, 2, 5.6]
Adding Elements During Runtime via Functions
Now, let’s have some fun.
We are going to use a function to add elements to the list while runtime. Consider this program:
blockchain = []


def add_list():

   blockchain.append(3.2)

   print(blockchain)


add_list()

add_list()

add_list()
So, we have defined a function called “add_list()” which is going to append 3.2 to the blockchain list every single time it is called. Did you notice how we declared the empty list with: blockchain = []? That was done so that we could show you how you could put in data from scratch.
So, if we print it, this is how it will look. We are back on Visual Studio Code btw.
Giving The List More Blockchain-Like Property
Till now we have pretty much dealt with a normal list. However, there needs to be a more organic connection between the blocks.
The reason why the blocks are connected to one another in a real blockchain is because they include data of the previous block as well. That is exactly what we are going to do by appending the data of the last element to the latest element via a nested list. In python, you can get the data of the last of the list using the [-1] index.
So if the blockchain has [1, 2, 3], then blockchain[-1] gives you 3.
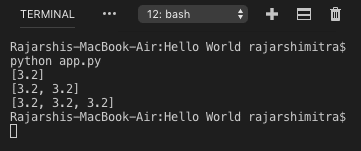
Anyway, let’s check the code, we are going use the input() function to get the value of the element of the blockchain from the user.
element1 = input("Give the first element of the blockchain ")

blockchain = [element1]

def add_list():

   blockchain.append([blockchain[-1], 3.2])

   print(blockchain)


add_list()

add_list()

add_list()
So, now when you print this, you will get:
Ok, so far we have given some character to our blockchain, but we still don’t have anything close to our working model. Don’t worry that will get solved soon.
Getting Closer to A Working Blockchain
blockchain = []
“”” Section 1 “””
def get_last_value():

   """ extracting the last element of the blockchain list """

   return(blockchain[-1])


def add_value(transaction_amount, last_transaction=[1]):

   blockchain.append([last_transaction, transaction_amount])
“”” Section 2 “””
def get_transaction_value():

   user_value = float(input('Enter your transaction amount '))

   return user_value


def get_user_choice():

   user_input = input("Please give your choice here: ")

   return user_input
“”” Section 3 “””
def print_block():

   for block in blockchain:

       print("Here is your block")

       print(block)
“”” Section 4 “””
def verify_chain():

   index = 0

   valid = True

   for block in blockchain:

       if index == 0:

           index += 1

           continue

       elif block[0] == blockchain[index - 1]:

           valid = True

       else:

           valid = False

           break

       index += 1

   return valid
“”” Section 5 “””
tx_amount = get_transaction_value()

add_value(tx_amount)


while True:

   print("Choose an option")

   print('Choose 1 for adding a new transaction')

   print('Choose 2 for printing the blockchain')

   print('Choose 3 if you want to manipulate the data')

   print('Choose anything else if you want to quit')


   user_choice = get_user_choice()


   if user_choice == 1:

       tx_amount = get_transaction_value()

       add_value(tx_amount, get_last_value())


   elif user_choice == 2:

       print_block()


   elif user_choice == 3:

       if len(blockchain) >= 1:

           blockchain[0] = 2


   else:

       break


   if not verify_chain():

       print('Blockchain manipulated')

       break
Yeah , we know that that’s a huge block of code however, we have divided the whole thing into different sections to help you understand what is going on in and every part of the code.
What we have attempted to do here is to create a prototype blockchain which does not depend on static declaration. Meaning, Users can themselves fill up the data during run time. This is why, if you see the first line of the code, then you will see that we are starting of with an empty blockchain.
Alright, so let’s start looking into the sections.
Note: We suggest that you copy paste the code above and keep it open in a new window or a doc file. We will keep referring to different part of the code in the explanation below, and it will be simpler for you to keep track.
Section 1
def get_last_value():

   """ extracting the last element of the blockchain list """

   return(blockchain[-1])


def add_value(transaction_amount, last_transaction=[1]):

   blockchain.append([last_transaction, transaction_amount])
So, this first section you must be pretty well-versed with by now. We are doing two things here:
- Extracting the last element of the blockchain
- Appending the last element along with the current element in a block to the blockchain.
Take a look at the arguments in add_value function:
- Last_transaction
- Transaction_amount
The transaction_amount is the value of the transaction that will be put into the blockchain. The last_transaction variable, on the other hand, is the value of the transaction in the last block which is going to be put into the new block.
So, why are we initializing last_transaction to [1]?
This is done purely to avoid an error during runtime. Think about this, if we are dealing with the first block of the blockchain, then it won’t have any “last_transaction” right? You will need at least two blocks for the concept of “last_transaction” to exist. This is why, in order to remove the possibility of any error in the first block, last_transaction is initialized to [1].
Section 2
def get_transaction_value():

   user_value = float(input('Enter your transaction amount '))

   return user_value


def get_user_choice():

   user_input = input("Please give your choice here: ")

   return user_input
Let’s call this section the input section. We have two functions here:
- get_transaction_value()
- get_user_choice()
In the first function, we are asking the user to enter the value of the transaction amount that they want to enter into the blockchain. Now remember, the input() function returns a string value. So, we use the float() function to change that number into a floating number.
In the second function, we are going to ask the user to input their choice.
Now, you might be wondering, “What choice are you talking about?”
Well, take a Section 5. Specifically the while loop. Do you see the option that we are asking there?
print("Choose an option")

print('Choose 1 for adding a new transaction')

print('Choose 2 for printing the blockchain')

print('Choose 3 if you want to manipulate the data')

print('Choose anything else if you want to quit')
So, the get_user_choice() function is used to take in the choice from the user to help understand what they want to do.
Section 3
def print_block():

   for block in blockchain:

       print("Here is your block")

       print(block)
This is a very straightforward section. We are using the for loop to print each block of the blockchain.
Section 4
def verify_chain():

   index = 0

   valid = True

   for block in blockchain:

       if index == 0:

           index += 1

           continue

       elif block[0] == blockchain[index - 1]:

           valid = True

       else:

           valid = False

           break

       index += 1

   return valid
Now this is something that we haven’t done so far.
In this section, we are verifying the validity of the blockchain. What exactly do we mean by that.
As you may know, a blockchain should be immutable. Since we are not using any hash functions yet, let’s use something else to show that the chain has been tampered with. This is why, in this function we are using a verify_chain function.
So, what are we doing here?
Firstly, we have two variables:
- Index = A counter which we will use to go through the blocks in the blockchain
- Valid = A Boolean variable which will return True or False as the final value of this function
After that, we are using a for loop to go through the blockchain, quite similar to the previous section where we used a loop to print the blocks. Inside the loop we are using three conditional statements, let’s go through each one of them:
The if Sub-section
This checks if the index is 0 or not. If it is, then the index increments by 1
The elif Sub-section
This is the part where we check if some tampering has been done or not. To understand how this works, imagine this scenario.

So, as you can see, the first element of Block B is the contents of its previous block. So, in this subsection, we are checking if the first element of the Block is equal to the elements of the previous block. If it is then this function True otherwise it returns False.
Section 5
tx_amount = get_transaction_value()

add_value(tx_amount)


while True:

   print("Choose an option")

   print('Choose 1 for adding a new transaction')

   print('Choose 2 for printing the blockchain')

   print('Choose 3 if you want to manipulate the data')

   print('Choose anything else if you want to quit')


   user_choice = get_user_choice()


   if user_choice == 1:

       tx_amount = get_transaction_value()

       add_value(tx_amount, get_last_value())


   elif user_choice == 2:

       print_block()


   elif user_choice == 3:

       if len(blockchain) >= 1:

           blockchain[0] = 2


   else:

       break


   if not verify_chain():

       print('Blockchain manipulated')

       Break
So, this is a long section, which is why we will need to to differentiate it into different subsections (again).
Subsection 1: Initialization
tx_amount = get_transaction_value()

add_value(tx_amount
We start off by initializing the first block of the blockchain. We get the value of the transaction amount (tx_amount) and then enter the value into the block of the blockchain.
Subsection 2: Giving a Choice
while True:

   print("Choose an option")

   print('Choose 1 for adding a new transaction')

   print('Choose 2 for printing the blockchain')

   print('Choose 3 if you want to manipulate the data')

   print('Choose anything else if you want to quit')


   user_choice = get_user_choice()
Ok so Subsection 1 onwards, all the other subsections are going to be executed within this while loop. So, the first thing that we are doing is giving the users an option to choose what exactly they want to do:
- Add a new transaction
- Print the blockchain
- Manipulate the data
- Quit the process
After that, user_choice stores the user’s data
Subsection 3: if-elif-elif-else
So, depending on the choice, we have 4 possibilities. The code looks like this:
if user_choice == 1:

       tx_amount = get_transaction_value()

       add_value(tx_amount, get_last_value())


   elif user_choice == 2:

       print_block()


   elif user_choice == 3:

       if len(blockchain) >= 1:

           blockchain[0] = 2

   else:

       break
- First, we add the transaction to the blockchain. We fill in the input from the user and store it into tx_amount. Once we have the transaction value, we add that, along with the value of the elements from the last block into the blockchain
- Second, we invoke the print function to print the blockchain
- Third, is the manipulate function. We have incorporated this just to show you how this blockchain will react if the data gets manipulated. So, what happens here is that we change the first element of the blockchain into 2. This only works if the blockchain has more than 1 element (the if condition checks that)
Check the following subsection to know what happens next - The last part is pretty straightforward. If the user sends some other option, then the else block activates which simply uses “break” to get out of the while loop
Subsection 4: Verification Call
if not verify_chain():

       print('Blockchain manipulated')

       Break
If the user chooses to manipulate the blockchain, then this subsection gets affected. Now remember, the verify_chain() returns a Boolean value:
- True
- False
The verify_chain() returns False if manipulation has been done.
Now, this subsection uses the not keyword, which turns False into True. This in turns activates the print function within the if-block to print “Blockchain manipulated”.
Outputs of The Program
Alright, so now we know how the program works. Let’s check out the outputs.
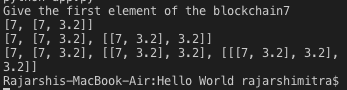
So, to go through what we have done above
We entered 3 values to our blockchain: 23.5, 43,1, and 5.89
We then printed the blockchain which gives this:

We then tried to manipulate our blockchain by changing a data, but our built-in verification system caught that and gave this output:

Fine, so we have a pretty good structure placed in so far. However, we still need to incorporate hashing and proof-of-work features to our code. So, since we already know what lists are, let’s acquaint ourselves with tuples and dictionaries.
Tuples and Dictionaries
Tuples and Dictionaries are data structures along with lists. Let’s compare these three and find out how they work.
Tuples are pretty similar to Lists, however, they cannot be edited once created. Dictionaries, on the other hand, has unique identifiers like NAME1 AND NAME2 in our example above which store values. They can be edited once created.
We will be using these data structures in our new and improved blockchain.
You might be wondering, “What is the point of doing that?”
Well, transactions, blocks etc. contain a lot of metadata which needs to be stored. Think of all the metadata that can be stored in a transaction:
- Sender’s id
- Recipient’s id
- Transaction date
- Transaction amount
Adding all this data helps us with keeping track of our transactions.
Adding Mining and Proof of Work Features
So, the first thing that we need to do is add features of mining and proof of work. Mining is the process by which miners solve cryptographically hard puzzles to find blocks to add to the blockchain. For mining these blocks, the miners get a reward called the block reward.
On the other hand, proof-of-work is the method of mining and consensus that is used in many cryptocurrencies like Bitcoin. We are going to be using proof-of-work in our blockchain.
If we were to summarize how Proof Of Work Protocol works with the blockchain.
- The miners solve cryptographic puzzles to “mine” a block in order to add to the blockchain.
- This process requires immense amount of energy and computational usage. The puzzles have been designed in a way which makes it hard and taxing on the system.
- When a miner solves the puzzle, they present their block to the network for verification.
- Verifying whether the block belongs to the chain or not is an extremely simple process.
Alright, so let’s look at our code:
“”” Section 1 “””
import hashlib

import json


reward = 10.0


genesis_block = {

   'previous_hash': '',

   'index': 0,

   'transaction': [],

   'nonce': 23

}

blockchain = [genesis_block]

open_transactions = []

owner = 'Blockgeeks'


def hash_block(block):

   return hashlib.sha256(json.dumps(block).encode()).hexdigest()
“”” Section 2 “””
def valid_proof(transactions, last_hash, nonce):

   guess = (str(transactions) + str(last_hash) + str(nonce)).encode()

   guess_hash = hashlib.sha256(guess).hexdigest()

   print(guess_hash)

   return guess_hash[0:2] == '00'


def pow():

   last_block = blockchain[-1]

   last_hash = hash_block(last_block)

   nonce = 0

   while not valid_proof(open_transactions, last_hash, nonce):

       nonce += 1

   return nonce
“”” Section 3 “””
def get_last_value():

   """ extracting the last element of the blockchain list """

   return(blockchain[-1])


def add_value(recipient, sender=owner, amount=1.0):

   transaction = {'sender': sender,

   'recipient': recipient,

   'amount': amount}

   open_transactions.append(transaction)
“”” Section 4 “””
def mine_block():

   last_block = blockchain[-1]

   hashed_block = hash_block(last_block)

   nonce = pow()

   reward_transaction = {

           'sender': 'MINING',

           'recipient': owner,

           'amount': reward

       }

   open_transactions.append(reward_transaction)

   block = {

       'previous_hash': hashed_block,

       'index': len(blockchain),

       'transaction': open_transactions,

       'nonce': nonce

   }

   blockchain.append(block)
“”” Section 5 “””
def get_transaction_value():

   tx_recipient = input('Enter the recipient of the transaction: ')

   tx_amount = float(input('Enter your transaction amount '))

   return tx_recipient, tx_amount


def get_user_choice():

   user_input = input("Please give your choice here: ")

   return user_input
“”” Section 6 “””
def print_block():

   for block in blockchain:

       print("Here is your block")

       print(block)
“”” Section 7 “””
while True:

   print("Choose an option")

   print('Choose 1 for adding a new transaction')

   print('Choose 2 for mining a new block')

   print('Choose 3 for printing the blockchain')

   print('Choose anything else if you want to quit')

   user_choice = get_user_choice()


   if user_choice == 1:

       tx_data = get_transaction_value()

       recipient, amount = tx_data

       add_value(recipient, amount=amount)

       print(open_transactions)


   elif user_choice == 2:

       mine_block()


   elif user_choice == 3:

       print_block()


   else:

       break
Ok, so let’s analyze the code.
Section 1
import hashlib

import json


reward = 10.0


genesis_block = {

   'previous_hash': '',

   'index': 0,

   'transaction': [],

   'nonce': 23

}

blockchain = [genesis_block]

open_transactions = []

owner = 'Blockgeeks'


def hash_block(block):

   return hashlib.sha256(json.dumps(block).encode()).hexdigest()
The first thing that we are doing here is importing hash libraries. We are specifically importing:
- hashlib: To use their hashing functions
- json: We need this package to convert the block from dictionary to string.
After that, we are declaring “reward”, a global variable which is going to store the mining block reward that we are going to give to our miners for mining a block.
Up next we have our genesis block. The genesis block is the first block in the blockchain. We are using 4 metadatas in our block:
- Previous_hash: Stores the hash of the previous block. This will be an empty string as the genesis block will not have any previous hash.
- Index: This is the index of the block in the blockchain. Since genesis block is the first block, its index is initialized to 0. Remember in programming terminology, the first element in a list is in the 0th position
- Transaction: The transaction that is stored inside the blockchain. Since this doesn’t have any, it is an empty list.
- Nonce: We will explain this later. It is initialized to 23 which is a dummy value.
After the genesis block is initialized, it gets added to the blockchain in the next step via blockchain = [genesis_block].
Open_transactions: A list that manages all the outstanding transactions in the blockchain. It is an empty list in the beginning.
Since we are the owner and the sender of this transaction, we have initialized this right in the beginning
Up next we have hashing function hash_block()
Inside it we are returning the hash of the block using this expression:
hashlib.sha256(json.dumps(block).encode()).hexdigest()
So, let’s see what we are doing here:
- Using the hashlib’s sha256 hashing algorithm.
- The json.dumps function then comes into play and converts the block which is a dictionary into a json-formatted string. However, the hashlib can’t read that so up next we have….
- The encode() function. This converts the json formatted string to a UTF-8 string which is readable by hashlib.
- The hashlib’s output is a byte hash. So we finally use the hexdigest() method to convert it into a normal string.
Section 2
def valid_proof(transactions, last_hash, nonce):

   guess = (str(transactions) + str(last_hash) + str(nonce)).encode()

   guess_hash = hashlib.sha256(guess).hexdigest()

   print(guess_hash)

   return guess_hash[0:2] == '00'


def pow():

   last_block = blockchain[-1]

   last_hash = hash_block(last_block)

   nonce = 0

   while not valid_proof(open_transactions, last_hash, nonce):

       nonce += 1

   return nonce
In section 2, we have two functions:
- Valid_proof
- The pow function
valid_proof()


def valid_proof(transactions, last_hash, nonce):

   guess = (str(transactions) + str(last_hash) + str(nonce)).encode()

   guess_hash = hashlib.sha256(guess).hexdigest()

   print(guess_hash)

   return guess_hash[0:2] == '00'
So, the valid_proof() function has three arguments:
- Transactions: The transactions inside the block
- Last hash: The hash of the last block
- Nonce
Ok, so what exactly is nonce? Well before that, we need to know what difficulty means. “Difficulty” is the idea of making mining as hard as possible. If mining isn’t hard, then all the coins in the system will be pumped out easily, making them absolutely useless.
So, the way we are calculating the hash of the system is by concatenating the transactions, hash of the last block and the nonce into a single string and then hashing them. The hash is only acceptable if the first two letters of it are zeroes.
That is how we are bringing in difficulty. It is impossible to predict how the hash will turn out to be and it is more of a lucky draw. This is why, it is extremely difficult to get a hash which starts with a specific pattern (such as 2 0s).
The function returns True if the program has a valid hash and False if not.
The pow() function
Up next we have the proof of work or the pow() function.
def pow():

   last_block = blockchain[-1]

   last_hash = hash_block(last_block)

   nonce = 0

   while not valid_proof(open_transactions, last_hash, nonce):

       nonce += 1

   return nonce
This function is pretty straightforward:
- First we are the extracting the last block from the blockchain and putting it into last_block
- We are then hashing the last_block and putting them into the last_hash
- The while loops keeps running until the valid_proof function returns TRUE. (The not convert will convert the TRUE into FALSE and hence break out of the loop)
- The nonce is then returned.
Section 3
def get_last_value():

   """ extracting the last element of the blockchain list """

   return(blockchain[-1])


def add_value(recipient, sender=owner, amount=1.0):

   transaction = {'sender': sender,

   'recipient': recipient,

   'amount': amount}

   open_transactions.append(transaction)
In this section we have two functions again:
- get_last_value
- add_value
The get_last_value()
This one is pretty straightforward. It extracts the last block of the blockchain.
add_value()
The function takes in the metadata of the transaction, namely:
- Sender name
- Recipient name
- Amount of the transaction
After that, the transaction is appended to the open_transactions list.
Section 4
def mine_block():

   last_block = blockchain[-1]

   hashed_block = hash_block(last_block)

   nonce = pow()

   reward_transaction = {

           'sender': 'MINING',

           'recipient': owner,

           'amount': reward

       }

   open_transactions.append(reward_transaction)

   block = {

       'previous_hash': hashed_block,

       'index': len(blockchain),

       'transaction': open_transactions,

       'nonce': nonce

   }

   blockchain.append(block)
In this section we have one function, the mine_block() function which will enable you to mine blocks
So, in this function, the following is going to happen:
- Extract the last block of the blockchain and put it in last_block
- Hash the last block
- Use the pow() function to extract the nonce
- Create a reward_transaction which awards the miner, i.e., us with the reward amount which we have set earlier (10.0 coins)
- The reward_transaction gets appended to the open_transaction list
- Finally, with the new approved nonce, we finally have a new block, which helps us get the metadata of the new block,
- The new block is appended to the blockchain
Section 5
def get_transaction_value():

   tx_recipient = input('Enter the recipient of the transaction: ')

   tx_amount = float(input('Enter your transaction amount '))

   return tx_recipient, tx_amount


def get_user_choice():

   user_input = input("Please give your choice here: ")

   return user_input
In this section we have two functions:
- get_transaction_value()
- get_user_choice()
#1 get_transaction_value()
This function takes in the metadata of the transaction such as the name of the recipient and the amount of the transaction.
At the same time, take a look at the return statement.
return tx_recipient, tx_amount
This function is returning a tuple (we talked about tuples before remember?)
#2 get_user_choice
This function basically takes in the choice of the user and returns it. This is pretty similar to the get_user_choice() function in the previous program.
Section 6
def print_block():

   for block in blockchain:

       print("Here is your block")

       print(block)
Similar to the last program, this is the print function which prints the blockchain.
Section 7
while True:

   print("Choose an option")

   print('Choose 1 for adding a new transaction')

   print('Choose 2 for mining a new block')

   print('Choose 3 for printing the blockchain')

   print('Choose anything else if you want to quit')

   user_choice = get_user_choice()


   if user_choice == 1:

       tx_data = get_transaction_value()

       recipient, amount = tx_data

       add_value(recipient, amount=amount)

       print(open_transactions)


   elif user_choice == 2:

       mine_block()


   elif user_choice == 3:

       print_block()


   else:

       break
This is also similar to the last program. The user gets a choice to either:
- Enter a transaction
- Mine a block
- Print the blockchain
Let’s now check out the outputs of the program.
Output of the Program
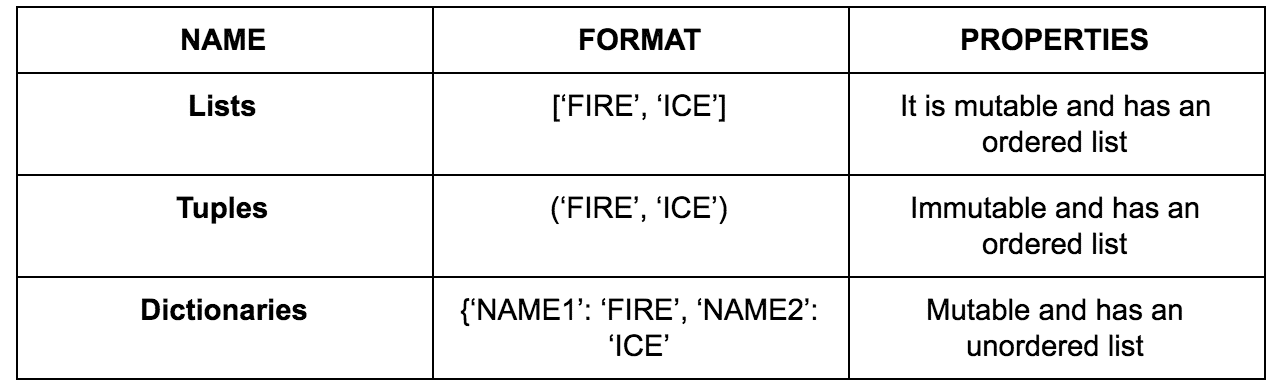
First and foremost, let’s choose option 2 and mine a block. When you do that, we get the following block of hashes:
That seems mind-boggling, until you pay a little closer attention and check the last hash:
“001f946e8c2172affa830ef27761270aab2de515ffac8ae90e5de95b48dc366c”
Do you see what’s so special about this hash?
Remember the difficulty that we set earlier? We were specifically looking for a hash which started with “00”. This is why, the computer ran through multiple hashes by changing the nonce until it finally stumbled upon a hash which fulfilled the given difficulty criteria.
Alright, so now let’s add a transaction. Suppose I want to send Sam, 2.4 coins, we will choose option 1 and get the following output:
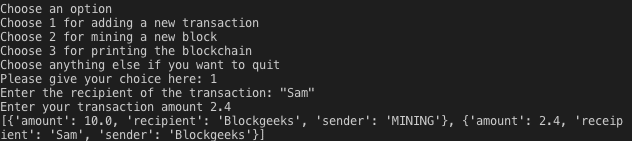
Pay attention to the last line. It shows the two transactions that we have done so far.
Wait…two transactions? We just did one right?
Not quite. Remember that we mined a block before this right? So the block reward transaction is also shown here.
Finally, let’s print the blockchain.

So, we have two blocks:
- Up first, we have the genesis block that we have declared ourselves. The nonce was something that we put in ourselves i.e. 23
- Next, we have the second block, which includes the mining transaction and the transaction that we ourselves did with “Sam”. The nonce of the block is 93
Conclusion
So, there you have it. We at least have somewhat of a working blockchain coded via Python. If you are interested to know more, then please continue your own research. We feel that python is a language that you should master if you want to get into developing. It is an extremely fun and easy-to-learn language which can open up doors for unlimited opportunities.