Building Xamarin iOS library wrappers with Azure DevOps Build Pipelines
Azure DevOps, formerly known as Visual Studio Team Services or VSTS for short, allows you to create automated release pipelines for all different kind of projects. One of the nice things is that you get free build time for opensource projects. So why not give it a spin and look if I can set up the build pipeline for my open source project PureLayout.Net. The PureLayout.Net library is a wrapper of the PureLayout iOS library written in Objective-C which allows you to quickly layout your UI in code. So it differs a bit from your standard Xamarin project as it involves the step of building the project, creating the bindings to C# and then packaging all up in a NuGet package. Since this is an iOS-only project, we will, of course, have to build this on a Mac.
Choosing a build agent
Good thing then that you Azure DevOps (could we all agree on ADO for this in the future? ) provides a Mac build agent hosted on Azure. Now the question left is, will the hosted Mac provide all the tooling that we need? If no, we would have to fall back onto the option of creating our own Mac build agent, i.e. renting it from a third party. For PureLayout.Net we require the following tools to be installed:
- Xamarin Toolchain
- XCode
- objective-sharpie
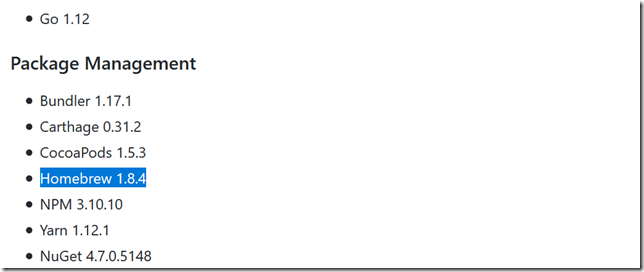
Luckily on GitHub the agents OS and tools are all listed. So we see that there is the Xamarin Toolchain and XCode. Unfortunately, objective-sharpie is not installed and while this is a bit of set back what we see installed on the hosted macOS agent is homebrew.
Homebrew is THE package manager for macOS, and it allows opensource projects to provide their tools as packages. A quick search on the interwebs shows there is a keg for objective-sharpie - yes they are going all the way on that brewing analogy. So we could install the tool while before we run the build. So let’s go ahead, and set up the build with the hosted macOS agent from ADO.
Hosted vs setting up your Build Agent: There are a few things to consider when choosing between setting up an agent on your own and then register it to ADO or opting for a hosted build agent. While it always depends on your situation. Generally speaking, setting up your build agent brings you more control over the setup and installed tools. You decide when updates happen and can give you have the option of having databases/files and so forth pre-setup and ready for reuse. On the other hand, you must maintain your agent and while this might work okay at first. Consider having to maintain multiple agents. How do you ensure that the agents are all equally setup? MInor differences in the setup could lead to an unstable build infrastructure which is something no one wants. If you do not have any requirement that prevents you from using hosted agents, I would recommend going the easy route and using hosted agents. Hosted agents come with the added benefit of being able to adjust the number of agents according to your workload - if you are a consultancy, this can be a huge bonus since project/build load might vary from time to time.
Configuring the build
The browser is all you need for setting up your build configurations or pipelines as ADO calls them these days. While ADO does offer templates for specific builds such as Xamarin.Android, there is no template for Xamarin.iOS wrapper projects - other than the blank template that is. The first step is to connect the repository which in case of PureLayout.Net is on GitHub. For the first time, one has to link GitHub with the ADO account by following the instructions.
When building PureLayout.Net manually. The the following steps create a new version of PureLayout.Net:
- Execute make
- Build the solution
- Pack the artefact into a NuGet package
- Enjoy the new NuGet package
The Makefile creates the native binary (and generate the required wrapping code). To create the wrapper, we require objective sharpie which we can install via Homebrew. To execute all the required commands in ADO a Command Line build step with the following instructions is used:
echo install objective sharpie
brew cask install objectivesharpie
echo Performing make
make
If you ever want to go down this rabbit hole of creating your wrapper project. Be sure to check out this article by Sam Debruyn - after reading this post of course .
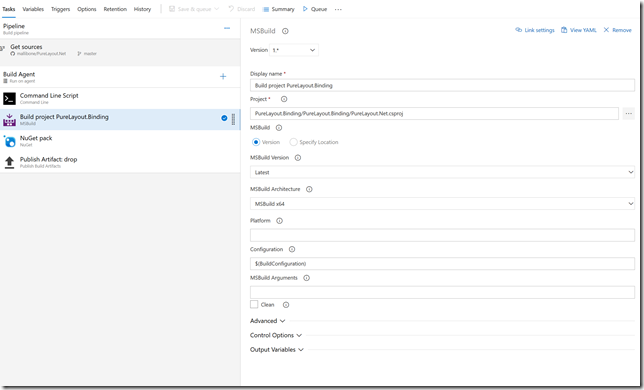
Next up is building the solution of the wrapper project, which can be done with an MSBuild step and defining the path to the csproj file: PureLayout.Binding/PureLayout.Binding/PureLayout.Net.csproj - there is even a handy repo browser. Under Configuration, you can set the build configuration to Release, but instead of hard coding it, consider using the environment variable $(BuildConfiguration). More about environment variables in a bit.
Next up is packing the compiled output into a NuGet package. By adding a NuGet build step, setting the Command to pack, the path to the csproj file and the output folder to the ADO environment variable $(Build.ArtifactStagingDirectory).
The final step is to publish the artefacts, i.e. the NuGet package. There is again a standard build step to use here called Publish Build Artifacts.
Are you still wondering about those environment variables above and how they come together? Environment variables are a great way to reduce duplicate hard written configurations in build steps. There are two kinds of environment variables those that you can define yourself and those that are predefined.
For creation purposes or if you are exploring what ADO has to offer the web UI is a great choice. However, if you talk with the grown-up DevOps engineers, they usually voice some concern over maintainability or the lack of sharing configurable definitions. One of the ways to overcome these issues is to define the entire build steps in a YAML file.
Configuring the build with YAML
YAML Ain’t Markup Language or YAML for short is the file format supported by ADO to store the build configuration alongside your code. While versioning also is done by ADO whenever you change the build steps, in the UI. YAML definitions further allow you to create templates for other similar projects - which can be real time savers.
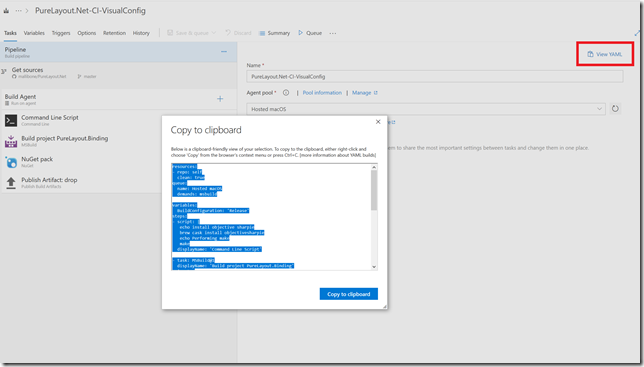
When selecting the build agent, we can view the YAML generated out of the build steps defined via the web UI.
In the projects root folder, we can now create a file, e.g. builddefinition.yaml which we can then check in to Git. Once the Git Repo contains the YAML build configuration, we can create a new pipeline based on the build config. Unfortunately, there is currently no way to use the visual designer and YAML configuration in the same pipeline.
Though not automatically exported the build trigger can also be set in the YAML file. According to the docs - which include some inspiring samples this is the resulting block for PureLayout.Net:
trigger:
  batch: true
  branches:
    include:
    - master
  paths:
    exclude:
    - README.md
pr:
  branches:
    include:
    - master
  paths:
    exclude:
    - README.md
The above configuration ensures that all pushes to master are triggering a build. The pr section is in regards to Pull Requests. Note the neat trick you can do with paths which allows you to prevent triggering a build should only the README.md or similar change.
Lesson learnt: Any configuration changes regarding git you still have to do in the visual designer. In the case of PureLayout.Net, it was ensuring that git submodules are checked out.
Is YAML better than the visual ADO web-based editor? Well, it depends. If you are just getting started with setting up automated pipelines, the visual editor allows for faster results. It also provides a better experience when discovering what is available on ADO. However, if you are looking for a way to share configurations, store your build definition alongside your code and know what you want to get done. YAML probably is the better solution for you.
You can see the full YAML configuration for PureLayout.Net on here.
Done?
When I initially set out to automate the build for PureLayout.Net, it was because I wanted to reduce the hassle for me to ensure that commits or PRs would not break anything. With the steps above the manual steps left are testing the NuGet package, adjust some metadata if needed and then deploy it to NuGet.org. Since it is a visual library, I feel comfortable manually “testing” the result - which means as much as looking at a screen and checking the layout with my own eyes. The manual release steps are also totally fine with me.
Nevertheless, you could automate a lot more. For instance, push the artefacts automatically to Azure Artifacts or other places, adjust the release metadata pending on various parameters or setting the Version number on the fly. Another possible area to automate would be the testing side and and and… For me I left it here, well not entirely, I still published the build status to GitHub - and this blog :


