This tutorial is the second in my series of tutorials on incorporating error checking into your Swift 4-based iOS apps. Remember that by “error checking,” I mean gracefully handling “unexpected values, events, and conditions that arise during program execution.” Today, I’ll limit my discussion of error checking to what Swift’s authors call “Error Handling.” Please read my first, introductory article in this series if you haven’t already. I can’t emphasize enough why you need to use error checking. Remember my discussion of app quality, user intolerance of buggy apps, and the huge amount of choices consumers have? The quality of your apps represents your reputation. Do you want a bad reputation when customers choose apps largely based on reviews? They can and will vote with their fingers (and wallets) and find other apps if they don’t like your app(s). Download my Xcode 9 playground so you can follow along with my discussion, run the code, and experiment with my Swift code by making your own changes.
This article is also a sequel to a tutorial I wrote on “iOS file management with FileManager in protocol-oriented Swift 4,” where I promised to add error checking to my code. iOS file management code absolutely needs error checking because of the nature of file manipulation:
… consider the task of reading and processing data from a file on disk. There are a number of ways this task can fail, including the file not existing at the specified path, the file not having read permissions, or the file not being encoded in a compatible format. Distinguishing among these different situations allows a program to resolve some errors and to communicate to the user any errors it can’t resolve.
“ERROR HANDLING” IN SWIFT 4
Reading Apple’s “The Swift Programming Language (Swift 4.1)” documentation, you’d think that “Error Handling” is the only way to deal with runtime errors. While it isn’t by far the only way to deal with errors, it is an important language feature. I’ll show you how to unleash Swift’s many other capabilities for error checking as this series of tutorials proceeds.
Overview of the Error Handling process
In Swift Error Handling, you mark methods that are capable of generating serious errors with the throws keyword. The definition of “serious” is subjective and up to you the programmer. You then must write code in your throws method (or block) that detects an unexpected condition, initializes an Error object with information describing the condition, and does a throw of the Error. Any other method that calls a method marked with the throws keyword must be able to handle a thrown Error. The calling method should wrap its call to a throws-marked method in a do try construct and either 1) do a catch and handle the Error or 2) do a catch and pass the Error off to the next caller in the call stack by doing a throw of the Error.
Note that you can catch or create and throw NSError objects for interoperability with Objective-C.
Some Apple SDKs still throw traditional exceptions in the form of NSException. Swift’s authors seem to be pushing towards use of Error Handling as the standard for error checking. Discussing exception handling is beyond the scope of this article.
When using an Apple SDK like Foundation, the authors of that code get to decide what constitutes “serious” and you must deal with any Error or NSError instances that are thrown. (You’ll want to at least try to handle NSException, too, if any are thrown while your app is running; if you don’t handle exceptions, your app will crash.)
Error Handling with do try catch
Earlier, I mentioned that if some block of code is marked as throws, you must handle it. You may ask yourself, “Well, how the heck should I know when to handle an Error or NSError? Do I look up every API call I make in the documentation?”
Thankfully, you don’t have to look up every call in every block of code that you write. The Swift compiler will tell you if you need to handle an Error or NSError.
Watch what happens when I try to create an instance of the FileHandle class, a member of Foundation. I start by writing the following statement…
|
1 |
let fileHandle = FileHandle(forReadingFrom: url) |
… and the compiler flags it with the error message, “Call can throw, but it is not marked with ‘try’ and the error is not handled” as shown here:
![]()
That tells me a whole lot. “Call can throw, but it is not marked with ‘try'” means that init(forReadingFrom:) is marked with the throws and is capable of reporting an Error or NSError.
But wait a minute. What about the last part of that error message; the thing about ‘and the error is not handled’?” Humor me and let me just add the try for now:
|
1 |
let fileHandle = try FileHandle(forReadingFrom: url) |
![]()
You see that we’re not quite finished yet. I’m not yet doing anything if an error is thrown. I’m not handling the error. That’s where Swift’s do try catch syntax comes into the picture. Here’s what I’d do in the simplest and broadest case:
|
1 2 3 4 5 6 7 8 9 10 11 |
do { let fileHandle = try FileHandle(forReadingFrom: url) // ... fileHandle.closeFile() } catch { print("Something went wrong here.") // write some code to recover from error } |
That catch allows me to handle anything that was thrown, but I wouldn’t get any detailed information describing the error. This is a “catch all” methodology, and you’ll generally see more specific catch clauses, like those shown below, but I can’t miss anything thrown using this broad methodology for error capturing.
Now I’ll specifically handle an Error. Notice my comment about leaving out the cast to Error. You should be able to figure that one out yourself. Note also that localizedDescription is the only information I can get from Error:
|
1 2 3 4 5 6 7 8 9 10 11 |
do { let fileHandle = try FileHandle(forReadingFrom: url) // ... fileHandle.closeFile() } catch let error // as Error - warning: "'as' test is always true" { print(error.localizedDescription) // write some code to recover from error } |
Because the explanation for “error” given on the documentation page for init(forReadingFrom:) states that “If an error occurs, upon return contains an NSError object that describes the problem,” a more precise form of the previous code block would be:
|
1 2 3 4 5 6 7 8 9 10 11 12 13 14 |
do { let fileHandle = try FileHandle(forReadingFrom: url) // ... fileHandle.closeFile() } catch let error as NSError { print(error.localizedDescription) print(error.domain) print(error.localizedFailureReason) print(error.localizedRecoveryOptions) // write some code to recover from error } |
NSError provides more information in this case — and I want to look for an NSError if I want to get information about the problem that occurred.
Watch what the compiler tells me if I try to catch an Error and an NSError:

The compiler is telling me that my catch for NSError is redundant and will be ignored. If I switch the order of the catch statements, everything’s OK because I assume that the Swift compiler is looking to handle the most specific errors first and then catch more general ones later:
|
1 2 3 4 5 6 7 8 9 10 11 12 13 14 15 16 |
do { let fileHandle = try FileHandle(forReadingFrom: url) // ... fileHandle.closeFile() } catch let error as NSError { print(error.localizedDescription) // write some code to recover from error } catch let error // as Error - "'as' test is always true" { print(error.localizedDescription) // write some code to recover from error } |
Suppose I want “pass the buck,” so to speak, to someone else so they can handle the error? I can propagate the error up the call stack to the method that called my FileHandle-related code:
|
1 2 3 4 5 6 7 8 9 10 |
do { let fileHandle = try FileHandle(forReadingFrom: url) // ... fileHandle.closeFile() } catch let error as NSError { throw error // just pass the error on... } |
Some code is capable of throwing different Error type instances, each one specifically tailored to the type of problem that occurred. In this case, you may end up with a long list of catch clauses. You can see an example in Apple’s documentation.
Finally, here’s an example of multiple catch statements, meant to be able to capture detailed error information and capture all error possibilities:
|
1 2 3 4 5 6 7 8 9 10 11 12 13 14 15 16 |
do { let fileHandle = try FileHandle(forReadingFrom: url) // ... fileHandle.closeFile() } catch let error as NSError { print(error.localizedDescription) // write some code to recover from error } catch let error // as Error - "'as' test is always true" { print(error.localizedDescription) // write some code to recover from error } |
Error Handling versus exception handling
Just because Swift Error Handling looks like something called “exception handling” in languages like Objective-C and C++, it isn’t. When an error is detected and a developer throws an exception in one of these languages, something called “stack unwinding” occurs (see also here), which is a resource intensive process. Don’t confuse Swift’s Error Handling with exception handling:
Error handling in Swift resembles exception handling in other languages, with the use of the try, catch and throw keywords. Unlike exception handling in many languages–including Objective-C–error handling in Swift does not involve unwinding the call stack, a process that can be computationally expensive. As such, the performance characteristics of a throw statement are comparable to those of a return statement.
This is a big difference and I urge you to spend a little time researching exception handling in other languages and comparing it to Swift’s Error Handling. This difference constitutes a good reason for you to take advantage of Swift’s Error Handling: it’s convenient and efficient.
The problem with NSException
When I encounter an NSException thrown from some Objective-C API, I can’t handle it unless I jump through hoops. You can examine several suggested courses of action here and here.
In Swift, I can’t wrap an attempt to access an item of an Array at a specific index in a do-try-catch. If my code happens to attempt accessing an Array index which doesn’t exist, I get an NSException of “Fatal error: Index out of range.”
I don’t know why Swift’s authors haven’t addressed this issue.
SWIFT 4 CODE FOR ERROR HANDLING
You should be able to master Swift’s Error Handling after walking through the next example.
Creating an Error and reporting it
What’s the use of going through all the rigamarole of detecting erroneous conditions and flagging them if you don’t know the who, what, when, where, how, and why the error occurred? Swift provides an elegant mechanism for you to capture as much information as you want when an error occurs. You create a struct type and use value semantics designed to capture information describing the error condition.
From Apple’s documentation:
In Swift, errors are represented by values of types that conform to the Error protocol. This empty protocol indicates that a type can be used for error handling.
Swift enumerations are particularly well suited to modeling a group of related error conditions, with associated values allowing for additional information about the nature of an error to be communicated.
Here’s my tried and tested FileSystemError type:
|
1 2 3 4 5 6 7 8 9 10 11 12 13 14 15 16 17 18 19 20 21 22 23 24 25 26 27 28 29 30 31 |
struct FileSystemError : Error { enum Category { case Read case Write case Rename case Move case Delete } let type: Category let verboseDescription: String let inMethodName: String let inFileName: String let atLineNumber: Int static func handle(error: FileSystemError) -> String { let readableError = """ \nERROR - operation: [\(error.type)]; reason: [\(error.verboseDescription)]; in method: [\(error.inMethodName)]; in file: [\(error.inFileName)]; at line: [\(error.atLineNumber)]\n """ print(readableError) return readableError } } // end struct FileSystemError |
It’s pretty powerful. It lets me group similar errors into categories and use those classifications throughout my code to, for example, label erroneous conditions or make decisions based on those labels. I can get a human readable description of an instance of my error type, making debugging very straightforward. Remember that “Structure types automatically receive a memberwise initializer if they do not define any of their own custom initializers.” Whenever I need to describe a FileSystemError, Xcode’s autocomplete requires me to fill in all values (click on the image to enlarge it):

iOS file management code with Error Handling
Let me walk you through an example of implementing Error Handling for one method. First I’ll show you the raw code, then I’ll explain it. I’m going to describe my code in series of steps — steps that are also comments in my code shown below. So as you read the code in this section, please refer to the corresponding step explanations in the next section.
I added the readBytes method shown below to the original file management code I wrote, displayed, and explained in my article on “iOS file management with FileManager in protocol-oriented Swift 4.”
|
1 2 3 4 5 6 7 8 9 10 11 12 13 14 15 16 17 18 19 20 21 22 23 24 25 26 27 28 29 30 31 32 33 34 35 36 37 38 39 40 41 42 43 44 45 46 47 48 49 50 51 52 53 54 |
extension AppFileManipulation { ... // STEP 0 - mark with "throws" func readBytes(_ bytes: Int, startingAt offset: Int = 0, from file: String, at directory: AppDirectories) throws -> String? { var textRead: String? = nil var fileHandle: FileHandle // STEP 1 var url: URL = buildFullPath(forFileName: file, inDirectory: directory) // STEP 2 do { // STEP 3 fileHandle = try FileHandle(forReadingFrom: url) // the only throw // STEP 4 defer { fileHandle.closeFile() print("Defer: file closed.") } // STEP 5: this CAN push the pointer in file to EOF let totalBytes = fileHandle.availableData // STEP 6 if (bytes > totalBytes.count) || ((bytes + offset) > totalBytes.count) { print("Cannot read out of bounds.") textRead = nil } else // STEP 7 { // after calling availableData, it's always // a good idea to reset the offset fileHandle.seek(toFileOffset: UInt64(offset)) let data = fileHandle.readData(ofLength: bytes) textRead = String(bytes: data, encoding: .utf8) print("Finished reading file.") } } catch // STEP 8 { // propagate the error to the caller throw FileSystemError(type: .Read, verboseDescription: "Error during read file.", inMethodName: #function, inFileName: #file, atLineNumber: #line) } return textRead } // end func readBytes } // end extension AppFileManipulation |
Error Handling step explanations
While reading each of the following steps, refer to the correspondingly numbered comments in my code above.
STEP 0: Mark the method as throws.
STEP 1: Create a full path to the file from which I want to read.
STEP 2: The init(forReadingFrom:) initializer for FileHandle is marked as throws:
|
1 |
convenience init(forReadingFrom url: URL) throws |
So wrap it in a do try catch block. My do is a bit broad in scope, but possibly wrapping multiple calls in multiple do clauses in the same method is unreadable to me.
STEP 3: try to create a FileHandle instance for reading from a file using the init(forReadingFrom:) initializer.
STEP 4: Wrap the closeFile() call for the file (handle) I just opened in a defer statement block so that the file will be closed “no matter how program control is transferred” out of my readBytes method. Even if an exception is thrown, the file, a valuable resource, will not be left open. What would’ve happened if I had placed the call to closeFile() towards the end of my readBytes method? Suppose further that I made many calls to my readBytes method and they all failed with a throw? Files are valuable resources.
STEP 5: Find the size of the file in bytes using the handle’s availableData property so I can determine how many bytes I can safely read.*
STEP 6: Make sure the developer doesn’t read outside the bounds of the file’s size. Notice I’m not throwing an exception here. I’m showing you that you have choices when dealing with errors. This is a judgement call. I could say that a bounds mistake while reading can be handled by returning nil to the caller. The caller can then decide what to do when nil is returned. Conversely, Apple considers the failure of a FileHandle initializer to be worthy of an Error. Why not just return nil? I believe that Swift’s authors are pushing the language to be more expressive and that marking methods with throws conveys information more immediately than does having to look up the meaning of a return value, if one was used.
STEP 7: Read the data from the file. Call seek(toFileOffset:) to move the file pointer to the position in the file at which the developer wishes to start reading. Call readData(ofLength:) to grab as many bytes as the developer requested. Finally, convert the data chunk read from file into a string encoded as UTF-8. That string is returned to the caller. Remember that the file we’re reading from will be closed by the defer statement I discussed in STEP 4.
STEP 8: If an exception is thrown in STEP 3, it is caught here in the catch clause. Notice that I built a very precise error message by using the FileSystemError type’s initializer. I’m able to get details like the method name, file name, and line number in which the exception occurred using the little-known but well-documented Swift “Literal Expression” list.
NOTE: In STEP 8, I could’ve caught the NSError thrown by the init(forReadingFrom:) method for FileHandle, but I wanted to show you how to create your own custom Error instances.
* Note that availableData, and several other FileHandle methods and properties, are not marked with throws, but some of their documentation pages state that, for example, “This method raises NSFileHandleOperationException if attempts to determine the file-handle type fail or if attempts to read from the file or channel fail.” What does Apple mean about “this method?” The top of the page for availableData is clearly marked as “Instance Property.” There’s a way to clarify this kind of questionable documentation. I do so by using the Swift compiler.
I wrap a questionable property or method like this in a do try catch block and watch for compiler output:
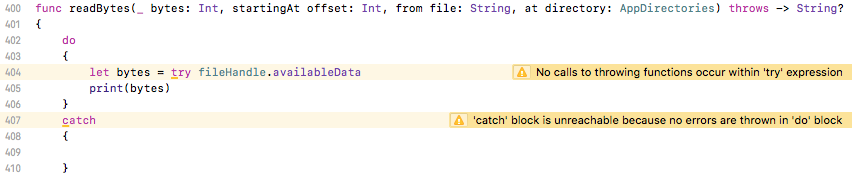
Notice that the line
|
1 |
let bytes = try fileHandle.availableData |
is flagged with the warning “No calls to throwing functions occur within ‘try’ expression.”
RUNNING MY CODE
I’ll first show you examples of my code running successfully and then show you how I deal with exceptions.
Creating some files to manipulate
Let me first use my AppFile class to create some files, one of which I’ll read to obtain some data:
|
1 2 3 4 5 6 7 8 9 10 11 12 13 14 15 16 17 18 19 20 21 22 23 |
struct AppFile : AppFileManipulation, AppFileStatusChecking, AppFileSystemMetaData { let fileName: String var currentAppDirectory: AppDirectories var currentFullPath: URL? init(fileName: String, currentAppDirectory: AppDirectories) { self.fileName = fileName self.currentAppDirectory = currentAppDirectory self.currentFullPath = buildFullPath(forFileName: fileName, inDirectory: currentAppDirectory) } ... func write() { writeFile(containing: "We were talking\nAbout the space\nBetween us all", to: currentAppDirectory, withName: "karma.txt") writeFile(containing: "And the people\nWho hide themselves\nBehind a wall", to: currentAppDirectory, withName: fileName) } ... let file = AppFile(fileName: "dharma.txt", currentAppDirectory: .Documents) file.write() ... |
Here are the file writes in action:

Reading from file without problems
Here’s the code for reading from one of the files I just wrote out:
|
1 2 3 4 5 6 7 8 9 10 11 12 13 14 15 16 17 18 19 20 21 22 23 24 25 26 27 28 29 30 31 32 33 34 |
struct AppFile : AppFileManipulation, AppFileStatusChecking, AppFileSystemMetaData { ... func read(at:Int) throws -> String? { do { let fileContents = try readBytes(48, startingAt: at, from: fileName, at: currentAppDirectory) return fileContents } catch let error as FileSystemError { // propagate the error to the caller throw error } } ... let file = AppFile(fileName: "dharma.txt", currentAppDirectory: .Documents) do { if let contents = try file.read(at: 0) { print(contents) } else { print("Returned nil.") } } catch let error as FileSystemError { FileSystemError.handle(error: error) } |
Here’s the file read in action — and a still image of the console output just in case you have trouble keeping up with the ani-GIF:

|
1 2 3 4 5 6 |
Finished reading file. Defer: file closed. And the people Who hide themselves Behind a wall |
Problem while reading from file
Let me introduce some code into my readBytes function that will throw a FileSystemError. I won’t go into detail as to how I induced an error. Just let me show you where I created several statements that throw. Refer to STEP 7 in my readBytes. I’ll call a couple of lines of code that throw in this section of my method (notice my comment just after the opening brace of my else clause):
|
1 2 3 4 5 6 7 8 9 10 11 12 13 |
... else // STEP 7 { // print("Introduce read error.") // after calling availableData, it's always // a good idea to reset the offset fileHandle.seek(toFileOffset: UInt64(offset)) let data = fileHandle.readData(ofLength: bytes) textRead = String(bytes: data, encoding: .utf8) print("Finished reading file.") } ... |
I could have dealt with the Error where it occurred in readBytes, but instead I’m going to propagate the error up the call stack until I want to deal with the Error. This is the beauty of Error Handling. I can deal with an error deep down inside an SDK. I can deal with it in intermediate-level code that serves as an interface to an SDK, without informing the user as she/he may not need to know about it. Or I can deal with an error at, for example, the UIViewController level and inform the user directly because the error is so severe as to render an app useless.
So I induce the error so that STEP 8 in my readBytes method is invoked. I collect information about a thrown error and re-throw it to the caller, like so:
|
1 2 3 4 5 6 7 |
... catch // STEP 8 { // propagate the error to the caller throw FileSystemError(type: .Read, verboseDescription: "Error during read file.", inMethodName: #function, inFileName: #file, atLineNumber: #line) } ... |
The calling method, read(at:), in my AppFile instance does a catch of the thrown Error, and does a throw up to the next block of code in the call stack, as shown here:
|
1 2 3 4 5 6 7 8 9 10 11 12 13 14 15 |
... func read(at:Int) throws -> String? { do { let fileContents = try readBytes(48, startingAt: at, from: fileName, at: currentAppDirectory) return fileContents } catch let error as FileSystemError { // propagate the error to the caller throw error } } ... |
Finally, the code that started the whole file read process handles the error by calling my static handle(error:) method of my FileSystemError Swift structure:
|
1 2 3 4 5 6 7 8 9 10 11 12 13 14 15 |
do { if let contents = try file.read(at: 0) { print(contents) } else { print("Returned nil.") } } catch let error as FileSystemError { FileSystemError.handle(error: error) } |
Here’s the output to console as the error is caught, both as it happened and as a snapshot:

|
1 2 3 4 5 6 7 8 |
Introduce read error. Defer: file closed. ERROR - operation: [Read]; reason: [Error during read file.]; in method: [readBytes(_:startingAt:from:at:)]; in file: [File System Error Checking.playground]; at line: [326] |
CONCLUSION
Please again review my introductory remarks on error checking in Swift. Today, we knocked out the topics on “handling Swift-defined and Objective-C-defined instances of Error and NSError, respectively,” “defining my own error types using the Error protocol,” and “using the defer construct to perform mandatory cleanup that would otherwise get skipped because an Error is thrown,” but we still need to go over:
- the absence of value,
nil; - expressions like
if let; - constructs like
guard; - creating failable initializers (
init?); and, - using best practices during design to avoid having an overbearing amount of error handling code in my projects.
Might be worth commenting that most of this goes out the window when writing unit tests. An XCTFail( ) simply aborts execution of the current function, with no opportunity to catch any exception, and deferred statements are not executed either.
We don’t strip out error handling so that unit tests will work, rather we use several different methods of testing on a case-by-case basis. We use our own flavor of test-driven development (TDD), we use XCTAssertThrowsError(_:_:file:line:_:) for expressions that throw errors, we use human testing, and we use unit testing. For cases like
defer, we depend on TDD and human testing — but we’re certainly not going to just put a bunch oftry!statements in our production code.