
Last updated on: May 27, 2023
Core Data allows us to store data in the device and make them accessible again even after the app terminates.
Core Data is NOT an SQLite database. It is a powerful framework that can use SQLite to store data.
We can also process the data with filtering, sorting, and calculations tasks. Things that are not achievable using just a database.
The equivalent of Core Data in Android is Room.
Contents
What we’re going to do in this tutorial?
This tutorial will teach you how to save, fetch, update, and delete data using Core Data by implementing them in two example apps that I have created. The Notes and the News app.
About the Notes app
In the Notes app, you write the note and set a priority (high, medium, or low). After you save it, it’s added to the list, and you can delete it by swiping left.
The tricky thing about implementing Core Data in this app is that we save the note’s priority color, a non-standard type.
Non-standard types, like UIColor and CLLocationCoordinate2D, cannot be stored in the database directly. They need to be converted into a supported format before they get stored.
About the News app
The News app gets the data from the web and shows a list of news articles. When you tap on one of them, it opens the browser with the full article.
We’re going to implement Core Data to have the news articles offline on our device. When a new article appears on the list, the stored data in Core Data will get updated automatically.
Notes app
You can find the starter project here
Preparing Core Data
Open the starter project and run it.
Add a new note to the list and then terminate the app.
You’ll see that the note that you wrote it’s not there anymore. This happens because the note was saved in the memory and not in the disk.
Adding Core Data
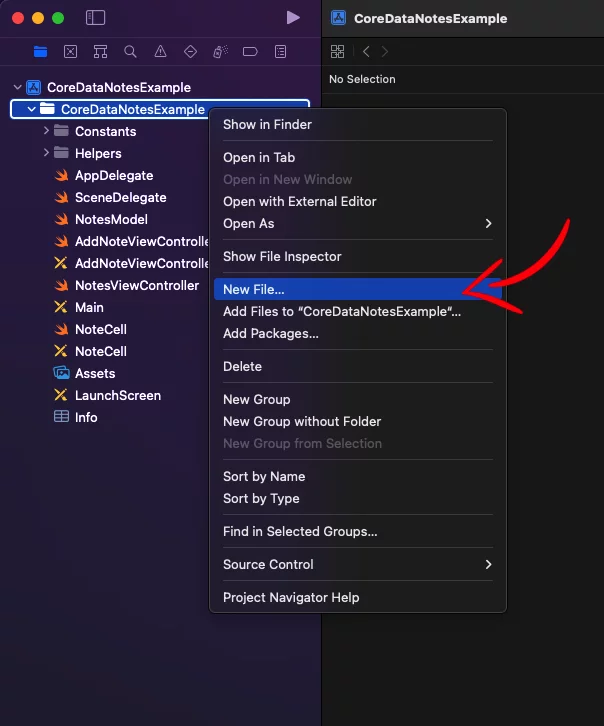
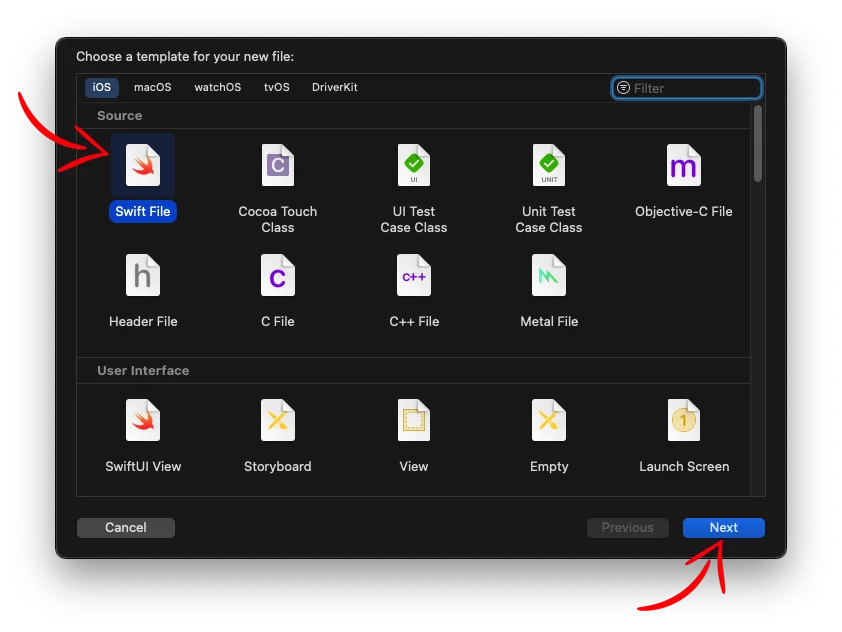
Right-click on your project’s folder in the project navigator and then New File…
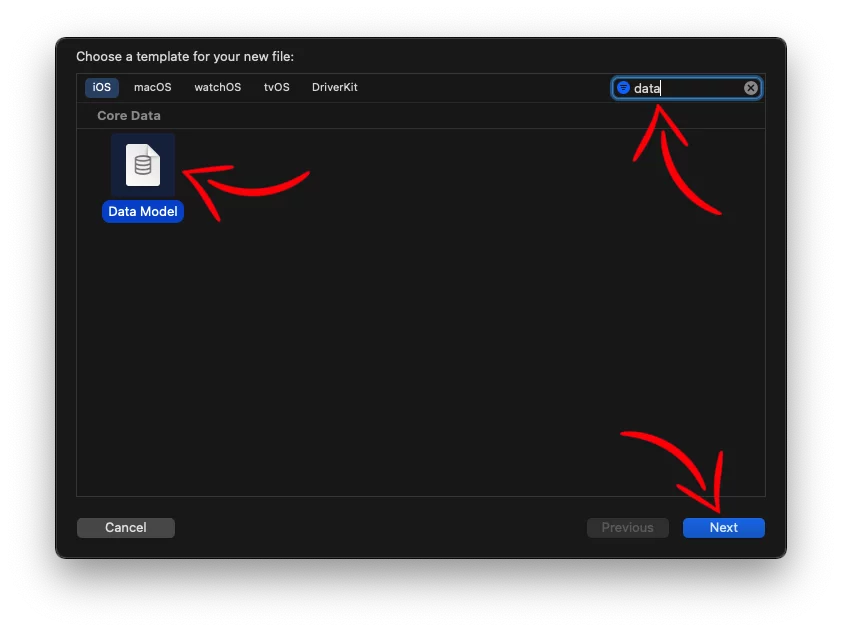
In the new window, type “data” in the top right corner, select Data Model, and press Next.
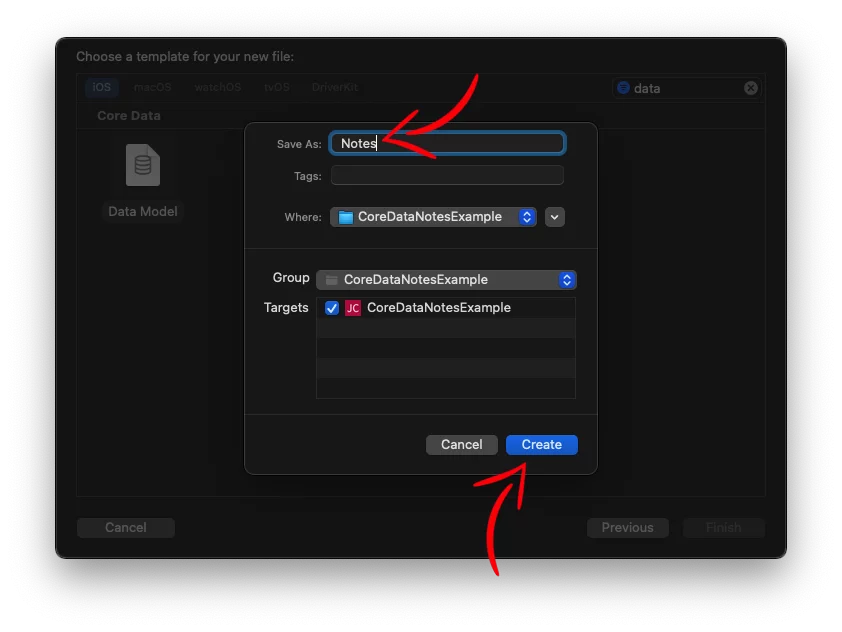
Give it a name, and save it.
Now, let’s add all the necessary code to connect Core Data with our project.
Create a new folder in your project and name it CoreData.

Inside this folder, create a new Swift File with the name CoreDataStack

Then, paste inside the following code:
import CoreData
class CoreDataStack {
private let modelName: String
init(modelName: String) {
self.modelName = modelName
}
private lazy var storeContainer: NSPersistentContainer = {
let container = NSPersistentContainer(name: self.modelName)
container.loadPersistentStores { _, error in
if let error = error as NSError? {
print("Unresolved error \(error), \(error.userInfo)")
}
}
return container
}()
lazy var managedContext: NSManagedObjectContext = self.storeContainer.viewContext
func saveContext() {
guard managedContext.hasChanges else { return }
do {
try managedContext.save()
} catch let error as NSError {
print("Unresolved error \(error), \(error.userInfo)")
}
}
}Code language: Swift (swift)Next, in the AppDelegate file, initialize the CoreDataStack by adding the name of the Core Data Model. Also, create the constant sharedAppDelegate to access the AppDelegate from the View Controllers.
class AppDelegate: UIResponder, UIApplicationDelegate {

    lazy var coreDataStack: CoreDataStack = .init(modelName: "Notes")

    static let sharedAppDelegate: AppDelegate = {
        guard let delegate = UIApplication.shared.delegate as? AppDelegate else {
            fatalError("Unexpected app delegate type, did it change? \(String(describing: UIApplication.shared.delegate))")
        }
        return delegate
    }()

    func application(_ application: UIApplication, didFinishLaunchingWithOptions launchOptions: [UIApplication.LaunchOptionsKey: Any]?) -> Bool {

        // ...

        return true
    }

    // ...

}Code language: Swift (swift)
After that, in the SceneDelegate file, in the sceneDidBackground(_ scene: UIScene) method, add the following line:
class SceneDelegate: UIResponder, UIWindowSceneDelegate {

    var window: UIWindow?

    // ...

    func sceneDidEnterBackground(_ scene: UIScene) {
        // Called as the scene transitions from the foreground to the background.
        // Use this method to save data, release shared resources, and store enough scene-specific state information
        // to restore the scene back to its current state.
        AppDelegate.sharedAppDelegate.coreDataStack.saveContext()
    }

}Code language: Swift (swift)Note: If you have created your project before Xcode 11, the SceneDelegate file doesn’t exist. You have to add it to the AppDelegate file.
This way, Core Data will save the data each time the user leaves the app in the background.
Note: Another way to add Core Data to your project is when you’re creating a new project, check the Core Data checkbox to let Xcode add all the necessary code.
• Setting up the Core Data Model
Now, we are going to create the structure for the data that we want to save with Core Data.
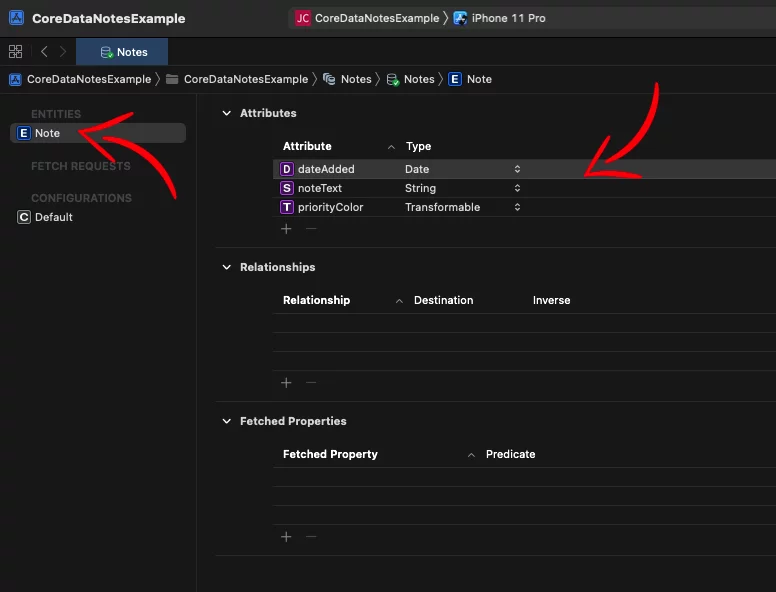
Go to the Core Data Model file, press the plus button to create a new Entity, and give it the name Note.

Note: If you’re familiar with SQL, Entities are like tables.
Inside an Entity, there are Attributes (like columns in SQL).
Now let’s add the following attributes:
- noteText as a type
String: The text of the note we write.
- priorityColor as a type
Transformable: TheUIColorof the selected priority.
- dateAdded as a type
Date: The date the note was added.
Good Thing to Know: When you want to store images, you have to set the type to Binary Data and check the Allows External Storage in the Attribute Inspector. We do this because when we initialize the Core Data, we load all the data to the memory. When you have a lot of saved images, you don’t want them to get loaded every time you open the app, but only when it’s time to show/use them. This way, you’ll avoid any performance issues.

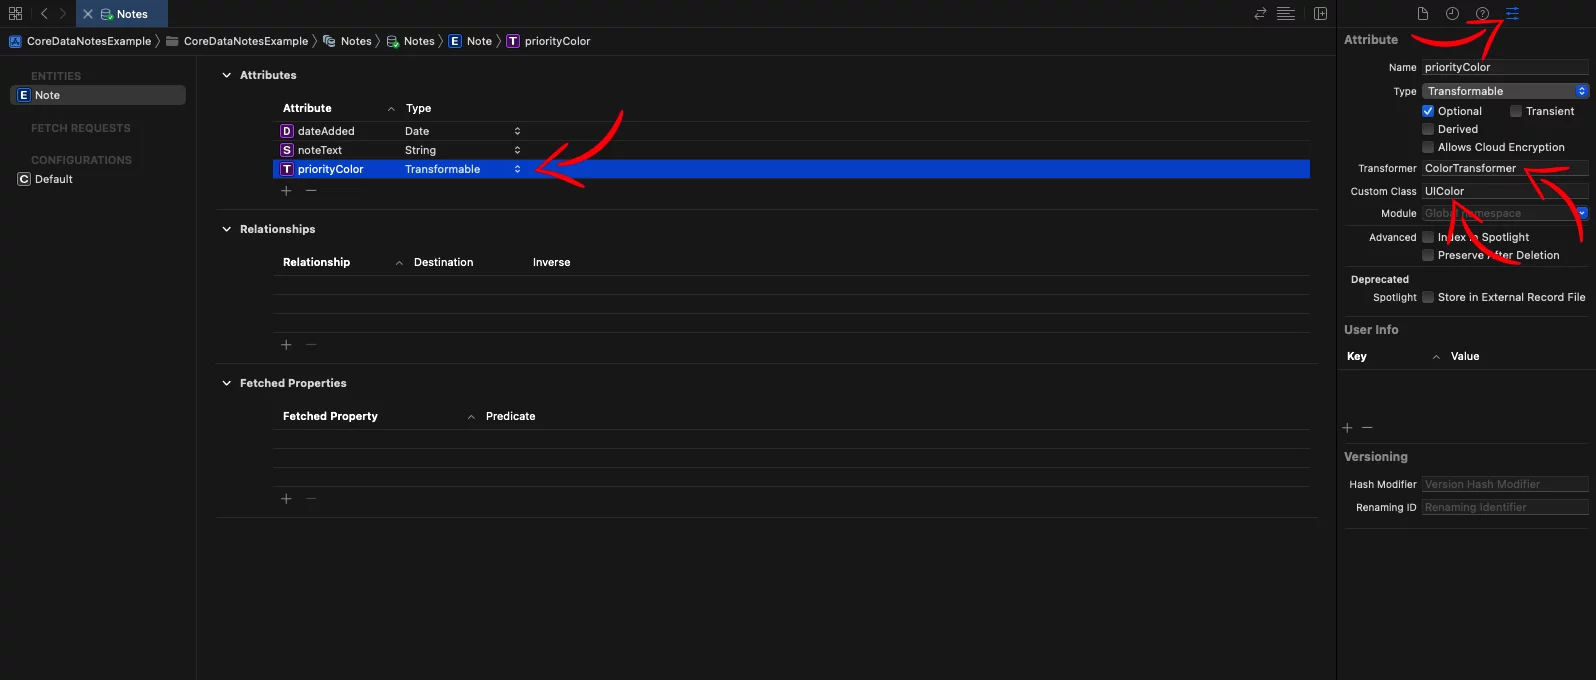
Like I said at the beginning, we’re going to save the color of the selected priority. If you look at the type of the priorityColor attribute is not UIColor but Transformable.
We use the type Transformable to save data that is not supported “out-of-the-box” from Core Data.
To store the colors, we have to create a new file to convert the UIColor into Core data supported format.
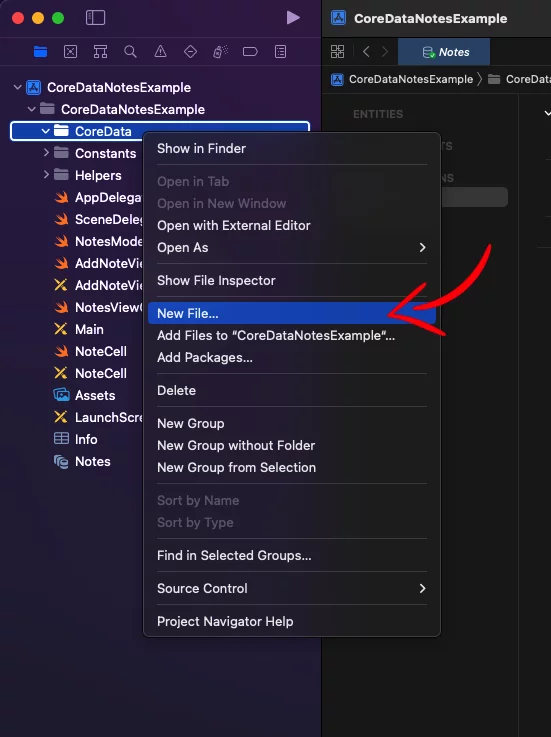
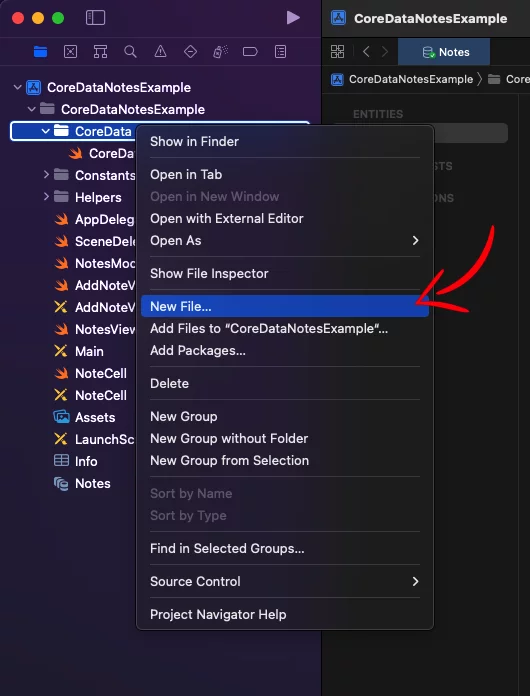
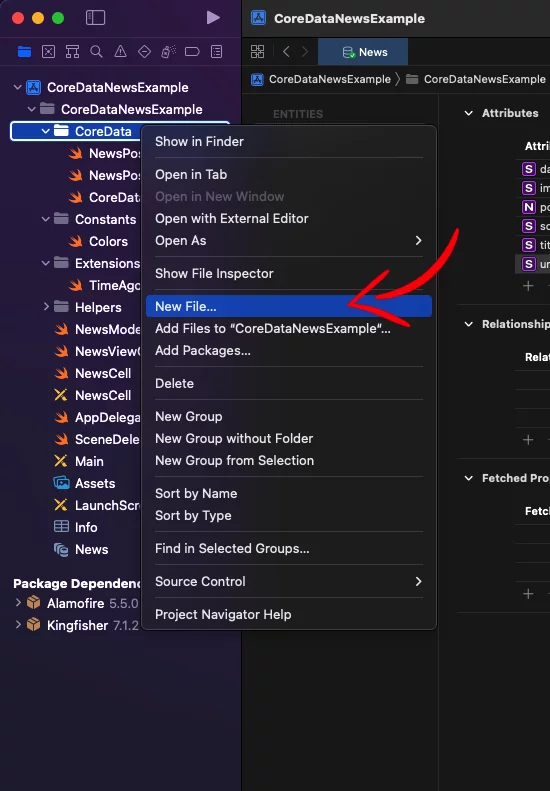
Go to the CoreData folder, right-click and select New File…
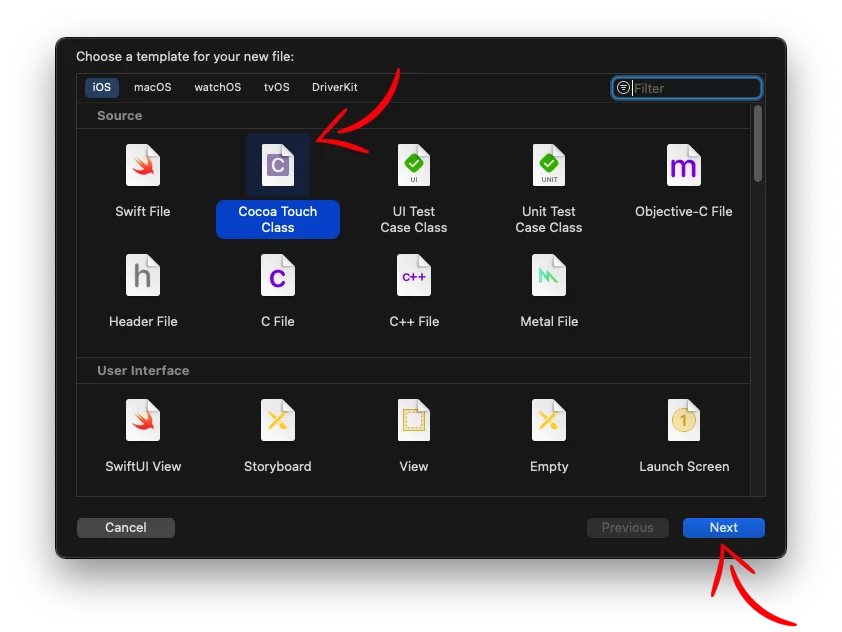
In the new window, select Cocoa Touch Class.
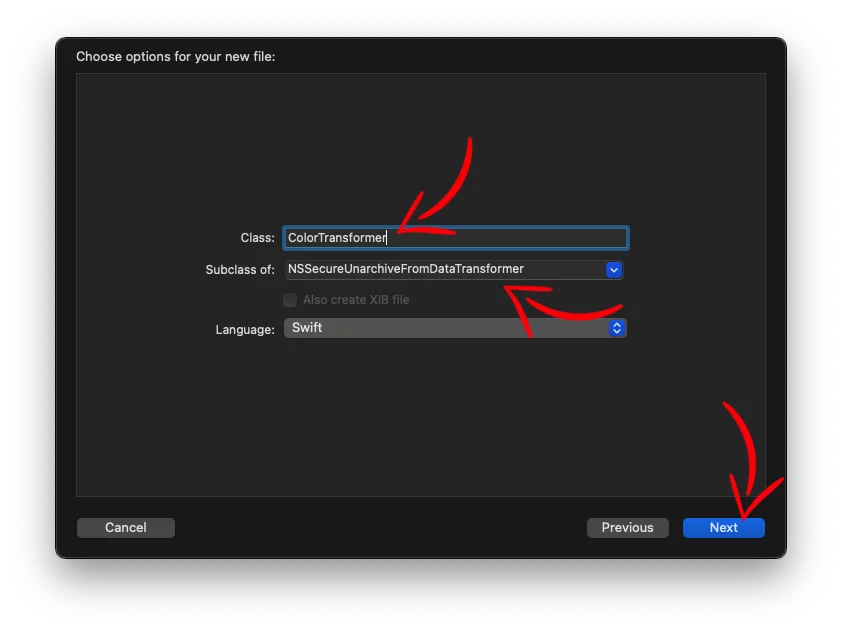
Give it the name ColorTransformer and subclass of NSSecureUnarchiveFromDataTransformer
Inside this file, paste the following code:
class ColorTransformer: NSSecureUnarchiveFromDataTransformer {
    override static var allowedTopLevelClasses: [AnyClass] {
        [UIColor.self]
    }

    static func register() {
        let className = String(describing: ColorTransformer.self)
        let name = NSValueTransformerName(className)

        let transformer = ColorTransformer()
        ValueTransformer.setValueTransformer(
            transformer, forName: name)
    }
}Code language: Swift (swift)
Go to AppDelegate, and inside the application(_:didFinishLaunchingWithOptions:) and register the ColorTransformer
class AppDelegate: UIResponder, UIApplicationDelegate {

    // ...

    func application(_ application: UIApplication, didFinishLaunchingWithOptions launchOptions: [UIApplication.LaunchOptionsKey: Any]?) -> Bool {

        // Register all transformers for Core Data
        <strong>ColorTransformer.register()</strong>

        return true
    }

}Code language: Swift (swift)
Now, go back to Core Data Model, select the priorityColor attribute in the Attribute Inspector tab, add the ColorTransformer as a Transformer and UIColor as a Custom Class.
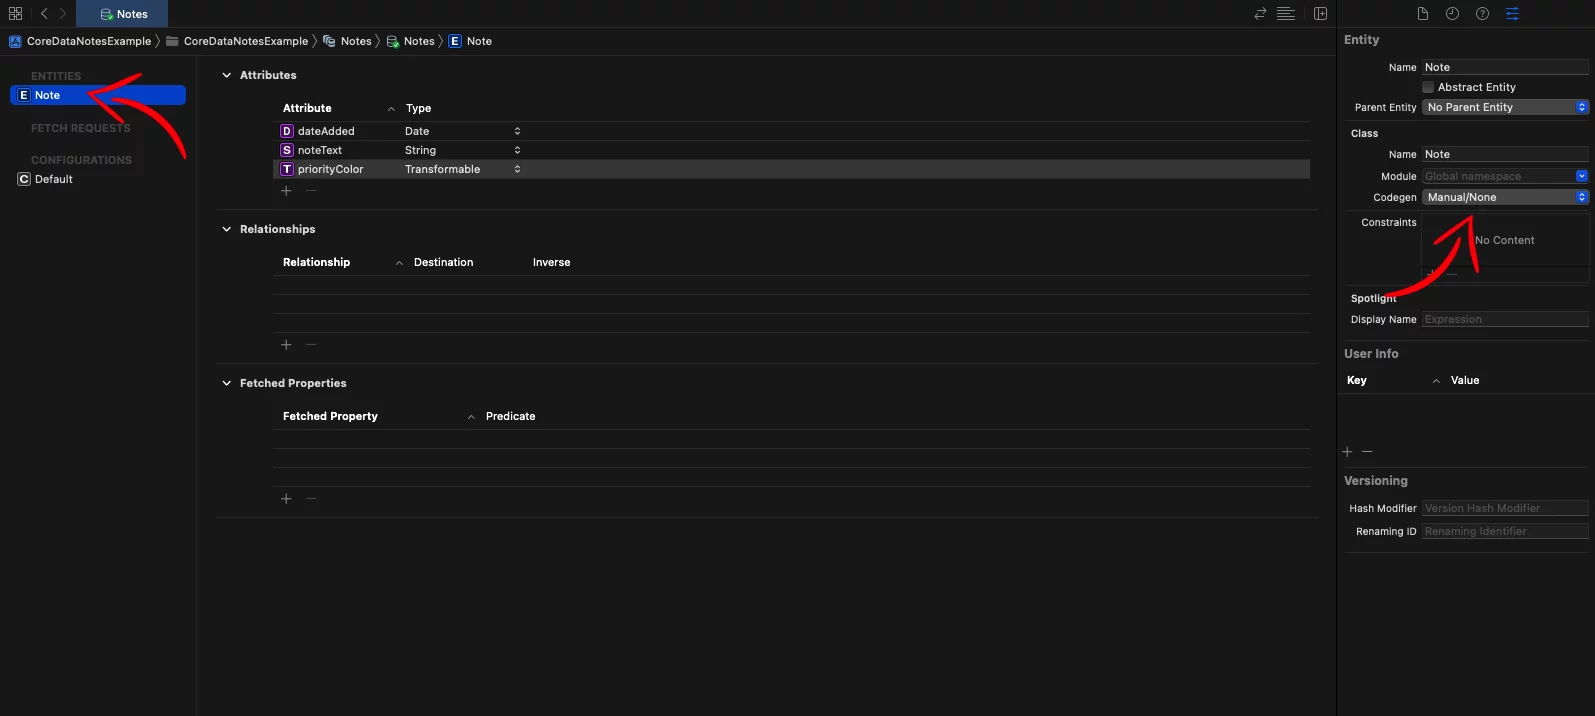
If you build the app, you’ll get an error. This is happening because Xcode automatically generates files during the build for the entities we have in our Core Data Model, and it doesn’t recognize the UIColor class.
So, we have to add these files to our project and change some things, but first, let’s disable the auto-generated files.
Select the Note entity, go to the Attribute Inspector tab, and set Codegen to Manual/None.
Select the Core Data Model file, and go Editor > Create NSManagedObject Subclass…
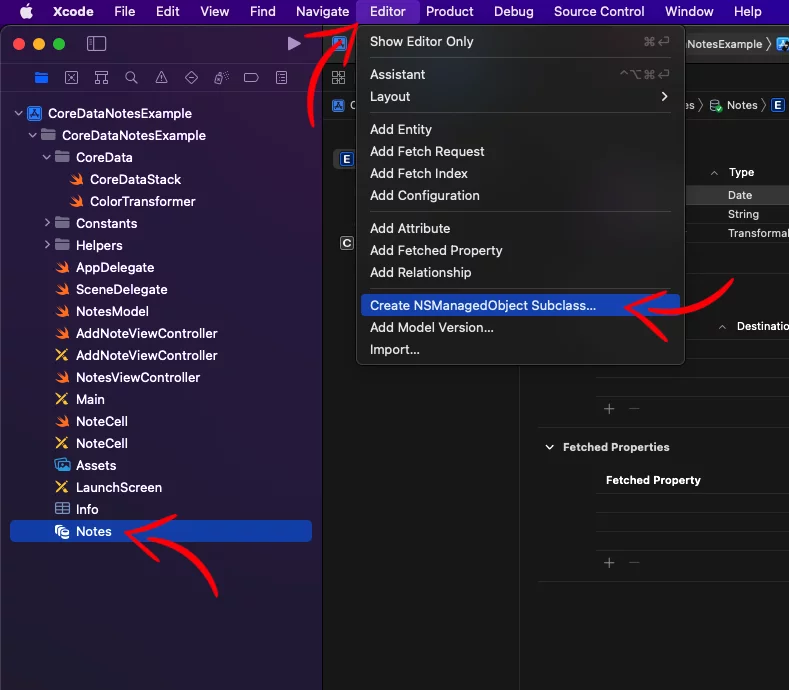
Follow the steps (Next, Next, Create) in the new window.
Move both files using drag-n-drop into the CoreData folder.
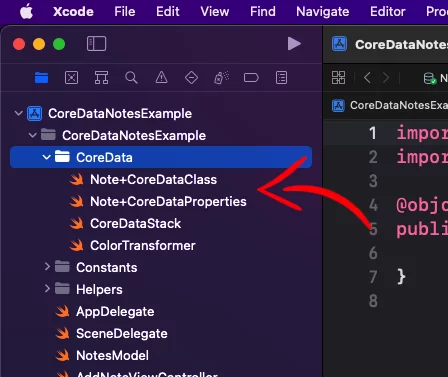
Inside the Note+CoreDataProperties file, add the UIKit framework.
So, in the end, the file will look like that:
import CoreData
import Foundation
import UIKit

public extension Note {
    @nonobjc class func fetchRequest() -> NSFetchRequest<Note> {
        return NSFetchRequest<Note>(entityName: "Note")
    }

    @NSManaged var dateAdded: Date?
    @NSManaged var noteText: String?
    @NSManaged var priorityColor: UIColor?
}

extension Note: Identifiable {}Code language: Swift (swift)
Saving data
First, we replace the notes model with Core Data’s NSManagedObject.
Go to the NotesViewController file, and change the model:
class NotesViewController: UIViewController {
    @IBOutlet var tableView: UITableView!
    @IBOutlet var addNoteButton: UIBarButtonItem!

    // REPLACE THIS
    var notes = NotesModel()

    // WITH THIS
    var notes = [Note]()

    override func viewDidLoad() {
        super.viewDidLoad()
        // ...
    }
}Code language: Swift (swift)
After we create a new note, by pressing the + button on the top right, we return the data to the NotesViewController using a closure.
@IBAction func addNoteButtonAction(_ sender: UIBarButtonItem) {
    // Open pop up to create a new note.
    let addNoteVC = AddNoteViewController(nibName: AddNoteViewController.identifier, bundle: nil)
    addNoteVC.modalTransitionStyle = .crossDissolve
    addNoteVC.modalPresentationStyle = .custom

    // Closure returns the note and selected priority from the AddNoteViewController, and we insert it at the top of the list.
    addNoteVC.saveNote = { [weak self] noteText, priorityColor in
        guard let self = self else { return }
        self.notes.insert(NotesModelItem(noteText: noteText, priorityColor: priorityColor), at: 0)
        DispatchQueue.main.async {
            self.tableView.reloadData()
        }
    }

    present(addNoteVC, animated: true, completion: nil)
}Code language: Swift (swift)
We’re going to replace the code inside the closure (saveNote) to store the notes in the Core Data.
addNoteVC.saveNote = { [weak self] noteText, priorityColor in
    guard let self = self else { return }

    let managedContext = AppDelegate.sharedAppDelegate.coreDataStack.managedContext
    let newNote = Note(context: managedContext)
    newNote.setValue(Date(), forKey: #keyPath(Note.dateAdded))
    newNote.setValue(noteText, forKey: #keyPath(Note.noteText))
    newNote.setValue(priorityColor, forKey: #keyPath(Note.priorityColor))
    self.notes.insert(newNote, at: 0)
    AppDelegate.sharedAppDelegate.coreDataStack.saveContext() // Save changes in CoreData
    DispatchQueue.main.async {
        self.tableView.reloadData()
    }
}Code language: Swift (swift)
Here, we create a new note, and we save the noteText and priorityColor parameters using the name of the attributes we put in the Core Data Model as the keys.
Then we insert the new note to the notes model at the top of the list.
Lastly, we save the changes in Core Data and we reload the UITableView.
Tip: Instead of using hardcoded string for the key names, you can use #keyPath()
Note: Every time you add, delete or edit something, don’t forget to call saveContext() to save the changes in Core Data.
Fetching data
To get the list of notes, we make a new method that returns all the data from Core Data using NSFetchRequest and call it every time we open the app.
import CoreData

// ...

override func viewDidLoad() {
    super.viewDidLoad()
    // ...
    self.getNotes()
}

func getNotes() {
    let noteFetch: NSFetchRequest<Note> = Note.fetchRequest()
    let sortByDate = NSSortDescriptor(key: #keyPath(Note.dateAdded), ascending: false)
    noteFetch.sortDescriptors = [sortByDate]
    do {
        let managedContext = AppDelegate.sharedAppDelegate.coreDataStack.managedContext
        let results = try managedContext.fetch(noteFetch)
        notes = results
    } catch let error as NSError {
        print("Fetch error: \(error) description: \(error.userInfo)")
    }
}Code language: Swift (swift)
Updating data
In the app, we use the didSelectRowAt method to detect when you tap on a note from the list, and we pass the data to the AddNoteViewController to edit them. When the edit is done, we return the data using a closure (the same as we do with new notes)
Go to didSelectRowAt, and replace the saveNote closure with the following code to update the data in Core Data.
addNoteVC.saveNote = { [weak self] noteText, priorityColor in
    guard let self = self else { return }
    self.notes[indexPath.row].setValue(noteText, forKey: #keyPath(Note.noteText))
    self.notes[indexPath.row].setValue(priorityColor, forKey: #keyPath(Note.priorityColor))
    AppDelegate.sharedAppDelegate.coreDataStack.saveContext()
    DispatchQueue.main.async {
        self.tableView.beginUpdates()
        self.tableView.reloadRows(at: [indexPath], with: .fade)
        self.tableView.endUpdates()
    }
}Code language: Swift (swift)
And also, above the closure pass optional arguments in the setNote
addNoteVC.setNote(text: currentNote.noteText ?? "", priorityColor: currentNote.priorityColor ?? UIColor.clear)

// ...

addNoteVC.saveNote = { [weak self] noteText, priorityColor in
    // ...
}Code language: Swift (swift)
Deleting data
If you want to delete a note, you can do it by swiping left. To delete it in Core Data, you have to add the following code in the trailingSwipeActionsConfigurationForRowAt method inside the deleteAction:
let deleteAction = UIContextualAction(style: .destructive, title: nil) { _, _, complete in
    // Remove the note from the CoreData
    AppDelegate.sharedAppDelegate.coreDataStack.managedContext.delete(self.notes[indexPath.row])
    self.notes.remove(at: indexPath.row)
    // Save Changes
    AppDelegate.sharedAppDelegate.coreDataStack.saveContext()
    // Remove row from TableView
    self.tableView.deleteRows(at: [indexPath], with: .automatic)
    complete(true)
}Code language: Swift (swift)
You can find the final project here
News app
You can find the starter project here
Preparing and Adding Core Data
We will do the same as did in the Notes app: create a new Core Data Model, add the necessary code, add a new Entry and Attributes, and add the generated files manually (NewsPosts+CoreDataClass.swift and NewsPosts+CoreDataProperties.swift).
The Entity has the name “NewsPosts”, and the attributes are:
- date as a type
String: Date of the post.
- image as a type
String: URL of the thumbnail.
- postID as a type
Integer 32: Unique id that each post has.
- source as a type
String: Name of the website that has the article.
- title as a type
String: Title of the article.
- url as a type
String: URL of the article.

Setting up NSFetchedResultsController
In this app, we’re going to use NSFetchedResultsController.
NSFetchedResultsController was built to make the whole process of using Core Data to a UITableView a lot easier.
Inside the CoreData folder, create a new file and name it NewsPostsProvider

Inside this file, we’re going to set up all the code that we need to retrieve the data from Core Data using the NSFetchedResultsController.
import CoreData
import UIKit

class NewsPostsProvider {
    private(set) var managedObjectContext: NSManagedObjectContext
    private weak var fetchedResultsControllerDelegate: NSFetchedResultsControllerDelegate?

    init(with managedObjectContext: NSManagedObjectContext,
         fetchedResultsControllerDelegate: NSFetchedResultsControllerDelegate?)
    {
        self.managedObjectContext = managedObjectContext
        self.fetchedResultsControllerDelegate = fetchedResultsControllerDelegate
    }

    /**
     A fetched results controller for the NewsPosts entity, sorted by date.
     */
    lazy var fetchedResultsController: NSFetchedResultsController<NewsPosts> = {
        let fetchRequest: NSFetchRequest<NewsPosts> = NewsPosts.fetchRequest()
        fetchRequest.sortDescriptors = [NSSortDescriptor(key: #keyPath(NewsPosts.date), ascending: false)]

        let controller = NSFetchedResultsController(
            fetchRequest: fetchRequest, managedObjectContext: managedObjectContext,
            sectionNameKeyPath: nil,
            cacheName: nil)
        controller.delegate = fetchedResultsControllerDelegate

        do {
            try controller.performFetch()
        } catch {
            print("Fetch failed")
        }

        return controller
    }()
}Code language: Swift (swift)
Now, in the NewsViewController we’re going to initialize the provider:
import CoreData

class NewsViewController: UIViewController {

    // ...

    lazy var dataProvider: NewsPostsProvider = {
        let managedContext = AppDelegate.sharedAppDelegate.coreDataStack.managedContext
        let provider = NewsPostsProvider(with: managedContext, fetchedResultsControllerDelegate: self)
        return provider
    }()

    override func viewDidLoad() {
        super.viewDidLoad()
        // ...
    }
}Code language: Swift (swift)
And add the NSFetchedResultsControllerDelegate at the bottom of the page with the following methods.
// MARK: - Fetched Results Delegate
extension NewsViewController: NSFetchedResultsControllerDelegate {
    func controllerWillChangeContent(_ controller: NSFetchedResultsController<NSFetchRequestResult>) {
        tableView.beginUpdates()
    }

    func controller(_ controller: NSFetchedResultsController<NSFetchRequestResult>, didChange sectionInfo: NSFetchedResultsSectionInfo, atSectionIndex sectionIndex: Int, for type: NSFetchedResultsChangeType) {
        switch type {
        case .insert:
            tableView.insertSections(IndexSet(integer: sectionIndex), with: .none)
        case .delete:
            tableView.deleteSections(IndexSet(integer: sectionIndex), with: .none)
        default:
            break
        }
    }

    func controller(_ controller: NSFetchedResultsController<NSFetchRequestResult>, didChange anObject: Any, at indexPath: IndexPath?, for type: NSFetchedResultsChangeType, newIndexPath: IndexPath?) {
        switch type {
        case .insert:
            tableView.insertRows(at: [newIndexPath!], with: .none)
        case .delete:
            tableView.deleteRows(at: [indexPath!], with: .none)
        case .move:
            tableView.deleteRows(at: [indexPath!], with: .none)
            tableView.insertRows(at: [newIndexPath!], with: .none)
        case .update:
            guard let cell = tableView.dequeueReusableCell(withIdentifier: NewsCell.identifier, for: indexPath!) as? NewsCell else { fatalError("xib doesn't exist") }
            let post = dataProvider.fetchedResultsController.object(at: indexPath!)
            // Thumbnail
            cell.thumbnailImageView.kf.setImage(with: URL(string: post.image!)!, placeholder: nil, options: [.transition(.fade(0.33))])
            // Title
            cell.titleLabel.text = post.title
            // Date
            cell.dateLabel.text = post.date?.iso8601Value()?.timeAgoSinceDate()
            // Source
            cell.sourceLabel.text = "Source: \(post.source!)"
        default:
            break
        }
    }

    func controllerDidChangeContent(_ controller: NSFetchedResultsController<NSFetchRequestResult>) {
        tableView.endUpdates()
    }
}Code language: Swift (swift)
Every time you open the app without an internet connection, the .update in the controller(_:didChange:at:for:newIndexPath:) method will be called and show the stored data from the Core Data in the UITableView.
Saving/Updating the data
Now, let’s see how to save or update the data (news articles) when we open the app while we have an internet connection.
Inside the NewsPosts+CoreDataProperties file, we add a new method called createOrUpdate that takes the model of the item and compares the item’s postID with the item’s postID from the database. If the postID does not exist in the database, it creates a new item. If it exists, it updates the stored data.
public extension NewsPosts {

    // ...

    internal class func createOrUpdate(item: NewsModelItem, with stack: CoreDataStack) {
        let newsItemID = item.id
        var currentNewsPost: NewsPosts? // Entity name
        let newsPostFetch: NSFetchRequest<NewsPosts> = NewsPosts.fetchRequest()
        if let newsItemID = newsItemID {
            let newsItemIDPredicate = NSPredicate(format: "%K == %i", #keyPath(NewsPosts.postID), newsItemID)
            newsPostFetch.predicate = NSCompoundPredicate(andPredicateWithSubpredicates: [newsItemIDPredicate])
        }
        do {
            let results = try stack.managedContext.fetch(newsPostFetch)
            if results.isEmpty {
                // News post not found, create a new.
                currentNewsPost = NewsPosts(context: stack.managedContext)
                if let postID = newsItemID {
                    currentNewsPost?.postID = Int32(postID)
                }
            } else {
                // News post found, use it.
                currentNewsPost = results.first
            }
            currentNewsPost?.update(item: item)
        } catch let error as NSError {
            print("Fetch error: \(error) description: \(error.userInfo)")
        }
    }

    internal func update(item: NewsModelItem) {
        // Title
        self.title = item.title
        // Thumbnail
        self.image = item.imageURL
        // Date
        self.date = item.date
        // Source
        self.source = item.source
        // Post URL
        self.url = item.url
    }
}

// ...Code language: Swift (swift)
And in the NewsViewController, we’re gonna call this method for every item (news article) that we get from the web.
func getData() {
    var urlRequest = URLRequest(url: URL(string: "https://raw.githubusercontent.com/johncodeos-blog/CoreDataNewsExample/main/news.json")!)
    urlRequest.cachePolicy = .reloadIgnoringLocalCacheData // We don't want Alamofire to store the data in the memory or disk
    AF.request(urlRequest).responseDecodable(of: NewsModel.self) { response in
        self.processFectchedNewsPosts(news: response.value!)
    }
}

private func processFectchedNewsPosts(news: NewsModel) {
    for item in news {
        NewsPosts.createOrUpdate(item: item, with: AppDelegate.sharedAppDelegate.coreDataStack)
    }
    AppDelegate.sharedAppDelegate.coreDataStack.saveContext() // Save changes in Core Data
    DispatchQueue.main.async {
        self.tableView.reloadData()
    }
}Code language: Swift (swift)
Fetching the data
Lastly, to fetch the list of news articles in the UITableView, we have to get the data using the dataProvider we initialized before.
extension NewsViewController: UITableViewDataSource, UITableViewDelegate {
    func numberOfSections(in tableView: UITableView) -> Int {
        return dataProvider.fetchedResultsController.sections?.count ?? 0
    }

    func tableView(_ tableView: UITableView, numberOfRowsInSection section: Int) -> Int {
        let sectionInfo = dataProvider.fetchedResultsController.sections![section]
        return sectionInfo.numberOfObjects
    }

    func tableView(_ tableView: UITableView, cellForRowAt indexPath: IndexPath) -> UITableViewCell {
        guard let cell = tableView.dequeueReusableCell(withIdentifier: NewsCell.identifier, for: indexPath) as? NewsCell else { fatalError("xib doesn't exist") }
        let currentPost = dataProvider.fetchedResultsController.object(at: indexPath)
        // Thumbnail
        cell.thumbnailImageView.kf.setImage(with: URL(string: currentPost.image!)!, placeholder: nil, options: [.transition(.fade(0.33))])
        // Title
        cell.titleLabel.text = currentPost.title
        // Date
        cell.dateLabel.text = currentPost.date?.iso8601Value()?.timeAgoSinceDate()
        // Source
        cell.sourceLabel.text = "Source: \(currentPost.source ?? "N/A")"
        return cell
    }

    // ...

    func tableView(_ tableView: UITableView, didSelectRowAt indexPath: IndexPath) {
        let currentPost = dataProvider.fetchedResultsController.object(at: indexPath)
        // Open the URL on browser
        UIApplication.shared.open(URL(string: currentPost.url!)!, options: [:], completionHandler: nil)
    }
}Code language: Swift (swift)
You can find the final project here
If you have any questions, please feel free to leave a comment below