

ARKit might seem intimidating but it’s not so bad if you already have some basic experience building iOS apps.
I’m a learn-by-doing type, so I’ve been playing around with ARKit, building basic apps to get familiar with it. In this post, I’ll review what I’ve learned creating a simple face tracking app.
I’ll do this in 3 parts:
- Initial Setup → First things first, get Camera permissions and make sure the device can use ARKit.
- Smile tracking → Start tracking smiles with ARKit. This is probably what you’re here for.
- User Interface → Add the UI for our app that will react to smiles.
As of this writing, the Xcode simulator does not support the front facing camera so you will need a real device to run the app. Your device will also need to have a TrueDepth camera (iPhone X or newer should be fine).
Finally, for my fellow members of the Copy Paste Club, all the code is available on Github.
Initial Setup
Start by opening up Xcode and creating a new project named “SmileTracker” (or whatever name you prefer).
Before we can get into face tracking, we’ll need to do two things:
- Make sure your device supports ARKit
- Get permission to access your device’s camera
In your new project, open ViewController.swift. Near the top of the file, underneath import UIKit, add the line: import ARKit. This will let us access all the goodies that Apple has provided us to make face tracking super easy.
Now add the following code inside of viewDidLoad:
guard ARFaceTrackingConfiguration.isSupported else {
    fatalError("Device does not support face tracking")
}
ARFaceTrackingConfiguration.isSupported is a boolean that will be true if the device running the app can support face tracking and false if not. In this case, if the device can’t support face tracking, we’ll crash the app with a fatal error.
Next, let’s get permission to use the camera. Add the following in viewDidLoad below our guard statement:
AVCaptureDevice.requestAccess(for: AVMediaType.video) { granted in
   if (granted) {
      Dispatch.main.sync {
          // We're going to implement this function in a minute
          self.setupSmileTracker()
      }
   } else {
      fatalError("User did not grant camera permission!")
   }
}
Here we’re asking the device to request camera permissions. If the user grants permissions, we’ll run the function that will setup our smile tracking (don’t worry about the error, we’ll be implementing this function in a moment).
We wrap the function in Dispatch.main.sync because we’ll be adding UI elements in this function, which can only be done on the main thread.
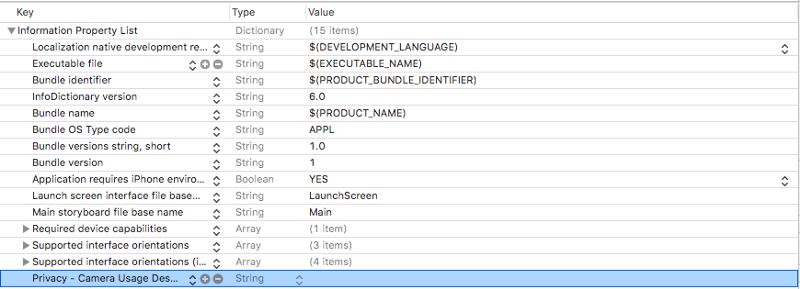
We’ll also need to add a Camera Usage Description to our Info.plist. Open Info.plist and add a new row (you can do this by highlighting the last row and hitting enter).
In the row you just created, add Privacy — Camera Usage Description to the Key column and make sure the Type column is set to string. You can leave the Value column blank or add a message to explain how you will use the camera to the user.
Your Info.plist should now look something like this:
If you’d like to test your app so far, you can comment out the line where we call setupSmileTracker(). Just remember to uncomment it later.
If you run your app now, you should see a popup asking you to enable camera permissions. If you say no you’ll have to go to application settings to enable those permissions in order for the app to run.
If the app crashes, check the console for one of our two error messages to see what went wrong.
Smile tracking
Open ViewController.swift and add the following variable to the top of ViewController:
class ViewController: UIViewController {
   let sceneView = ARSCNView()

   override func viewDidLoad() {...}
}
ARSCNView comes equipped with an ARSession that your iPhone uses to coordinate AR experiences. We’ll be using sceneView’s ARSession to analyze our user’s face through the front facing camera.
Add this function to your file underneath viewDidLoad:
func setupSmileTracker() {
   let configuration = ARFaceTrackingConfiguration()
   sceneView.session.run(configuration)
   sceneView.delegate = self
   view.addSubview(sceneView)
}
Here we’ve created a configuration to handle face tracking and used it to run our sceneView’s ARSession.
Then we set sceneView's delegate to self and add it to our view.
Xcode will tell you that there is a problem since ViewController does not conform to ARSCNViewDelegate. Go to where ViewController is declared near the top of the file and change the line to the following:
class ViewController: ViewController, ARSCNViewDelegate {
   ...
}
Now add thisARSCNViewDelegate function in your ViewController class setupSmileTracker:
func renderer(_renderer: SCNSceneRenderer, didUpdate node: SCNNode, for anchor: ARAnchor) {
   ...
}
renderer will run every time our scene updates and provides us with the ARAnchor that corresponds to the user’s face.
To make it easier to create face tracking experiences, Apple automatically creates an ARFaceAnchor and adds it to our session when we use an ARFacetrackingConfiguration to run it. This ARFaceAnchor is then passed into renderer as an ARAnchor.
Add the following code to renderer:
func renderer(_renderer: SCNSceneRenderer, didUpdate node: SCNNode, for anchor: ARAnchor) {
   // 1
   guard let faceAnchor = anchor as? ARFaceAnchor else { return }

   // 2
   let leftSmileValue = faceAnchor.blendshapes[.mouthSmileLeft] as! CGFloat
   let rightSmileValue = faceAnchor.blendShapes[.mouthSmileRight] as! CGFloat

   // 3
   print(leftSmileValue, rightSmileValue)
}
There’s a lot going on inside this function so I’ve numbered the steps (Ray Wenderlich style).
In step 1 we convert the ARAnchor into an ARFaceAnchor and assign it to the faceAnchor variable.
ARFaceAnchor contains information about the current position and orientation, topology, and facial expression of the face we’re tracking.
ARFaceAnchor stores information about facial expressions in its variable blendShapes. blendShapes is a dictionary that stores coefficients corresponding to various facial features. If you’re interested, I suggest you check out the full list of facial features in Apple’s documentation. (Hint: if you want to add frown tracking you’ll find a way to do it in here.)
In step 2, we use faceAnchor.blendShapes to get the a CGFloat that corresponds to how much the left and right sides of the user’s mouth is smiling by using the keys mouthSmileLeft and mouthSmileRight.
Finally, step 3 just prints out the two values so you can make sure it’s working properly ?.
At this point you should have an app that:
- Gets camera and face tracking permissions from the user
- Uses ARKit to track the users facial expressions
- Prints how much the user is smiling on the left and right sides of their mouth to the console
We’ve made a lot of progress, so let’s take a second to make sure everything is running properly.
When you run the app for the first time, you should be asked if you will grant camera permissions. Make sure to say yes.
You’ll then be sent to a blank screen, but you should start seeing CGFloat values being printed to the console (there may be a short delay before you see them).
When you smile at your phone you should notice the values being printed going up. The more you smile the higher the numbers go.
If it’s working properly, congratulations ?! If you’re running into an error, double check to make sure your device supports face tracking and you have camera permissions turned on. If you’ve been following this writeup from the beginning the console will print errors in both those cases.
User interface
So we’re tracking faces, now let’s build the UI to react to smiles.
First add a new UILabel called smileLabel to the top of the file, just below sceneView.
class ViewController: UIViewController {
   let sceneView = ARSCNView()
   let smileLabel = UILabel()

   ...
}
This will be the view that reacts to the user’s facial expressions.
Add the following code at the bottom of your setupSmileTracker function:
smileLabel.text = "?"smileLabel.font = UIFont.systemFont(ofSize: 150)

view.addSubview(smileLabel)

// Set constraints
smileLabel.translatesAutoresizingMaskIntoConstraints = false
smileLabel.centerXAnchor.constraint(equalTo: view.centerXAnchor).isActive = true
smileLabel.centerYAnchor.constraint(equalTo: view.centerYAnchor).isActive = true
Here, we’re adding the basic UI properties to our smileLabel and setting its constraints so it is in the middle of the screen. Now when you run the app, you should see a giant ? emoji in the middle.

Once you see the emoji appear, add the following function to your ViewController:
func handleSmile(leftValue: CGFloat, rightValue: CGFloat) {
   let smileValue = (leftValue + rightValue)/2.0
   switch smileValue {
   	  case _ where smileValue > 0.5:
      	 smileLabel.text = "?"
      case _ where smileValue > 0.2:
         smileLabel.text = "?"
      default:
         smileLabel.text = "?"
   }
}
This function will change the emoji in our smileLabel depending on how much the user is smiling into the camera. We calculate the smileValue by taking the average of the left and right smile values given to us by our ARFaceAnchor (very scientific, I know).
Plug that value into the switch statement, and the more the user smiles the happier our emoji gets.
Finally, go back to our renderer function and add this to the bottom to plug in our left and right smile values into handleSmile:
DispatchQueue.main.async {
   self.handleSmile(leftValue: leftSmileValue, rightValue: rightSmileValue)
}
Again, we use DispatchQueue because we are making changes to the UI, which must be done on the main thread.
When you run the app you should now see the emoji change depending on how much you smile at it.
In the gif below I’ve added my face so that you can see it working with the camera output along with the emoji.
Your app won’t have the camera output, but you can add it by adding our ARSCNView, sceneView, to the superview and giving it dimensions.
Wrapping up
I hope this post was helpful for you to get started creating apps with ARKit.
If you want to extend this app further, check out the list I mentioned above with all the other facial features you can track. I left a hint for how to extend this to check for frowns as well.
Come back and comment with any cool projects you create on your own, I’m still getting my feet wet with this stuff so it’d be excited to see more complex apps.
I’ve posted all the code for this app up on Github for feedback and questions. Thanks for reading and good luck!
Thanks so much for reading! If you liked this story, follow me on Twitter where I post updates about stories I’m working on and what I’m up to.