A Styleguide
A few years ago we introduced a Styleguide into each of our website builds. The styleguide is used to create components and global styles across the site, and help to speed up our build time.

CMS Guide
The other client-facing document we created was a CMS Guide. Until now, this has been a branded Google Word Document that we send to the client before launch, to support a full CMS training session. This outlines how Craft works, and how each section of the site has been designed so they can easily update their site.
While this has served us well, there was the issue of the client saving or printing this documentation. When their content editors moved on, we often had to resend the guide, which isn’t user friendly or efficient.
The process of creating the guide was pretty tedious. Generally it involved manually cutting/pasting content to create a new guide. It also requires quite a bit of effort to maintain all the guides, through CMS updates and site development.
Clients also aren’t always in the Google Docs ecosystem. This makes the documents hard for them to find online. Often clients will print them out, rather than referring to the “live” version. This means old versions end up hanging around long past their use-by date.
Our Solution
As a team we discussed creating a plugin. One which would display links to the Styleguide and CMS Guide within Craft itself.
The first step was moving the CMS guide into the CMS. Originally we thought of doing this as hard coded Twig files, however we knew down the line this would cause some problems when we needed to add specific content for the client. With this in mind, we decided the CMS guide should be created within the CMS as its own structure.
How the plugin should work
During our initial conversations we decided the plugin would have the following areas:
A Dashboard
This area will house the external links for the Styleguide and CMS Guide. This will make it easy for the client to access the guides from the admin area.

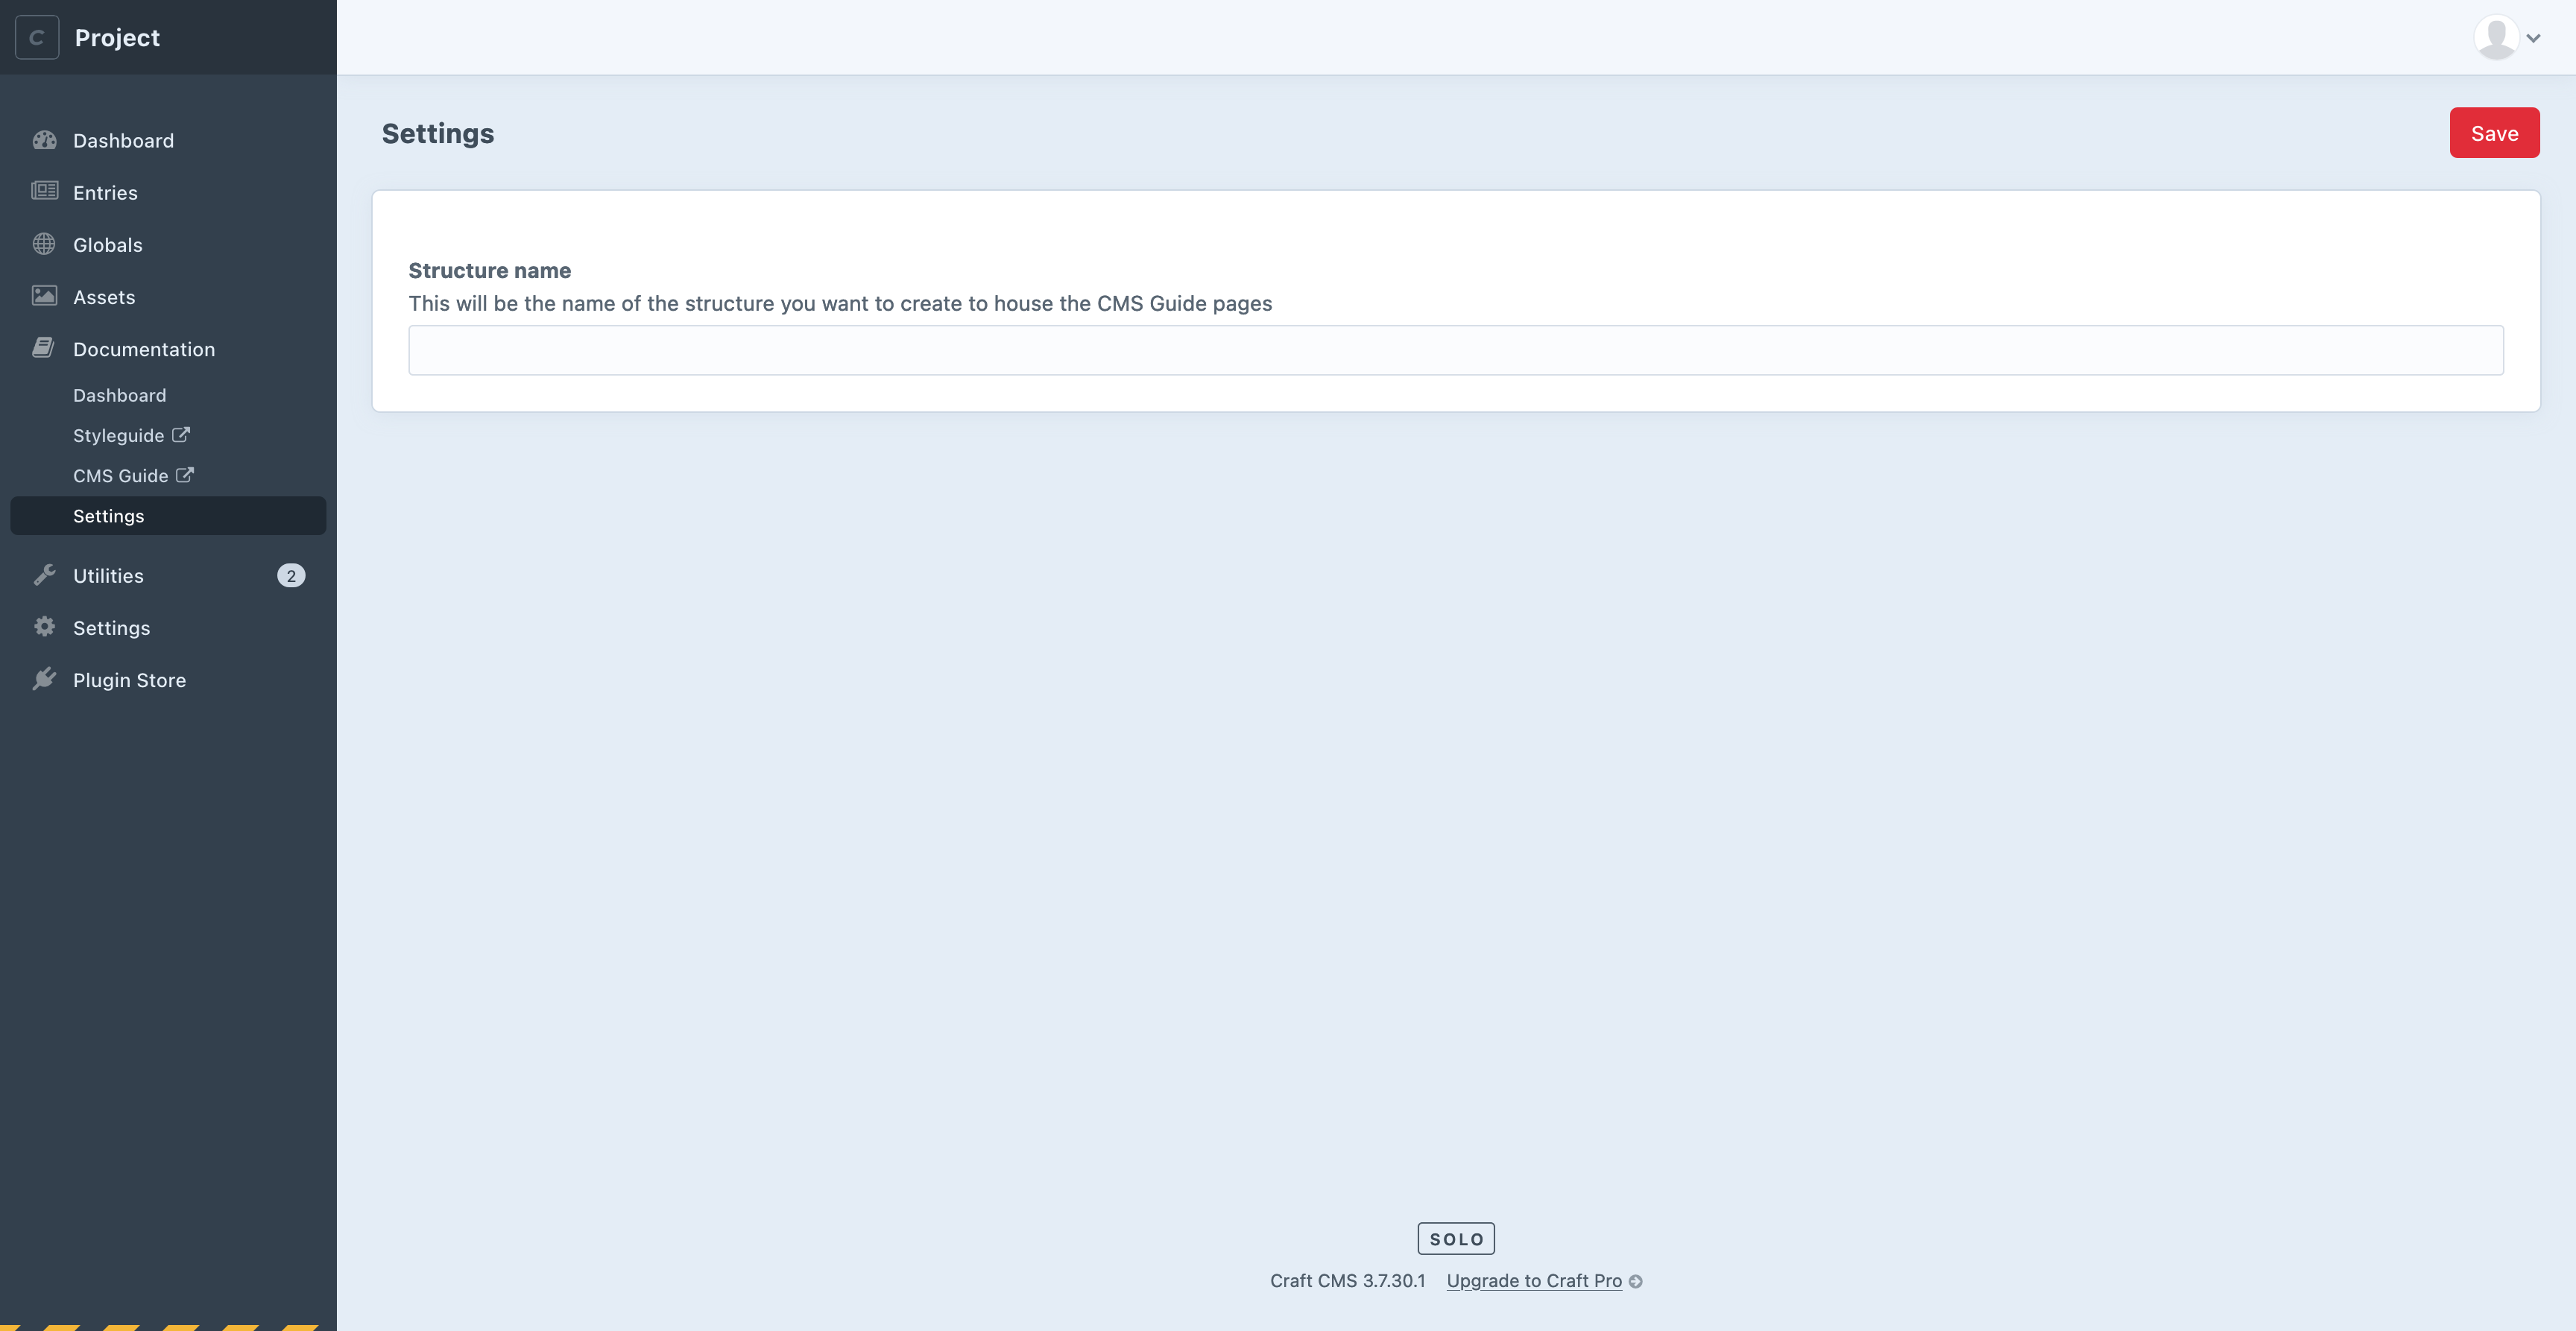
Settings Page
The settings area will allow us to name and create a structure to house the guide entries & populate it with default entries and content.This allows us to be able to edit the guide when needed.
Building the plugin
After agreeing the structure as a team, I got to work on the services needed within the plugin.
Adding a Controller
The first step of the plugin was to create a controller which would house the action needed on the Craft Admin Form, within the settings page.
Within this controller I needed to make sure the form would be validated to keep the process smooth for the team. So before it runs any of the services, I needed it to check the following:
The field isn’t empty – This was to make sure a structure name was always submitted.
Check that the section name doesn’t already exist. – This is to make sure we don’t get any database conflicts.
Check that the plugin can save the new structure name.

Creating the Volume
As we have some entries within the guide for generic Craft information, we decided set these up as default entries. This meant that you could automatically add them to the CMS without having to copy and paste them for every site. These entries also include images, so we needed to have a volume available to house these.
After entering a new structure name our next step is to create a new volume. To do this, I created a new service class called CreateVolume.
This service initially checks whether or not the volume we want to create already exists:
$volumeCheck = Craft::$app
    ->getVolumes()
    ->getVolumeByHandle("websiteGuideImages");
If the volume doesn’t exist the service then creates it with the given config:
use craft\volumes\Local;

$volume = new Local([
    "name" => "Website Guide Images",
    "handle" => "websiteGuideImages",
    "hasUrls" => true,
    "url" => "/cms-assets/websiteGuideImages",
    "path" => "@webroot/cms-assets/websiteGuideImages",
]);

if (!Craft::$app->volumes->saveVolume($volume)) {
    throw new Exception("Couldn’t save volume.");
}
After the volume is created, we want to move some of our default images from the plugin directory to the new volume folder. We also have to index the volume to make sure they can be found and displayed on the front-end.
$assetIndexerService = Craft::$app->getAssetIndexer();
$sessionId = $assetIndexerService->getIndexingSessionId();

$success = $assetIndexerService->indexFile(
    $volume,
    $fileName,
    $sessionId
);

if (!$success) {
    Craft::error("Couldn’t update the asset index", __METHOD__);
}
Creating a new Field
As the guide will allow us to add Images, Lists, Headings etc, we needed to create a field which would let all of this happen. The Craft Redactor field was our first choice as it is a plugin we use on a lot of our sites already.
I needed to create this field within the CMS and make sure it had the correct config. To do this, I created a service class called CreateField.
Due to this being an external plugin, I also needed to make sure that Redactor was installed before we create a structure. Thankfully, Craft gives you an easy way to check if a plugin is installed & enabled.
{% set plugin = craft.app.plugins.getPlugin('websitedocumentation', false) %}

{% if plugin is not empty %}
{% endif %}
The first step of creating a field was to create a new Field Group. This would house our new field and separate it from the rest of the content.
Then I had to create the field based on a specific config. This meant we could add custom formatting options & allow our new volume without causing any conflicts with the JSON files the client site may use on other components.
// Set the config for the field
$config = [
    "buttons" => [
        "html",
        "formatting",
        "bold",
        "italic",
        "unorderedlist",
        "orderedlist",
        "link",
        "image",
        "video",
    ],
    "plugins" => ["video"],
    "linkNewTab" => true,
    "toolbarFixed" => true,
];
With the config created, we then could create the field using Crafts own method:
use craft\redactor\Field as Redactor;

// Get all fields
$fieldsService = Craft::$app->getFields();

// Create a new redactor field
$field = $fieldsService->createField([
    "type" => Redactor::class,
    "id" => null,
    "uid" => null,
    "groupId" => $group->id,
    "name" => "Document Body Field",
    "handle" => "documentBodyField",
    "columnSuffix" => null,
    "instructions" => "",
    "searchable" => false,
    "configSelectionMode" => "manual",
    "manualConfig" => json_encode($config),
    "availableVolumes" => !empty($volume) ? $volume->uid : "",
    "purifyHtml" => "",
]);

// Return false if the field cannot be saved
if (!$fieldsService->saveField($field)) {
    return false;
}
Creating a new Structure
The next step is to create the Structure with the name added to the settings area. To do this, I created a service class called CreateStructure and passed the name as a variable.
As we’ve already checked that this section doesn’t already exist, the service can jump right into creating a new section using Craft’s own methods. I needed to make sure the following attributes were added as part of Craft’s Section model:
Name
Handle
Type
Enable Versioning
Preview Targets
Max Levels
Section Settings
The name and handle can be created from the name we’ve submitted to the service. I then added custom attributes to the rest to work with our setup.
// Set the section type to Stucture
$section->type = Section::TYPE_STRUCTURE;

// Enable versioning on the structure
$section->enableVersioning = 1;

// Hide previews for the structure as we won't have urls
$section->previewTargets = [];

// Set the Max Levels to 2. This should be default. If anymore are needed this can be changed in settings.
$section->maxLevels = 2;

// Set the settings for all sites, this is in case of a multisite install.
$allSiteSettings = [];

foreach (Craft::$app->getSites()->getAllSites() as $site) {
    $siteSettings = new Section_SiteSettings();
    $siteSettings->siteId = $site->id;

    // Remove Urls & Enable any new entries in the section by default.
    $siteSettings->uriFormat = null;
    $siteSettings->enabledByDefault = true;
    $siteSettings->hasUrls = false;

    $allSiteSettings[$site->id] = $siteSettings;
}

// Save the Settings to the new section
$section->setSiteSettings($allSiteSettings);
We then save the section and check whether the save has been successful. This check is important as the next few steps rely on the structure existing.
$success = Craft::$app->sections->saveSection($section);

if (!$success) {
    Craft::error(
        'Couldn’t save the section "' . $name . '"',
        __METHOD__
    );

    return false;
}
Updating the Default Entry Type
After the structure exists, the default entry type needs to be updated to have our new field available.
To do this we need to use Craft’s FieldLayout and FieldLayoutTab models to validate our new tabs.
The code will get the field by its handle and then create a new layout to include it as a Custom Field.
use craft\fieldlayoutelements\CustomField;

// Get our new field
$bodyField = Craft::$app->fields->getFieldByHandle("documentBodyField");

$elementConfigs = Json::encode([
    "type" => CustomField::class,
    "fieldUid" => $bodyField->uid,
]);

$elementConfig = Json::decode($elementConfigs);

// Add the config to the layout
$layoutElement = Craft::$app->fields->createLayoutElement(
    $elementConfig
);
Adding Default Entries
Once the structure has been created, the plugin then adds a button to create default entries from the settings page: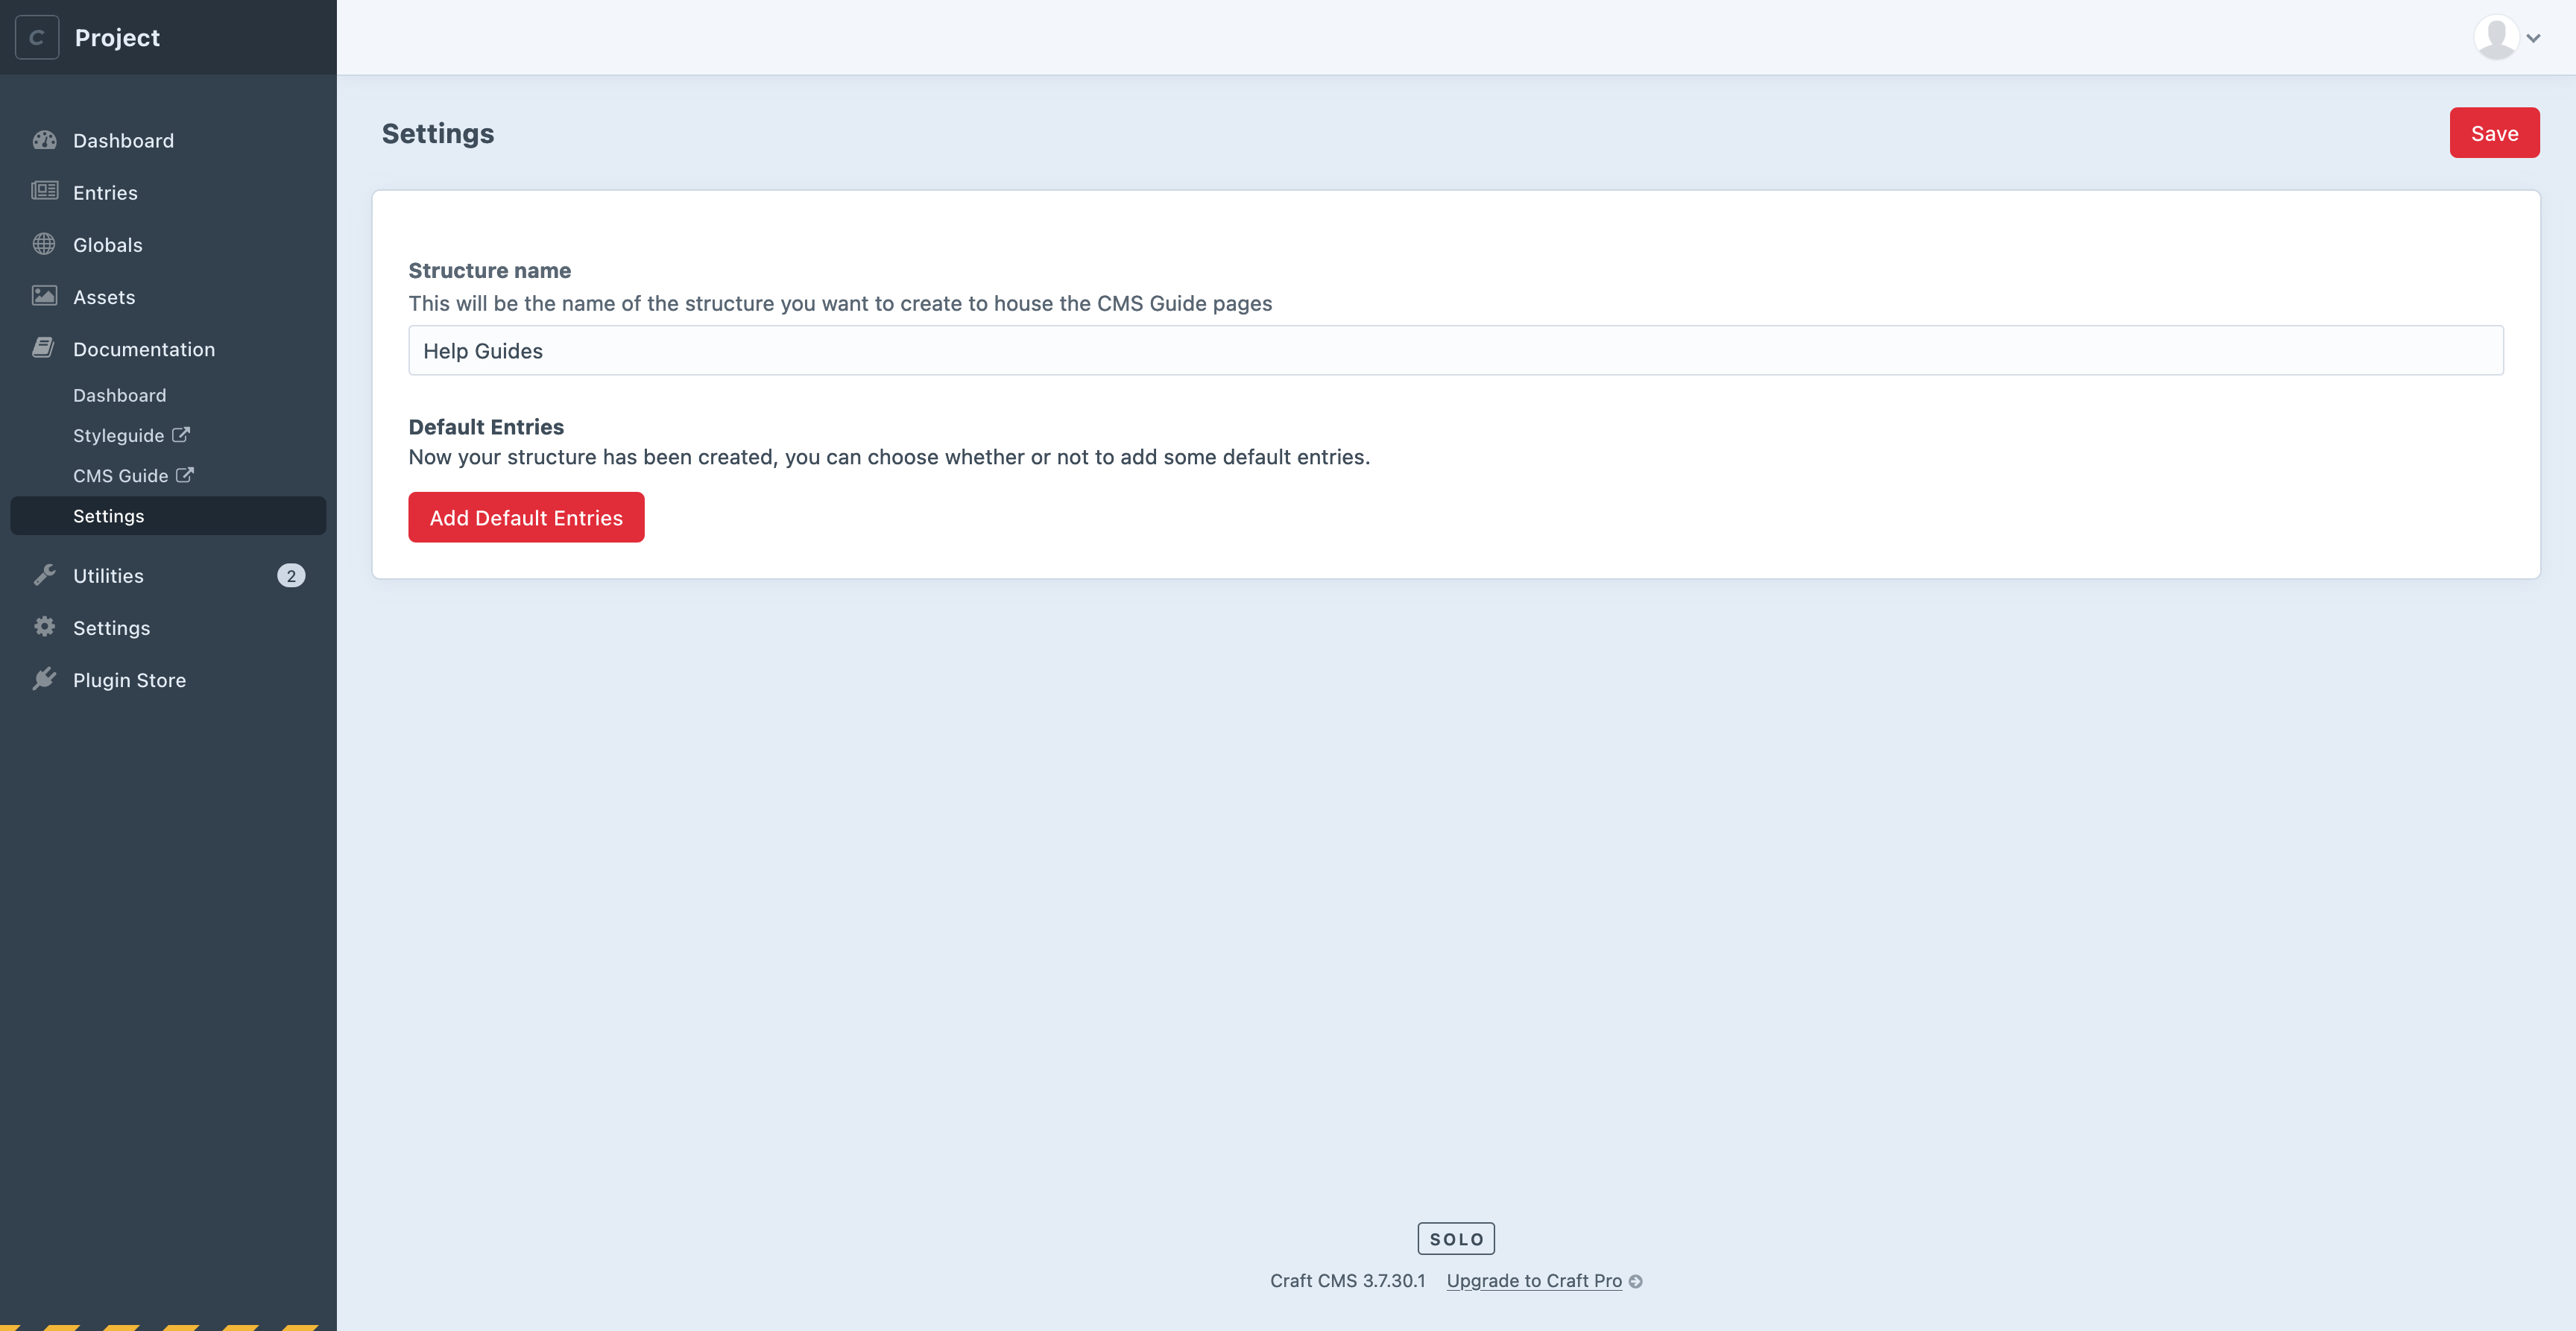
Clicking this button will run the CreateEntries service against the structure which has been created.
Within the service we have a list of entries we want to add, so we loop through these and use Craft’s Entry Element to create these.
// Create a new element
$entry = new Entry();

// Assign the entry to our new structure
$entry->sectionId = $structure->id;

// Set the Type to 1, so it takes on the default entry type
$entry->typeId = $structure->getEntryTypes()[0]->id;

// Enable the entry
$entry->enabled = true;

// Set the entry title
$entry->title = $item["title"];
Within the plugin template we house the default content which belongs to each of the entries. During their creation, we want to check if a specific content template exists, and if it does, we can populate the Redactor field with this content.
if (Craft::$app->view->doesTemplateExist(
    "websitedocumentation/content/" . $slug
)) {
    // We need to render the template if it exists
    $defaultContent = Craft::$app->view->renderTemplate(
        "websitedocumentation/content/" . $slug
    );

    // If the data exists, lets add it to the field
    $entry->setFieldValues([
        "documentBodyField" => $defaultContent,
    ]);
}

// Save the entry
$success = Craft::$app->elements->saveElement($entry);

// If the save fails, lets throw an error
if (!$success) {
    Craft::error(
        'Couldn’t save the entry "' . $entry->title . '"',
        __METHOD__
    );
    return false;
}
Now the structure is built….
Now the structure is all built, it will display the entries as a guide within the CMS. This makes it much easier for the client to view the CMS guide & styleguide rather than digging through old emails to find the url, and having the content in Craft makes it much easier for us to update when we need to.
There was one last thing to do before publishing the plugin…
Adding a Dashboard Widget
Another way to make the links more accessible was to add them to the Dashboard as a widget.
This was surprisingly easy to do with Craft. I had to create a widget file which extends Craft’s own Widget Code, and renders a template which includes the two links.
I then registered the Widget to the Dashboard using Craft’s EVENT_REGISTER_WIDGET_TYPES event.
Publishing the plugin
Once the plugin was tested, and I was happy with how it worked, the next step was to publish it so we could use Composer to install it.
To do this I created a new Packagist account for Toward, then added a new package linked to our plugins Github Repo.
By publishing the plugin it means we can make sure any updates can be version controlled and it allows us to further automate the installation across our sites.
Conclusion
Craft offers a lot of great functionality out of the box and that’s one of the reasons we love it. We also love that, when you need something extra Craft’s flexible architecture allows us to extend it in all sorts of ways.. Using our Craft expertise, we were able to make our processes more efficient, reduce CMS training time, and make our client’s lives easier.
Need a Craft CMS Developer?
Contact us to see if we can help!

