At the Queensland C# Mobile Developers meetup group's August 2019 Meetup, I gave a talk entitled "(Some of) What's new in iOS13", covering - appropriately - some of the new features iOS13 brings us as Xamarin developers. Given there are such a large number of additions in iOS13, I decided to focus on four areas - Dark Mode, PencilKit, ARKit and CoreML. Most of the functionality was covered in demos.
Slides are available at the end of the post, and detail on each of the new areas is below. If you want to play along, you can install the Xamarin.iOS / Xcode11 Preview and clone the sample app.
Dark Mode
(WWDC Reference: Implementing Dark Mode on iOS)
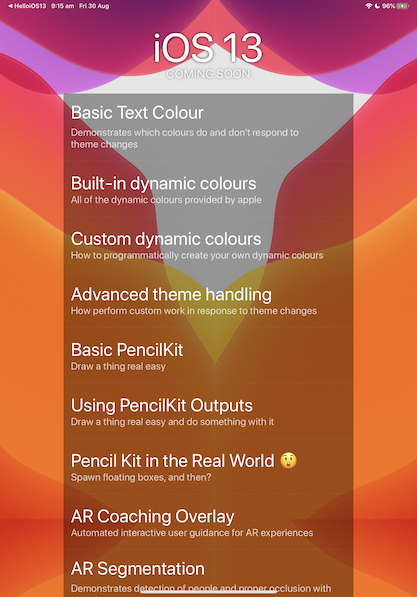
As you have probably heard, iOS13 ships with a new 'dark mode', in the form of a system-wide theme setting that is observed by all Apple apps and various aspects of UIKit. This themeability is mostly enabled by new dynamic behaviour in UIColor and in image assets - specifically, the ability for these to take on different appearances depending on whether dark mode is enabled or not. Apple's semantic colours (e.g. UIColor.LabelColor, UIColor.DarkTextColour) are all dynamic in iOS13, which means they automatically change based on the user's selection. A number of new semantic colours have been added in iOS13, some of which you can see below.

You can easily determine which colours on the UIColor class are dynamic, as they have the -Color suffix. For example, UIColor.SystemGreenColor is dynamic, whereas UIColor.Green is not.
By targeting iOS13, your app also opts in to themeability, which means that parts of it will begin responding automatically to changes - the parts that were already referring to semantic colours, either explicitly in your code, or by default (e.g. a label that hasn't had its text colour modified). It's likely that an existing app will not be using dynamic colours throughout, so there may be not-insubstantial effort involved in making it work cleanly in both modes. Although Apple talks a lot about defining dynamic colours in your asset catalog, dynamic colours can also be defined programmatically, which may simplify migrations depending on your apps architecture. This is achieved by creating a UIColor using a new constructor that takes an Action<UITraitCollection> that iOS will call whenever the theme changes; in this action you can test for the current theme and return the appropriate colour. It sounds complicated but is simple in practice:

In iOS13 Dark Mode can be toggled by the user (relatively) easily via Control Center, so your app should be ready to have the theme changed while it is running - it's not enough to check the setting at startup. If you need to perform arbitrary work on a screen in response to a theme change, you can do so by overriding the TraitCollectionDidChange method on UIViewController (which could be your base viewcontroller or Xamarin.Forms PageRenderer), and making changes based on the new theme setting. For example, in the below demo (which represents me and my feelings on non-dark mode apps) we replace images, change text, and toggle animations when notified that the theme has changed in TraitCollectionDidChange.
If you want to target iOS13 but aren't up to making the changes for theme support, you can opt your app out of dynamic behaviour by setting the OverrideUserInterfaceStyle on a view-like element to UIUserInterfaceStyle.Light or UIUserInterfaceStyle.Dark. Your UIWindow is a good place if you want it to apply to the entire app. Make sure to CheckSystemVersion before you do, as the selector is not present on devices below iOS13.
Currently Apple is not requiring apps to support dark mode, but as the OS and built in apps support it, it will be interesting to see whether users expect it. When updating to iOS13 or setting up a new iOS13 device, users are explicitly asked to select between light and dark theme, so they will be aware of the feature.
In the Xamarin.Forms space, Gerald has put together informing and entertaining proposal/specification for handling the new appearance considerations for iOS here. It also begins to consider the equivalent theming coming in Android 10.
PencilKit
(WWDC Reference: Introducing PencilKit)
PencilKit is a high performance drawing framework that makes it super easy to give users of your app a sophisticated but familar drawing environment, with a very small amount of code. As the name suggests, the framework is optimised for use with Apple Pencil (which is quite the feat of engineering - watch the WWDC video for more information), but also works fine for users providing direct touch input. Two core pieces of PencilKit that you're likely to interact with are PKToolPicker and PKCanvasView.
PKToolPicker
The PKToolPicker class lets you control the display of a toolbox UI for drawing tasks.

You might think the UI looks familiar - that's because it's made up of the same core set of tools that you have access to for markup in other Apple apps like Photos. PKToolPicker gives you colour and drawing tool pickers, a ruler, a lasso selection tool and an eraser. Additionally, it includes a built in undo/redo functionality, and the toolbox can be moved around the screen and docked to edges by the user. All of this functionality comes for free - no need for you to write any code.
PKCanvasView
PKCanvasView is (as you might expect) a class that represents a canvas onto which the user can draw. It's a UIView subclass (more precisely, a UIScrollView subclass) so can be added to your normal view hierarchy at any arbitrary size, which may be smaller or larger than the actual content size. You'll generally use PKCanvasTool with PKToolPicker and can set up a sophisticated drawing environment with as few lines of code as below:

PKCanvasView takes input from a user directly or via an Apple pencil and maintains a PKDrawing representing the drawn content. Although it's possible to get a bitmap representation of drawn content out of PKDrawing, internally it maintains a vector-like representation. This allows for several nice behaviours, including smart selection/smart modification, and automatic recolouring. For example, in the below video (slightly sped up) the lasso tool locks to the sun's rays and allows them to be dynamically recoloured and moved:
By default, PKCanvasView automatically recolours its content in response to theme changes. For example, the below attempt at a Xamagon recolours based on the selected theme:
 If you add a delegate to your
 PKCanvasView, you can be notified of changes to the drawing as the user makes them. You can get an bitmap representation of of a PKDrawing using the GetImage method. For example, in the below demo (sped up), changes to a drawing are used to create a tiling background, and each subsequent image is layered and animated in a different direction, giving a space-like effect:
In an earlier post I also demonstrated using PKCanvasView with ARKit and the demo app includes a simplified version of that (no repl required :))
Although these demos have mostly been focused on creating new drawings, PKCanvasView can also be used for markup, by giving it a transparent background and placing it over other content.
ARKit3
(WWDC Reference: Introducing ARKit3)
ARKit3 is the third iteration of Apple's augmented reality (AR) framework for mobile devices. In this sense, it is more evolution than revolution, but still includes a large number of welcome improvements across a range of areas, including increased performance and accuracy, enhancements to multiuser AR and a new record/replay capability. Several new AR tasks are now supported, including body tracking, people occlusion, multi-camera tracking and automatic coaching.
Demonstrating AR features can pose practical challenges, so I focussed on a few small demos.
ARCoachingOverlayView
A good AR experience begins with having good tracking data and anchors. ARCoachingOverlayView is a new ARKit feature provided by Apple that allows you to embed an automated, consistent, guide-like overlay into your AR experiences, to help users orient themselves and ARKit correctly.
You make use of the coach by linking an ARCoachingOverlayView to your ARSession and providing it an ARCoachingGoal. Whenever the coach detects that the goal is not met, it will automatically display and guide the user towards the outcome.

ARCoachingOverlayView can be given a delegate, which will call back in response to events such as activation or deactivation of the coach. You can respond to these in order to update your interface (e.g. remove distractions) to help the user focus on tracking.
Since the coach will presumably be used by Apple's own AR application as well as other third parties, I guess the idea is that users will become familiar with this sort of onboarding.
People Occlusion
With the new person segmentation capability, ARKit3 is able to detect people in a frame and their distance from the camera ("depth"), in order to have people and virtual content occlude each other appropriately. The below demo demonstrates this new capability, first with segmentation disabled (to convey the problem) and then with segmentation enabled. Note that segmentation generally performs better for people (and larger parts of people, like bodies) that are further from the camera than what I demonstrate here.
Enabling segmentation is as easy as setting the appropriate flag on your ARWorldTrackingConfiguration:

You can also access estimated depth and segmentation data from ARKit with each frame. In the above video this was simply displayed towards the top of the screen, but if you are clever there might be other things you can do with it.
Multi-camera tracking
In previous versions, ARKit has been limited to using a single camera at a time for AR purposes. Most tasks, such as world tracking, image and object detection, and image tracking, are all performed using the front camera. Face tracking, relies on technologies present in the front camera only. In the past, you would need to use an ARFaceTrackingConfiguration to perform face tracking, meaning that performing sophisticated world tracking at the same time was off the table. In ARKit3, you can now make use of both cameras simulateneously during AR work, making it possible to combine front and back camera tasks. ARWorldTrackingConfiguration has a new property, UserFaceTrackingEnabled which when set causes the front camera to provide face tracking input to the AR session.
![]()
You are notified of face anchors in the same way that you are when using an ARFaceTrackingConfiguration, so code you have written for face tracking purposes can still be used here. Combining face tracking with other AR might be useful for allowing the user's expressions or facial movement to influence the scene. Or, you could use it to create creepy floating heads that match your own movement in 3D space. The possibilities are endless.

(Honourable Mention) RealityKit
RealityKit is a new 'single-experience-focused' (my words) framework for AR. Compared to the typical arrangement of ARKit + SceneKit, RealityKit provides a simplified API and a various constraints that make creating AR experiences easier. RealityKit the framework is supported by a new application, 'Reality Composer' which provides a GUI for defining RealityKit projects and can be used on macOS or on iOS devices. The RealityKit APIs do not appear to be bound in current Xamarin.iOS previews, maybe because they are Swift-only. I wonder if there will be an answer for this by release.
CoreML3
(WWDC Reference: Core ML 3 Framework)
Like ARKit, Apple's CoreML framework comes with a bunch of improvements, many of which I cannot claim to understand completely.
Protocol extensions: CoreML3 brings with it version 4 of the CoreML protocol, which includes support for several new model types and a major bump in the number of neural network layer types, making it a compatible conversion target for more external modes.
On-device model personalisation: A certain subset of CoreML model types can now be marked as updatable. An updatable model can be deployed with your app, augmented with new examples collected from the user, and retrained in situ, without need for connectivity or external services, and without data leaving the user's device.
Improvements to CoreML tooling: Both CreateML (Apple's GUI/Wizard-based model training tool), and Turi Create (Apple's python-based model training library) have received several enhancements, in the talk I looked at the former.
Easy Sound Classifier training with CreateML
A new Sound Classifier wizard has been added to CreateML, making it easy to train CoreML models that can categorise audio. To demonstrate this, I used the wizard to train a model that could recognise categories of sound from the Freesound General-Purpose Audio Tagging Challenge. The challenge dataset included approximately 9,000 training examples across 41 categories (applause, finger clicking, keys jangling, barking and many others). With a little preprocessing (generating the folder/file structure that CreateML expects), this dataset dropped straight into CreateML for training without any issues.

Training the model took about two hours on my sacrificial Catalina MBP 2016 and evaluated with reasonable, but not incredible, results. Later I read that about 60% of the training labels in the dataset have not been manually verified. Mislabelled data would influence the quality of the model and evaluation metrics.

To improve the model, I ended up adding an additional 'Ryan' category, trained on audio from my Introduction to ARKit talk at the Melbourne Xamarin Meetup. As we'll see, it did a pretty good job at detecting me.
Live Audio Recognition with SoundAnalysis
SoundAnalysis new framework in iOS13 that simplifies the process of using a CoreML model for sound classification. It takes a trained model (see previous section) and an audio source (either samples, or streaming/recorded audio), and attempts to classify the audio using the model.
Although the documentation from Apple is currently light on, it's fairly straightforward to use a trained model with SoundAnalysis to classify live audio. The feature is a collaboration between SNAudioStreamAnalyzer which performs analyis based on your model, and AVAudioEngine which provides the input (e.g from the microphone). A DidProduceResult callback gives you access to classification data.

The results are an NSArray of SNSoundClassificationResults that are essentially pairs of possible classification and confidence, an example printed to the console below:
{
  "Finger_snapping": 0.77,
  "Scissors": 0.16,
  "Bus": 0.02,
  "Computer_keyboard": 0.02,
  "Bark": 0.01
}
I found the trained model tended produce a lot of false positives (poor precision), but it's worth noting that the dataset was tailored towards sample classification, not neccessary classification of streaming audio. You can see the final model in use below:
warning: contains very low quality audio recorded by laptop mic
also me attempting to bark like a dog
This was a 'good' take, and the model did not always perform as well as I'd like. By increasing the threshold for 'positive classification' and potentially smoothing predictions (e.g. only consider a sound classified if receiving multiple sequential confident classifications in a row), it should be possible to reduce the false positive rate.
Demo App
The "Hello iOS13" app containing demos is on Github: rdavisau/hello-ios13.
Slides
Links for the slides are below.
Slides (31): PDF

|

|

|

|

|

|

|

|