
Never take your eyes off the cash flow because it's the life blood of business.
Richard Branson, billionaire
Welcome! We are delighted you’ve chosen Pulse, a simple but powerful tool for managing the lifeblood of your business: cash. You’ll get the most out of Pulse if you set it up right on the front end.
We have detailed documentation for you here, but if you start by reading the overview below, you’ll be miles ahead.
What Pulse Does for You
Pulse compiles the transactions you enter or import and gives you a Cash Flow Table and three Income & Expenses Reports.
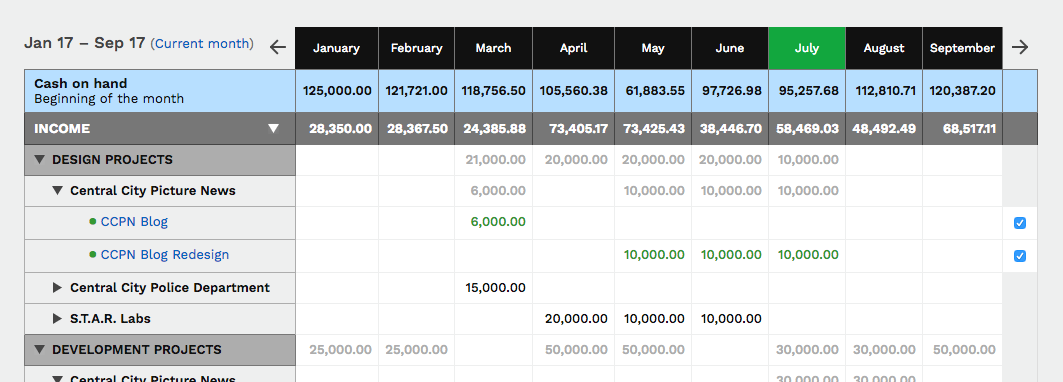
The Cash Flow Table shows you every transaction, beautifully organized by week or month (most Pulse customers choose a nine-month view).
Income & Expenses Report
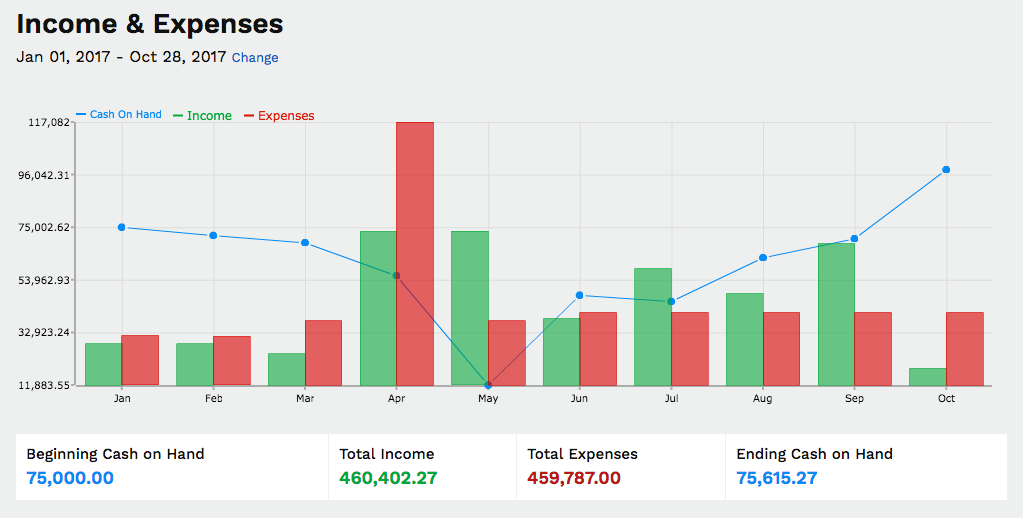
The Income & Expenses Report takes that information and gives you the blue Pulseline© that illustrates how much and when cash is flowing in and out of your business. You can look down the road and take action now to avoid running out of cash then.

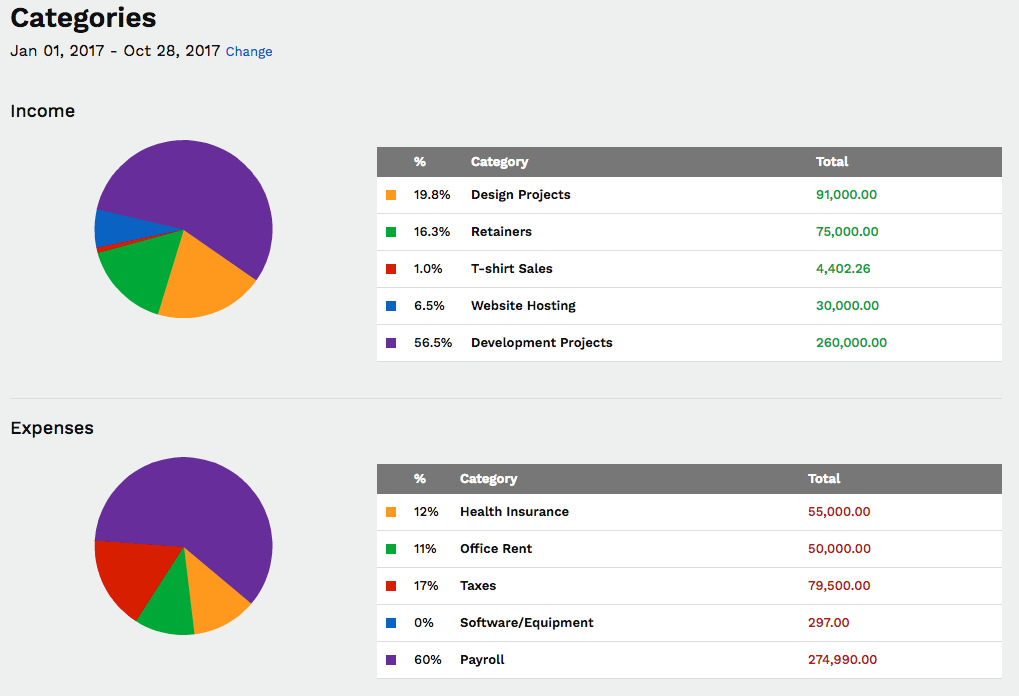
Pulse provides two other Income & Expenses reports you’ll turn to as needed: Income & Expenses by Client and Income and Expenses by Category.
Income & Expenses by Category Report
Income & Expenses by Companies Report

Setting Up Pulse
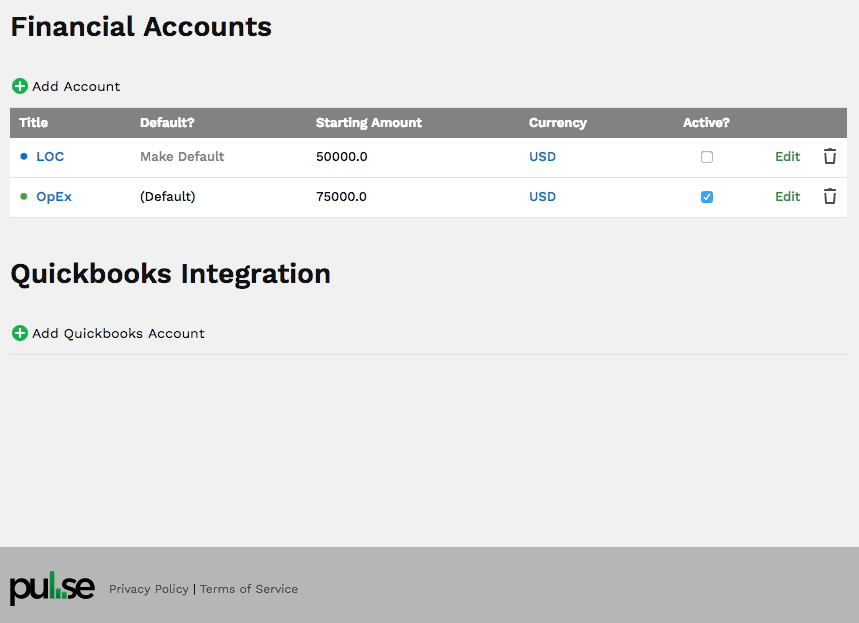
Pulse groups your Income and Expense entries under Financial Accounts. Financial Accounts are essentially discrete pools of money (like a bank account is). At the start, you are automatically assigned one: “Primary Account.”
You can have up to 60 Financial Accounts, depending on the Pulse plan you are using.
One Financial Account may be enough for you. But you can add more later if you want to able to isolate different pools of money and their specific transactions. This could be individual customers (useful for accountants or financial planners), a different bank account (for operating expenses, savings accounts, taxes, escrow or overseas bank accounts, for example), or if you want to use Pulse to track your personal as well as business cashflow.
Some Pulse customers take full advantage of this and have dozens of Financial Accounts. Most have between three and five.
Start by entering your Cash on Hand as of the first day of the month you want to start Pulse.
- Click on Settings in the top right of your screen
- On the Settings screen, click on Financial Accounts (listed in the right sidebar under Categories & Settings)
- On the Financial Accounts screen, you can add/edit the "Starting Amount"
Income and Expenses
Pulse needs two types of transactions to do its job: 1) What you pay – Expenses, and 2) What you get paid – Income.
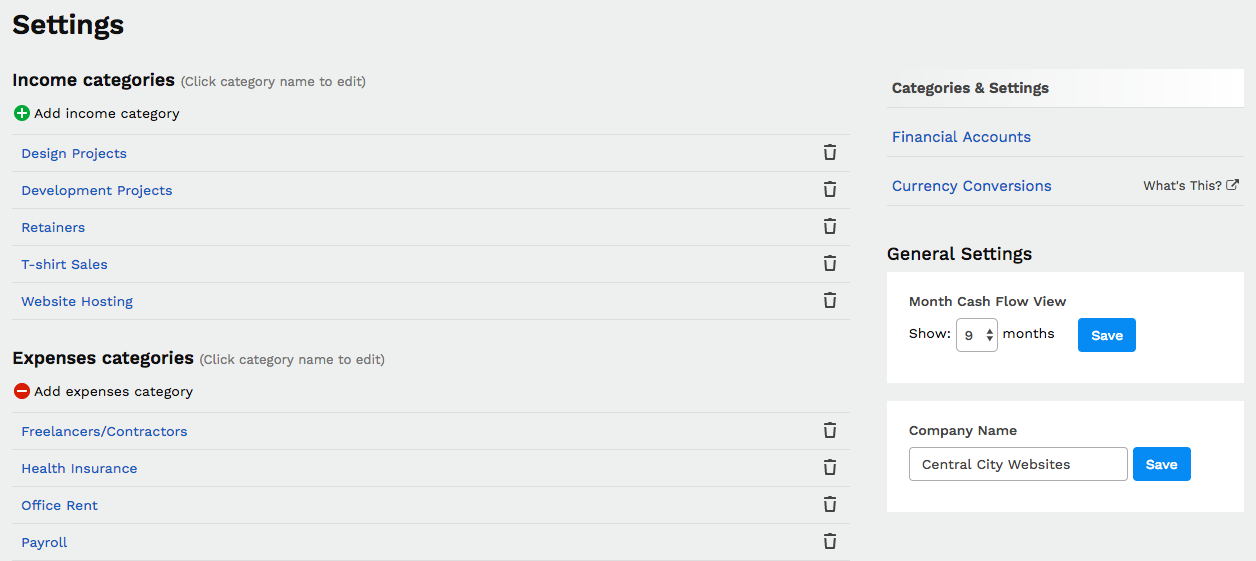
We recommend you start by creating Income Categories and Expense Categories on the Settings screen.
Organizing your Income and Expense transactions by Categories lets you use the “Income and Expenses by Category” report mentioned above. This lets you quickly drill down to locate problems.
Income Categories might be “T-shirt Sales,” “Website Hosting,” “Warrantee Sales,” “Commission Income,” “Fee Income,” and “Dividends and Interest Income.”
Expense Categories might be: “Equipment Rental,” “Overhead,” “Materials,” “Payroll,” “Warrantee Payments,” “Training”, “Dues/Subscriptions,” “Professional Fees,” “Executive Bonuses,” and “Contract Labor.”
Define Companies
Once you’ve created income and expense categories, you can go add transactions. But we recommend you first add your Companies (another name for this section could be Clients) and their associated Projects to Pulse.
This allows Pulse to associate Income and Expense items with a Company. The benefit of that? Pulse’s Income and Expenses by Company report drills down for you.
Your Companies in Pulse are the people, organizations, or things that pay you. A Company could be “S.T.A.R. Labs,” or “Investments,” “Tenants,” or even “Miscellaneous” (to capture several smaller sources of income). A Company could even be large and diverse groups of small customers such as “Subscribers.”
Create Projects
Pulse sorts income by Project, so you’ll create at least one Project for each Company. A Project could be “Website Design-Build,” it could be “Maintenance,” or “AdWords Admin,” “Loan Proceeds,” “Rent on Suite 200A,” “Rebates,” “Tribute,” “New Subscriber Premiums,” or anything else that generate Income or Expense you can assign directly to that Company.
Not every Income or Expense Item will belong to a Company, of course. You will have Categories like “Equipment Rental,” “Tax Refunds,” and “Insurance” that may not belong to a specific Company. You will want to make sure they go in a Category, though, so you can use that great Income & Expenses by Category Report.
A Category called “Overhead” is useful for employee compensation, rents, utilities, legal fees, insurance, office supplies and other ongoing costs of doing business.
Adding Transactions
Next, you’ll add your Income transactions – what you get paid. You’ll click on the “Add Income” link on your Cash Flow Table.
On the "Add Income" page: If the Income is to be associated with a Company, you click on “Select a Project” and select from the drop-down menu. If you don’t want to assign the Income transaction to a Company, use the default setting: “Title” – just title your Income transaction.
Then select or create a Category for this Income transaction (optional but strongly recommended, so you can benefit from the Income & Expenses by Category report).
Enter the transaction amount and any information about recurrence of the transaction (monthly, for a fee, for example).
You can upload a file (a purchase order, for example) or add Notes (“New contract needed for 2018”) to any Income item.
Click “Add Income” and you’re done.
Repeat for all your Income transactions.
Then you set up your Expenses.
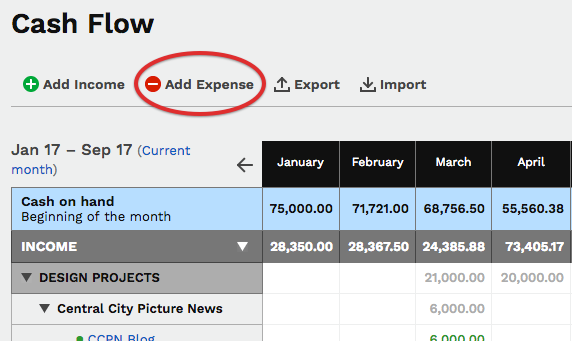
On the "Add Expenses" page: If the Expense is to be associated with a Company, you click on “Select a Project” and select from the drop-down menu. If you don’t want to assign this Expense to a Company, the default setting is “Title” – just title your Expenses transaction.
Then select or create a Category for this Expense transaction (optional but strongly recommended, so you can benefit from the Income & Expenses by Category report).
Enter the transaction amount and any information about recurrence of the transaction (monthly for a lease payment, for example).
You can upload a file (that lease, for example) or add Notes (For example “$5,000 per month rate is contingent on 150 hours per month.”) to any Expense item.
Click “Add Expense” and you’re done.
Repeat for all your Expense transactions.
Now you will be able to take advantage of the Cash Flow table (under “Cash Flow” in your navigation), and the Income and Expense reports (under “Reports”).

Pulse Cash Flow Table
Pulse Income & Expenses Report
Now is a good time to add any other Users to your Pulse Account if you have the Plus or Premium plans. The capabilities of each user depend on the role you assign to them.
If you've made it this far, you're off to a great start. These five articles are more in-depth and will help you use your account effectively so you can start projecting cash flow confidently.