Migrate a Simple SAM Application to the Serverless Framework


When trying to build your own serverless applications on Amazon Web Services it’s likely that you stumbled across the AWS Serverless Applications Model (SAM). AWS provides this tool to try and make development with AWS Lambda, API Gateway, and other serverless services a little easier. When you’re just starting to use AWS and need to deploy simple microservices, SAM can be a useful tool to simplify that development process.
For many developers out there, SAM is the first framework they encounter for building on top of AWS and they start building out their applications with it. But what happens when you spend some time with your SAM application and you realize that you could actually benefit from a few additional features? Maybe you’re looking to share secrets between different services? Or maybe you want to deploy to different environments like staging and production? While looking for these features, you might have stumbled upon the Serverless Framework and realized that it checks some of the boxes you’re looking for.
Just one problem. You already spent all that time getting your SAM application up and running, how are you supposed to move it all over without starting from scratch? Well, let’s take a look!
Our Sample Environment
In order to show you how to migrate the most common parts of a SAM application over to the Serverless Framework I’ll be using a demo application that looks like this:

This is a common AWS architecture pattern that contains a simple microservice. It starts by taking HTTP requests through an API Gateway endpoint, then processing those requests with AWS Lambda before reading or writing data in a DynamoDB table and returning a result back through API Gateway.
When using SAM to deploy this microservice our code could look like this:
|
1 2 3 4 |
sam-app ├── create.js ├── package.json └── template.yml |
We have a create.js file for our Lambda handler, a package.json to install any dependencies and a template.yml that helps us tie everything together and provision our infrastructure. You can see all the files for the SAM application here. The final files for the Serverless Framework version are here, but we’ll go through how to change your application over to the Serverless Framework bit by bit.
As a heads up, this post will assume that you’ve already installed the Serverless Framework and are somewhat familiar with it. If you’re not, take a look at the getting started documentation guide and the Serverless blog.
Migrating SAM Code to Serverless Framework Code
In order to migrate our application from SAM to Serverless Framework, we should start by breaking apart the SAM template.yml file piece by piece and constructing an equivalent serverless.yml.
Template Metadata
The first few lines of template.yml look like this (the comments using the # symbol are just to give you context about where we are in the file):
|
1 2 3 4 5 6 |
# template.yml # metadata AWSTemplateFormatVersion: '2010-09-09' Transform: 'AWS::Serverless-2016-10-31' Description: A microservice using AWS SAM, API Gateway, Lambda, and DynamoDB |
In a serverless.yml file none of this SAM metadata is required so we can omit it all or include it as comments depending on our preferences. However, we will want to include metadata about the application itself so that we can integrate our application with the Serverless Dashboard. To do this, we can add a few lines at the top of our new serverless.yml file:
|
1 2 3 4 5 6 7 |
# serverless.yml # metadata org: fernando # Replace this with your organization app: customers-demo service: api frameworkVersion: '>=1.50.0 <2.0.0' |
The first three lines specify the organization and application that this service will belong to and give your service a name (api) so that you can find it in the Serverless Dashboard. If you haven’t had a chance to use the Dashboard yet you can sign take a look at the docs and sign up to try it out for free. Finally, the frameworkVersion line just specifies that you’re using a version of the Serverless Framework that has this functionality.
SAM Functions
Next up, we need to extract any functions from the SAM template and migrate them to serverless.yml. With this step we’ll need to look for any resources in the template.yml with the type of AWS::Serverless::Function and break them apart a little bit. Take this example of the newCustomer function:
|
1 2 3 4 5 6 7 8 9 10 11 12 13 14 15 16 17 18 19 20 21 22 23 24 25 26 27 28 29 30 31 32 33 34 35 36 |
# template.yml # metadata # . . . Resources: # function resource newCustomer: Type: 'AWS::Serverless::Function' Properties: Handler: create.create Runtime: nodejs8.10 CodeUri: . Description: Used to create a new customer in the database MemorySize: 512 Timeout: 10 Policies: - Version: '2012-10-17' Statement: - Effect: Allow Action: - 'dynamodb:PutItem' Resource: 'Fn::Join': - '' - - 'arn:aws:dynamodb:' - Ref: 'AWS::Region' - ':' - Ref: 'AWS::AccountId' - ':table/customerTable' Events: Api1: Type: Api Properties: Path: /create Method: POST |
There’s a lot going on here including:
- Setting up the location of the code for the function
- Configuring timeout and memory
- Setting an IAM policy up for the function to use
- Configuring the events that will trigger the function (a POST endpoint of API Gateway)
We could translate all this configuration into serverless.yml and apply it directly to a single function. However, a better idea might be to anticipate that the service will grow to include more functions and different stages of development. To prepare for this we can take advantage of the Serverless Framework’s provider section.
Serverless Framework Provider Section
To streamline development of services with multiple functions, it can be useful to have a shared set of configuration that is automatically applied to all functions. This is what the provider section of the serverless.yml file is for. The closest equivalent in SAM is the Globals section which also allows for defaults across multiple parts of the application.
|
1 2 3 4 5 6 7 8 9 10 11 12 13 14 15 16 |
# serverless.yml # metadata # . . . # provider provider: name: aws runtime: nodejs8.10 memorySize: 512 timeout: 10 environment: TABLE_NAME: customerTable-${opt:stage, 'dev'} iamRoleStatements: - Effect: Allow Action: - dynamodb:PutItem Resource: "arn:aws:dynamodb:us-east-1:*:table/customerTable-${opt:stage, 'dev'}" |
In the provider section above we specify aws as the provider (instead of Azure, Google Cloud, or some other provider) and then set service-level configuration so that all functions will have the node.js 8.10 runtime, the specified memory size and timeout length, a stage-specific environment variable for the DynamoDB table name, and an IAM role with limited DynamoDB permissions.
Serverless Framework Functions
Because we’ve already done a lot of configuration in the provider section creating our function and the events that trigger it is fairly straightforward.
|
1 2 3 4 5 6 7 8 9 10 11 12 13 14 |
# serverless.yml # metadata # . . . # provider # . . . # functions functions: newCustomer: handler: create.create events: - http: path: /create method: post |
We first need to include the name of the function resource we’re creating, in this case, it is newCustomer. After that, we will need to specify where Serverless Framework should look for the handler file, and what the handler function in that file is called. This assumes that our Serverless Framework project files are structured like this:
|
1 2 3 |
serverless-framework-app ├── create.js └── serverless.yml |
This project is flat with serverless.yml right alongside create.js. Because of this, we use “create.create” to refer to the create.js file in the same directory and the create function inside of that file. We can also reference handlers in subdirectories. For example, if our file structure looks like this:
|
1 2 3 |
├── functions │ └── create.js └── serverless.yml |
We could use a handler of functions/create.create to achieve the same result.
Finally, this chunk of code under the function section sets up the API Gateway API to trigger the Lambda function when a POST request is made to the /create endpoint:
|
1 2 3 4 |
events: - http: path: /create method: post |
With the function taken care of let’s look at transferring over other resources described in a SAM template.
Other Resources
Let’s start by looking at the DynamoDB table resource in “template.yml”.
|
1 2 3 4 5 6 7 8 9 10 11 12 13 14 15 16 17 18 19 20 21 22 23 24 |
# template.yml # metadata # . . . Resources: # function resource # ... # resources continued customerTable: Type: 'AWS::DynamoDB::Table' Properties: TableName: customerTable AttributeDefinitions: - AttributeName: customer_id AttributeType: S KeySchema: - AttributeName: customer_id KeyType: HASH ProvisionedThroughput: ReadCapacityUnits: 1 WriteCapacityUnits: 1 |
In template.yml all additional resources are put under the Resources section. When working to migrate resources from SAM to Serverless Framework you’re going to have to take a more detailed approach to the migration. You might not be able to simply convert the SAM code over the Serverless Framework equivalent and deploy.
If you do, you might run into problems ranging from naming collisions when deploying, to important data still needing migration from legacy resources, or function code that still references older resources. Let’s see how we might solve a few of these issues.
Naming Conflicts
First, let’s solve the naming conflict issue when we move over our DynamoDB resource to serverless.yml.
|
1 2 3 4 5 6 7 8 9 10 11 12 13 14 15 16 17 18 19 20 21 22 23 24 25 26 |
# serverless.yml # metadata # . . . # provider # . . . # functions # . . . # dynamodb resources: Resources: customerTable: Type: 'AWS::DynamoDB::Table' Properties: TableName: customerTable-${opt:stage, 'dev'} AttributeDefinitions: - AttributeName: customer_id AttributeType: S KeySchema: - AttributeName: customer_id KeyType: HASH ProvisionedThroughput: ReadCapacityUnits: 1 WriteCapacityUnits: 1 |
The first change when moving resources to serverless.yml is that the DynamoDB customerTable resource is now nested in the resources section under Resources. If this seems redundant, just know that the “resources” section in serverless.yml also allows for us to configure “Outputs” alongside “Resources” to pass to other CloudFormation stacks.
Next, instead of simply calling our DynamoDB table customerTable like we are in the SAM application, we’re changing the name to refer to the stage the service is deployed in with customerTable-${opt:stage, ‘dev’}. So if we deploy the service later with serverless deploy –stage someStage the table becomes customerTable-someStage. Otherwise, it just assumes you’re deploying to development and deploys with a name of customerTable-dev. This also has the added benefit of avoiding a naming conflict with the existing customerTable.
Migrating Data from the Legacy Application
Depending on what additional service resources you use there could be different options for migrating data. Unfortunately, there is currently no method for migrating an existing CloudFormation resource to another stack. Because of this, you’ll need to create a new DynamoDB table and migrate the data into that table.
The simplest way to do this is to create a backup of the existing table and then load that backup in the place of the new table. To make this work with the quirks of CloudFormation you will need to:
- Create the backup from the old table
- Deploy the service containing the new table
- Delete the new table (without using CloudFormation!)
- Restore the backup with the same name as the table you just deleted
You can do this in the DynamoDB portion of the AWS console or by using a script like this one.
Now that we’ve covered loading the new DynamoDB table with data let’s look at improvements we can make to our Lambda function.
Updating Function Code in create.js
When migrating over to Serverless Framework we can often use the same handler files that we would have in a SAM application. However, in our new service we’re using a dynamic naming convention to refer to resources like DynamoDB as they are named in different application stages. Because create.js in the SAM application has the DynamoDB table name as customerTable we need to update this hardcoded name. In the case of node.js this means using process.env.TABLE_NAME instead of customerTable to reference the environment variable we setup earlier in the provider section of serverles.yml.
Overall Benefits of Our Migration
With this application migrated over let’s take a look at some of the benefits that we’re getting over our old SAM application.
First, we’re able to do deployments more efficiently and dynamically with a single serverless deploy command and options such as –stage to specify deployment stages. These stages are also automatically reflected inside of our infrastructure when we create resources specific to each environment. To go with this, our function now points to an environment-specific DynamoDB table.
We’re also able to easily extend the configuration of our infrastructure and deployment using the many options provided by the Serverless Framework.
But this is just a subset of what the Serverless Framework now offers.
Monitoring and Alerting
After setting up the Serverless Dashboard we can now monitor our deployed applications and quickly surface the root causes of errors as well as evaluate performance for potential improvements.
This enables us to continue to iterate quickly on our applications without needing to dive into the depths of disparate AWS tools. We can also use the dashboard to set up intelligent alerting on errors or other possible issues.
Secret Management
Because SAM is primarily a deployment tool, as our application grew, we would have been left to figure out how to manage secrets on our own. But within the Serverless Dashboard you can store secrets across services and load them into your applications as environment variables. All you need to do is set the secret up in the dashboard:

And then include a line like this under your environment section:
|
1 2 |
environment: API_KEY: ${secrets:STRIPE_API_KEY} |
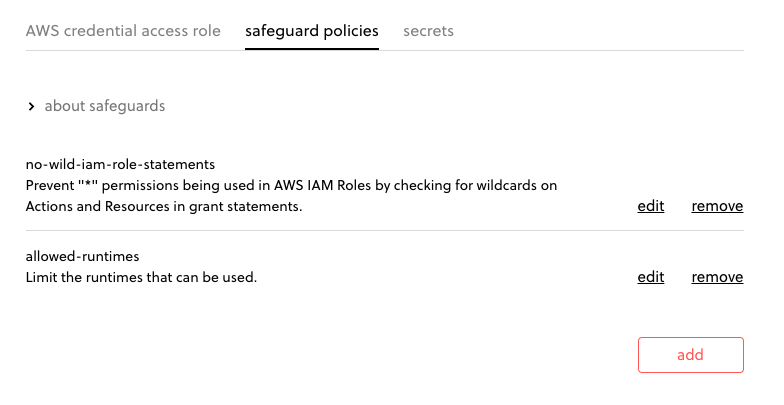
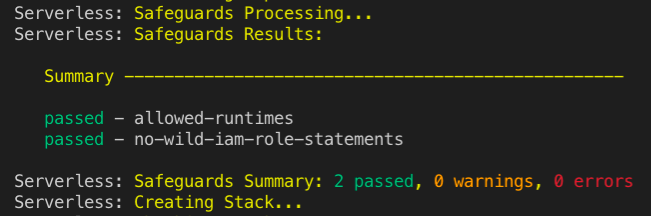
Security and Safeguards for Growing Teams
As your Serverless applications evolve you’ll need to adapt to a growing team that may benefit from some guardrails. You can use Serverless Safeguards to run a range of customizable pre-deployment checks to block developers from making mistakes like deploying to the wrong region or including plaintext secrets in serverless.yml.
Overall, you’ll have access to a much larger ecosystem of serverless development tools and best practices along with a development community that has your back. Every migration is unique, but hopefully, this example can help you start to think about the process of moving from SAM to the Serverless Framework. Have more questions? Hop into the Serverless Forum or the Slack and ask away!