
8 guidelines to make social media posts more accessible

Written by Carly Hill
Published on February 1, 2023
Reading time 15 minutes

Social media has the power to bring people together—but when you don’t use social media accessibility best practices, it also has the power to exclude.
For the most part, scrolling through social is a no-brainer. We can log on while we watch TV, throughout the day, even during Zoom meetings (hey, we’ve all done it.)
But the ease of scrolling through social isn’t a universal experience. For people who use accessibility aids to people who need additional contrast in visuals and text, partaking in social media can be a frustrating experience.
Thankfully, you have the power to make your social channels more inclusive of more of your audience. And that puts your brand in the enviable position of improving social media engagement, while showing the whole of your audience that you see them.
What is social media accessibility?
Social media accessibility is the practice of designing and developing social media content and posts that provide a smooth, inclusive experience for everyone—including for you, the marketer.
Non-accessible content can cause all sorts of annoying, disruptive experiences—like videos with a lot of background noise that don’t use captions. Creating more accessible social content is truly a win-win for everyone involved—from you, to your audience.
We talked to social strategist, accessibility advocate and creator of Accessible Social Alexa Heinrich for this article. When it comes to social media accessibility, she said: “Creating accessible social media means ensuring that everyone can access your content. No matter their physical or cognitive abilities.”
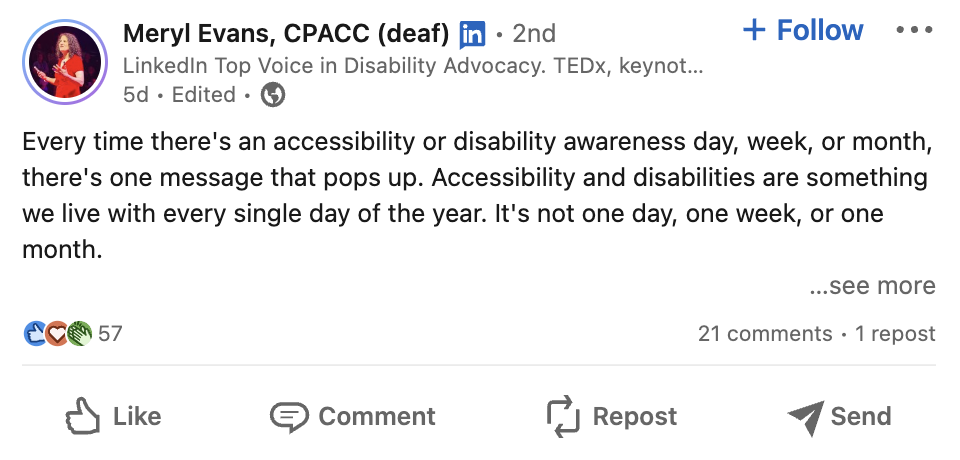
Make accessibility part of your strategy, and apply it to your social content every day—not just when disability awareness dates are trending.
Why accessibility matters on social
One in four Americans lives with a disability. And according to Pew Research, 62% of adults with a disability report owning a laptop, and 72% use a smartphone.
In other words: without inclusive social media, you risk alienating members of your audience, or missing them entirely.
“Logically, the more accessible you make your content, the more people that will be able to access and engage with it,” Alexa tells us. “Inclusive best practices can have a direct impact on your communication efforts and affect how many people you reach with your digital content.”
From screen readers to Sticky Keys and more, technology has made it easier for people with disabilities to be a part of the online conversation. But that same technology requires you, the marketer, to follow accessibility best practices to provide an inclusive experience.
“Marketers should care about the experience that their followers have when they engage with their brand on social media.”
In short, Alexa summed it up best, “Marketers should care about the experience that their followers have when they engage with their brand on social media.”
8 guidelines to make your social posts more accessible on every platform
Making your social posts more accessible on social media is relatively easy, once you know where to start.
Here are 8 social media accessibility best practices and tips you can start implementing today:
- Add alt text to images
- Make your text accessible
- Be mindful of emojis
- Add closed captions and subtitles to videos
- Make your visual content accessible
- Use inclusive language
- Prioritize inclusivity in your images
- Make accessibility and inclusion part of your routine
1. Add alt text to images
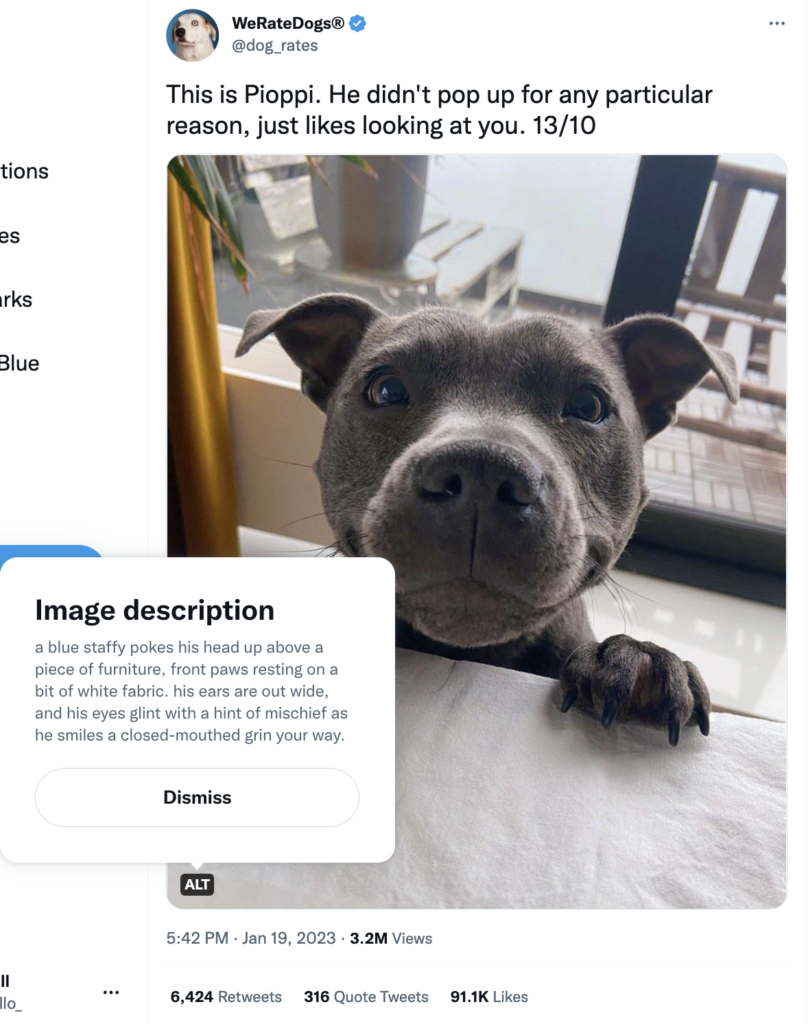
Alternative text, or “alt text,” is a short yet informative description of an image that screen readers use to describe that image on social media.
Here’s an example of what it looks like on Twitter:
Alt text is easy to add, yet underused. Other times, it’s used incorrectly altogether. Unfortunately, it’s not uncommon to see some brands or accounts use alt text to hide unhelpful easter eggs, image credit and calls to action.

Best practices for creating and adding alt text
Alexa put it best: “When writing alt text, ask yourself, ‘What about my image is vital for someone to know?’ Think about what you’re trying to achieve with your social media content. Make sure that your alt text is descriptive enough to make your image accessible in a way that helps you meet those objectives and properly informs your followers.”
Here are some best practices to follow:
- Keep it succinct, yet informative. 125 characters is a common guideline, but don’t be afraid to write longer to paint a clearer picture for graphics or images alike.
- Skip writing “image of” or “picture of.” These are a given.
- Include keywords. Alt text plays into SEO—include keywords, as long as they’re relevant.
- Include context, too. The alt text for the Tweet below is “Snoozing fox in the brush at Lake Clark National Park & Preserve, Alaska,” which clearly explains why the image was paired with text about waking up early.

And pro tip: Add video descriptions, too. Videos may not have an alt text option, so remember to add descriptions to your captions or threads to describe your video content. The below video from US Fish and Wildlife Services provides an in-depth and extremely informative description of their video.

Finally, just remember: don’t overthink it. Alt text is subjective. As Alexa put it, “As the content author, you have the power to decide what details are important in not only your image, but your entire post as well.”

As far as how you actually implement it, here are a few tips on how to add alt text on each platform:
Twitter:
- Upload an image to your Tweet.
- Select add description under the image.
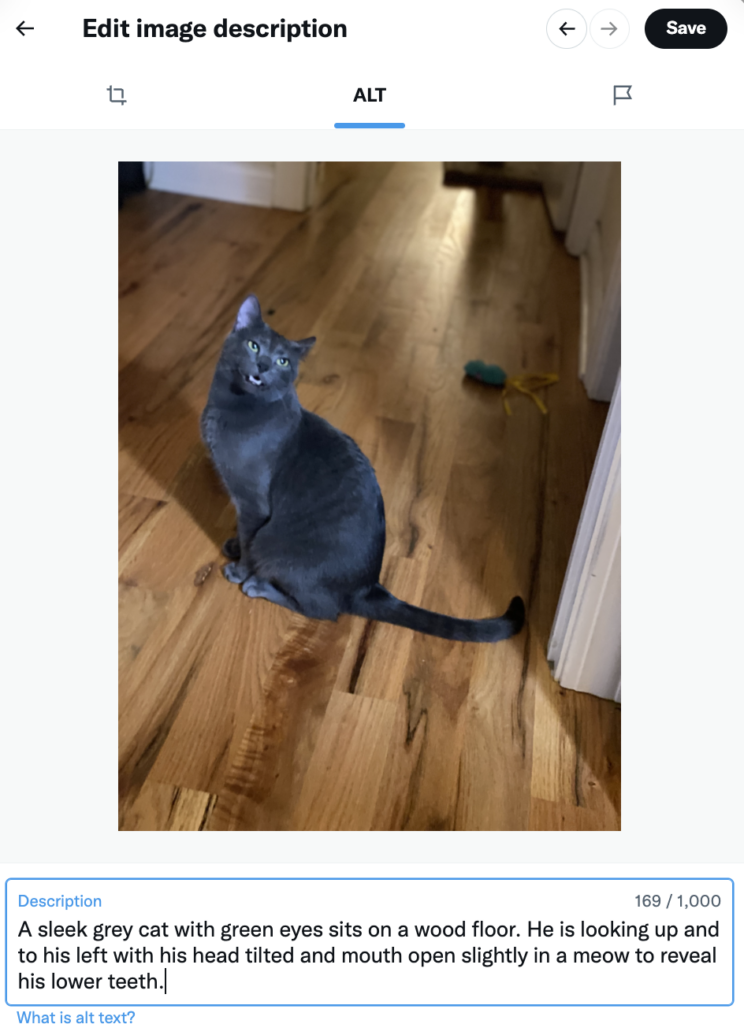
- Enter your alt text description up to 1,000 characters.
- Tap save.
- An “ALT” badge will appear on your image to indicate that it contains alt text.
- If you have multiple images, tap add description for any of them and use the arrows in the editing window to toggle between images.
- According to Accessible Social, using GIFs from Twitter’s media library allows you to add alt text to GIFs, too.
Facebook: Facebook will automatically add alt text to images, but these auto-descriptions are far from perfect.
To add alt text to a new post:
- Upload your image to a post.
- Tap edit (or, on mobile, tap the three dots on your image.
- Tap Alternative text.
- Add your Custom alt text.
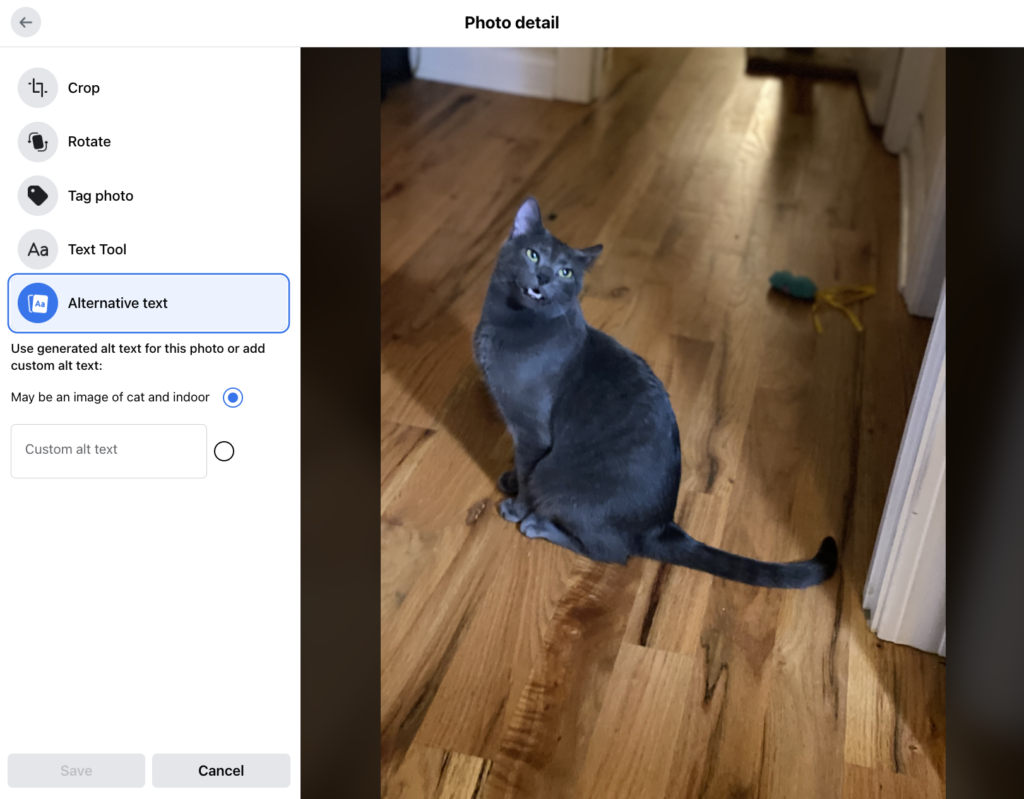
Editing alt text that was automatically assigned to your photos is easiest on mobile. The auto alt text for this image was “may be an image of cat and indoor”—all the more reason to add your own. To edit your alt text:
- Go to your post.
- Tap on your photo.
- Tap the … in the top corner.
- Select Edit Alt Text.
Instagram:
When adding Instagram images on desktop, you’ll see an Accessibility dropdown option. But adding alt text to images as you share them on mobile is more complicated:
- Upload your image once you’re done editing.
- Hit Next.
- Tap Advanced settings.
- Tap Write alt text.
To add alt text to an existing post:
- Tap the … above your post.
- Tap edit.
- Tap Accessibility.
- Write your alt text.
- Hit Done.
LinkedIn:
- As you add an image to a post, tap Add description in the top right of your image.
- Note: Adding or editing alt text is only available on desktop.
Between the back and forth and limitations, like not having the ability to use alt text in Facebook’s Business Suite, adding alt text platform by platform can be challenging. Using Sprout Social streamlines your accessibility and publishing efforts. You can add alt text to your images across Facebook, Twitter and LinkedIn, in one step.
While API limitations mean you can’t add alt text to Instagram images in Sprout, you can add image descriptions to your captions as you schedule your posts—an accepted and widely-used alternative.
The Sprout platform helps cut down on steps so you can double down on accessibility. In fact, our accessibility features were a big factor in why Texas A&M University chose Sprout as their go-to social media management platform.
2. Make your text accessible
While playing around with typography on your website or social posts can be trendy, fancy fonts can be a nightmare for screen readers.
When it comes to social posts, a number of best practices will make all of your text more inclusive.
How to write accessible text
Let’s start with a few best practices to follow:
- Format your hashtags the right way. From adding humor to celebrating hashtag holidays, hashtags are here to stay. Make hashtags easier to read for screen readers and users alike with “CamelCase,” where you capitalize the first letter of each word in a hashtag. So instead of #weloveteamsprout, write #WeLoveTeamSprout.
- Avoid all caps. All caps make words harder to identify by their shape, and screen readers may read them as acronyms—not full words. For example: text vs TEXT.
- Be mindful of font color. This is more relevant for landing pages or blog posts you link to. Ensure your font and hyperlink colors are accessible.
- Spell out acronyms first. This helps screen readers and people unfamiliar with acronyms.
- Write in plain language. Avoid jargon and overly technical language to make your posts more accessible to those new to your industry, non-native speakers or people who experience cognitive impairments.
- Avoid run-on sentences. Instead, opt for clear, short sentences.
- Present the most important information first. Helpful for accessibility, and to get your point across clearer, sooner.
- Include @ mentions at the end of your posts. This helps the flow of your post, especially for screen readers.
- Use special characters correctly, and in moderation. Screen readers know to not read all special characters aloud, like ampersands. But too many special characters in your text can result in a confusing experience for people using screen readers.
- Avoid “creative” typography. Playing around with cute fonts has become popular in social bios and posts. But these don’t work well with assistive technologies.
You 𝘵𝘩𝘪𝘯𝘬 it's 𝒸𝓊𝓉ℯ to 𝘄𝗿𝗶𝘁𝗲 your tweets and usernames 𝖙𝖍𝖎𝖘 𝖜𝖆𝖞. But have you 𝙡𝙞𝙨𝙩𝙚𝙣𝙚𝙙 to what it 𝘴𝘰𝘶𝘯𝘥𝘴 𝘭𝘪𝘬𝘦 with assistive technologies like 𝓥𝓸𝓲𝓬𝓮𝓞𝓿𝓮𝓻? pic.twitter.com/CywCf1b3Lm
— Kent C. Dodds 🌌 (@kentcdodds) January 9, 2019
3. Be mindful of emojis
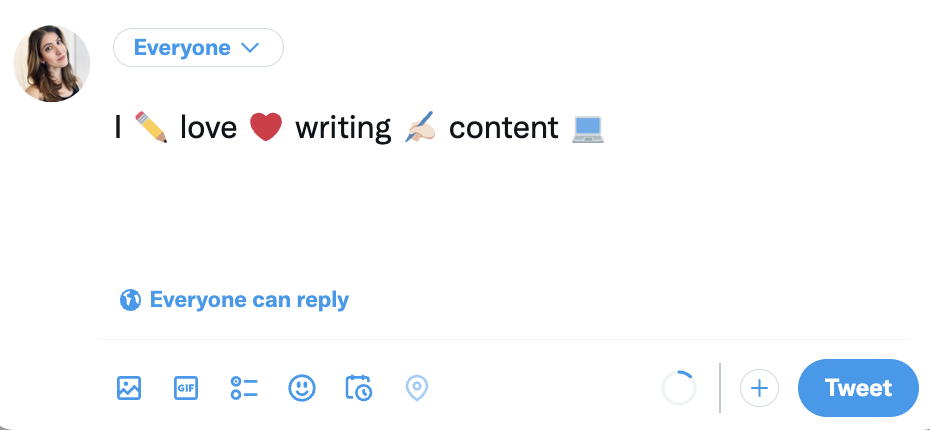
Consider this: every emoji has a description assigned to it, like alt text to an image.
A screen reader would read the Tweet below as, “I pencil love red heart writing writing hand: light skin tone content laptop.” Not so cute.
How to use emojis while keeping your content accessible
You don’t need to stop using emojis, just be mindful of where and how much you use them. Here are some tips:
- Be mindful of trends that rely on repetitive, overused emojis. The viral “red flag” trend, for example, is a nightmare for screen readers. If you must jump on a trend like this, limit your post to just a few emojis rather than using dozens. Find more tips in this article.
- Use emojis in moderation. This limits confusion in your posts. Put them at the end of a social post. This also helps you lead with your key information. And keep in mind: custom emojis that represent different skin tones are fantastic and inclusive, but be aware that they have longer descriptions. If you use multiple in a row, you’ll add complexity for folks using a screen reader.
- Avoid emojis in your profile name. This is disruptive to screen readers.
4. Add closed captions and subtitles to videos
Including closed captions should be an essential part of your video marketing strategy.
As Alexa put it, “Captions make videos accessible for a variety of users—from those with hearing loss or cognitive disabilities to those learning a new language to people who simply don’t want to wake their sleeping partners or babies.”
It also happens to be popular with Gen Z and millennial content consumers. Plus, captions even give you an SEO boost.
Captions are always a win when added to your videos. Here are a few common best practices:
- Go beyond what’s being said. Subtitles write out what’s said, but closed captions add extra information for context like sounds in the background or music being played.
- Ensure captions aren’t covered by platform content. Especially important in formats like Reels and TikTok.
- Create high contrast captions. Make sure your captions are visible against your background, like white text against a black highlight, or vice versa.

Here’s how to add and edit closed captions
Most social platforms have made this an easy step to include. But while auto captions are incredibly helpful, like any AI process, they’re not perfect—which can lead to confusing, or even offensive caption mistakes.
Luckily, platforms that offer automatic captions also offer ways to edit them.
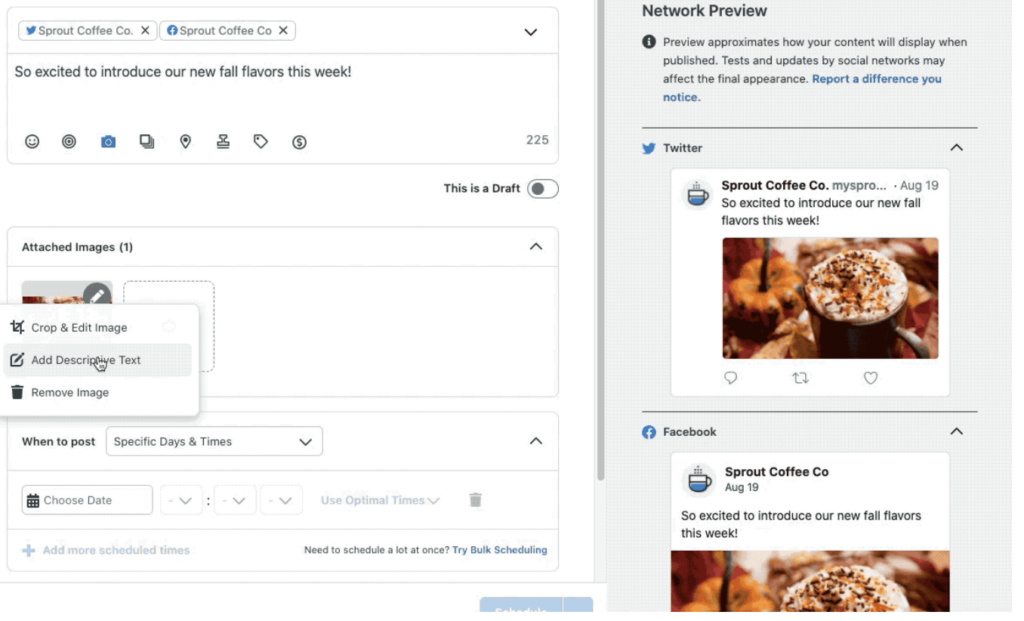
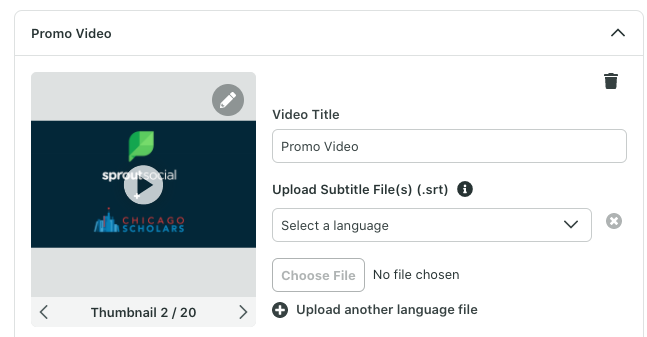
Using Sprout: Using Sprout, you can upload SubRip Subtitle Files (SRT) to Facebook, YouTube and Twitter videos while creating your posts in Compose.
- Navigate to “Compose.”
- Select Facebook, YouTube or Twitter from the Profile Picker.
- Click the camera icon, select upload video and add the video you want to use.
- Add a title.
- Select the language for the SRT files you plan to upload.
- Click Choose File to upload your file. You also have the option to click Upload another language file.
- Schedule your post.
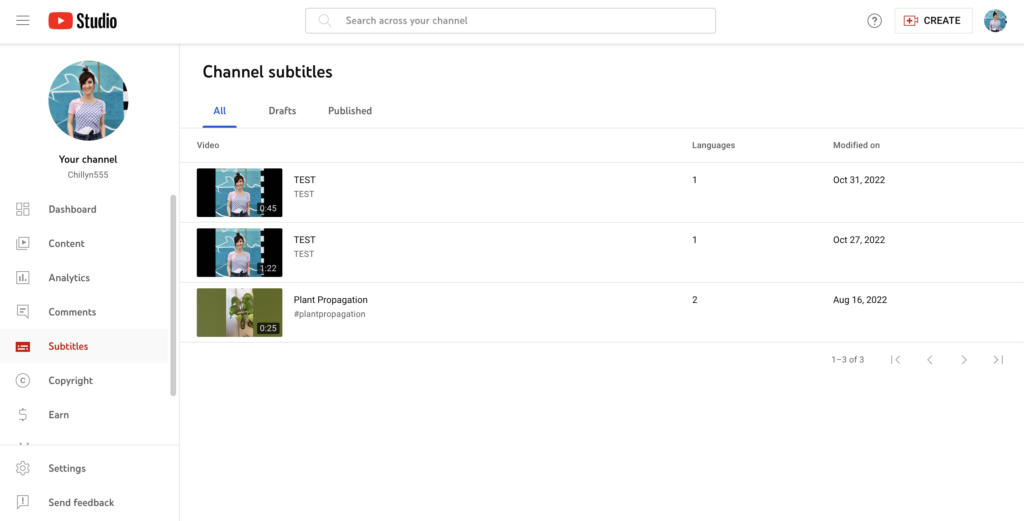
YouTube: It’s important to caveat—on YouTube, closed captions are called subtitles. There are a number of tools you can use to generate YouTube subtitles faster. But adjusting auto captions is an easy and quick place to start.
- To add or edit auto captions on your videos, log into YouTube Studio.
- Click the Subtitles tab on the left navigation.
- Select the videos you want to add subtitles to, or edit subtitles of.
- Set your language.
- You’ll be taken to a page where you can edit the auto-subtitles of your video. Click Duplicate and Edit to correct any auto-caption errors.
- Publish.
- Heads up: When you upload a video and opt into auto captions, your captions may not populate right away. Keep checking back, then edit them when they are available.
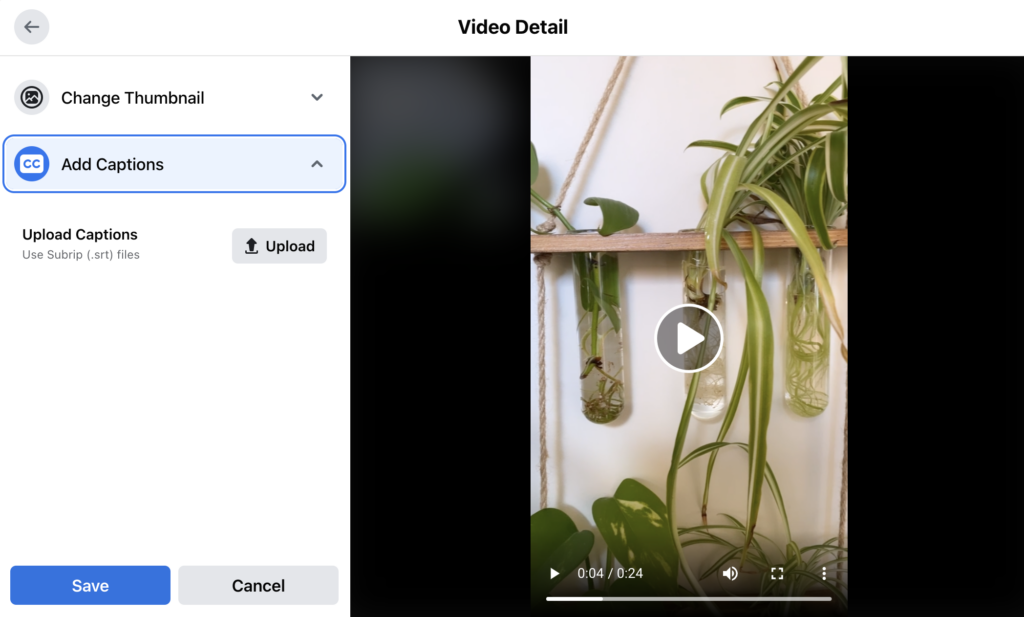
Facebook:
On desktop:
- Add your video to a post.
- Click Edit.
- Click Add Captions.
- Click Upload Captions. Facebook uses Subrip (.SRT) files for captions.
On mobile
- Add your video to a post.
- Tap Edit.
- Tap CC at the top of the screen.
- Facebook will transcribe the audio.
- Select the look of your captions.
- Edit them by tapping the Edit Captions button. Then, adjust words you need to change by tapping on them and typing in corrections.
Instagram:
- Upload your video (all videos on Instagram upload as Reels now.)
- Tap Next.
- Tap the Stickers icon at the top of the screen.
- Tap the Captions sticker.
- Instagram will transcribe your audio.
- Tap your captions as they appear on the screen to edit individual words.

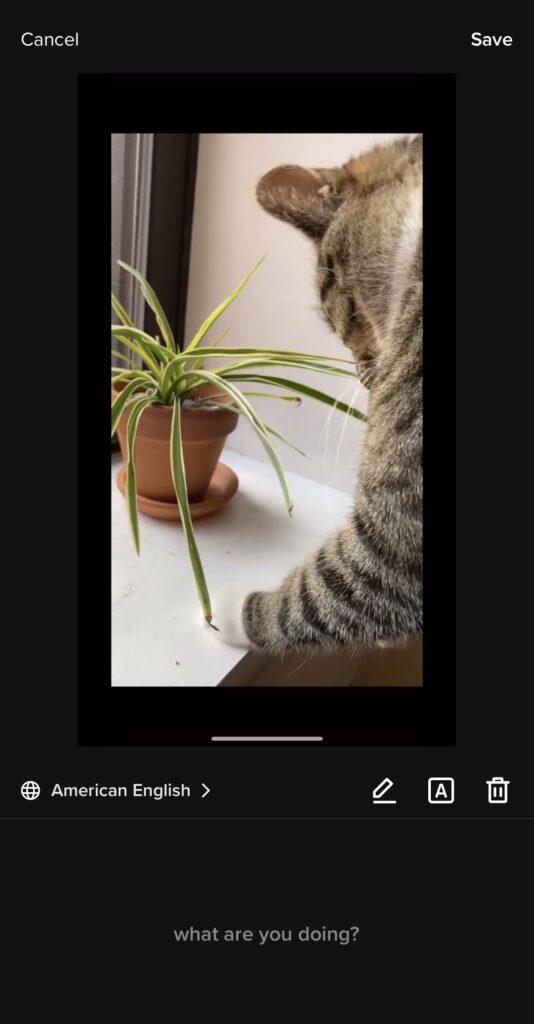
TikTok:
- Upload your video.
- Tap Captions on the side navigation.
- TikTok will transcribe your audio.
- Review your captions, and tap the pencil icon to edit them.
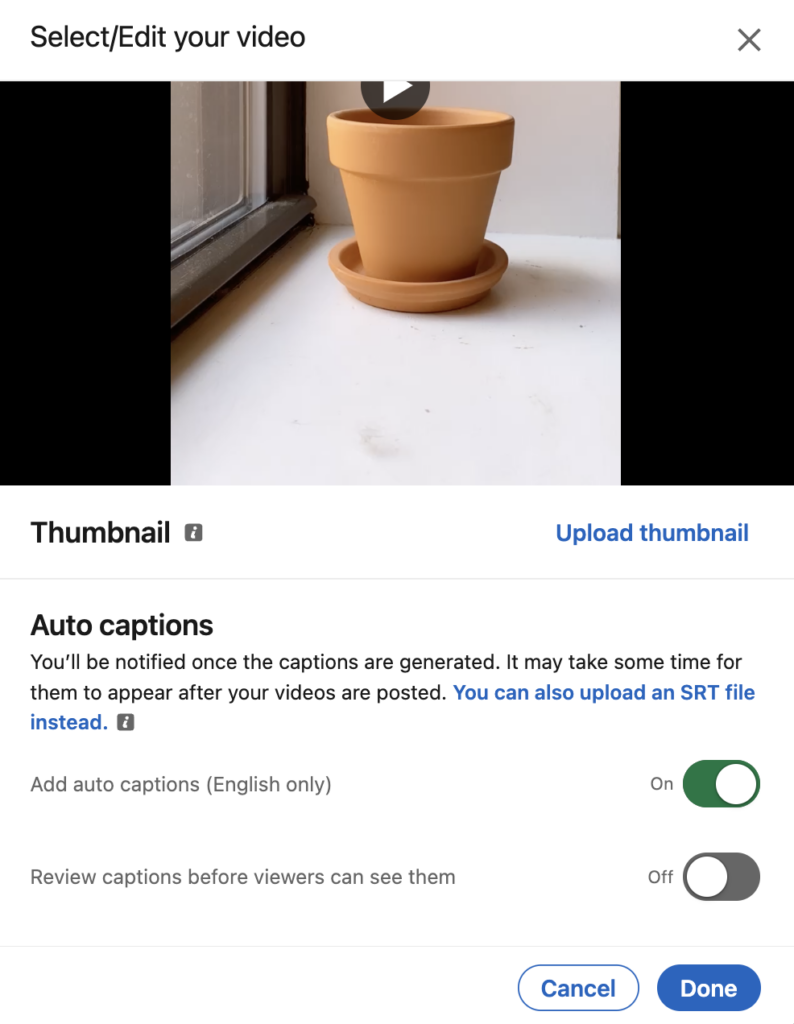
LinkedIn:
- Exciting news: LinkedIn now offers both auto captions and a way to review them. Start by logging into LinkedIn on desktop.
- Add a video to a post.
- Under Auto Captions, toggle on Add auto captions and review captions before viewers can see them to be extra safe.
- You’ll see a banner below your post when your captions are review-ready.
- Review your captions by clicking the … on your post.
- Click CC Edit Captions.
- You can also upload an .SRT file instead, which is prompted above your auto caption option.
Twitter:
- To add captions to your Twitter video content, you need to upload an .SRT subtitle file.
- Click on a video within your Media Studio Library.
- Select Subtitles.
- Choose your text language.
- Click Upload and select the .SRT file.
- To update the file further, click the pencil icon.
5. Make your visual content accessible
Making your images and videos accessible goes beyond just using alt text and captions.
From providing warnings on content that would impact people with photosensitivity to making your content accessible to people with colorblindness, there are a number of ways you can provide a better experience with your visuals.
How to create accessible visual assets
There are a number of ways you can make your visuals more accessible to all:
- Avoid packing a graphic with text. Consider limiting the information on your graphics and linking to a blog post or landing page for a full statement, full event info, a full blog post, etc.
- Include a warning for people with photosensitivity. If you post a video with strobe effects or flashing lights, include a warning and create a pause before your content plays. TikTok includes a warning for content that may trigger unpleasant or dangerous effects for some people.
- Be mindful of viral trends that are not accessible. Trends that rely on unique post formatting, like the handshake trend below, may be fun to jump on. But they’re not friendly to assistive technologies. Before jumping on trends, consider how they would be read by a screen reader, and consider limiting using these trends, or holding off altogether.

- Don’t rely on different colors to convey meaning. This may exclude those who are colorblind, and may be impacted by cultural differences.
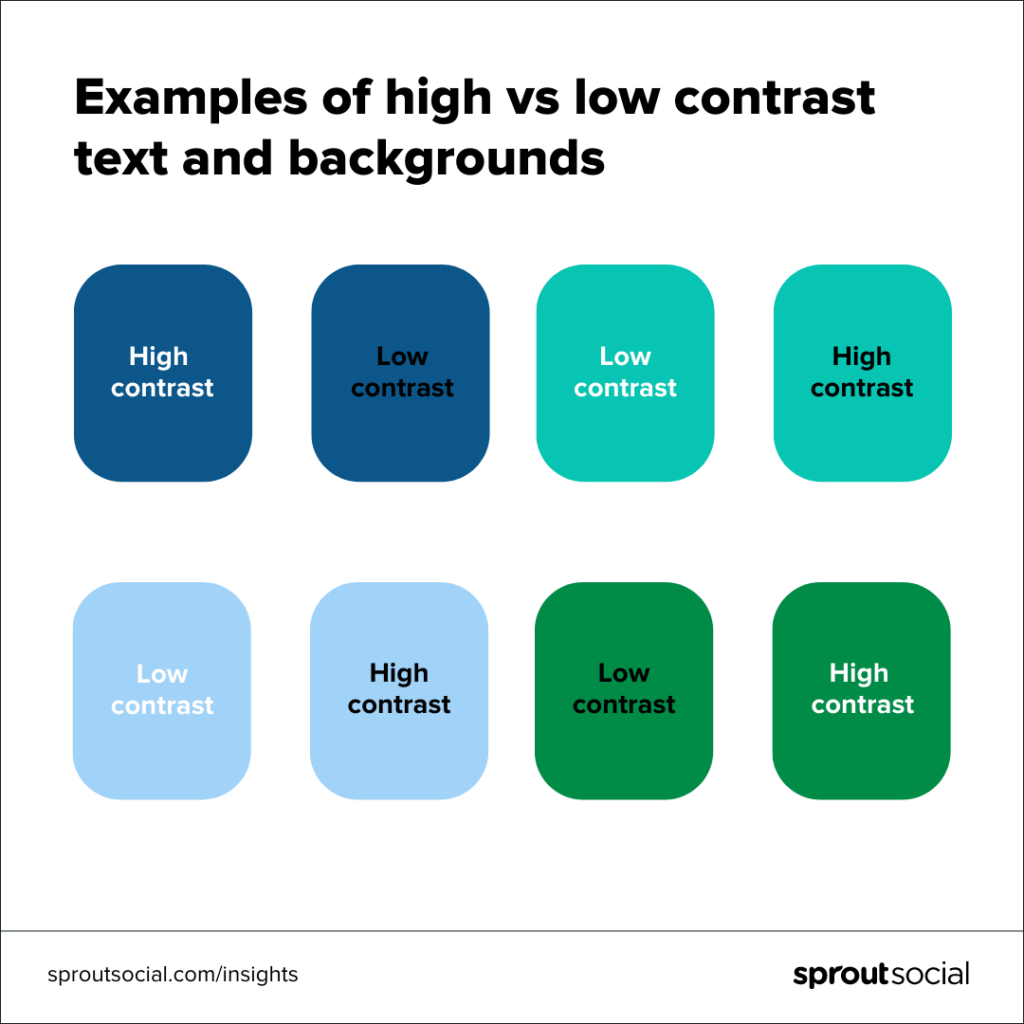
- Create visuals with high contrast. High contrast makes graphics easier to interpret. Ensuring the colors in your graphics have a 4.5:1 contrast will help make the text on your graphics visible to everyone.
6. Use inclusive language
It can be all too easy to perpetuate bias, stigmas and marginalization in the words and phrases we may have gotten used to every day—even when we don’t realize we’re doing it. Not even beloved musical artists are immune.
Inclusive language is what it sounds like: using language that is inclusive and respectful, and free of bias, discrimination or exclusionary terms. Using it in your communications—from social posts to job descriptions—helps everyone feel like they’re addressed, included and welcome to participate.
Here’s how to use inclusive language
Inclusive language takes self-checking and education. But it’s important to start now and to make it a part of your everyday process.
Here are a few ways to start using more inclusive language:
- Bust bias in your writing. For example, using the word “normal” as a comparison group can be ableist, or puts one group in “the norm.” Using gendered language is biased, too—a tool like the gender decoder can help.
- Use people-first language. For example, saying “a person with a disability” vs “a disabled person.”
- Keep an eye out for offensive language. Language is ever-evolving. Keep an eye out for now-outdated phrases, sayings or references, and cultural appropriation in your language.
- Keep learning. Language is constantly evolving, and we are constantly learning. Be curious about others, and educate yourself on preferred terms. Our inclusive writing guide is a great place to start.
- When in doubt, ask. Preferred terms even differ within groups and over time. Rather than assuming pronouns or preferred terms, when in doubt, respectfully ask.
7. Prioritize inclusivity in your images
Accessibility and inclusion matters when it comes to HOW you post.
But it also applies to WHAT you post.
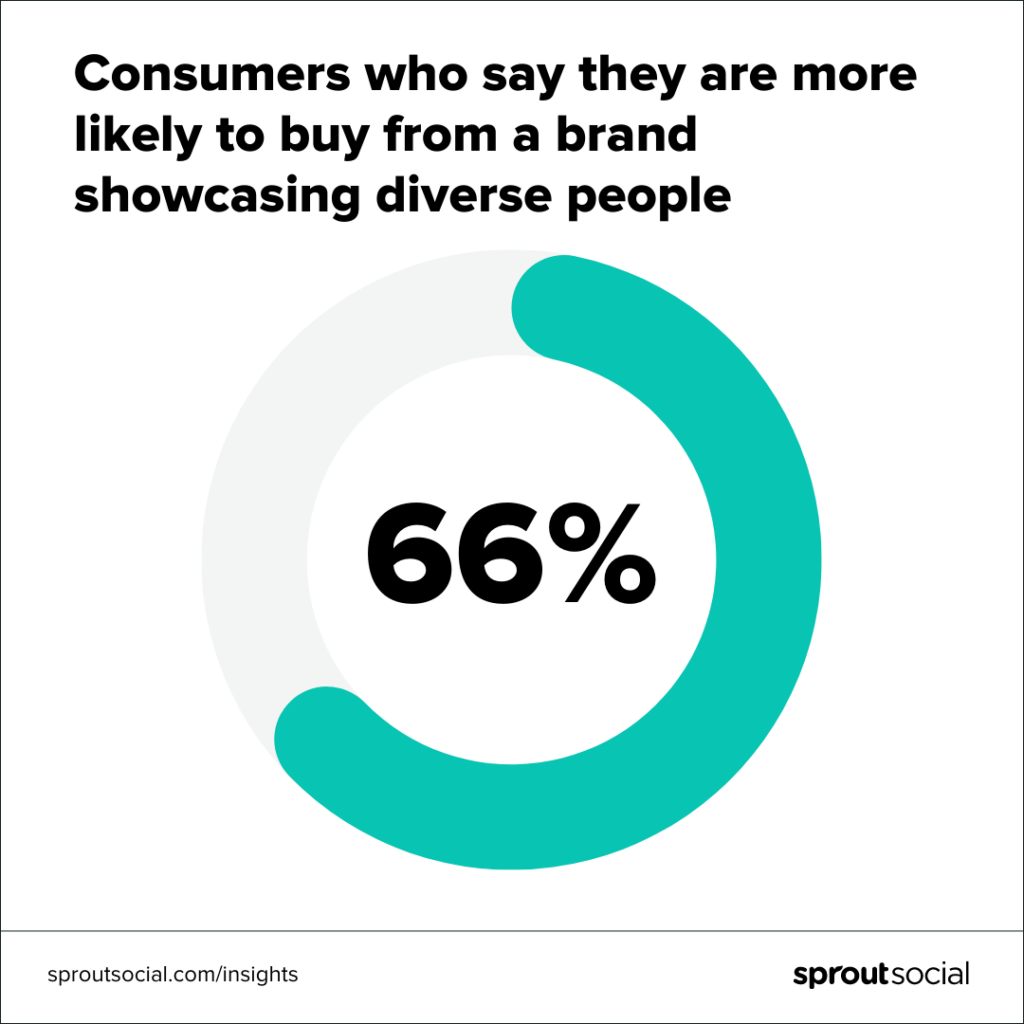
After all, according to a recent Sprout Social survey, 66% of respondents said they were more likely to buy from brands showcasing people of diverse races, gender identities, ages and more. A Facebook analysis found that people with disabilities and the LGBTQIA+ community, for example, are underrepresented in digital ads.
Prioritize diversity in social media and ensure that the whole of your audience feels included. Just remember to make these images accessible, of course.
How to prioritize more inclusive marketing assets
These are just a few tips to get you started. To dive deeper, check out our article on diversity in social media.
- Be mindful of your models. Do your models reflect the many ages, backgrounds and perspectives of your audience?
- Consider your collaborators. Inclusive social media content extends to creators, agencies and partners you work with and feature, as well. What voices are you amplifying, and are there voices you could amplify more?
- Listen. Listen to your audience if they take issues with your materials, and make changes.
- Prioritize diversity all year-round. Only featuring a diversity of gender identities and couples during Pride Month, or women during Women’s History Month is inauthentic and risks tokenism. Feature people of all ages, backgrounds, body types and more all year around to truly represent and speak to your audience.
- Make your alt text descriptions inclusive. There are many resources out there about being inclusive with your alt text. Educate yourself on how to be inclusive with your descriptions, and know that this could come down to preference—for example, how someone identifies. When in doubt, ask—never assume. This resource has some great examples.

8. Make accessibility and inclusion part of your routine
If all of this seems overwhelming when you’re just starting out, know that you’re not alone. In a recent Sprout Social survey of 300 marketers, almost a third said that the time commitment to making posts accessible is their biggest challenge when it comes to accessibility.
But by now, you know how important it is to include more social media accessibility and expand your audience.
Integrating accessibility best practices into your content creation workflow makes accessibility part of the process—not an afterthought.
And, silver lining: in that same data above, almost a quarter of marketers report being able to prioritize accessible content smoothly.
Provide training for yourself and your team. Then, bake accessibility practices into your social scheduling and content planning routine. Setting your team up with a platform that makes adding alt text as you publish easy (like Sprout Social’s publishing tools) can help you streamline this further.
Social media accessibility benefits everyone
Don’t let the fear of perfection hold you back from making your posts more accessible and inclusive. The first step is the most important. The sooner you start putting accessibility and inclusive practices into your social media strategy, the better.
If you want to see how Sprout can streamline social media management for your entire team—accessibility features included—try us for free for 30 days. Sign up for a free trial and start your accessibility practices today.
- Categories
Celebrating Black History Month: Best practices for celebrating on social media and beyond
Published on February 5, 2024 Reading time 15 minutes - Categories
Why partnerships with Latinx creators matter to your inclusive marketing strategy
Published on September 23, 2022 Reading time 4 minutes - Categories
How brands can build inclusive campaigns year-round
Published on March 14, 2022 Reading time 6 minutes - Categories
Guide to using inclusive language for your brand and business
Published on October 7, 2021 Reading time 7 minutes
Share