Load Testing Using Locust.io
There is a time after our application or service is running, we want to know the performance and load that can be handled by our service. Does our service’s performance diminish after some number of users try to access it? Does our service become unstable? All these questions can be answered using load testing. So, it’d be handy for us as the developer to know about load testing and we’ll learn it here.
But the important thing that we have to remember is performance tweaking should typically be done after the system is up and running. Just like Donald Knuth said:
“Premature optimization is the root of all evil”
So make sure you’re not optimizing your application prematurely.
In this article, we’ll learn how to use Locust.io in Python to do load testing. Let’s start.
Introducing Locust.io
Directly taken from the official documentation.
Locust is an easy to use, scriptable and scalable performance testing tool.
Features
- Write test scenarios in plain old Python
- Distributed and scalable — supports hundreds of thousands of concurrent users
- Web-based UI
- Can test any system
- Hackable
With these features, Locust gives us some freedom to write our tests. We can do load testing for HTTP, XLM-RPC, and gRPC services by writing a custom user/client. Also, the neat part is we can see the statistics of our tests directly on the web UI. This could handy if we have to present our findings to non-tech people.
Installation
Note: We need Python 3.6 or later to use Locust.io
Probably, you’d need to set up a virtual environment first on your local machine. It’s a good practice to isolate our workspace and not using the global environment.
Install Locust using pip.
pip install locust(or pip3 install locust )
We can validate that we’ve installed Locust properly by running commandlocust -von our terminal. It’ll give us the Locust version number we’ve successfully installed.
Start With a Simple Example
For the API we want to test, I wrote it using FastAPI. But it’s okay if you don’t understand FastAPI. I’ll explain what the API does.
Let’s start with a hello world example. Both for the FastAPI app and Locust test script.
What the above code does is basically gives us Hello World response when we hit the endpoint /hello. Short and simple!
Now, the Locust test script.
Write the above code in locustfile.py and you can run the test by running locust command on your terminal.
You can open the web UI on http://0.0.0.0:8089/ (by default). Then, you’ll see this.
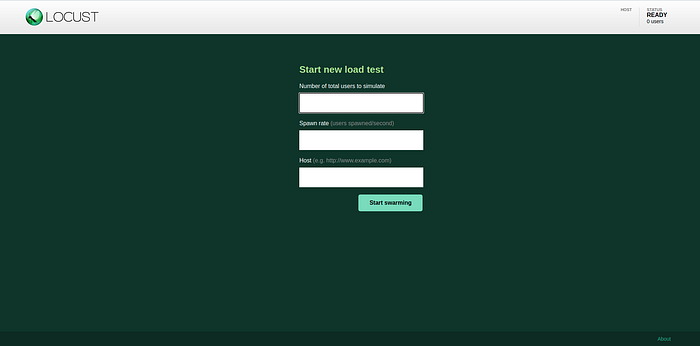
Here, you have to specify the number of users to simulate, its spawn rate and your service API host URL (since I am using FastAPI, the default is http://localhost:8000/). After the test is running for a while, you’ll see something similar to this.
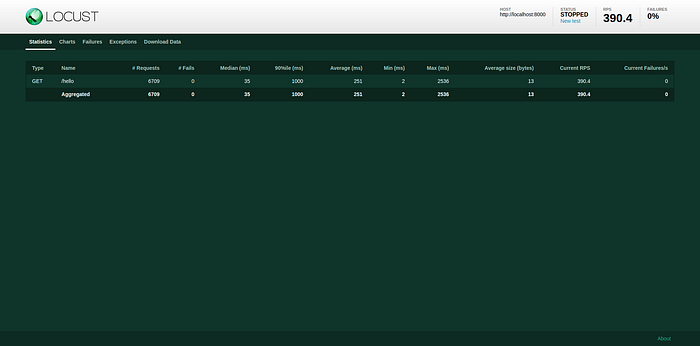

Quite neat looking right? Now, the explanation for the test script.
Our test script is also pretty simple. We have the import statement on top. Then we define the user class that will get simulated when the test is running. HelloWorldUser class extends HttpUser class, since our application is using HTTP call for the interaction. wait_timeis used to specify how long a simulated user should wait between executing tasks, and the decorator task is used to specify that the hello_world method is a task that should get executed by the simulated user.
A Bit Advanced Example
In this section, we’ll modify both our FastAPI app and the Locust test script. Let’s cover more advanced usage of Locust.io.
FastAPI application:
Certainly longer than our previous eleven lines of code. What does this code do?
/login: a user has to specify his username and password to get a token (I used a dummy example here) because all endpoints are protected by a verification process (excluding the/helloendpoint). Therefore to access all other endpoints, a user has to specifylogin_tokenin his request header./logout: here we basically let the user log out by giving some dummy response./fastand/slow: I puttime.sleepto mock some expensive process./double-me: this endpoint takes path parameternumthen give back the doubled value ofnum./square-me: this is a post-method request. A user has to specifynumandnums.numis a number andnumsis a list of numbers. This endpoint returns the squared value ofnumandnums.
Locust test script:
Wow! This is quite a mouthful of code. Let’s analyze this code bit by bit.
TestUseris a class of simulated users that gets run when the test is running. Like the simple example, it extendsHttpUser. Also, it haswait_timeproperty.- In the simple example, we defined the tasks using
taskdecorator. The above code gives us a different way to define the tasks a simulated user has to do. We can define functions just likefast_taskandslow_task. Notice that both functions have access to the simulated user (including the propertiesTestUserhas). - Other than defining a function as a task. We could also use a class to write tasks.
ProcessNumberTaskextendsTaskSet, then we can write the tasks usingtaskdecorator as usual. The difference is we can’t accessclientor simulated user’s properties directly fromself. We access them throughself.user. Then we can putProcessNumberTaskclass totasksproperty ofTestUserclass. - Just like any other common application, before we can access the functionalities the application provides, we need to log in. Look at line 36 of
on_startfunction definition. This function runs for every simulated user. Asking for the login token by providing username and password. Then, if the request is successful, we save the login token to be used later for accessing other endpoints. - In
on_startfunction definition we call the endpoint/loginas a context manager. But you can use it as a normal function call. - In
on_stopfunction definition we can do something for every simulated user when the test is stopped. For example, log out or clear up some sessions. - Locust provides us with event hooks. In the above code, we used several event hooks but let’s start with
initevent hook. Theinitevent is triggered at the beginning of each Locust process. This is especially useful in distributed mode where each worker process (not each user) needs a chance to do some initialization. We can spawn a checker that checks if the number of requests exceeding 5000, if it does then the test stops. Notice that we can access the stats of our test throughenvironmentvariable. - The other event hooks are
test_startandtest_stop.test_startfires when a new load test is started. It’s not fired again if the number of users changes during a test. Meanwhile,test_stopfires when a load test is stopped.
Running Locust Distributed
Once your application gets bigger, so do your test. After a while, a single machine can’t simulate the number of users you expect using your app. For that reason, we need to distribute load tests across multiple machines.
Assume that you have your test script. You can start Locust on master node with this command (the Locust file name is my_locustfile.py).
locust -f my_locustfile.py --masterThen to start worker nodes using this:
locust -f my_locustfile.py --worker --master-host=192.168.0.14Replace 192.168.0.14 with the IP address of your master node.
Another way to distribute Locust process is by using docker.
You can use this command to run the test using docker (not distributed).
docker run -p 8089:8089 -v $PWD:/mnt/locust locustio/locust -f /mnt/locust/locustfile.pyAlso, you can use docker-compose. This is an example of how to use it.
To run multiple workers you can use this command (in this case, 4 worker nodes).
docker-compose up --scale worker=4Retrieve Test Statistics in CSV Format
It’s pretty easy to retrieve the test statistics of our test in CSV format. What we have to do is just executing this command (assuming we have our load test script in locustfile.py)
locust --csv=resultWe’ll have 4 CSV files: result_exceptions.csv, result_failures.csv, result_stats.csv, and result_stats_history.csv.
Conclusion
In this article, we’ve covered several fundamental use cases of Locust, from the simple one to a bit more advanced one. Locust gives us some flexibility to write our own test based on our use case. Not just providing us with statistics data we need but also gives us a good looking web UI to monitor the load test. Although, we’ve covered quite a lot of aspects there are still things that are overlooked. Such as other command-line options, configuration using configuration file, custom clients, etc. So, you can find the rest in the official documentation. I think the documentation is well written and easy to navigate.
You can get the full code used in this article here: https://github.com/agusrichard/python-workbook/tree/master/locust-article-material
For additional knowledge, I have another example of Locust load testing: https://github.com/agusrichard/python-workbook/tree/master/load-test-locust. The code of the API service for this test is here: https://github.com/agusrichard/go-workbook/tree/master/load-test-experiment
Thank you for reading and don’t hesitate to give this article some claps if you think this article helps you. Until next time!

