Cypress released the first alpha version of component testing back in version 4.5.0. It caught the attention of many, but if you are like me, you didn’t understand the buzz. It’s completely okay, as component testing was always more of a domain of developers than testers. But testers can take an interest in component testing, too. Now that Cypress’ component testing features have reached General Availability (GA) in version 11, I decided to dive into this topic and find out why component testing is important. The more I played with it, the more I understood the appeal. In this blog post, I’d like to share my perspective with you.
What is a component?
Components are like Lego blocks. In the same way as toy castles, cars, and other creations can be built from Lego blocks, Web applications are built from components. Like Lego blocks, components come in different shapes and sizes and can serve different purposes. Some are used just once, some are reused all the time.
Each component has certain visual and functional properties. Like a Lego block, a component can be a common one that is used all the time and changed just slightly, or it can be a unique one that serves a specific function.
I want to show you how this works on a simple Vue.js application. Let‘s take a look at a simple Vue component that might look something like this:
<template>
 <button class=".green-button">{{ buttonText }}</button>
</template>
<script setup lang="ts">
defineProps({
 buttonText: {
   type: String,
   default: "Hello world"
 }
});
</script>
This component consists of two parts. One is the <template> part that contains a dynamic HTML markup. The second part is the <script> part that contains a TypeScript function that defines the properties that we want to render in the <template>. There is a buttonText string property that will be rendered inside the <button> element.
This is an example of a reusable component. I can use the button element all across my application, but I might want to render different texts for the button. Whenever I want to use this component, I call it like this:
<MyButton buttonText="Click me!" />
The button will render differently based on what property is passed into it. Here are some examples:

Why test a component?
If you need to make sure that this button looks good with an emoji, special character, or normal text, what do you do? You could choose an end-to-end approach by clicking through the app to find and validate all the buttons, but this is not going to be very effective. It will be slow and cumbersome.
Enter component testing.
Instead of opening the whole application, with component testing, you can just mount the component in isolation. This means that you can save time loading just the parts you are interested in and test much faster. Or you test different properties of the same component and see how they render. This can be really helpful for situations where small changes affect a big portion of the app.
Imagine you are a developer who wants to refactor a component. While you are doing so, you can get immediate feedback on anything that might be broken. In other words, it’s easier to simply render a component with an emoji than to hunt through your app looking for it.This is why component testing is growing in popularity and why it is becoming one of the major trends in front-end testing. We can already see different implementations of component testing in tools like Jest, Storybook, WebdriverIO, Playwright, and Cypress.
Buttons don’t seem like much, though…
You are right. This example is way too simple to show the value of component testing.
Instead of a button, imagine a login form that validates a multitude of different inputs. How do you test that the form throws correct errors?
You could write an end-to-end test that will load the login screen, enter valid (or invalid) credentials, validate error messages, log in, log out, etc.
Or, instead, you could open the login form component only and try different inputs without the need of logging in or loading the rest of the login page. Loading a single component is way faster than loading the whole application. Testing a component in isolation can provide a lot of value, especially in cases like these.
What makes component testing with Cypress great
The main difference between Cypress and other tools is that it runs its component tests in a real browser. Besides that, you have all the power of the Cypress API at hand for your component tests as well. You can click, type, make assertions, and intercept network calls. You can spy on functions or stub them. This enables you to get to some really hard-to-reach places in your app and test them. You can mock your data or the component state, avoiding difficult data management or app setup.
Setting up component testing in Cypress
Starting with Cypress v10, setting up component testing is very straightforward.Once you open Cypress GUI using the npx cypress open command, you will be welcomed by this screen:
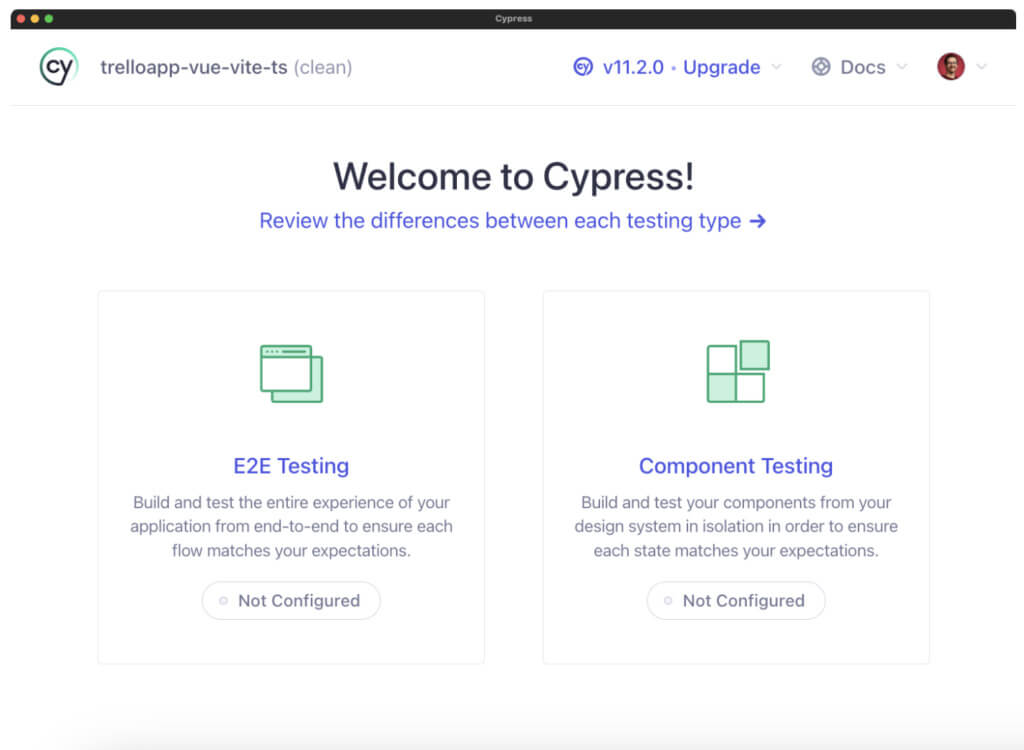
The component testing option will take you through a simple setup wizard that will help you set up everything according to your application’s needs. As opposed to end-to-end testing, component testing is actually framework-specific. While the principles are pretty much the same for all frameworks, the loaders differ slightly – each one of them needs a separate set of tools. The setup wizard will take you through the steps to set up everything.
Framework and bundler
On the very next screen, Cypress asks you to choose a framework and a bundler. It even tries to detect the ones used in your app automatically. If you are building web applications for living, you are probably familiar with the different choices.
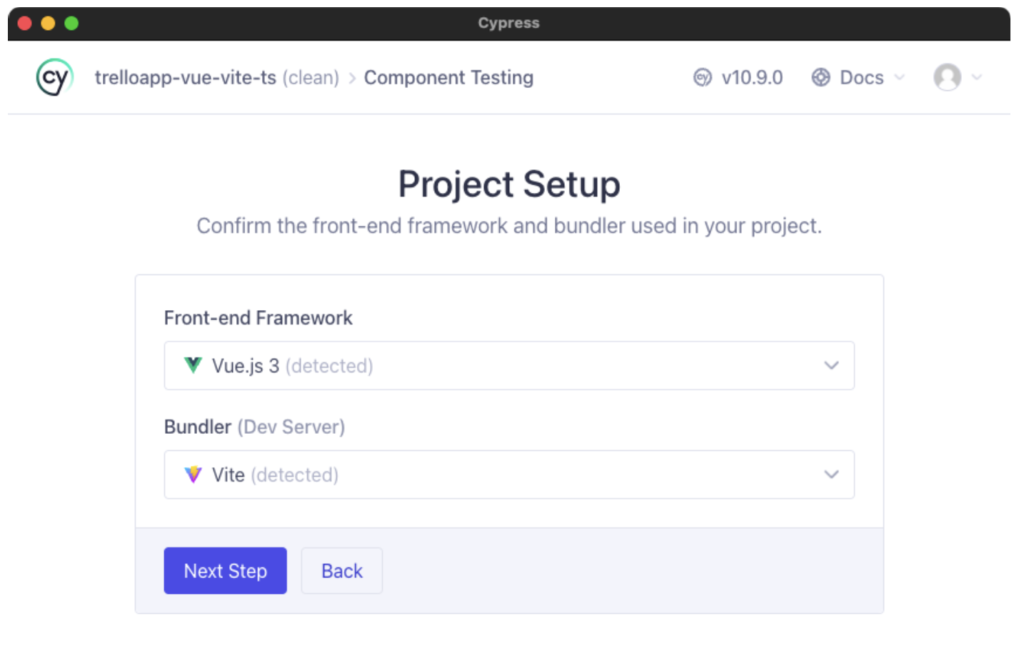
As a tester, I needed to become familiar with these terms, especially with the “bundler”. The bundler is an essential part in building a modern web application. It converts the code you write into something a browser can read. As mentioned earlier, components split our application into small “Lego blocks”. These are often .vue files, .jsx files, or something similar. But these will not work in browsers by themselves. The bundler makes them into a bunch of .html, .js, and .css files that browsers can read.
When running a component test, Cypress will use the bundler to convert your component file into something a browser can read using the same bundler as your application does.
Cypress component testing project
Based on the inputs, the installation wizard will set up our project. Looking at the cypress.config.ts file, you can see that the configuration is actually pretty concise:
export default defineConfig({
 component: {
   devServer: {
     framework: "vue",
     bundler: "vite",
   },
 },
});
By default, Cypress will take options set in vite.config.ts file in our project, so anything we have set up for our app will instantly become available to Cypress tests as well.
cy.mount()
Besides resolving our configuration, Cypress will create a couple of helper files, one of the most important being component.ts located in the cypress/support folder.
import { mount } from 'cypress/vue'

// Augment the Cypress namespace to include type definitions for
// your custom command.
// Alternatively, can be defined in cypress/support/component.d.ts
// with a <reference path="./component" /> at the top of your spec.
declare global {
 namespace Cypress {
   interface Chainable {
     mount: typeof mount
   }
 }
}

Cypress.Commands.add('mount', mount)

// Example use:
// cy.mount(MyComponent)
This file will contain the mounting function for the framework you use. Cypress supports React, Angular, Svelte, Vue, and even frameworks like Next.js and Nuxt. As of Cypress version 11, most of these are out of beta.
How Cypress is built
Cypress’ architecture is unique when compared to other testing tools. With Playwright or Selenium, the goal is to automate a browser in order to perform some actions. With Cypress, you are essentially building an app to test your app.
When you are developing an application, your files get bundled and opened inside a browser. Imagine your standard npm run dev mode.
With Cypress, pretty much the same principle is applied. Your test files get bundled and opened in a browser. With component testing, instead of opening the app for your end-to-end test, you’ll mount your component. Pretty cool, if you ask me.
Creating a first component test
Once you set up your component testing configuration and your cy.mount() command, you are ready to start testing! So, let’s take a look at how this can be done.
With end-to-end testing, we usually have a dedicated folder where all our tests are. But with component testing, it is better to place your tests right next to your components.
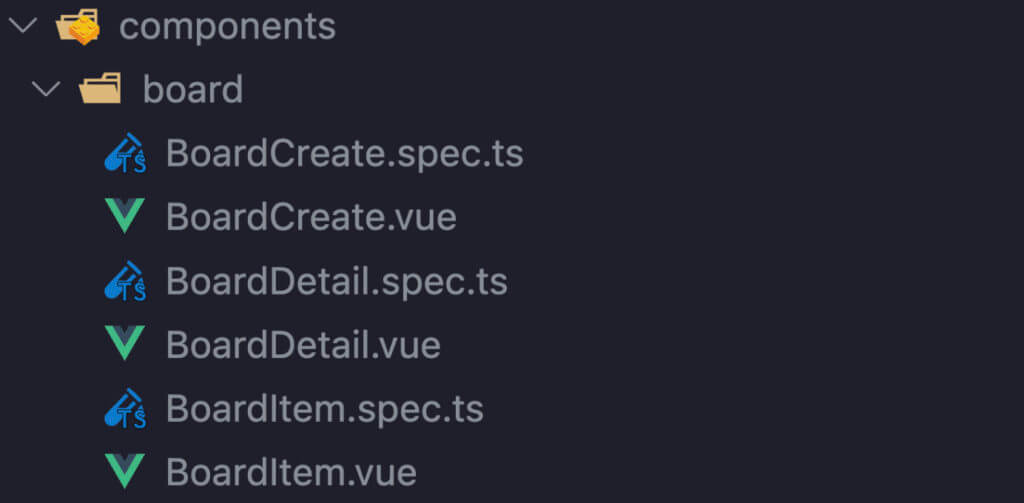
When you create your first test, put a standard naming convention in place. In fact, Cypress will encourage you to do so with its default configuration, as it will look for any .cy.js or .cy.ts files. Basically, the .cy addition identifies the file as a Cypress test
You can, however, change this to .spec.ts in your configuration file:
component: {
 devServer: {
   framework: 'vue',
   bundler: 'vite',
 },
 setupNodeEvents(on, config) { },
 specPattern: 'src/**/*.spec.ts',
}
Mounting the component
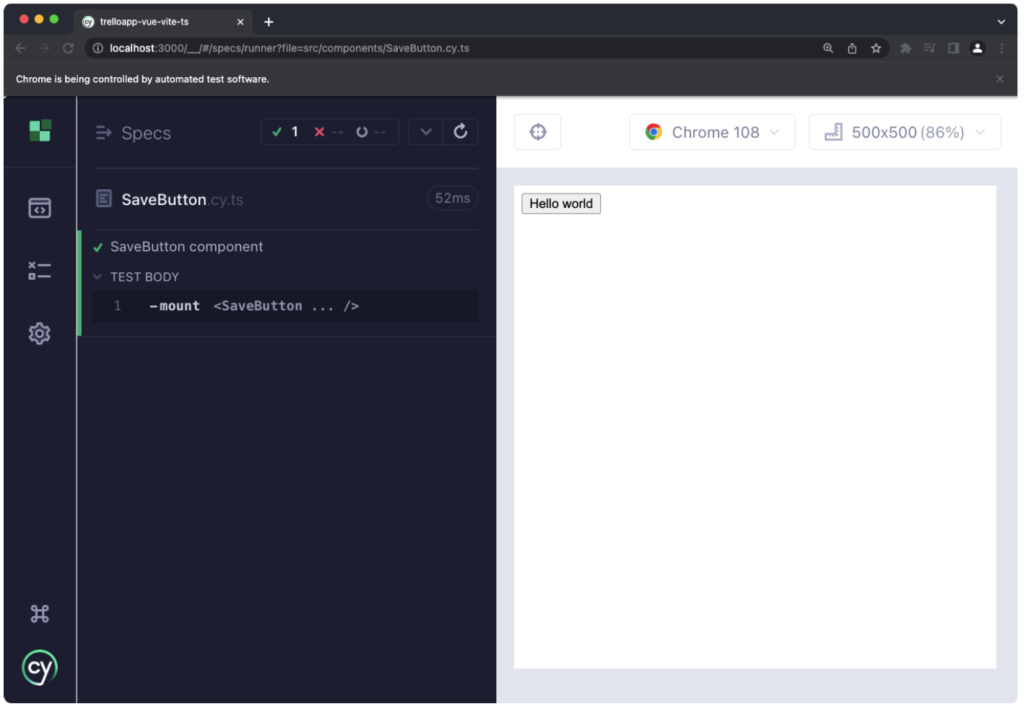
Let’s now try to test our button component from before. Component testing in Cypress feels very familiar with end-to-end testing. It uses the same it() and describe() blocks from Mocha, but instead of calling cy.visit(), you will use cy.mount() to mount your component into the browser.
import SaveButton from './SaveButton.vue'

it('display save button', () => {

 cy.mount(SaveButton)

})
Notice that whenever we want to mount a component, we need to import it into our test file. When we run this test in Cypress, it will successfully mount our component.
You’d be right to raise your eyebrows, as this is not exactly what you would expect. Our component is missing CSS styles! In many cases, components rely on some other resource. It can be a module, package, state manager, or CSS as in this case. This means that in order to make our component test work, it is often the case that we need to import a bunch of stuff.
CSS is something that probably all your components will need, so you might want to import that to your component.ts configuration file. This is a place to set a global configuration for mounting all of our components.
import { mount } from 'cypress/vue'
import '@/index.css';

declare global {
 namespace Cypress {
   interface Chainable {
     mount: typeof mount
   }
 }
}

Cypress.Commands.add('mount', mount)
Passing properties
Let’s now try something else with our component. You may remember that we were defining a buttonText property that would then render text in our button. We can pass our own properties to the button right within the test by giving our cy.mount() function a props object with given properties:
import SaveButton from './SaveButton.vue'

it('SaveButton component', () => {

 cy.mount(SaveButton, {
   props: {
     buttonText: 'Hello world'
   }
 })

})
Easy, right? We are now ready to test different versions of the button that may appear in our application. And since we are in a Cypress test, we can use Cypress commands, too. For example, we can check that the buttonText property is actually rendered in our button:
import SaveButton from './SaveButton.vue'

it('SaveButton component', () => {

 const buttonText = 'Hello world'

 cy.mount(SaveButton, {
   props: {
     buttonText
   }
 })

 cy.get('button').should('have.text', buttonText)

})
Component testing and its importance
Component testing enables you to look at the individual components of your application and ensures that they are working as expected. It helps testers and developers identify and fix issues with individual components before they become bigger problems affecting the whole application.
While component testing still falls mainly in the developers’ area of expertise, understanding this type of testing is beneficial for testers as well. Most notably, learning how web applications are built improves intuition for finding serious bugs.
To learn more about component testing in Cypress, check out the Getting Started with Component Testing in Cypress on-demand webinar. Head over to the Applitools design team solution page to learn how Applitools speeds up component testing with AI.