Updates
- Sep 5, 2022. Starting with Nuke 11, docs are generated using DocC and the custom documentation website was removed.
Nuke 10 is out, but this post is not about it. It’s about a new package called NukeUI. It comes with two main components:
LazyImagefor SwiftUILazyImageViewfor UIKit/AppKit
struct ContainerView: View {
    var body: some View {
        LazyImage(source: "https://example.com/image.jpeg")
            .placeholder { Image("placeholder") }
            .transition(.fadeIn(duration: 0.33))
    }
}
LazyImage uses Nuke for loading images and has many customization options. But it’s not just that. It also supports progressive images, it has GIF support powered by Gifu and can even play short videos, which is a much more efficient way to implement animated images.
You can learn more about LazyImage in the repository. And in this post, I’ll quickly go over some of the design decisions.
Design #
My initial approach to SwiftUI in Nuke was to provide a view model (ObservableObject) that you could integrate into your views – FetchImage. The reasoning was that creating views in SwiftUI is easy: you can start with a simple example and customize it precisely the way you want. With Nuke 10, FetchImage is part of the main library. But this approach is good only up to a point.
Firstly, there are just not that many customization options you might want, so it’s a good idea to provide a solution that works for most people. Secondly, I wanted it to be versatile. Adding Gifu integration, supporting progressing rendering, playing video – putting all these things together can be a daunting task. And this is the problem I wanted to tackle with NukeUI.
Naming #
I wanted a name for this component that would feel at home in SwiftUI. Image was taken by SwiftUI. Nuke.Image felt clunky. I tried a couple more options before settling on LazyImage.
It’s lazy because it loads the image from the source only when it appears on the screen. And when it disappears (or is deallocated), the current request automatically gets canceled. When the view reappears, the download picks up where it left off, thanks to resumable downloads.
If you look at the native Image, it’s not resizable, and it takes the intrinsic size of the image by default. That’s not a good default for LazyImage that doesn’t know the size of the image before it downloads it. You must specify the view size before loading the image. By default, it will resize the image to fill the available space and preserve the aspect ratio. You can change this behavior by passing a different content mode.
And if you are coming to SwiftUI from the web, the terms used by NukeUI will be instantly familiar: “lazy” image loading, image “source”, etc.
Implementation #
I initially started working on a version of LazyImage by using only SwiftUI, but quickly realized there were practically no advantages of doing that, but there were limitations. And I needed to use UIKit, at least partially, if I wanted to use Gifu.
So instead of the initially planned one component, I made two: LazyImageView for UIKit and AppKit and LazyImage, a thin wrapper on top of it for SwiftUI. They both have equivalent APIs, which makes them easy to learn. And I didn’t need to re-implement any of the functionality, which is great.
My initial SwiftUI implementation was also using @StateObject, making it iOS 14+ only. But with the new approach, I dropped the deployment target to iOS 13.
I also added an escape hatch similar to SwiftUI Introspect. So if some features are not yet exposed in LazyImage or SwiftUI, there is a “legal” way to access the underlying UIKit or AppKit components.
LazyImage(source: "https://example.com/image.jpeg")
    .onCreated { view in
        view.videoGravity = .resizeAspect
    }
Animated Images #
The main target (Nuke) always had easy integration with Gifu or other GIF rendering engines. And with NukeUI, you don’t need to do anything. NukeUI adds Gifu as a dependency by default. Gifu is a relatively small Swift library, and if you install it using SPM, it ends up in the same binary, so there is barely any overhead. It also keeps Nuke light because it doesn’t contain a rendering engine like some other frameworks do.
I added support for GIF to LazyImageView, and LazyImage also got it without me having to do anything. But there is a problem with GIF – it’s inefficient.
Video #
If you think about it, animated images don’t really make sense as a separate concept. It’s just video! A common approach for addressing GIF inefficiencies is replacing them with short videos with no sound. An MP4 video file can be an order of magnitude lighter than an equivalent GIF and can also take advantage of hardware-accelerated rendering.
For example, check out the “AppKit is Done” post. It’s all MP4 videos that are 2 MB on average. An equivalent GIFs would’ve taken tens of megabytes.
So I thought LazyImage was a great opportunity to accelerate the switch to video. With LazyImage, displaying a short video is as easy as providing a video URL as a source.
struct ContentView: View {
    var body: some View {
        LazyImage(source: "https://kean.github.io/videos/cat_video.mp4")
    }
}
And it works great even in the lists.
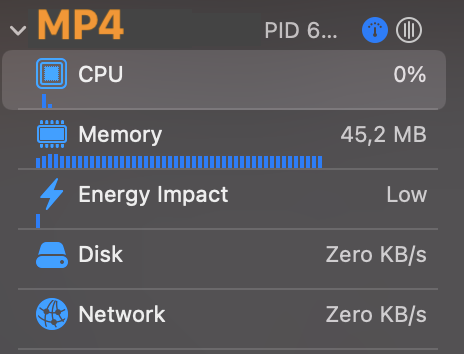
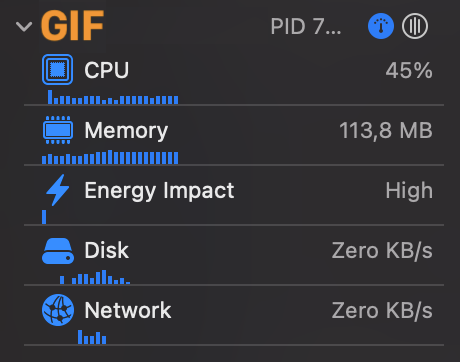
If you compare the performance metrics, there is a massive difference. Video playback doesn’t use CPU when running on the device, has minimum impact on battery, and consumes much less memory.
It required a bit of digging into AVKit because there was no high-level API to play videos from memory. I ended up using an asset (AVAsset) with a custom AVAssetResourceLoaderDelegate:
// This allows LazyImage to play video from memory.
final class DataAssetResourceLoader: NSObject, AVAssetResourceLoaderDelegate {
    private let data: Data
    private let contentType: String

    init(data: Data, contentType: String) {
        self.data = data
        self.contentType = contentType
    }

    func resourceLoader(_ resourceLoader: AVAssetResourceLoader, shouldWaitForLoadingOfRequestedResource loadingRequest: AVAssetResourceLoadingRequest) -> Bool {
        if let contentRequest = loadingRequest.contentInformationRequest {
            contentRequest.contentType = contentType
            contentRequest.contentLength = Int64(data.count)
            contentRequest.isByteRangeAccessSupported = true
        }

        if let dataRequest = loadingRequest.dataRequest {
            if dataRequest.requestsAllDataToEndOfResource {
                dataRequest.respond(with: data[dataRequest.requestedOffset...])
            } else {
                let range = dataRequest.requestedOffset..<(dataRequest.requestedOffset + Int64(dataRequest.requestedLength))
                dataRequest.respond(with: data[range])
            }
        }

        loadingRequest.finishLoading()

        return true
    }
}
Both LazyImage and LazyImageView support video playback out of the box. There is nothing you need to do to enable video playback. It does the right thing by default:
- It plays automatically
- It doesn’t show any controls
- It loops continuously
- It’s always silent
- It doesn’t prevent the display from sleeping
- It displays a preview until the video is downloaded
Pre-Release #
I hope I got you interested in LazyImage. You can learn more in the repository.LazyImage 0.1.0 is out (pre-release version) and you can give it a try now. You can see it in action in the Nuke Demo.
