
In this four-part tutorial series, you’re building a social network with Django that you can showcase in your portfolio. This project is strengthening and demonstrating your understanding of relationships between Django models and showing you how to use forms so that users can interact with your app and with each other. You’re also making your site look good by using the CSS framework Bulma.
In the previous part of this tutorial series, you built templates and views for displaying a list of all profiles, as well as individual profile pages. You also learned how to apply style rules defined by the CSS framework Bulma to make your pages look good.
In the third part of this tutorial series, you’ll learn how to:
- Create the front-end interface to let users follow and unfollow profiles
- Submit and handle a POST request in Django using buttons
- Set up the model for your text-based content
- Build styled templates to display content on the front end
- Use intricate model relationships in template code
At the end of this part, your social network will have all the pages you’d expect, and you’ll be able to create dweets on the back end and display them on the front end. Your users will be able to discover and follow other users and read the contents of the profiles that they follow. They’ll also be able to click a button that sends an HTTP POST request handled by Django to unfollow a profile if they want to stop reading a certain user’s content.
You can download the code that you’ll need to start the third part of this project by clicking the link below and going to the source_code_start/ folder:
Get Source Code: Click here to get the source code you’ll use to build and handle POST requests with Django.
Demo
In this four-part tutorial series, you’re building a small social network that allows users to post short text-based messages. The users of your app can also follow other user profiles to see the posts of those users or unfollow them to stop seeing their text-based posts:
You’re also learning how to use the CSS framework Bulma to give your app a user-friendly appearance and make it a portfolio project you can be proud to show off!
In the third part of this tutorial series, you’ll continue working with Bulma-styled templates, and you’ll create the model for your text-based message content. You’ll also set up and handle HTTP POST request submissions on your Django app’s front end, which will allow users to follow or unfollow each other by clicking a button:
At the end of this tutorial, each user will be able to go to a new dashboard page to access a personal feed of dweets that’s based on which profiles they follow. They’ll also be able to follow and unfollow other users. That’s a giant leap ahead for your Django social network!
Project Overview
In this section, you’ll get an overview of what topics you’ll cover in this third part of the tutorial series. You’ll also get a chance to revisit the full project implementation steps, in case you need to skip back to a previous step from earlier in the series or if you want to see what’s still up ahead.
At this point, you should have finished working through parts one and two of this tutorial series. If you did, then you’re now ready to continue with the next steps of this tutorial series. These steps focus on the code logic for following and unfollowing profiles, as well as how to set up dweets:
| Step 7 | Follow and Unfollow Other Profiles |
| Step 8 | Create the Back-End Logic For Dweets |
| Step 9 | Display Dweets on the Front End |
After completing all the steps in the third part of the tutorial series, you can continue with part four.
To get a high-level idea of how you’re working through all four parts of this tutorial series on building your Django social network, you can expand the collapsible section below:
You’re implementing the project in a number of steps spread out over multiple separate tutorials in this series. There’s a lot to cover, and you’re going into detail along the way:
✅ Part 1: Models and Relationships
- Step 1: Set Up the Base Project
- Step 2: Extend the Django User Model
- Step 3: Implement a Post-Save Hook
✅ Part 2: Templates and Front-End Styling
- Step 4: Create a Base Template With Bulma
- Step 5: List All User Profiles
- Step 6: Access Individual Profile Pages
- Step 7: Follow and Unfollow Other Profiles
- Step 8: Create the Back-End Logic For Dweets
- Step 9: Display Dweets on the Front End
⏭ Part 4: Forms and Submissions
- Step 10: Submit Dweets Through a Django Form
- Step 11: Prevent Double Submissions and Handle Errors
- Step 12: Improve the Front-End User Experience
Each of these steps will provide links to any necessary resources. By approaching the steps one at a time, you’ll have the opportunity to pause and come back at a later point in case you want to take a break.
With the high-level structure of this tutorial series in mind, you’ve got a good idea of where you’re at and which implementation steps you’ll handle in the last part.
Before getting started with the next step, take a quick look at the prerequisites to skim any links to other resources that might be helpful along the way.
Prerequisites
To successfully work through this part of your project, you need to have completed the first part on models and relationships and the second part on templates and styling, and you should confirm that your project is working as described there. It would be best if you’re also comfortable with the following concepts:
- Using object-oriented programming in Python
- Setting up a basic Django project
- Managing routing and redirects, view functions, templates, models, and migrations in Django
- Using and customizing the Django admin interface
- Reading and writing HTML with class attributes
Remember to make sure that you’ve completed the first two parts of this tutorial series. This third part will pick up right where you left off at the end of the second part.
Note: You won’t be able to follow this part of the tutorial series if you don’t have the working project from the previous parts ready to go.
You can also download the code that you’ll need for starting the third part of this project by clicking the link below and going to the source_code_start/ folder:
Get Source Code: Click here to get the source code you’ll use to build and handle POST requests with Django.
For additional requirements and further links, check out the prerequisites mentioned in the first part of this tutorial series on building a basic social network in Django.
Step 7: Follow and Unfollow Other Profiles
At this point, you can access all profiles on the profile list page, and you can also visit users’ profile pages. Additionally, you can navigate between these views on the front end using dynamic links. At the end of this step, you’ll be able to follow and unfollow profiles through buttons on the profile pages.
Once you’ve added the possibility to follow and unfollow a profile, you’ll have recreated the back-end functionality that your Django admin interface provided for you out of the box when you set it up in the first part of this tutorial series.
Add Buttons to Your Profiles
Add HTML code with Bulma button styling to create two buttons for interacting with profiles:
<div class="buttons has-addons">
    <button class="button is-success">Follow</button>
    <button class="button is-danger">Unfollow</button>
</div>
A good spot for the buttons for following and unfollowing a user could be right below their profile name. Get your bearings on where that is in your own template code, then add the HTML shown above.
If you’re using the HTML from the profile.html template, then you can add it as shown in the collapsible section below:
<!-- dwitter/templates/dwitter/profile.html -->

{% extends 'base.html' %}

{% block content %}

<div class="column">

    <div class="block">
    <h1 class="title is-1">
        {{profile.user.username|upper}}'s Dweets
    </h1>
    </div>
    <div class="buttons has-addons">
        <button class="button is-success">Follow</button>
        <button class="button is-danger">Unfollow</button>
    </div>
</div>

<div class="column is-one-third">

    <div class="block">
        <a href="{% url 'dwitter:profile_list' %}">
            <button class="button is-dark is-outlined is-fullwidth">
                All Profiles
            </button>
        </a>
    </div>

    <div class="block">
        <h3 class="title is-4">
            {{profile.user.username}} follows:
        </h3>
        <div class="content">
            <ul>
            {% for following in profile.follows.all %}
                <li>
                    <a href="{% url 'dwitter:profile' following.id %}">
                        {{ following }}
                    </a>
                </li>
            {% endfor %}
            </ul>
        </div>
    </div>

    <div class="block">
        <h3 class="title is-4">
            {{profile.user.username}} is followed by:
        </h3>
        <div class="content">
            <ul>
            {% for follower in profile.followed_by.all %}
                <li>
                    <a href="{% url 'dwitter:profile' follower.id %}">
                        {{ follower }}
                    </a>
                </li>
            {% endfor %}
            </ul>
        </div>
    </div>

</div>

{% endblock content %}
After adding this HTML code snippet to profile.html, you’ll see two buttons rendered under a user’s profile name.
If you go to http://127.0.0.1:8000/profile/1, for example, you can ensure that Django’s development server is running and that you can access a profile page on your localhost. This URL shows you the profile page of the user profile with the ID 1 and includes the new buttons:
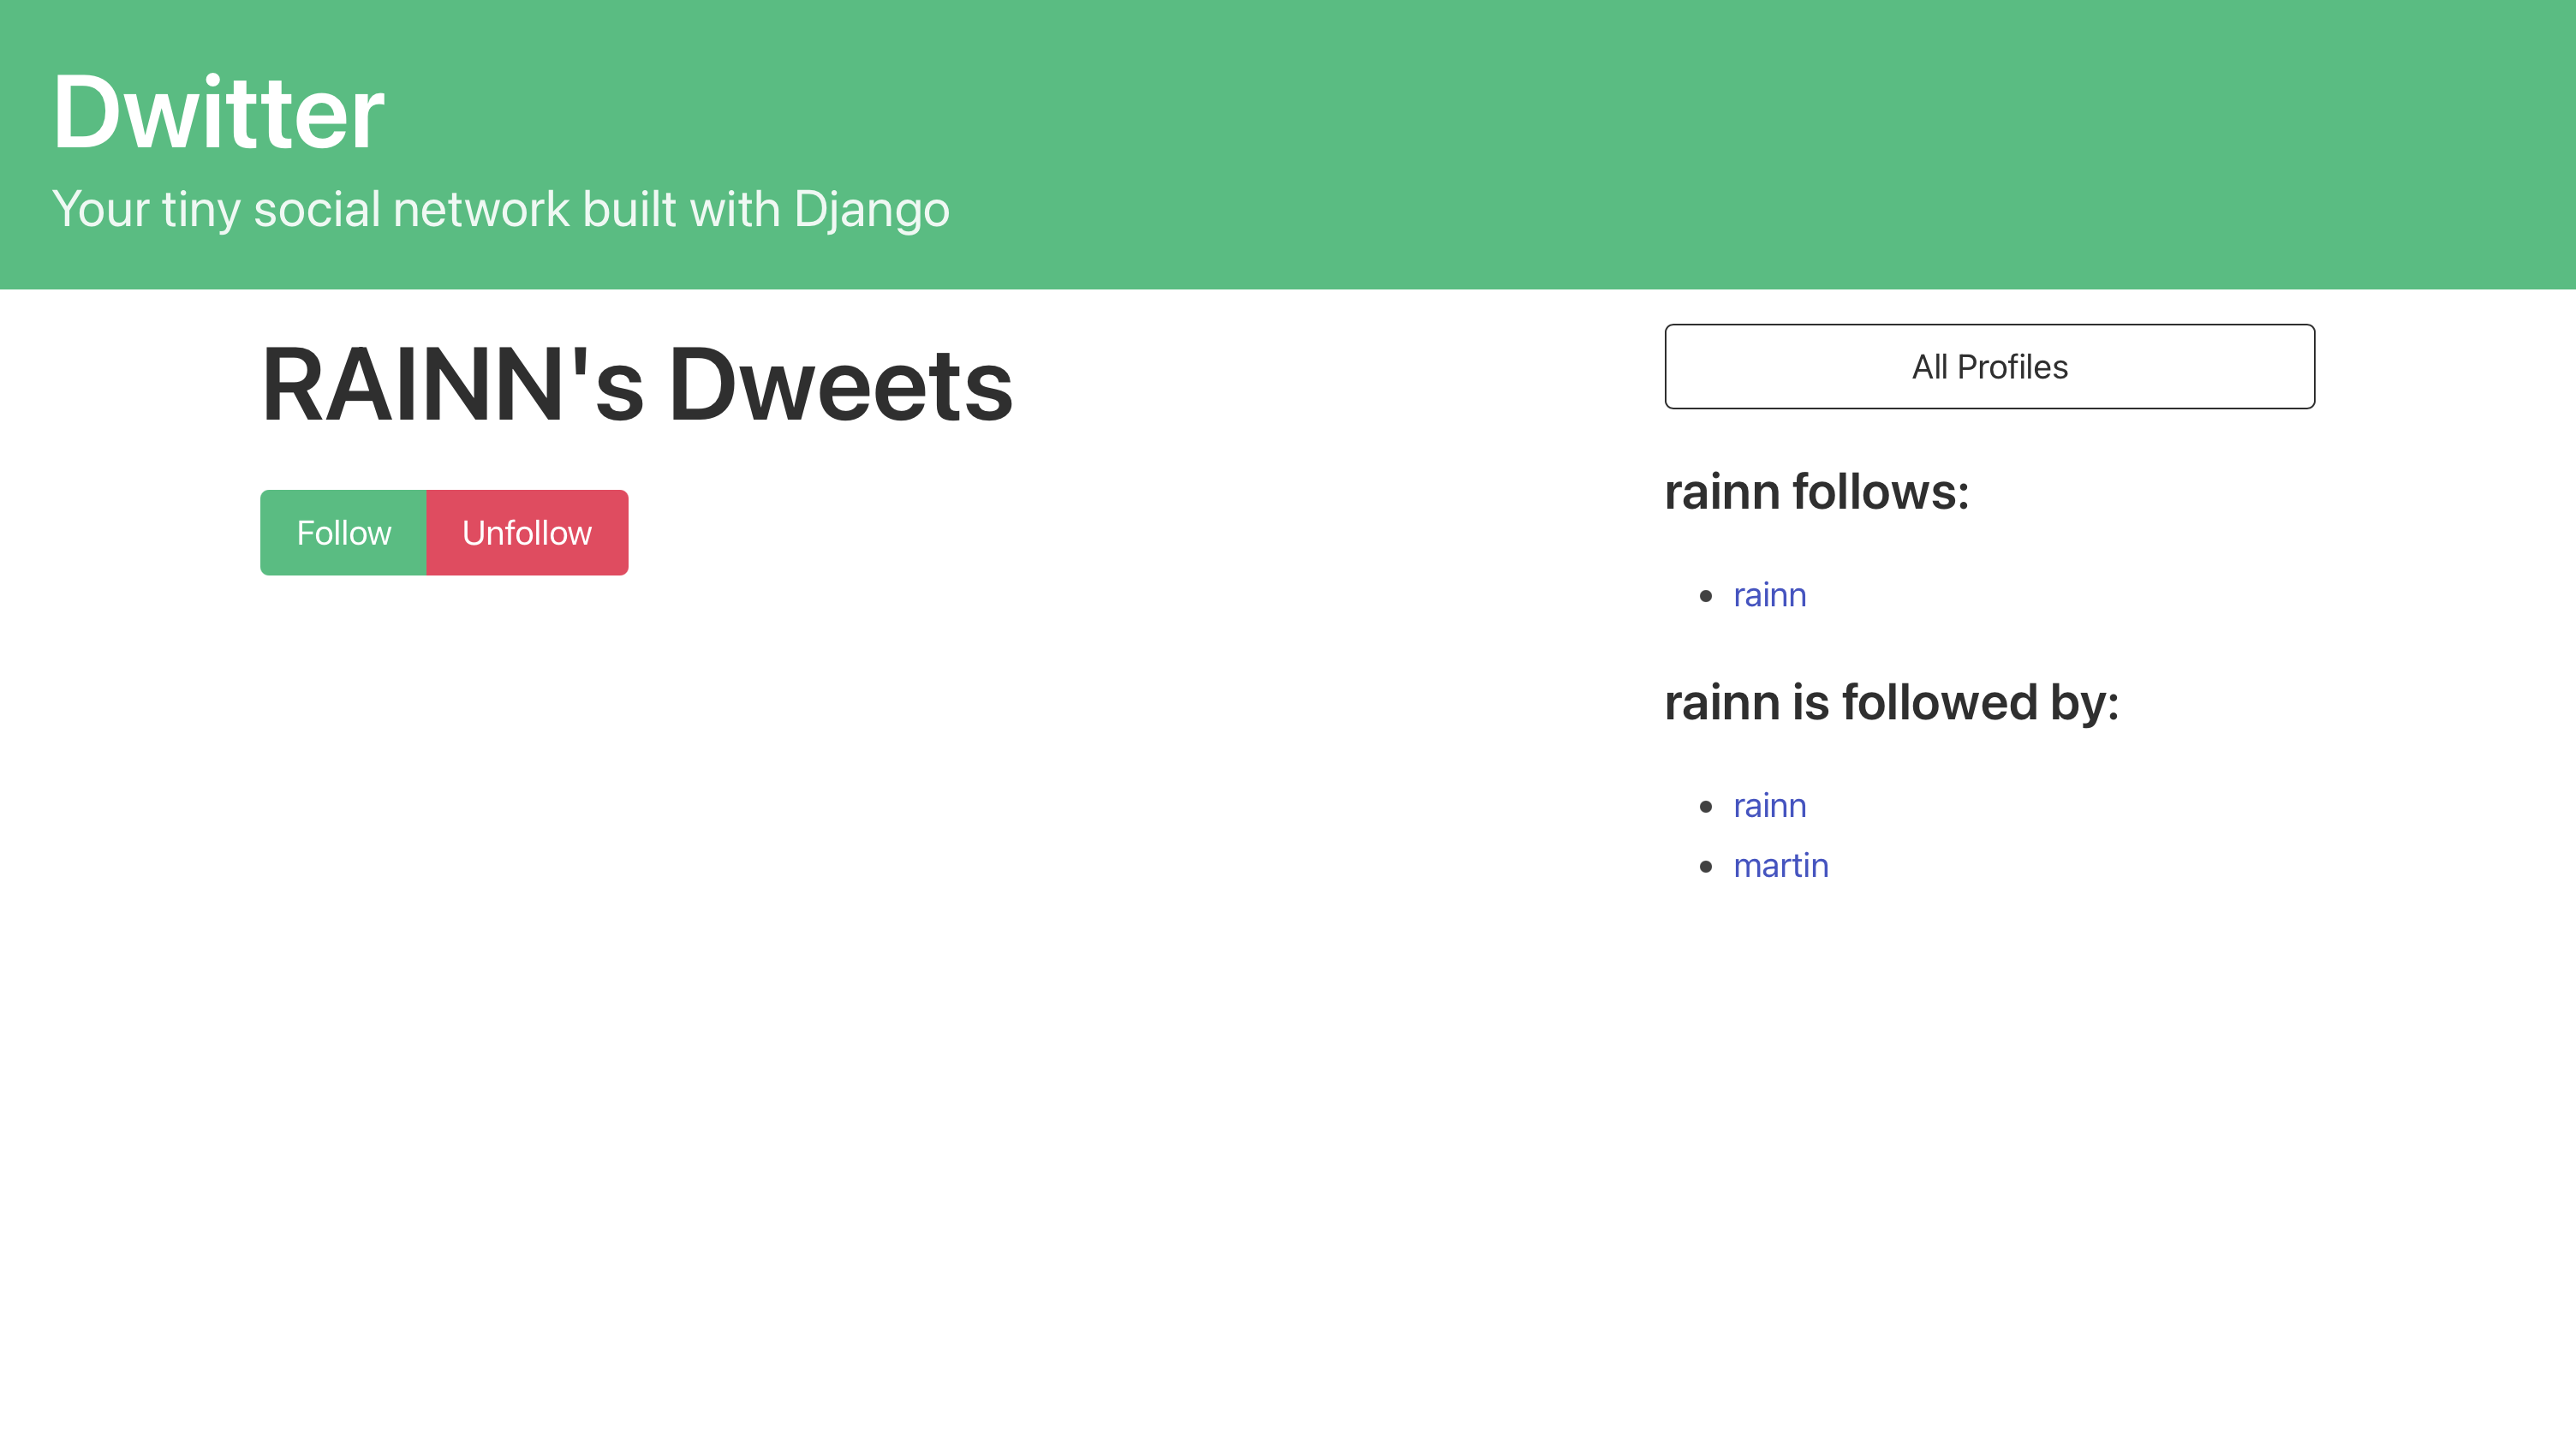
The buttons look good! However, it seems that you could click to follow a profile even if you’re already following it.
To create some distinction there, you could gray out the irrelevant button so that the relevant action will be more apparent for your users. Bulma should render your buttons grayed-out if you add an HTML class called is-static. You can apply this class depending on whether or not the logged-in user is already following the profile that they’re viewing:
 1<div class="buttons has-addons">
 2    {% if profile in user.profile.follows.all %}
 3        <button class="button is-success is-static">Follow</button>
 4        <button class="button is-danger">Unfollow</button>
 5    {% else %}
 6        <button class="button is-success">Follow</button>
 7        <button class="button is-danger is-static">Unfollow</button>
 8    {% endif %}
 9</div>
You’ve been working with the user variable that Django sends with every GET and POST request. Note that you don’t even need to explicitly pass this variable to your context dictionary in views.py. The user variable holds information about the currently logged-in user:
-
Line 2: In this conditional statement, you’re checking whether the profile that you’re currently viewing is in the query set of all profiles that the logged-in user follows.
-
Lines 3 to 4: If the user already follows the profile that they’re looking at, then the Follow button will be grayed out by adding the
is-staticclass. The Unfollow button will be colored and appear clickable. -
Lines 6 to 7: If the user doesn’t follow the profile that they’re looking at, then the Follow button will appear clickable, and the Unfollow button will be grayed out.
-
Line 8: In this line, you’re closing the conditional statement.
By adding a bit of code logic through Django’s template tags and styling, you’ve made it clearer to users that they can only follow profiles that they’re not currently following and that they can only unfollow those profiles that they’re following already.
Navigate to a profile page URL such as http://127.0.0.1:8000/profile/1 or, if you’re still there, then just reload the page to see the changes:
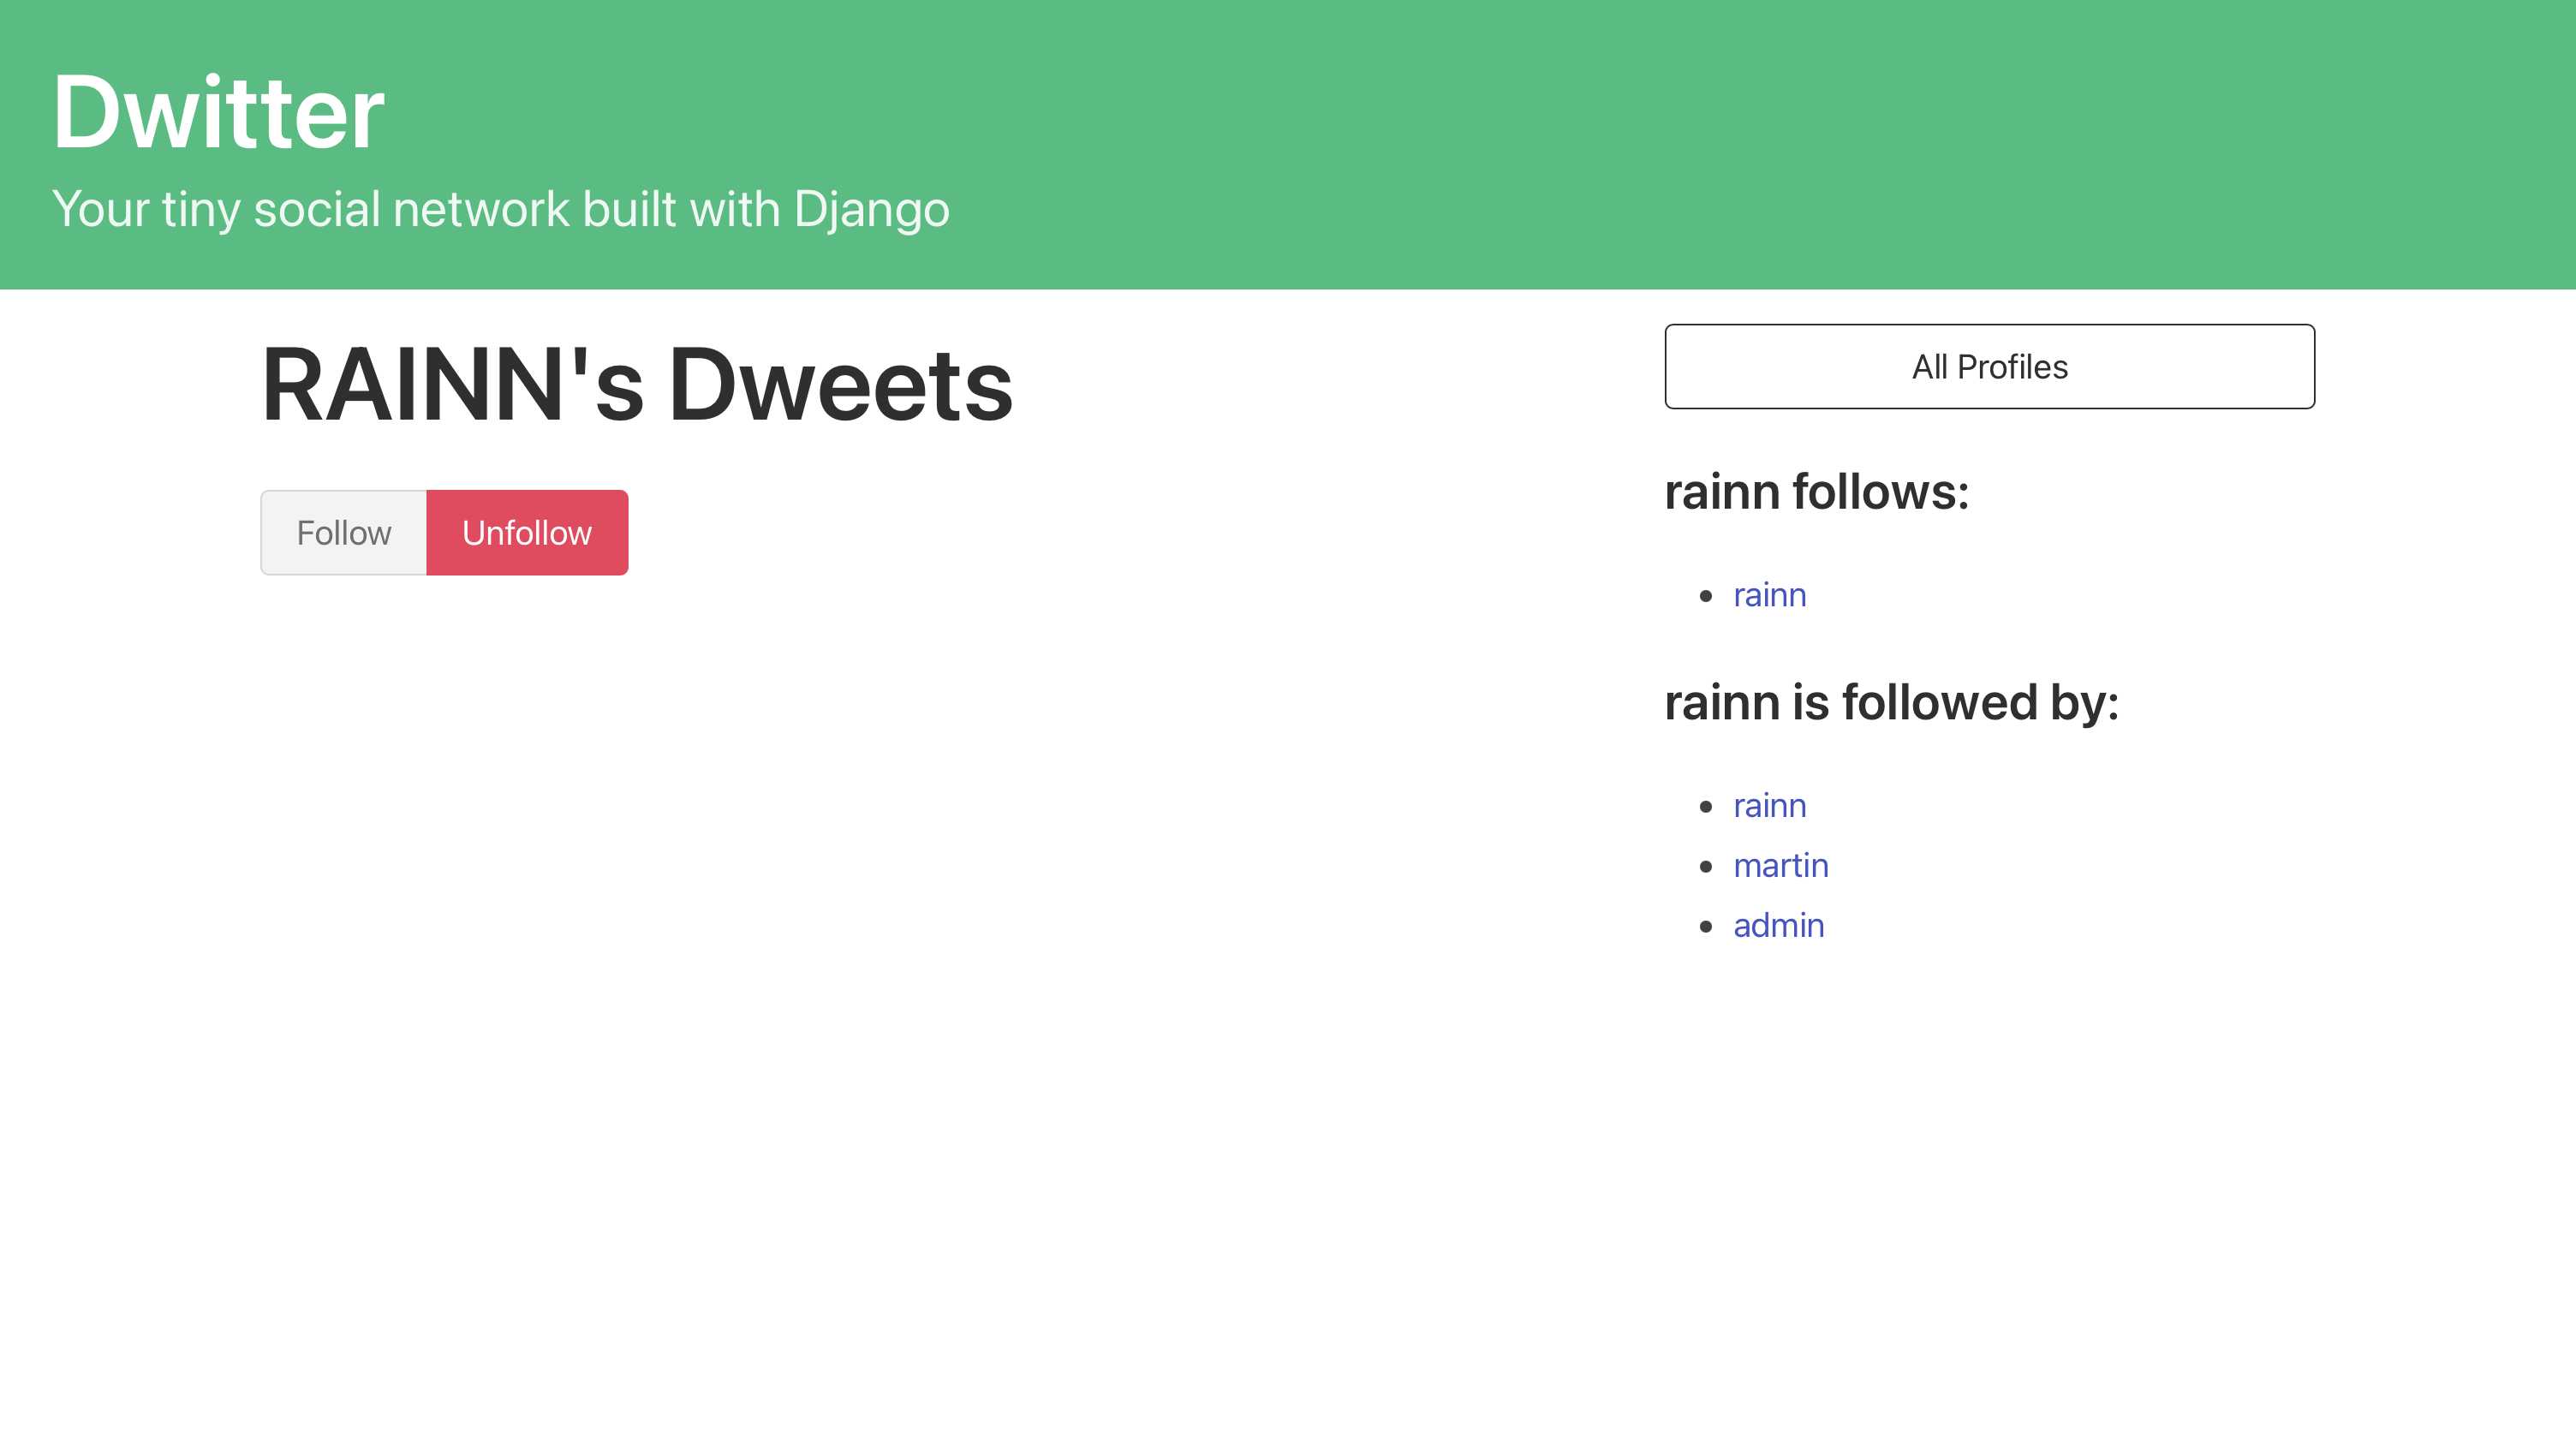
However, even though the information is now displayed in a more user-friendly way, clicking the clickable button doesn’t actually do anything. For this, you’ll need to create an HTML form and handle the form submission in your code logic.
Handle POST Requests in Django Code Logic
Your next step is to implement the logic of what should happen when someone clicks one of these buttons. For this, you’ll need an HTML form so that you can submit the data and handle it in your view:
 1<form method="post">
 2    {% csrf_token %}
 3    <div class="buttons has-addons">
 4    {% if profile in user.profile.follows.all %}
 5        <button class="button is-success is-static">Follow</button>
 6        <button class="button is-danger" name="follow" value="unfollow">
 7            Unfollow
 8        </button>
 9    {% else %}
10        <button class="button is-success" name="follow" value="follow">
11            Follow
12        </button>
13        <button class="button is-danger is-static">Unfollow</button>
14    {% endif %}
15    </div>
16</form>
You applied a few essential changes to your template by updating this code:
-
Lines 1 and 16: You wrapped your two buttons in an HTML
<form>element and added the HTML attributemethodwith the value"post"to clarify that you’ll send data with this form. -
Line 2: You added a CSRF token through a convenient template tag that Django provides. You need to add this for security reasons if you want to allow your users to submit forms in your Django app.
-
Lines 6 and 10: You added two HTML attributes to both
<button>elements:-
namedefines what key you’ll use to access the value in your view function. You set this key to"follow"for both buttons. -
valuedefines what value the form will send to your view function under the key name defined innamewhen you press one of the buttons. You set the value of the Follow button to"follow"and the value of the Unfollow button to"unfollow".
-
You won’t see any change on the front end of your web app after adding this code, but the changes are necessary so that Django can forward the user-submitted data to your view logic. You also need the attribute values defined in lines 6 and 10 to distinguish which button the user pressed on the back end.
With all the front-end logic set up in profile.html, you can switch to views.py, where you can pick up the user-submitted data and handle it:
 1# dwitter/views.py
 2
 3# ...
 4
 5def profile(request, pk):
 6    profile = Profile.objects.get(pk=pk)
 7    if request.method == "POST":
 8        current_user_profile = request.user.profile
 9        data = request.POST
10        action = data.get("follow")
11        if action == "follow":
12            current_user_profile.follows.add(profile)
13        elif action == "unfollow":
14            current_user_profile.follows.remove(profile)
15        current_user_profile.save()
16    return render(request, "dwitter/profile.html", {"profile": profile})
Because of how you set up the form in profile.html, the form will redirect back to the same page, which means that Django will pick up the request with profile(). It works this way because of how you set up your URL configuration. This time, however, Django sends an HTTP POST request that holds the user-submitted data, and you can address this in your code update:
-
Line 7: You introduce a conditional check to see whether the incoming request to your Django view function is an HTTP POST request. This will only be the case if someone submitted the form on
profile.htmlby clicking either the Follow or Unfollow button. -
Line 8: You use the
userattribute from Django’srequestobject, which refers to the currently logged-in user, to access that user’s.profileobject and assign it tocurrent_user_profile. You’ll need access to this user’s profile later on to change whom they’re following. -
Line 9: You get the user-submitted data from the
request.POSTdictionary and store it indata. Django puts data inrequest.POSTwhen a user submits a form with the attributemethod="post". -
Line 10: You retrieve the submitted value by accessing the data at the key
"follow", which you defined in your template with thenameHTML attribute on your<button>elements. -
Lines 11 to 14: You set up a conditional statement that either adds or removes the user profile from the currently logged-in user’s
.follows, depending on which button they pressed. The two buttons submit different values for the"follow"data key, which you use to distinguish between the two buttons. -
Line 15: You use
.save()oncurrent_user_profileto propagate the changes to.followsback to the database.
Finally, after all this conditional action—which Django only executes when the page is called with a POST request from a form submission—you render the same template again. render() will reload the page and correctly display the changed follower list after a button click.
Note: In case you haven’t created profiles for you and your existing users you may run into an RelatedObjectDoesNotExist error when performing the POST request. To prevent this error you can verify that your user has a profile in your profile view:
# dwitter/views.py

# ...

def profile(request, pk):
    if not hasattr(request.user, 'profile'):
        missing_profile = Profile(user=request.user)
        missing_profile.save()

    profile = Profile.objects.get(pk=pk)
    if request.method == "POST":
        current_user_profile = request.user.profile
        data = request.POST
        action = data.get("follow")
        if action == "follow":
            current_user_profile.follows.add(profile)
        elif action == "unfollow":
            current_user_profile.follows.remove(profile)
        current_user_profile.save()
    return render(request, "dwitter/profile.html", {"profile": profile})
When you call the profile view, you first check whether request.user contains profile with hasattr(). If the profile is missing, then you create a profile for your user before proceeding.
You can now follow and unfollow the profiles of other users on your social network. Confirm that this works as expected by exploring the profiles in your profile list and selectively following and unfollowing them. You should see the list in your sidebar update accordingly.
With this, you’ve fully connected the follow and unfollow back-end logic with the front end. You added an HTML <form> element and two buttons in profile.html. You also implemented the code logic in profile() that translates the button presses into changes that affect your database.
Step 8: Create the Back-End Logic for Dweets
At this point, you can choose to follow and unfollow user profiles through the front end of your app. However, even if you do follow another profile, there’s nothing there to see! At this point, users of your social network can’t create any content. Changing this will be your next challenge.
At the end of this step, you’ll have created the back end for the content of your social network—short text-based messages called dweets—that users can post to your app. You’ll also be able to create dweets for users through the Django admin.
Just as you brainstormed in the project overview in part one, your social network will focus on short-form text-based messages. In memory of old-school Twitter, you’ll set the character limit to 140 characters.
Note: Up to now, the type of content that users post could have been anything. Your focus was only on the connections between users of your app.
Now you’re getting specific. If you wanted to allow a different form of content in your social network, you’d need to branch off in another direction at this point.
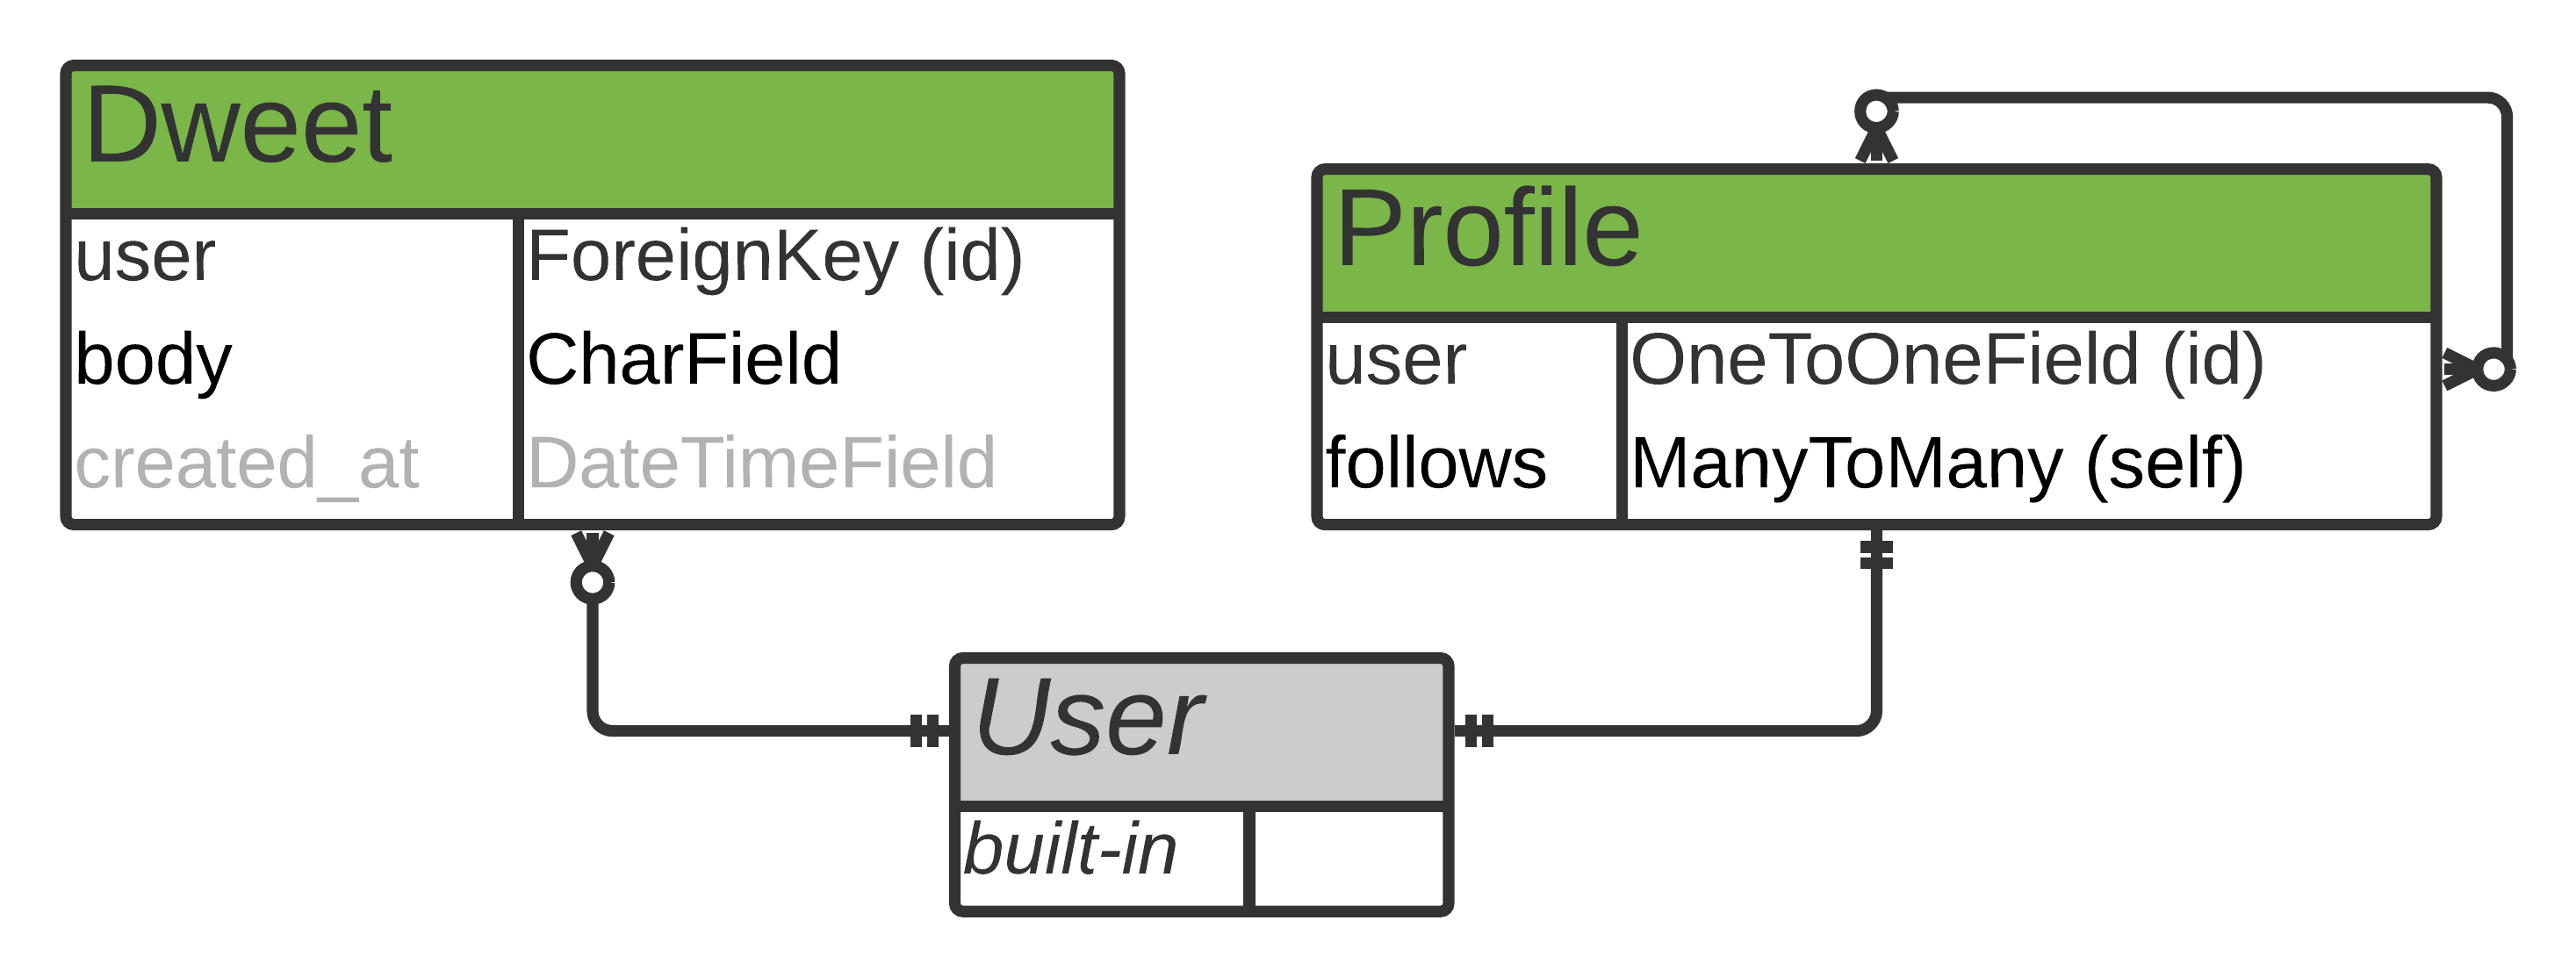
You planned to create a model that focuses on the fundamentals of what content your users will share on your social network. You also decided that you’ll tie the dweets to a user account and that, apart from the text body, the only thing the dweeets need to record is the time of submission:
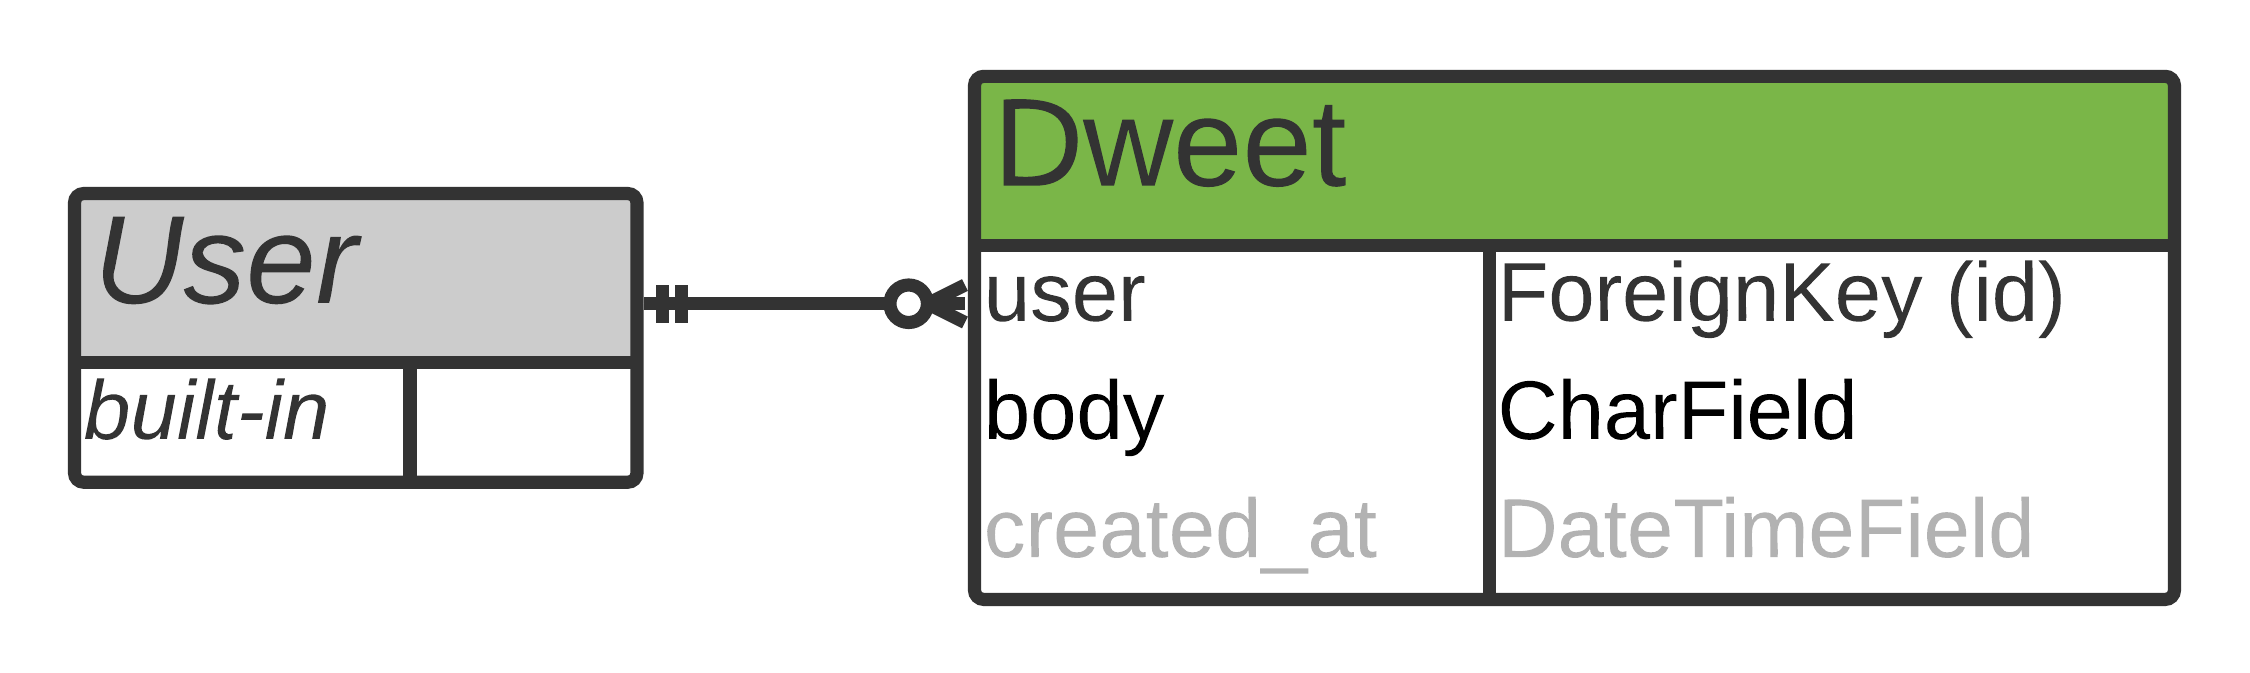
The entity-relationship (ER) diagram shows that your Dweet model will have a foreign key relationship to Django’s built-in User model. Each user of your social network will be able to create many dweets associated with their account.
Make the Model
You need a way to store the user-created text-based messages in your database. For that, you’ll need to create a new model in dwitter/models.py:
# dwitter/models.py

# ...

class Dweet(models.Model):
    user = models.ForeignKey(
        User, related_name="dweets", on_delete=models.DO_NOTHING
    )
    body = models.CharField(max_length=140)
    created_at = models.DateTimeField(auto_now_add=True)
Your Dweet model needs only three fields:
-
user: This field establishes the model relationship to Django’s built-inUsermodel. You define that it’ll be a foreign key relationship, which means that each dweet will be associated with a user. You also pass"dweets"torelated_name, which allows you to access the dweet objects from the user side of the relationship through.dweets. Finally, you specify that orphaned dweets should stick around by settingon_deletetomodels.DO_NOTHING. -
body: This field defines your content type. You set it as a character field with a maximum length of 140 characters. -
created_at: The final field of your new model records the date and time when the text-based message is submitted. Settingauto_now_addtoTrueon aDateTimeFieldobject ensures that this value gets automatically added when a user submits a dweet.
And with these three fields set, you’re finished creating your Dweet model! Next, you need to apply the changes to your database by running the makemigrations and migrate management commands:
(social) $ python manage.py makemigrations
(social) $ python manage.py migrate
After running both of these commands, your changes in models.py have been applied to your database. Your back end is all set to record dweets, but so far, you don’t have a way of submitting them through your web app.
Add Dweets Through the Admin Interface
Eventually, you want your social network users to submit dweets through the front end of your web app. First, however, you’ll make sure that everything you’ve built so far works as expected. You’ll start by adding the functionality to create dweets through your admin interface.
To get access to your new Dweet model in your admin interface, you need to register it:
# dwitter/admin.py

from django.contrib import admin
from django.contrib.auth.models import Group, User
from .models import Dweet, Profile

# ...

admin.site.register(Dweet)
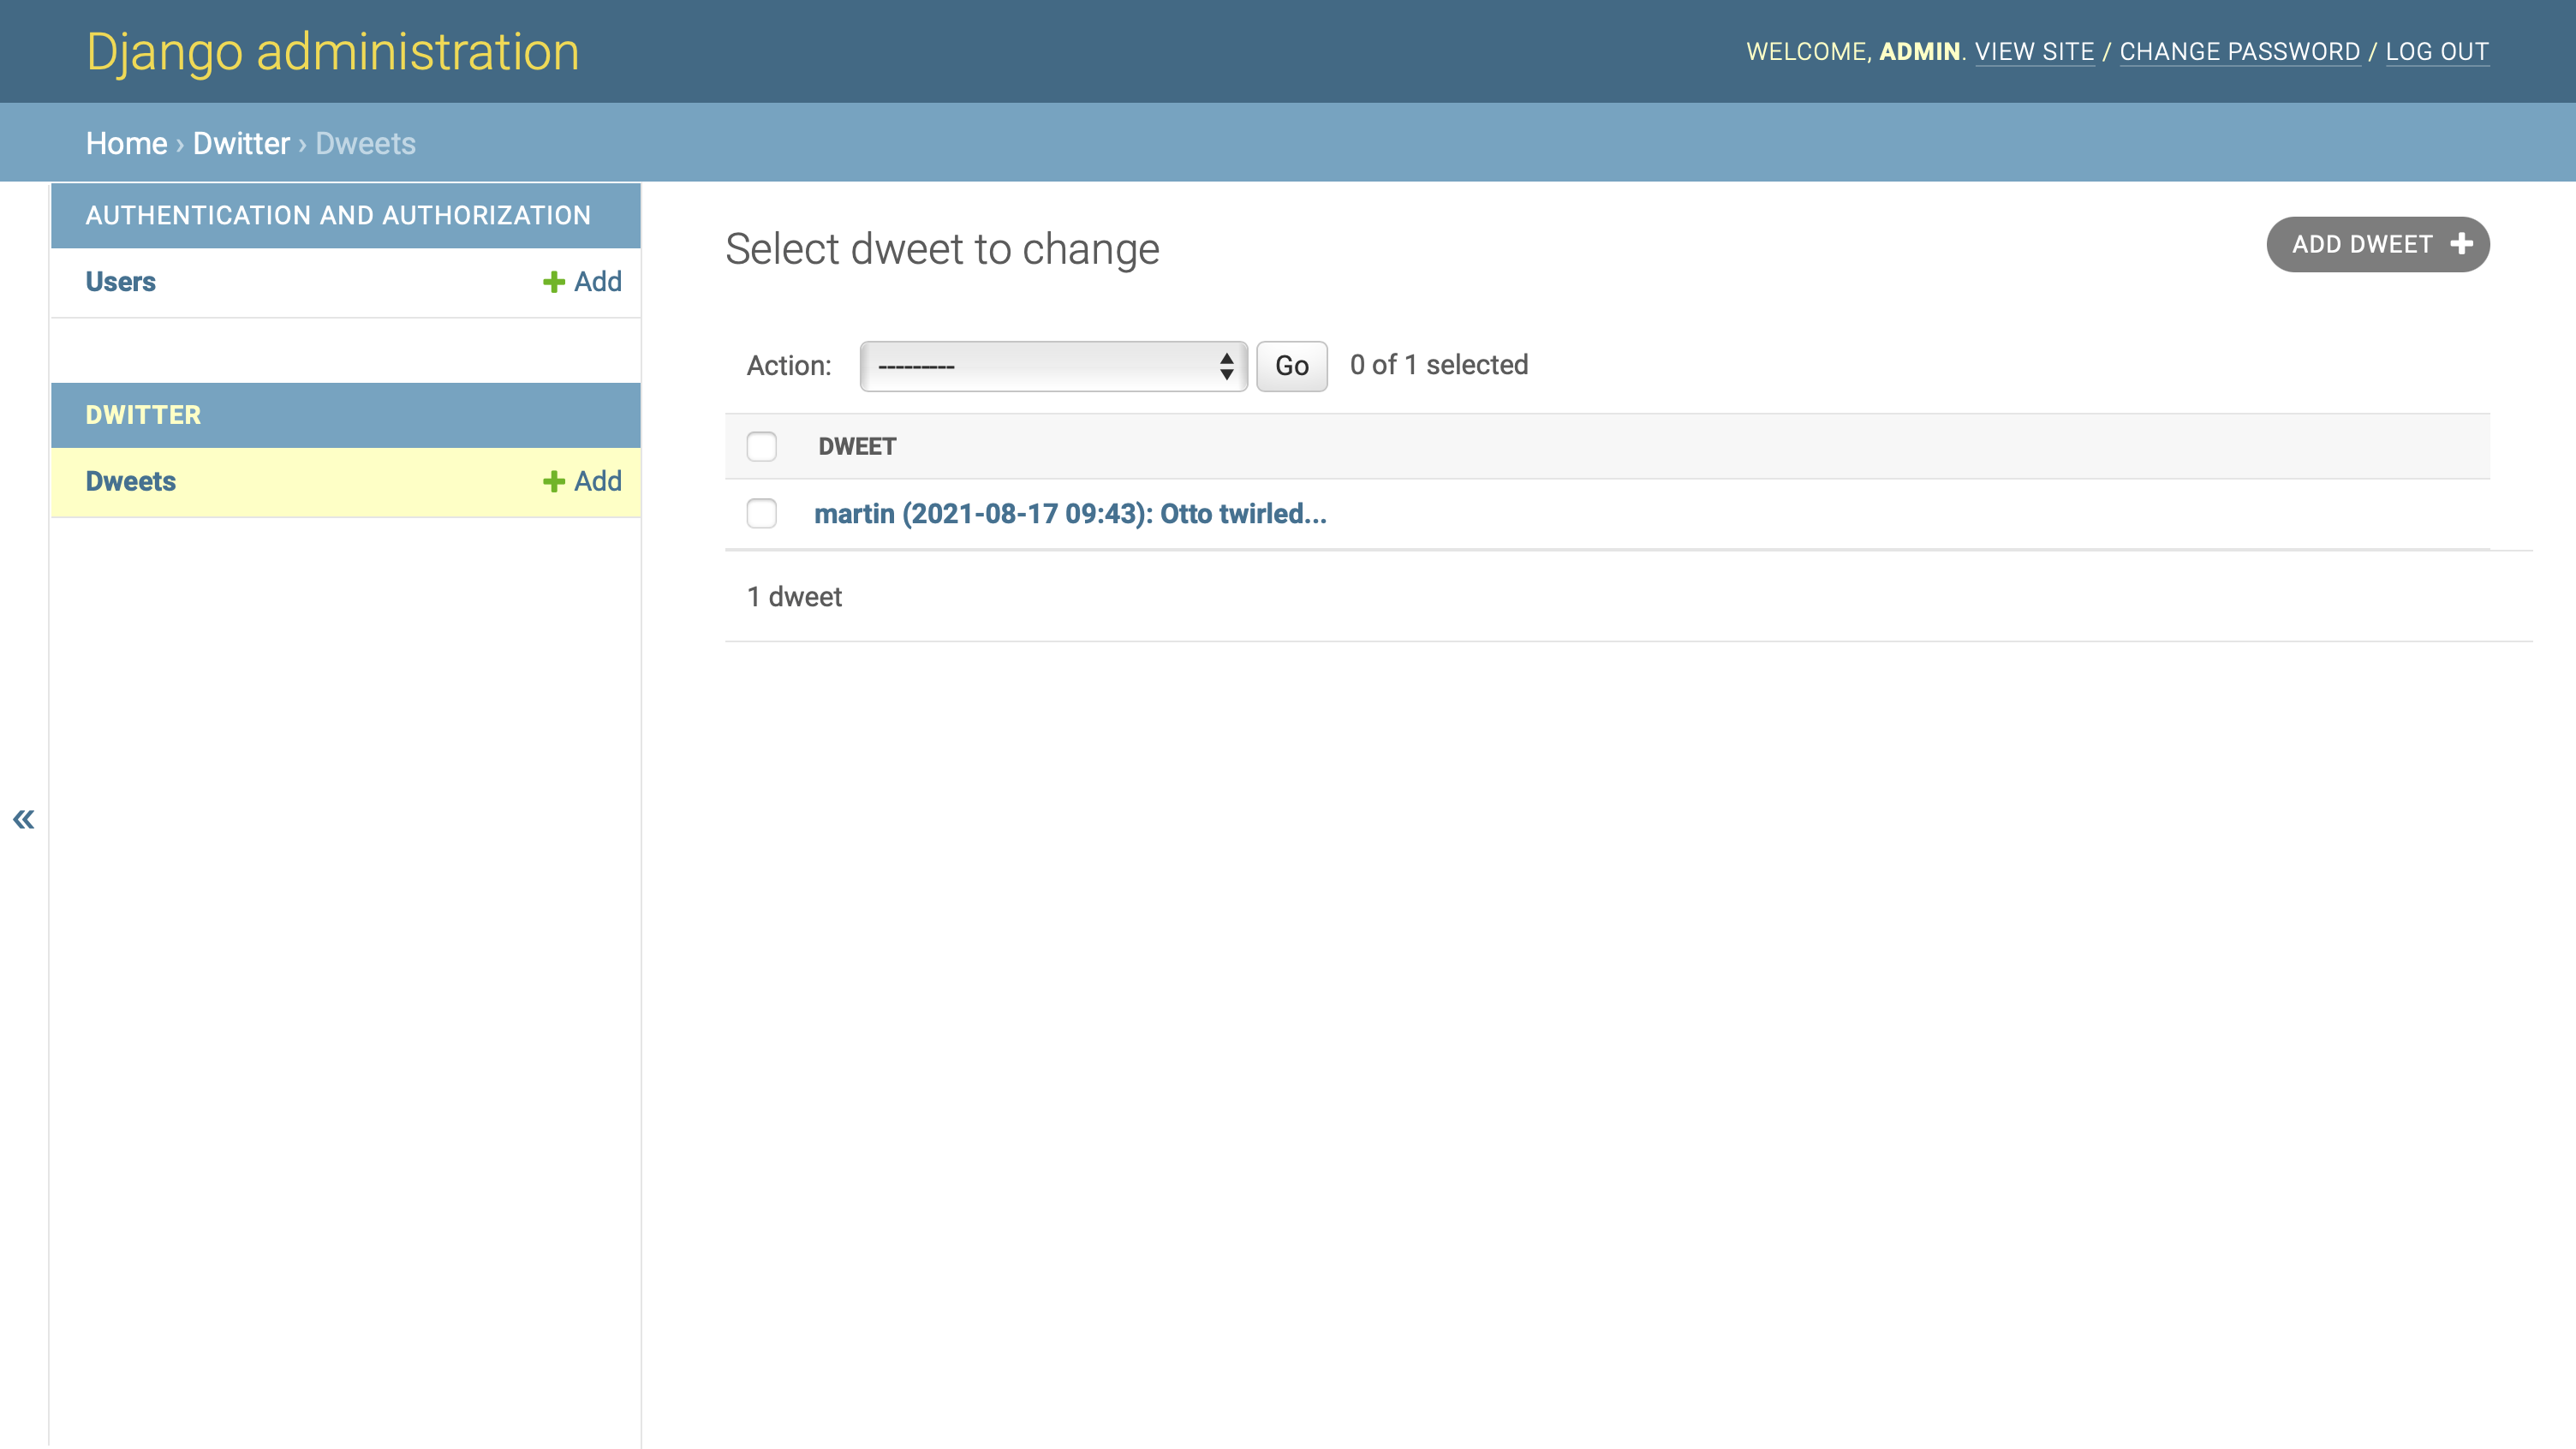
If you head over to your admin interface after doing this, you’ll see that the Dwitter → Dweets option now shows up. Click on the + Add button next to it and create a new dweet:
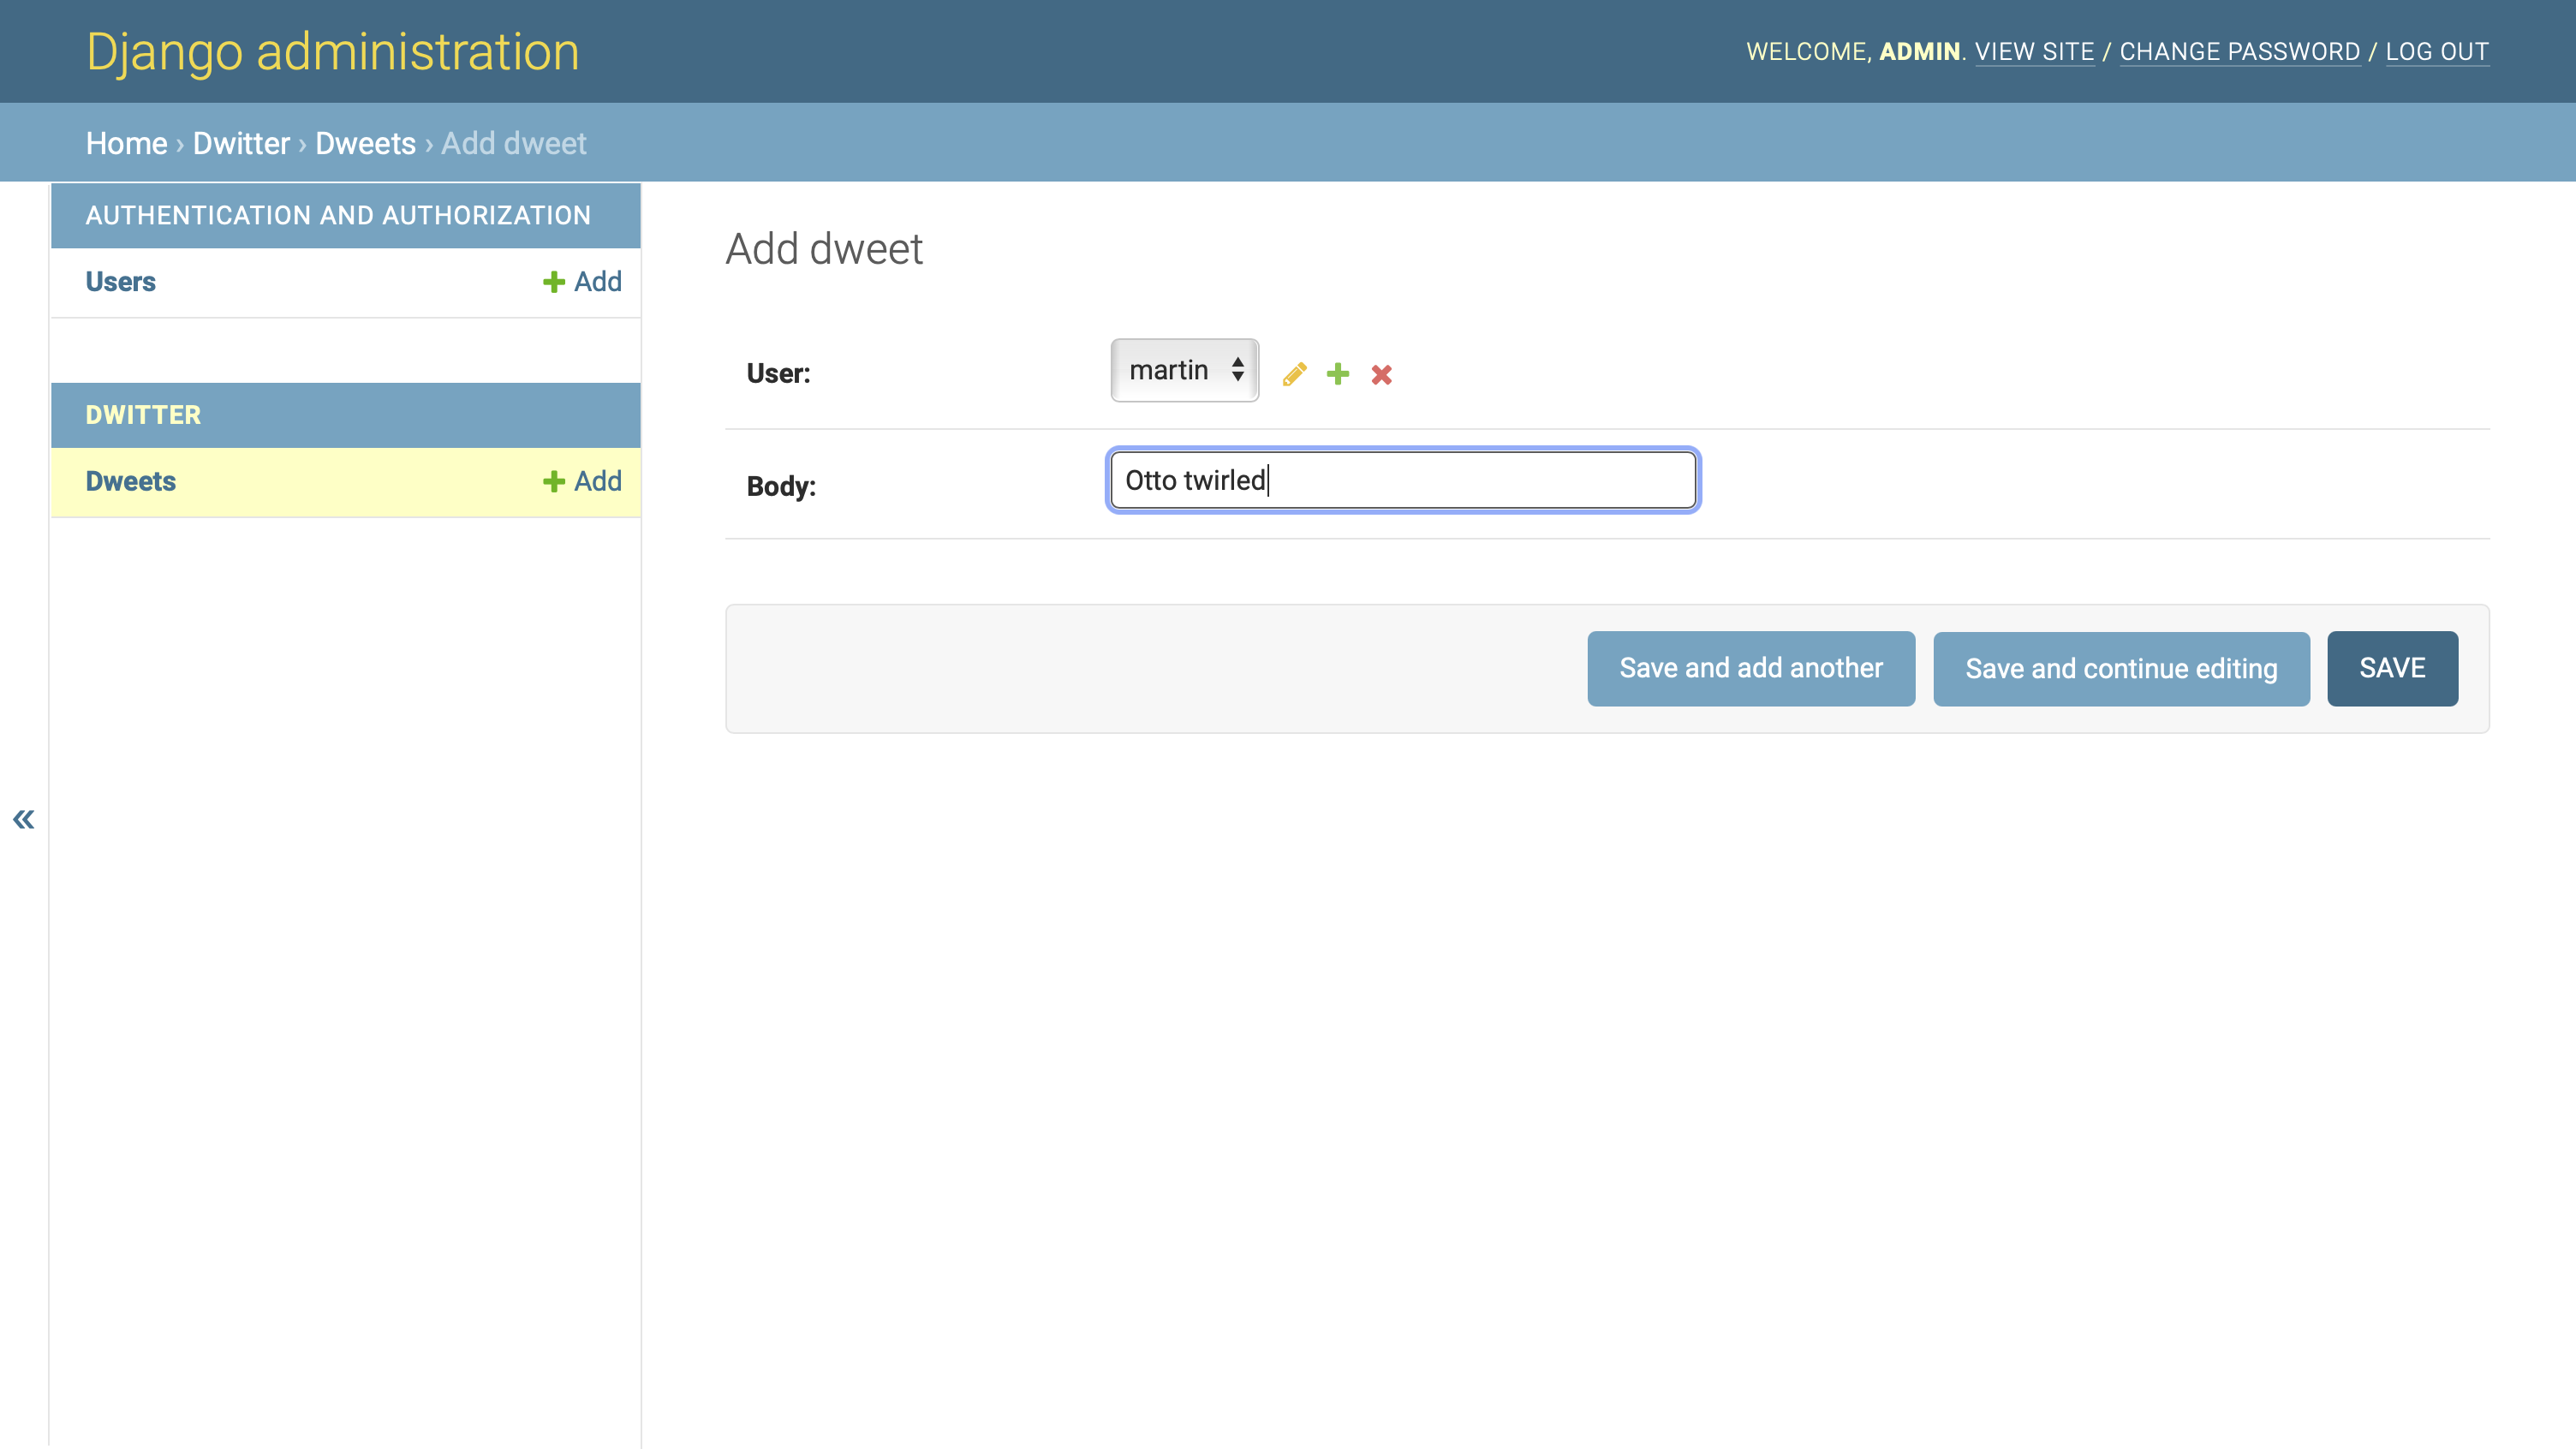
Note that you need to assign an existing user object to the dweet that you want to create. You can select one from the dropdown. You also need to add text for the body of the dweet. You don’t need to add the date when you’re creating it because Django will handle that automatically after you click on Save.
By providing the user and the text body, you’re able to create a new dweet through your admin interface:

However, Dweet object (1) isn’t an exceedingly descriptive name for the submitted dweet. It’d be more user-friendly if you could see who wrote it, when they wrote it, and at least the beginning of the text. You can change how Django displays a Dweet object by overriding .__str__() in the class definition of Dweet:
# dwitter/models.py

class Dweet(models.Model):
    user = models.ForeignKey(User,
                             related_name="dweets",
                             on_delete=models.DO_NOTHING)
    body = models.CharField(max_length=140)
    created_at = models.DateTimeField(auto_now_add=True)

    def __str__(self):
        return (
            f"{self.user} "
            f"({self.created_at:%Y-%m-%d %H:%M}): "
            f"{self.body[:30]}..."
        )
By adding a custom .__str__() method that returns a Python f-string consisting of the username, the created date, and the first thirty characters of the message body, you’ve improved how Django renders dweets on the admin interface:
With this change applied, the dweet overview page in the Django admin interface will remain helpful and readable even once your users have added many additional dweets.
Note: In preparation for the following steps, you should create a couple of dweets and assign them to different users of your app. Make sure that you have at least three users and that they all have a few example dweets so that you can see which dweets show up when you follow or unfollow profiles.
In this step, you created a new model for the text content of your Django social network, registered it in your admin interface, and improved how Django displays the objects. In the next section, you’ll add the code to tell Django to show these dweets on the front end of your web app.
Step 9: Display Dweets on the Front End
At this point, you have the profiles set up, and you can create dweets through your Django admin interface. At the end of this step, you’ll be able to view dweets through the front end, and you’ll be able to display the dweets of profiles you follow on a dashboard page.
If you haven’t created any dweets through the admin interface yet, then head back there, make a few dweets, and assign them to different users. Having some dweets to check on will be helpful once you’ve set up the dashboard page to display the dweets of the profiles you follow.
Display Personal Dweets on Each Profile Page
First, you’ll head back to profile.html, where you’ll add code to display all dweets of the user associated with this profile. Later, you’ll make another site that’ll show all the dweets of people you follow.
On the profile page, you have access to profile. How can you iterate over a user’s dweets in a similar way to how you did with the followers of a profile?
If you think back to writing Dweet, you might remember that you set related_name to "dweets". The name you defined there gives you reverse access to the associated Dweet objects through the User model. Further, you can access a linked User instance through the Profile object that you’re passing in the context dictionary:
profile.user.dweets
Nice! With this code, you’re taking a complete tour through all the model relationships that you’ve set up during this project. Go ahead and use it in profile.html so that you can see each user’s dweets on their profile page:
<!-- dwitter/templates/dwitter/profile.html -->

<!-- ... -->

<div class="content">
    {% for dweet in profile.user.dweets.all %}
        <div class="box">
            {{ dweet.body }}
            <span class="is-small has-text-grey-light">
                ({{ dweet.created_at }})
            </span>
        </div>
    {% endfor %}
</div>
Add this HTML snippet, which has Bulma styling included, right after closing <div class="block">:
<!-- dwitter/templates/dwitter/profile.html -->

{% extends 'base.html' %}

{% block content %}

<div class="column">

    <div class="block">
    <h1 class="title is-1">
        {{profile.user.username|upper}}'s Dweets
    </h1>

    <form method="post">
        {% csrf_token %}
        <div class="buttons has-addons">
        {% if profile in user.profile.follows.all %}
            <button class="button is-success is-static">
                Follow
            </button>
            <button class="button is-danger"
                    name="follow"
                    value="unfollow">
                Unfollow
            </button>
        {% else %}
            <button class="button is-success"
                    name="follow"
                    value="follow">
                Follow
            </button>
            <button class="button is-danger is-static">
                Unfollow
            </button>
        {% endif %}
        </div>
    </form>
    </div>

    <div class="content">
        {% for dweet in profile.user.dweets.all %}
            <div class="box">
                {{ dweet.body }}
                <span class="is-small has-text-grey-light">
                    ({{ dweet.created_at }})
                </span>
            </div>
        {% endfor %}
    </div>

</div>

<div class="column is-one-third">

    <div class="block">
        <a href="{% url 'dwitter:profile_list' %}">
            <button class="button is-dark is-outlined is-fullwidth">
                All Profiles
            </button>
        </a>
    </div>

    <div class="block">
        <h3 class="title is-4">
            {{profile.user.username}} follows:
        </h3>
        <div class="content">
            <ul>
            {% for following in profile.follows.all %}
                <li>
                    <a href="{% url 'dwitter:profile' following.id %} ">
                        {{ following }}
                    </a>
                </li>
            {% endfor %}
            </ul>
        </div>
    </div>

    <div class="block">
        <h3 class="title is-4">
            {{profile.user.username}} is followed by:
        </h3>
        <div class="content">
            <ul>
            {% for follower in profile.followed_by.all %}
                <li>
                    <a href="{% url 'dwitter:profile' follower.id %} ">
                        {{ follower }}
                    </a>
                </li>
            {% endfor %}
            </ul>
        </div>
    </div>

</div>

{% endblock content %}
This does the trick! The iteration works after stepping through your model relationships, and you can view the dweets of the current user in a pleasant way thanks to Bulma’s stylesheet:
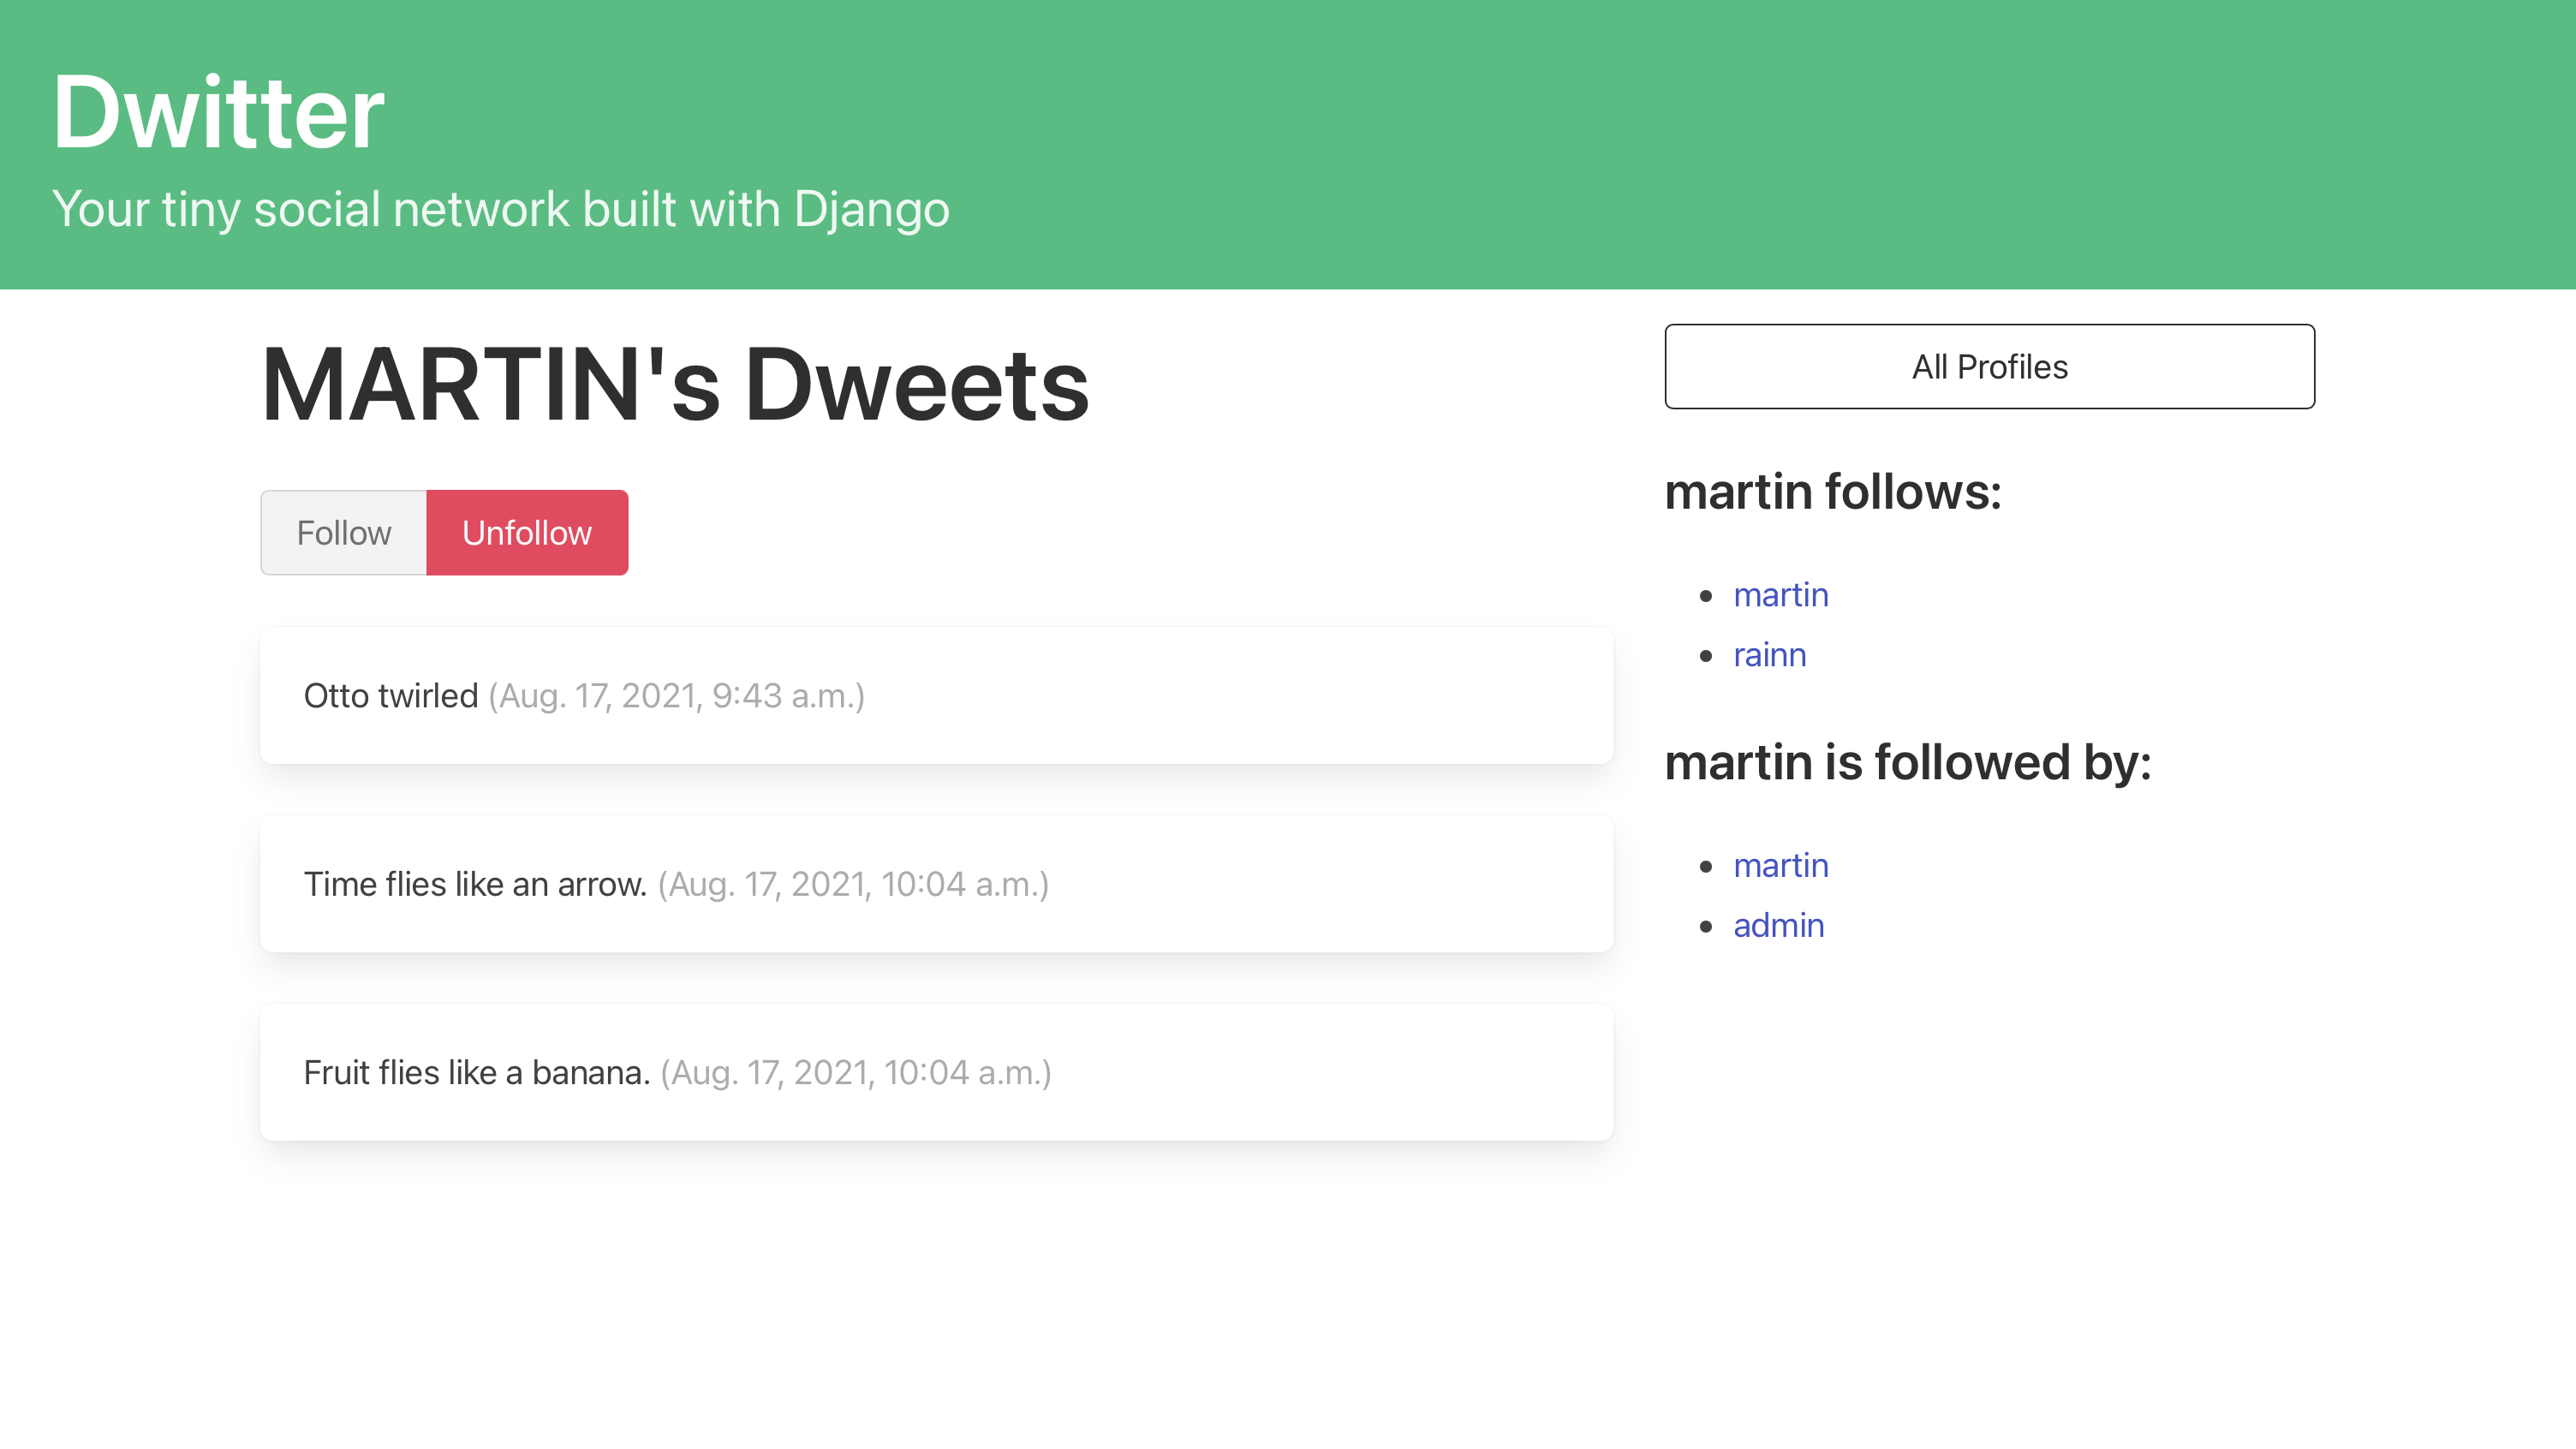
Check out another user profile by clicking on one of the links that you set up earlier. All your profile pages are working as expected, and they look lovely! You can now explore everyone’s followers, whom they’re following, and their dweets. You can also follow or unfollow each profile with the click of a button. That’s exactly what most users would expect to see on their profile page.
You’re still missing a way to display a feed of all the dweets of all the profiles you follow. You’ll implement this functionality by updating your dashboard view.
Create a Dashboard View
You already set up a placeholder dashboard view early on in part two of this series, which means that the appropriate routing is already defined, and Django will call dashboard() when you navigate to the base URL. So far, there’s not much to see, as it only renders your base template. Now you’ll update this endpoint to make it more useful and display your dashboard page. On your dashboard, you want to be able to do two things:
- Read all dweets from the profiles you follow
- Submit a dweet
You’ll tackle the second task in the next part of this series. For now, you’ll focus on displaying the dweets of all the profiles you follow. Update dashboard() in views.py to point it to a different template:
# dwitter/views.py

from django.shortcuts import render
from .models import Profile

def dashboard(request):
    return render(request, "dwitter/dashboard.html")
Of course, that template doesn’t exist yet. To keep Django from complaining, you head over to dwitter/templates/dwitter/ and create a new template called dashboard.html and add some draft code logic to confirm that it works as expected:
 1<!-- dwitter/templates/dwitter/dashboard.html -->
 2
 3{% for followed in user.profile.follows.all %}
 4    {% for dweet in followed.user.dweets.all %}
 5        <li>{{dweet.user.username}} ({{ dweet.created_at }}): {{ dweet.body }}</li>
 6    {% endfor %}
 7{% endfor %}
After adding this code snippet to dashboard.html and navigating to the base URL at localhost:8000/, you should see an unformatted list containing all the dweets of all the profiles you follow mixed together.
Note: If nothing new comes up, make sure that your admin user follows itself and at least two other profiles. You can also check that these users have some existing dweets in your database.
Before you make this list look better with Bulma’s styling, it’s worth it to first revisit the model relationships that you’re chaining together in your Django template:
-
Line 3: You dive into the
userobject that Django sends with every POST or GET request. It refers to the logged-in user, currently your admin user. With.profile, you access the profile of your admin user, which you set up when you extended the DjangoUsermodel. The profile has an attribute called.followsthat holds a collection of all the user profiles that this profile follows. Finally, with.all, you access an iterable of that collection. -
Line 4: You nest another
forloop into the previous one. Here, you accessfollowedto get at each user profile that the currently logged-in user follows. Then you step through the.userobject and itsrelated_name,.dweets, to access all the dweets that this user has written. With.all, you again access an iterable of that collection. -
Line 5: You now have access to each dweet in
dweet. You use that to pick out the information you want from each text-based message and assemble this information in a single HTML list item.
It’s pretty powerful how you can use Django’s model relationships to find precisely the information that you’re looking for, even if it requires you to drill through a succession of different steps! Keep in mind that it works this way because of how you set up your models in earlier steps:
You can take a pencil and fetch the database draft that you created in part one. Try to think about how your models are connected, and make sure that you understand how and why you can access the dweets in the way you did above before moving on.
Now you can buff up dashboard.html so that it fits with the design of the rest of your social network:
<!-- dwitter/templates/dwitter/dashboard.html -->

{% extends 'base.html' %}

{% block content %}

<div class="column">
    {% for followed in user.profile.follows.all %}
        {% for dweet in followed.user.dweets.all %}
            <div class="box">
                {{ dweet.body }}
                <span class="is-small has-text-grey-light">
                    ({{ dweet.created_at }} by {{ dweet.user.username }}
                </span>
            </div>
        {% endfor %}
    {% endfor %}
</div>

{% endblock content %}
By extending your base template and adding some styling through Bulma’s CSS classes, you’ve created an attractive dashboard page that shows your feed displaying all the dweets of all the profiles you follow:
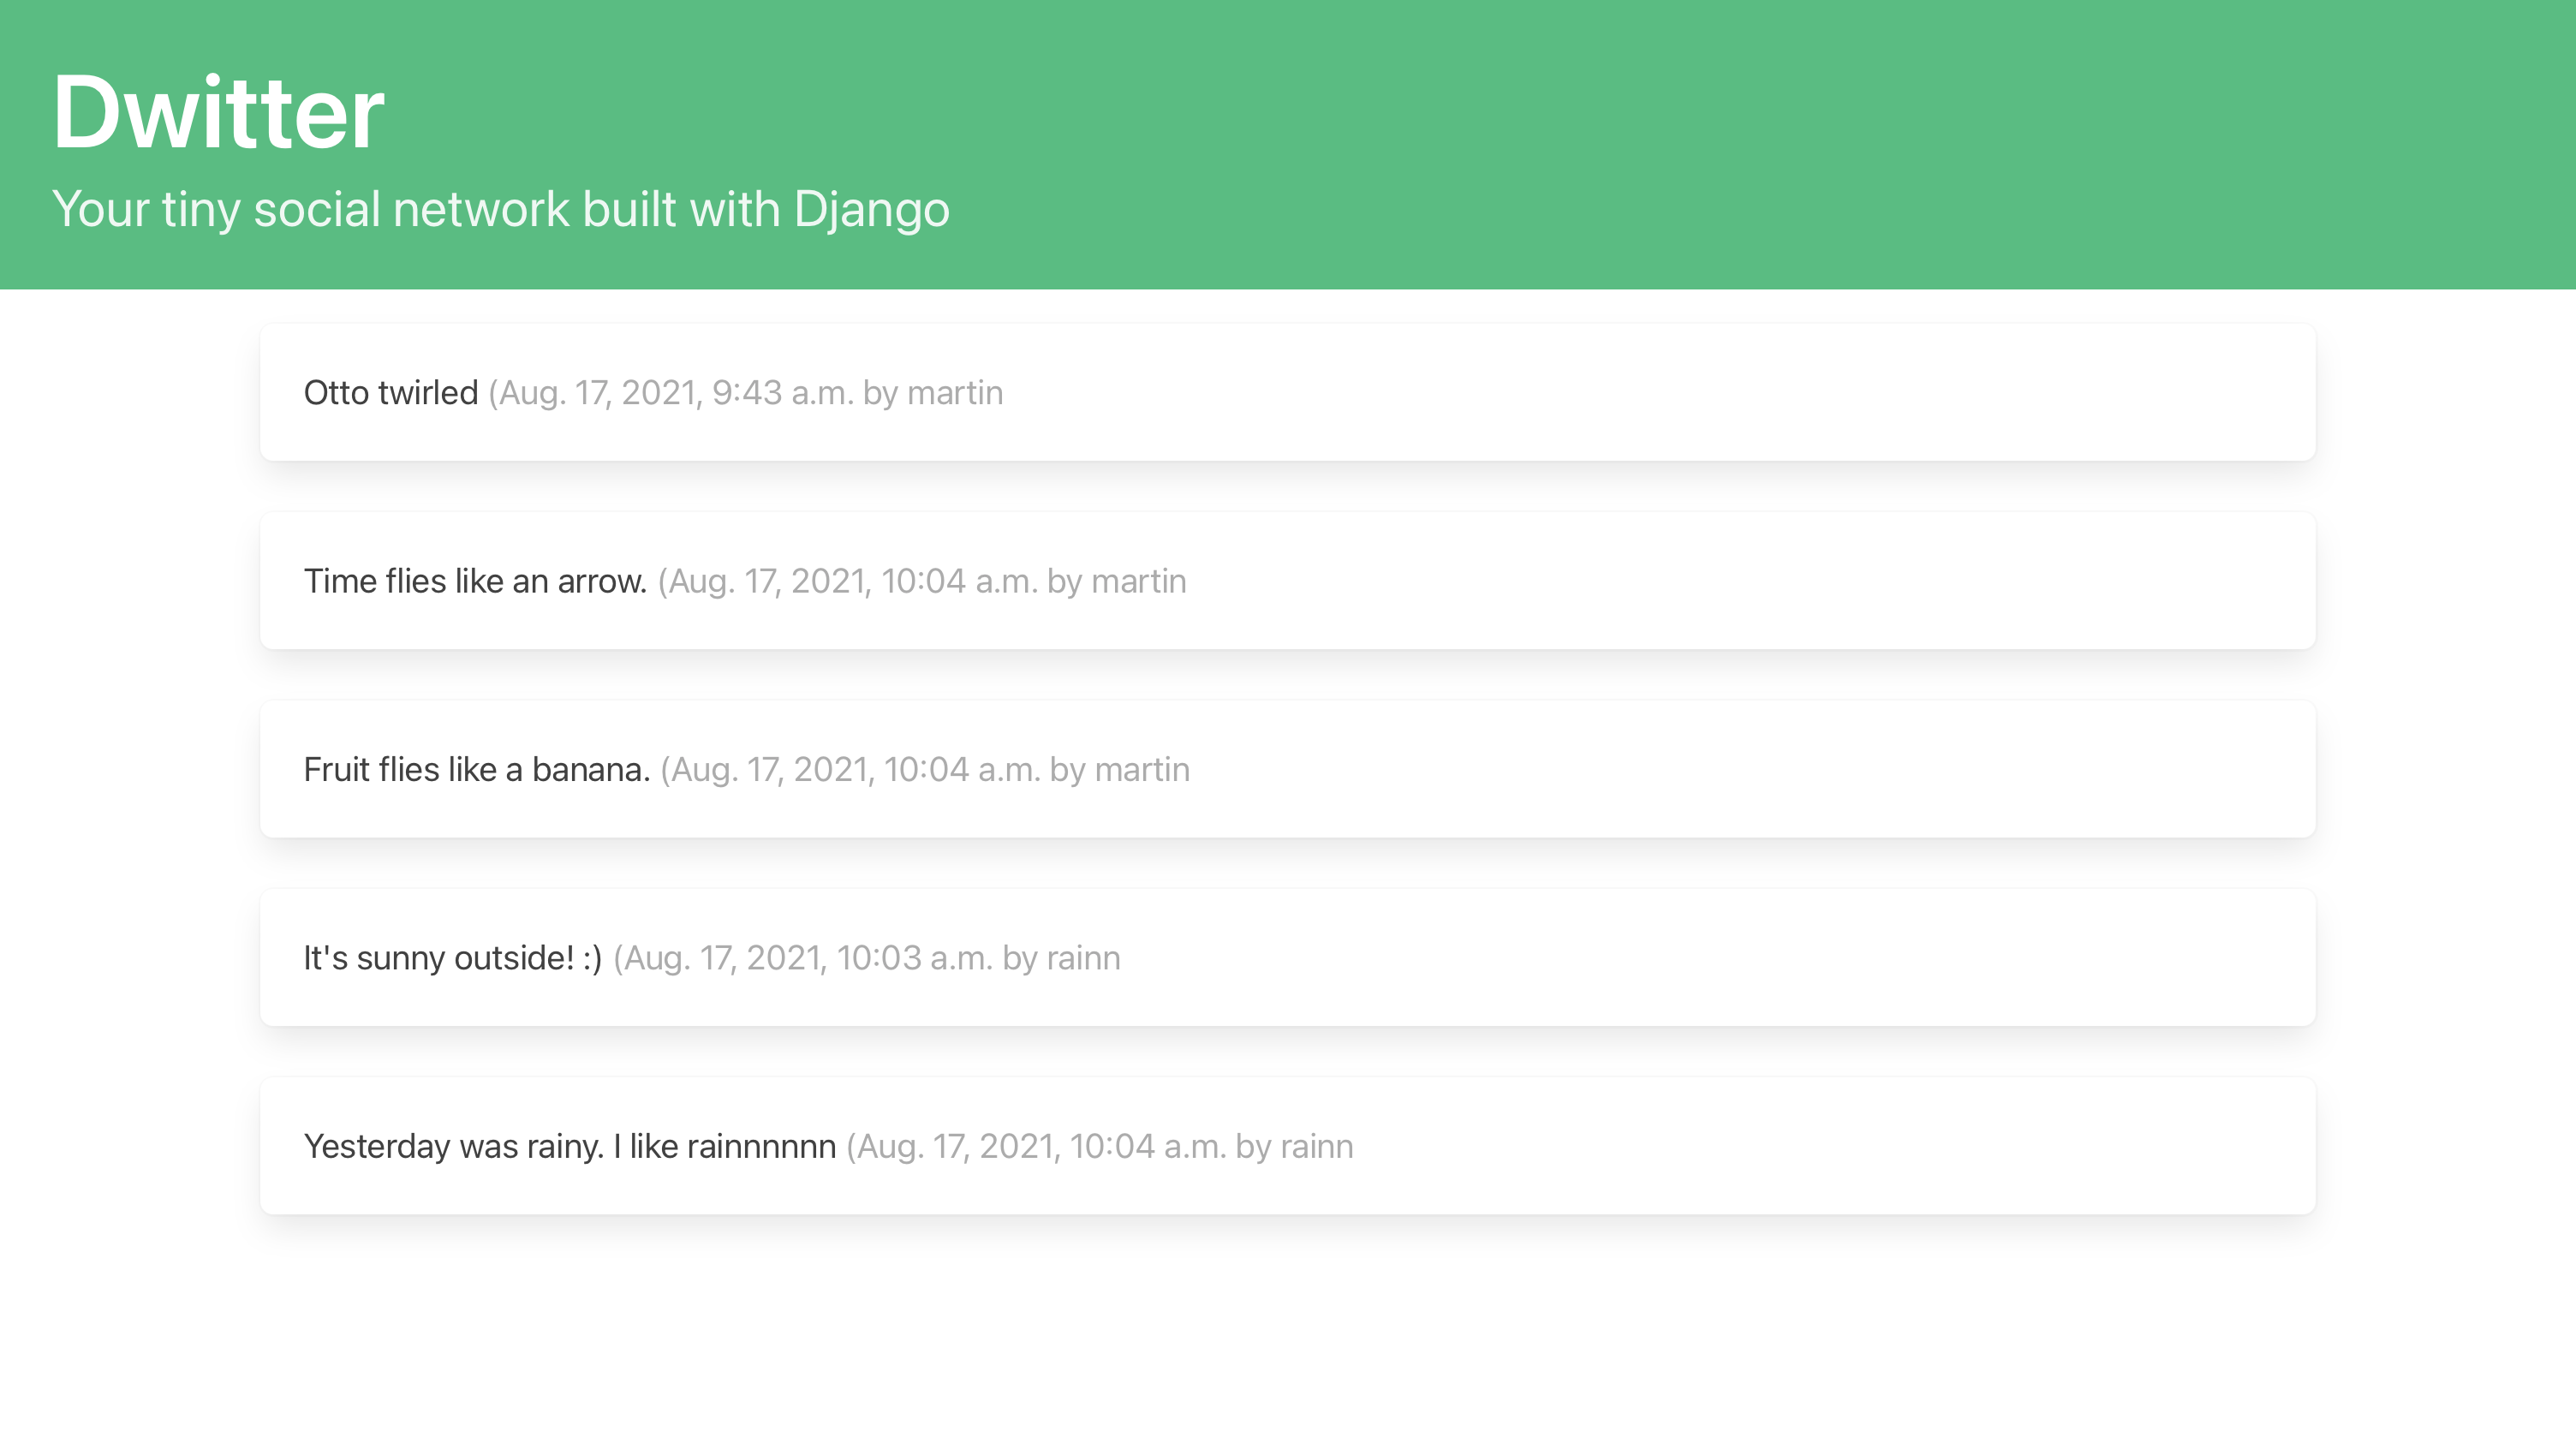
Each user will see their own personal feed of dweets, based on which profiles they follow. That’s a giant leap ahead for your Django social network!
In this step, you added a new dashboard template that displays a personal feed of dweets, and you also added code to profile.html that shows each user’s dweets on their profile page. In the next step, you’ll add a Django form that allows users to submit dweets from their dashboard page.
Conclusion
In this part of the tutorial series, you continued to build the front end and the back end of your small social network using Django. Your app users can now follow and unfollow other user profiles and view the text-based messages of profiles that they follow.
In the process of building this project, you’ve learned how to:
- Create the front-end interface to follow and unfollow profiles
- Submit and handle a POST request in Django using buttons
- Set up the model for your text-based content
- Build styled templates to display content on the front end
- Use intricate model relationships in template code
In the next and final part of this tutorial series, you’ll create a Django form that allows your users to submit new dweets through the front end. You’ll also make sure that the content submissions are valid. Finally, you’ll improve the user experience by adding navigation and sorting the dweets to display the newest messages first.
You can download the code that you should have by the end of this part of your project by clicking the link below and going to the source_code_final/ folder:
Get Source Code: Click here to get the source code you’ll use to build and handle POST requests with Django.
Next Steps for Your Basic Social Network With Django
Now that you’ve completed the third part of this tutorial series, you can continue to the final part, where you’ll build and submit HTML forms with Django.
In the upcoming part of this tutorial series, you’ll add the code logic that will allow your users to create content on your web app by using a form. You’ll make a Django form in forms.py, connect it to code logic in views.py, and render it in a template so that your users can submit dweets from the front end.
You’ll build out the dashboard page as the main page of your social network. Users can then submit their content so that it’ll show up on the platform together with the dweets of the profiles that they follow.
Keep in mind that you can keep referring back to earlier steps while working on this project. For example, it might be helpful to consult the plan that you drafted in the project overview of the first part of the tutorial series and update your plan as you make your way through the rest of the steps.


