
Shell - New Navigation Paradigm in Xamarin Forms

Xamarin.Forms Shell
A new navigation paradigm
Starting with Xamarin.Forms 3.6 there is a new navigation paradigm available for us developers to use called Shell. In this post I want to discuss the benefits of using Shell over the traditional Page push and pop navigation that you may be accustomed to, as well as the initial steps that you need to perform in order to get Shell working on a new blank app.
Keep in mind that at the moment of writing this post, Shell is still in Preview, but is going to be one of the core features that will be fully available for Xamarin Forms 4.
What is Shell?
The new Xamarin Forms Shell is a new paradigm for application navigation that greatly reduces the development complexity that you would find with the normal push-pop navigation, especially in scenarios which require flyout menus. Additionally, applications that use Shell will benefit from improvements in rendering speed and reduced memory consumption.
The Navigation Hierarchy
When you use Shell, you define the content and navigation structure of your application inside of a XAML-C# class similar to how you define Pages or other views, and based on the way you set that structure you can end up with an app that contains a Flyout menu, each of the items on that menu could be a TabbedPage, each of the tabs in that page could have many ContentPages displayed with a top tab bar. Personally I think such a navigation structure would be too complex, but the beauty here is that Shell allows you to create the navigation that you want.
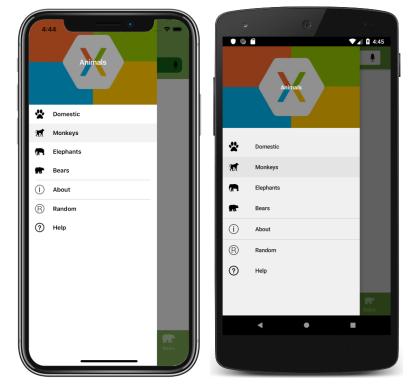
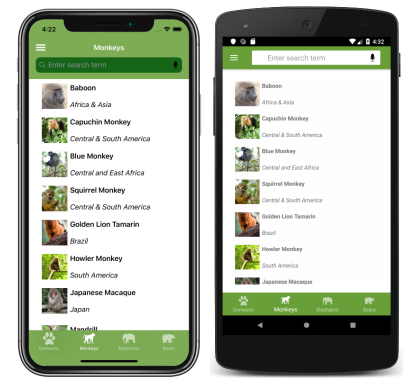
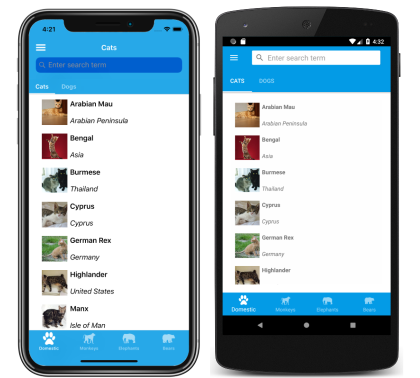
Take a look at these images to get a good idea about how the navigation can be structured, from the Flyout menu to the individual ContentPages:

How do I setup Shell?
The good news is that there is a new template in Visual Studio 2019 that can get you started with Shell very quickly, but I think the best way to understand what is happening is to start with a Blank template and setup everything from the ground up.
So let’s get a Blank app ready to use the new Shell. The first think to do is to make sure that your projects reference a Xamarin Forms package that is 3.6 or greater. Inside of the solution, check the packages (and NuGet) folders to make sure that the Xamarin Forms version of the package is 3.6 or greater. If it isn’t, you can right-click on the package and click on update.

Experimental
As I mentioned before, currently the Shell is in Preview, meaning that it is not available by default even by updating the Xamarin Forms package that is referenced in all your projects to version 3.6 (which you absolutely need to do). If you are already using Xamarin Forms 4 or greater you ca skip this step, but if like me, you are using 3.6, you will have to open both the AppDelegate from your iOS project, and the MainActivity from the Android project and add the following line before the Forms.Init() call:
global::Xamarin.Forms.Forms.SetFlags("Shell_Experimental");
Creating the Shell
Once you have this setup, you can start using the Shell class, so we can create our own subclass that will do exactly what we need it to do. You can start by creating a new class using the ContentPage (XAML) template, that which creates a C# AND a XAML file for a new page. Immediately, you will have to change the class that your new class inherits from:
public partial class MainShell : Shell
Don’t forget that this means changing the definition from the XAML file as well. Instead of ContentPage, you will now be using a Shell:
<Shell xmlns="http://xamarin.com/schemas/2014/forms"
       xmlns:x="http://schemas.microsoft.com/winfx/2009/xaml"
       xmlns:local="clr-namespace:FocusTasksApp.Views"
       x:Class="FocusTasksApp.MainShell">
</Shell>
Just like this you now have the Shell ready, and you can use it to set the MainPage from the App’s constructor, similar to how you would use a NavigationPage when using the push-pop paradigm, only this time you don’t need to set a root, because the entire navigation will eventually be defined from the XAML file:
MainPage = new MainShell();
Bonus
Since now the Shell acts as the container for your whole app, you can take advantage of this and do something like using Material design (requires additional setup) for the entire app by simply setting the Visual property for the Shell to Material directly from this page:
<Shell xmlns="http://xamarin.com/schemas/2014/forms"
       xmlns:x="http://schemas.microsoft.com/winfx/2009/xaml"
       xmlns:local="clr-namespace:FocusTasksApp.Views"
       x:Class="FocusTasksApp.MainShell"
       Visual="Material">
</Shell>
The content of the Shell
As you may have realized by the screenshots at the beginning of this post, your navigations can get as complex as you need them to be, but let me show you how you can set a normal ContentPage as the content for the Shell. In the XAML file that you have for the definition of Shell, you can define a single-page application like this:
<Shell xmlns="http://xamarin.com/schemas/2014/forms"
       xmlns:x="http://schemas.microsoft.com/winfx/2009/xaml"
       xmlns:local="clr-namespace:ShellExample"
       x:Class="ShellExample.MainShell">
    <ShellItem>
        <ShellSection>
            <ShellContent>
                <local:MainPage/>
            </ShellContent>
        </ShellSection>
    </ShellItem>
</Shell>
Notice how I set a local namespace reference so that I could access MainPage. Aside from that, the definition of the content is very straight forward. This is everything required to display that item in the view.
Now so far you may think that we went through a lot simply to display that view, but the power and simplicity of Shell goes way beyond what we have with “traditional” navigation. Take the next example, where defining a “TabbedPage” is now as easy as editing the ShellItem so that it now contains a new ShellSection:
<ShellItem>
    <ShellSection>
        <ShellContent>
            <local:MainPage/>
        </ShellContent>
    </ShellSection>
    <ShellSection>
        <ShellContent>
            <local:SecondaryPage/>
        </ShellContent>
    </ShellSection>
</ShellItem>
Granted as it is, it doesn’t display icons, but that would be as easy as setting the Icon property for each section. Each Section, similar to the tabs in a traditional TabbedPage also has a Title property, so if we set both, here is the result that we can get:

There are a ton more things we can do with the new Shell, and I will be talking about them in coming posts, but hopefully this post has begun to help you understand the Shell.
Now, I wouldn’t recommend you use it in production just yet, there are a few things that are quickly changing or being removed, unless you see that Xamarin Forms 4 is already out when you are reading this, but I also think that you should start familiarizing yourself with it, since it is the future of Xamarin Forms.
This topic, along with many many others, is covered in greater depth in my 25-hour long "The Complete Xamarin Developer Course: iOS and Android" course, which you can practically steal from me by