
Notifications
Notifications plugin for Craft CMS 3.x
Send notifications across a variety of delivery channels, including mail and Slack. Notifications may also be stored in a database so they may be displayed in your web interface.
- Installation
- Introduction
- Sending notifications
- Database notifications
- Delete notifications
- Mail notifications
- Slack notifications
- Notification events
- Custom channels
Support Open Source. Buy beer.
This plugin is licensed under a MIT license, which means that it's completely free open source software, and you can use it for whatever and however you wish. If you're using it and want to support the development, buy me a beer over at Beerpay!
Requirements
This plugin requires Craft CMS 3.1.0 or later.
Installation
To install the plugin, follow these instructions.
Open your terminal and go to your Craft project:
cd /path/to/projectThen tell Composer to load the plugin:
composer require percipioglobal/craft-notificationsIn the Control Panel, go to Settings → Plugins and click the “Install” button for Notifications.
Copy the
config.phpfile toconfig/notifications.phpin your application.Make sure your notifications are autoloaded by adding the following to your
composer.jsonand runnningcomposer dump -o
"autoload": {
    "psr-4": {
        "app\\notifications\\": "./notifications"
    }
},
Introduction
Typically, notifications should be short, informational messages that notify users of something that occurred in your application. For example, if you are writing a billing application, you might send an "Invoice Paid" notification to your users via the email and SMS channels.
Creating notifications
Each notification is represented by a single class (stored in the notifications directory of your application). You will have to create it manually or it will be created for you when you run the notifications/make command:
./craft notifications/make BlogPostAdded
This command will place a fresh notification class in your notifications directory. Each notification class contains a via method and a variable number of message building methods (such as toMail or toDatabase) that convert the notification to a message optimized for that particular channel.
Sending notifications
Notifications can be sent in two ways, either from the configuration file when an event is fired, or from your own plugins.
First, let's show how you configure sending a notification when for example a new blogpost is added:
<?php

return [
    'notifications' => [
        [
            'class' => \craft\elements\Entry::class,
            'event' => \craft\elements\Entry::EVENT_AFTER_SAVE,
            'notification' => \app\notifications\BlogPostAdded::class,
        ],
    ],
];
Here we're listening from the EVENT_AFTER_SAVE event on the Entry class of Craft which will cause our notification to be triggered every time we save an entry.
In our BlogPostAdded class we can then use the via function to determine if and how we want to send the notification:
/**
 * Get the notification's delivery channels.
 *
 * @return array
 */
public function via()
{
    $entry = $this->event->sender;

    if ($entry->section->handle === 'blog' && !$this->event->isNew) {
        return [
            'database' => Craft::$app->getUsers()->getUserByUsernameOrEmail('hello@percipio.london'),
        ];
    }

    return [];
}
We know the event is an ElementEvent, which contains the sender and an isNew property, using this information we can determine that we only want to send a notification when the entry is from the blog section and it's a new Entry.
Sending a notification from a plugin
From a plugin, you can use the notificationsService to send you own notifications.
use percipioglobal\notifications\Notifications;
use app\notifications\BlogPostAdded;

Notifications::getInstance()->notificationsService->send(new BlogPostAdded());
Database notifications
To save a notification in the database for later retrieval, make sure your via method returns the database key with a User object as value.
return [
    'database' => Craft::$app->getUsers()->getUserByUsernameOrEmail('hello@percipio.london'),
];
When using the database notification channel, your Notification class should define a toDatabase or toArray function.
This can be as simple as:
public function toDatabase()
{
    return ArrayHelper::toArray($this);
}
When retrieving the notifications from the database in your templates, the notification will contain the data that is passed here.
Retrieving notifications
The notifications plugin provides a template variable to retrieve notifications and mark them as read.
Let's see how we can loop over the notifications, this automatically uses the current logged in user to find notifications for:
  {% for notification in craft.notifications.unread %}
    {# The notification object contains all the data from the toDatabase or toArray function on your notification class #}
  {% endfor %}
You can also retrieve the notifications through the notificationsService
use percipioglobal\notifications\Notifications;

// All unread notifications
Notifications::getInstance()->notificationsService->getAllUnread();

// All notifications
Notifications::getInstance()->notificationsService->getAll();
Marking notifications as read
To mark notifications as read, we can use the Twig variable or the notificationsService as well
  {% for notification in craft.notifications.unread %}
    {{ craft.notifications.markAsRead(notification) }}
  {% endfor %}
use percipioglobal\notifications\Notifications;

Notifications::getInstance()->notificationsService->markAsRead($notification);
Delete read notifications
To keep your database clean and lean, you can delete the read notifications older than a given time frame. The default time is set to -1 month. If you want a custom time frame, provide the date within the strtotime PHP restrictions.
## Mail notifications
To configure a notification to be sent as an email, make sure your `via` method on the Notification class returns a key with `mail`:
```php
return [
'mail' => 'hello@percipio.london',
];
```
If a notification supports being sent as an email, you should define a `toMail` method on the notification class. This method will receive a `$notifiable` object that contains everything you defined in your `via` method.
The `toMail` function should return a `craft\mail\Message` instance. You may also return an array of `craft\mail\Message` instances if you wish to send multiple emails. Let's take a look at an example toMail method:
```php
public function toMail($notifiable)
{
$title = $this->event->sender->title;
$message = new Message();
$message->setTo($notifiable);
$message->setSubject("A new blogpost was added");
$message->setHtmlBody("
<p>Hey there!</p>
<p>A new blogpost was added with the title {$title}</p>
");
return $message;
}
```
## Slack notifications
You will need to configure an ["Incoming Webhook"](https://api.slack.com/incoming-webhooks) integration for your Slack team. This integration will provide you with a URL you may use when defining your `via` function.
```php
return [
'slack' => '<YOUR_WEBHOOK_URL>',
];
```
The implementation and documentation are mostly based on [Laravel Notifications](https://laravel.com/docs/5.5/notifications).
### Formatting Slack notifications
If a notification supports being sent as a Slack message, you should define a `toSlack` method on the notification class. This method should return a `percipioglobal\notifications\messages\SlackMessage` instance. Slack messages may contain text content as well as an "attachment" that formats additional text or an array of fields. Let's take a look at a basic `toSlack` example:
```php
/**
* Get the Slack representation of the notification.
*
* @param mixed $notifiable
* @return SlackMessage
*/
public function toSlack()
{
return (new SlackMessage)
->content('A new blogpost was added!');
}
```
#### Customizing The Sender & Recipient
You may use the `from` and `to` methods to customize the sender and recipient. The `from` method accepts a username and emoji identifier, while the `to` method accepts a channel or username:
```php
/**
* Get the Slack representation of the notification.
*
* @param mixed $notifiable
* @return SlackMessage
*/
public function toSlack($notifiable)
{
return (new SlackMessage)
->from('Ghost', ':ghost:')
->to('#other')
->content('This will be sent to #other');
}
```
You may also use an image as your logo instead of an emoji:
```php
/**
* Get the Slack representation of the notification.
*
* @param mixed $notifiable
* @return SlackMessage
*/
public function toSlack($notifiable)
{
return (new SlackMessage)
->from('Laravel')
->image('https://yoursite.com/favicon.png')
->content('This will display your logo next to the message');
}
```
#### Slack attachments
You may also add "attachments" to Slack messages. Attachments provide richer formatting options than simple text messages. In this example, we will send an error notification about an exception that occurred in an application, including a link to view more details about the exception:
```php
/**
* Get the Slack representation of the notification.
*
* @param mixed $notifiable
* @return SlackMessage
*/
public function toSlack($notifiable)
{
$url = url('/exceptions/'.$this->exception->id);
return (new SlackMessage)
->error()
->content('Whoops! Something went wrong.')
->attachment(function ($attachment) use ($url) {
$attachment->title('Exception: File Not Found', $url)
->content('File [background.jpg] was not found.');
});
}
```
The example above will generate a Slack message that looks like the following:

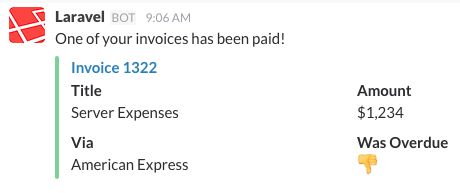
Attachments also allow you to specify an array of data that should be presented to the user. The given data will be presented in a table-style format for easy reading:
```php
/**
* Get the Slack representation of the notification.
*
* @param mixed $notifiable
* @return SlackMessage
*/
public function toSlack($notifiable)
{
$url = url('/invoices/'.$this->invoice->id);
return (new SlackMessage)
->success()
->content('One of your invoices has been paid!')
->attachment(function ($attachment) use ($url) {
$attachment->title('Invoice 1322', $url)
->fields([
'Title' => 'Server Expenses',
'Amount' => '$1,234',
'Via' => 'American Express',
'Was Overdue' => ':-1:',
]);
});
}
```
The example above will generate a Slack message that looks like the following:
#### Markdown Attachment Content
If some of your attachment fields contain Markdown, you may use the `markdown` method to instruct Slack to parse and display the given attachment fields as Markdown formatted text. The values accepted by this method are: `pretext`, `text`, and / or `fields`. For more information about Slack attachment formatting, check out the [Slack API documentation](https://api.slack.com/docs/message-formatting#message_formatting):
```php
/**
* Get the Slack representation of the notification.
*
* @param mixed $notifiable
* @return SlackMessage
*/
public function toSlack($notifiable)
{
$url = url('/exceptions/'.$this->exception->id);
return (new SlackMessage)
->error()
->content('Whoops! Something went wrong.')
->attachment(function ($attachment) use ($url) {
$attachment->title('Exception: File Not Found', $url)
->content('File [background.jpg] was *not found*.')
->markdown(['text']);
});
}
```
## Notification Events
When a notification is sent, there are two events that get triggered, the `NotificationsService::EVENT_BEFORE_SEND` and `NotificationsService::EVENT_AFTER_SEND` which send a `percipioglobal\notifications\events\SendEvent` event.
The `sendEvent` contains the following properties:
```php
/**
* @var mixed The notifiable.
*/
public $notifiable;
/**
* @var NotificationsRecord The notification about to be sent.
*/
public $notification;
/**
* @var string The channel on which the notification is about to be sent.
*/
public $channel;
/**
* @var bool Whether we send the notification
*/
public $sendNotification = true;
/**
* @var mixed The response after sending the event
*/
public $response = null;
```
The `sendNotification` property can be changed when listening for `EVENT_BEFORE_SEND` to prevent the notification from being sent. The `response` property is only set on the `EVENT_AFTER_SEND` event.
## Custom channels
Craft Notifications ships with three channels (database, mail & Slack), but you may want to write your own drivers to deliver notifications via other channels. We make this simple by exposing an event where you can register new channels.
Let's explore how we'd register a `voice` channel:
```php
Event::on(
NotificationsService::class,
NotificationsService::EVENT_REGISTER_CHANNELS,
function (RegisterChannelsEvent $event) {
$event->channels[] = [
'voice' => function () {
return new VoiceChannel();
},
];
}
);
```
Your `VoiceChannel` class would then look like this:
```php
<?php
namespace app\channels;
use percipioglobal\notifications\models\Notification;
class VoiceChannel
{
/**
* Send the given notification.
*
* @param mixed $notifiable
* @param \percipioglobal\notifications\models\Notification $notification
* @return void
*/
public function send($notifiable, Notification $notification)
{
$message = $notification->toVoice($notifiable);
// Send notification to the $notifiable...
}
}
```
Once your notification channel class has been defined, you may simply add the key to your `via` method in your notifications. What the value should be depends on the implementation of your channel.
```php
<?php
namespace App\Notifications;
use app\channels\VoiceChannel;
use app\channels\messages\VoiceMessage;
use percipioglobal\notifications\models\Notification;
class InvoicePaid extends Notification
{
/**
* Get the notification channels.
*
* @param mixed $notifiable
* @return array|string
*/
public function via($notifiable)
{
return [
'voice' => '<YOUR_DESTINATION>',
];
}
/**
* Get the voice representation of the notification.
*
* @param mixed $notifiable
* @return VoiceMessage
*/
public function toVoice($notifiable)
{
// ...
}
}
```
**The implementation of channels are very alike to how it's done with Laravel, if you need a specific channel there's a big chance you'll find one at [Laravel Notification Channels](http://laravel-notification-channels.com/) that only needs a few implementation changes.**
The functionality of adding a channel is very easily extracted to a plugin, if you implement a custom one, please consider sharing them with the community.
Brought to you by [Percipio Global Ltd.](https://percipio.london)
To install this plugin, copy the command above to your terminal.